User Guide
Page 3
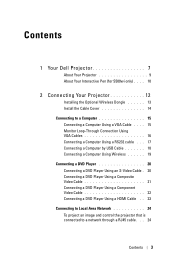
... the Cable Cover 14 Connecting to a Computer 15 Connecting a Computer Using a VGA Cable . . . . 15 Monitor Loop-Through Connection Using VGA Cables 16 Connecting a Computer Using a RS232 cable . . . 17 Connecting a Computer by USB Cable 18 Connecting a Computer Using Wireless 19 Connecting a DVD Player 20 Connecting a DVD Player Using an S-Video Cable . 20 Connecting a DVD Player Using a Composite Video Cable 21 Connecting a DVD Player Using a Component Video Cable 22 Connecting a DVD Player Using a HDMI Cable . . 23 Connecting to Local Area Network 24 To project an image and control...
... the Cable Cover 14 Connecting to a Computer 15 Connecting a Computer Using a VGA Cable . . . . 15 Monitor Loop-Through Connection Using VGA Cables 16 Connecting a Computer Using a RS232 cable . . . 17 Connecting a Computer by USB Cable 18 Connecting a Computer Using Wireless 19 Connecting a DVD Player 20 Connecting a DVD Player Using an S-Video Cable . 20 Connecting a DVD Player Using a Composite Video Cable 21 Connecting a DVD Player Using a Component Video Cable 22 Connecting a DVD Player Using a HDMI Cable . . 23 Connecting to Local Area Network 24 To project an image and control...
User Guide
Page 5
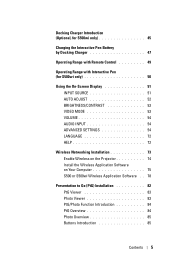
... Charger 47 Operating Range with Remote Control 49 Operating Range with Interactive Pen (for S500wi only 50 Using the On-Screen Display 51 INPUT SOURCE 51 AUTO ADJUST 52 BRIGHTNESS/CONTRAST 53 VIDEO MODE 53 VOLUME 54 AUDIO INPUT 54 ADVANCED SETTINGS 54 LANGUAGE 72 HELP 72 Wireless Networking Installation 73 Enable Wireless on the Projector 74 Install the Wireless Application Software on Your Computer 75 S500 or S500wi Wireless Application Software . . 78 Presentation to Go (PtG) Installation 82 PtG...
... Charger 47 Operating Range with Remote Control 49 Operating Range with Interactive Pen (for S500wi only 50 Using the On-Screen Display 51 INPUT SOURCE 51 AUTO ADJUST 52 BRIGHTNESS/CONTRAST 53 VIDEO MODE 53 VOLUME 54 AUDIO INPUT 54 ADVANCED SETTINGS 54 LANGUAGE 72 HELP 72 Wireless Networking Installation 73 Enable Wireless on the Projector 74 Install the Wireless Application Software on Your Computer 75 S500 or S500wi Wireless Application Software . . 78 Presentation to Go (PtG) Installation 82 PtG...
User Guide
Page 18
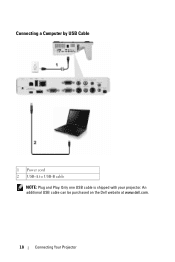
An additional USB cable can be purchased on the Dell website at www.dell.com. 18 Connecting Your Projector Connecting a Computer by USB Cable 1 Power cord 2 USB-A to USB-B cable NOTE: Plug and Play. Only one USB cable is shipped with your projector.
An additional USB cable can be purchased on the Dell website at www.dell.com. 18 Connecting Your Projector Connecting a Computer by USB Cable 1 Power cord 2 USB-A to USB-B cable NOTE: Plug and Play. Only one USB cable is shipped with your projector.
User Guide
Page 29
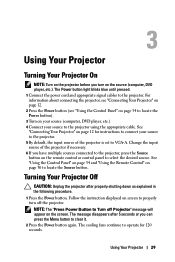
... remote control or control panel to properly turn on your source (computer, DVD player, etc.) 4 Connect your source to the projector. 5 By default, the input source of the projector if necessary. 6 If you have multiple sources connected to the projector, press the Source button on page 36 to locate the Source button. NOTE: The "Press Power Button to Turn off the projector. Using Your Projector 29 Follow the instruction displayed on the screen. The Power button light blinks blue until pressed. 1 Connect the power cord and appropriate signal cables to VGA...
... remote control or control panel to properly turn on your source (computer, DVD player, etc.) 4 Connect your source to the projector. 5 By default, the input source of the projector if necessary. 6 If you have multiple sources connected to the projector, press the Source button on page 36 to locate the Source button. NOTE: The "Press Power Button to Turn off the projector. Using Your Projector 29 Follow the instruction displayed on the screen. The Power button light blinks blue until pressed. 1 Connect the power cord and appropriate signal cables to VGA...
User Guide
Page 35
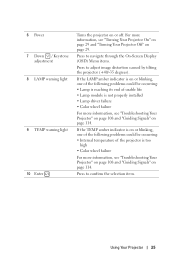
... properly installed • Lamp driver failure • Color wheel failure For more information, see "Troubleshooting Your Projector" on page 108 and "Guiding Signals" on page 114. Press to adjust image distortion caused by tilting the projector (+40/-35 degrees). 6 Power 7 Down / Keystone adjustment 8 LAMP warning light 9 TEMP warning light 10 Enter Turns the projector on page 29. If the TEMP amber indicator is on or blinking, one of the following problems could be occurring: • Internal temperature of usable life • Lamp...
... properly installed • Lamp driver failure • Color wheel failure For more information, see "Troubleshooting Your Projector" on page 108 and "Guiding Signals" on page 114. Press to adjust image distortion caused by tilting the projector (+40/-35 degrees). 6 Power 7 Down / Keystone adjustment 8 LAMP warning light 9 TEMP warning light 10 Enter Turns the projector on page 29. If the TEMP amber indicator is on or blinking, one of the following problems could be occurring: • Internal temperature of usable life • Lamp...
User Guide
Page 40
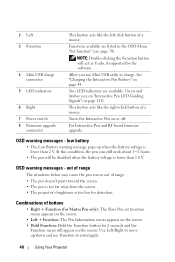
... and RF board firmware upgrade. OSD warning messages - Use Left/Right to move up when the battery voltage is lower than 2 V. Two LED indicators are listed in the OSD Menu "Set function" (see on "Interactive Pen LED Guiding Signals" on the screen. • Hold Function: Hold the Function button for detection. Combinations of a mouse. This button acts like the left click button of buttons • Right + Function...
... and RF board firmware upgrade. OSD warning messages - Use Left/Right to move up when the battery voltage is lower than 2 V. Two LED indicators are listed in the OSD Menu "Set function" (see on "Interactive Pen LED Guiding Signals" on the screen. • Hold Function: Hold the Function button for detection. Combinations of a mouse. This button acts like the left click button of buttons • Right + Function...
User Guide
Page 44
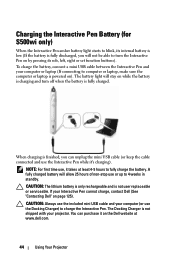
... S500wi only) When the Interactive Pen amber battery light starts to blink, its nib, left, right or set function buttons). When charging is finished, you will stay on while the battery is charging and turn the Interactive Pen on the Dell website at least 4-5 hours to fully charge the battery. CAUTION: Always use the included mini USB cable and your projector. The battery light...
... S500wi only) When the Interactive Pen amber battery light starts to blink, its nib, left, right or set function buttons). When charging is finished, you will stay on while the battery is charging and turn the Interactive Pen on the Dell website at least 4-5 hours to fully charge the battery. CAUTION: Always use the included mini USB cable and your projector. The battery light...
User Guide
Page 52
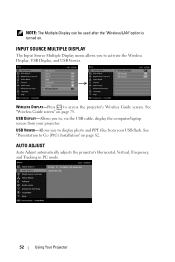
...) Installation" on page 75. AUTO ADJUST Auto Adjust automatically adjusts the projector's Horizontal, Vertical, Frequency, and Tracking in PC mode. 52 Using Your Projector INPUT SOURCE MULTIPLE DISPLAY The Input Source Multiple Display menu allows you to , via the USB cable, display the computer/laptop screen from your projector. USB DISPLAY-Allows you to display photo and PPT files from your USB flash. USB VIEWER-Allows you to access the projector's Wireless Guide screen. See "Wireless Guide screen" on page 82. WIRELESS DISPLAY-Press to activate the Wireless Display...
...) Installation" on page 75. AUTO ADJUST Auto Adjust automatically adjusts the projector's Horizontal, Vertical, Frequency, and Tracking in PC mode. 52 Using Your Projector INPUT SOURCE MULTIPLE DISPLAY The Input Source Multiple Display menu allows you to , via the USB cable, display the computer/laptop screen from your projector. USB DISPLAY-Allows you to display photo and PPT files from your USB flash. USB VIEWER-Allows you to access the projector's Wireless Guide screen. See "Wireless Guide screen" on page 82. WIRELESS DISPLAY-Press to activate the Wireless Display...
User Guide
Page 60
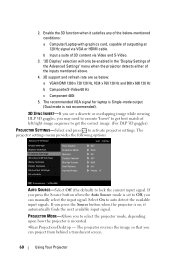
... input signal. The projector reverses the image so that you can project from behind a translucent screen. 60 Using Your Projector "3D Display" selection will only be enabled in the "Display Settings of the Advanced Settings" menu when the projector detects either of the inputs mentioned above. 4. 3D support and refresh rate are as below -mentioned conditions: a Computer/Laptop with graphics card, capable of 3D content via VGA or HDMI cable. PROJECTOR MODE...
... input signal. The projector reverses the image so that you can project from behind a translucent screen. 60 Using Your Projector "3D Display" selection will only be enabled in the "Display Settings of the Advanced Settings" menu when the projector detects either of the inputs mentioned above. 4. 3D support and refresh rate are as below -mentioned conditions: a Computer/Laptop with graphics card, capable of 3D content via VGA or HDMI cable. PROJECTOR MODE...
User Guide
Page 95
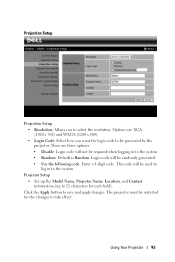
... a 4-digit code. Projector Setup • Set up the Model Name, Projector Name, Location, and Contact information (up to 21 characters for the changes to take effect. Using Your Projector 95 This code will be used to log in to the system. • Random: Default is Random. Login code will not be required when logging in to the system. Click the Apply button to select the resolution. Projection Setup Projection Setup • Resolution...
... a 4-digit code. Projector Setup • Set up the Model Name, Projector Name, Location, and Contact information (up to 21 characters for the changes to take effect. Using Your Projector 95 This code will be used to log in to the system. • Random: Default is Random. Login code will not be required when logging in to the system. Click the Apply button to select the resolution. Projection Setup Projection Setup • Resolution...

User Guide
Page 100
...VGA-A, VGA-B, S-Video, Composite Video, HDMI, Wireless Display, USB Display, or USB Viewer. • Video Mode: Select a mode to disable the audio function. Audio Control • Audio Input: Select the input source. Movie: For viewing movies and photos. - Click the Auto Adjust button to restore the factory default settings. 100 Using Your Projector There are : Audio-A, Audio-B, HDMI, Wireless/LAN, and Microphone. • Volume: Select the value (0~20) for presentation slides. - sRGB: Provides a more accurate color representation. - Click the Factory Reset button to adjust...
...VGA-A, VGA-B, S-Video, Composite Video, HDMI, Wireless Display, USB Display, or USB Viewer. • Video Mode: Select a mode to disable the audio function. Audio Control • Audio Input: Select the input source. Movie: For viewing movies and photos. - Click the Auto Adjust button to restore the factory default settings. 100 Using Your Projector There are : Audio-A, Audio-B, HDMI, Wireless/LAN, and Microphone. • Volume: Select the value (0~20) for presentation slides. - sRGB: Provides a more accurate color representation. - Click the Factory Reset button to adjust...
User Guide
Page 110
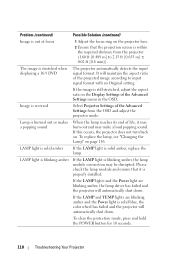
... POWER button for 10 seconds. 110 Troubleshooting Your Projector If the LAMP light is blinking amber, the lamp module connection may make a loud popping sound. Select Projector Settings of the Advanced Settings from the projector (1.60 ft [0.489 m] to input signal format with an Original setting. Problem (continued) Image is out of focus The image is stretched when displaying a 16:9 DVD Image is reversed Lamp is burned out or makes a popping sound LAMP light is solid amber LAMP light...
... POWER button for 10 seconds. 110 Troubleshooting Your Projector If the LAMP light is blinking amber, the lamp module connection may make a loud popping sound. Select Projector Settings of the Advanced Settings from the projector (1.60 ft [0.489 m] to input signal format with an Original setting. Problem (continued) Image is out of focus The image is stretched when displaying a 16:9 DVD Image is reversed Lamp is burned out or makes a popping sound LAMP light is solid amber LAMP light...
User Guide
Page 111
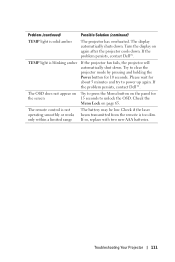
... the screen 15 seconds to clear the projector mode by pressing and holding the Power button for about 5 minutes and try to power up again. If so, replace with two new AAA batteries. If the problem persists, contact Dell™. Turn the display on page 65. Please wait for 10 seconds. TEMP light is too dim. Check if the laser beam transmitted from the remote is blinking...
... the screen 15 seconds to clear the projector mode by pressing and holding the Power button for about 5 minutes and try to power up again. If so, replace with two new AAA batteries. If the problem persists, contact Dell™. Turn the display on page 65. Please wait for 10 seconds. TEMP light is too dim. Check if the laser beam transmitted from the remote is blinking...
User Guide
Page 112
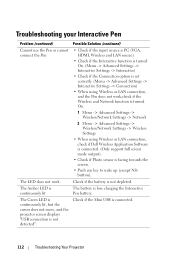
... use the Pen or cannot connect the Pen The LED does not work ,check if the Wireless and Network function is turned On. 1 Menu -> Advanced Settings -> Wireless/Network Settings -> Network 2 Menu -> Advanced Settings -> Wireless/Network Settings -> Wireless Settings • When using Wireless or LAN connection, check if Dell Wireless Application Software is connected. (Only support full screen mode output). • Check if Photo sensor is connected. 112 Troubleshooting Your Projector Possible Solution (continued) • Check if the input source is PC (VGA, HDMI, Wireless and LAN source...
... use the Pen or cannot connect the Pen The LED does not work ,check if the Wireless and Network function is turned On. 1 Menu -> Advanced Settings -> Wireless/Network Settings -> Network 2 Menu -> Advanced Settings -> Wireless/Network Settings -> Wireless Settings • When using Wireless or LAN connection, check if Dell Wireless Application Software is connected. (Only support full screen mode output). • Check if Photo sensor is connected. 112 Troubleshooting Your Projector Possible Solution (continued) • Check if the input source is PC (VGA, HDMI, Wireless and LAN source...
User Guide
Page 114
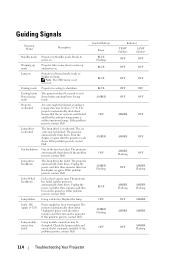
... Unplug the power cord after the projector cools down before Power Saving mode Projector overheated Lamp driver overheated Fan breakdown Lamp driver breakdown Color Wheel breakdown Lamp failure Fault - Guiding Signals Projector Status Description Standby mode Warming up and power on. The air vents may be disrupted. If this problem persists, contact Dell. The projector automatically shuts down . Lamp is within operational range. If this problem persists, contact Dell. Power supply has been interrupted. Projector takes some time to display an image. If the...
... Unplug the power cord after the projector cools down before Power Saving mode Projector overheated Lamp driver overheated Fan breakdown Lamp driver breakdown Color Wheel breakdown Lamp failure Fault - Guiding Signals Projector Status Description Standby mode Warming up and power on. The air vents may be disrupted. If this problem persists, contact Dell. The projector automatically shuts down . Lamp is within operational range. If this problem persists, contact Dell. Power supply has been interrupted. Projector takes some time to display an image. If the...
User Guide
Page 116
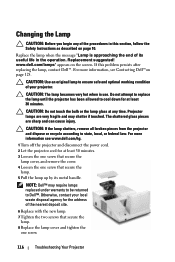
... address of the nearest deposit site. 6 Replace with the new lamp. 7 Tighten the two screws that secure the lamp. 5 Pull the lamp up by its useful life in the operation. For more information, see www.dell.com/hg. 1 Turn off the projector and disconnect the power cord. 2 Let the projector cool for at least 30 minutes. CAUTION: The lamp becomes very hot when in this problem persists after replacing...
... address of the nearest deposit site. 6 Replace with the new lamp. 7 Tighten the two screws that secure the lamp. 5 Pull the lamp up by its useful life in the operation. For more information, see www.dell.com/hg. 1 Turn off the projector and disconnect the power cord. 2 Let the projector cool for at least 30 minutes. CAUTION: The lamp becomes very hot when in this problem persists after replacing...
User Guide
Page 117
.... Troubleshooting Your Projector 117 When a new lamp module has been changed, the projector will automatically detect and reset the lamp hours. 9 Reset the lamp usage time by selecting "Yes" for the US only) LAMP(S) INSIDE THIS PRODUCT CONTAIN MERCURY AND MUST BE RECYCLED OR DISPOSED OF ACCORDING TO LOCAL, STATE, OR FEDERAL LAWS. CAUTION: Lamp Disposal (for Lamp Reset in the OSD Power Settings of the Advanced Setting menu (see Power Settings...
.... Troubleshooting Your Projector 117 When a new lamp module has been changed, the projector will automatically detect and reset the lamp hours. 9 Reset the lamp usage time by selecting "Yes" for the US only) LAMP(S) INSIDE THIS PRODUCT CONTAIN MERCURY AND MUST BE RECYCLED OR DISPOSED OF ACCORDING TO LOCAL, STATE, OR FEDERAL LAWS. CAUTION: Lamp Disposal (for Lamp Reset in the OSD Power Settings of the Advanced Setting menu (see Power Settings...
User Guide
Page 121
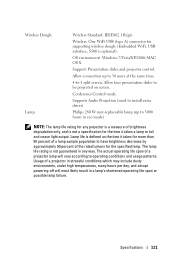
... to be projected on screen. Wireless Dongle Lamp Wireless Standard: IEEE802.11b/g/n Wireless: One WiFi USB (type A) connector for supporting wireless dongle (Embedded WiFi, USB interface, S500 is defined as the time it takes a lamp to fail and cease light output. Supports Audio Projection (need to install extra driver) Philips 280 W user-replaceable lamp (up to 30 users at the same time. 4-to-1 split screen. OS environment: Windows 7/Vista/XP/2000, MAC OS X Support: Presentation slides and projector control.
... to be projected on screen. Wireless Dongle Lamp Wireless Standard: IEEE802.11b/g/n Wireless: One WiFi USB (type A) connector for supporting wireless dongle (Embedded WiFi, USB interface, S500 is defined as the time it takes a lamp to fail and cease light output. Supports Audio Projection (need to install extra driver) Philips 280 W user-replaceable lamp (up to 30 users at the same time. 4-to-1 split screen. OS environment: Windows 7/Vista/XP/2000, MAC OS X Support: Presentation slides and projector control.
User Guide
Page 129
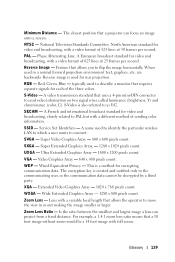
... flip the image horizontally. Reverse image is also referred to connect. Red, Green, Blue - typically used in or out making the image smaller or larger. S-Video - A video transmission standard that requires separate signals for encrypting communication data. S-Video is used to identify the particular wireless LAN to which a user wants to as Y/C. A French and international broadcast standard for rear projection. A name used for video and broadcasting, closely related to move the view...
... flip the image horizontally. Reverse image is also referred to connect. Red, Green, Blue - typically used in or out making the image smaller or larger. S-Video - A video transmission standard that requires separate signals for encrypting communication data. S-Video is used to identify the particular wireless LAN to which a user wants to as Y/C. A French and international broadcast standard for rear projection. A name used for video and broadcasting, closely related to move the view...
User Guide
Page 130
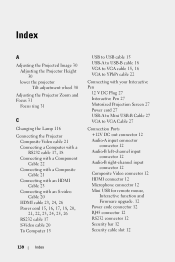
... Plug 27 Interactive Pen 27 Motorized Projection Screen 27 Power cord 27 USB-A to Mini USB-B Cable 27 VGA to VGA Cable 27 Connection Ports +12V DC out connector 12 Audio-A input connector connector 12 Audio-B left-channel input connector 12 Audio-B right-channel input connector 12 Composite Video connector 12 HDMI connector 12 Microphone connector 12 Mini USB for remote mouse, Interactive function and Firmware upgrade. 12 Power code connector 12 RJ45 connector 12 RS232...
... Plug 27 Interactive Pen 27 Motorized Projection Screen 27 Power cord 27 USB-A to Mini USB-B Cable 27 VGA to VGA Cable 27 Connection Ports +12V DC out connector 12 Audio-A input connector connector 12 Audio-B left-channel input connector 12 Audio-B right-channel input connector 12 Composite Video connector 12 HDMI connector 12 Microphone connector 12 Mini USB for remote mouse, Interactive function and Firmware upgrade. 12 Power code connector 12 RJ45 connector 12 RS232...


