
Page 20
Connecting a Computer by USB Cable VGA-OUT VGA-A IN VGA-B IN HDMI USB-A Audio-In Audio-Out Composite S-Video Mini-USB DOUSB RJ45 RS232 1 2 MOLEX 1 Power cord 2 USB-A to USB-B cable NOTE: Plug and Play. Only one USB cable is shipped with your projector. An additional USB cable can be purchased on the Dell website at www.dell.com. 20 Connecting Your Projector
Connecting a Computer by USB Cable VGA-OUT VGA-A IN VGA-B IN HDMI USB-A Audio-In Audio-Out Composite S-Video Mini-USB DOUSB RJ45 RS232 1 2 MOLEX 1 Power cord 2 USB-A to USB-B cable NOTE: Plug and Play. Only one USB cable is shipped with your projector. An additional USB cable can be purchased on the Dell website at www.dell.com. 20 Connecting Your Projector
Page 30
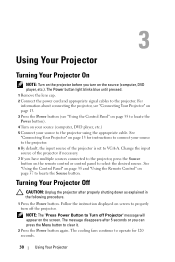
...the projector. 6 By default, the input source of the projector if necessary. 7 If you have multiple sources connected to the projector, press the Source button on the remote control or control panel to properly turn on screen to select the desired source. See "Connecting Your Projector" on page 37 to the projector using the appropriate cable. The Power button light blinks blue until pressed. 1 Remove the lens cap. 2 Connect the power cord and appropriate signal cables to operate for instructions to connect your source to locate the Source button. See "Using the Control Panel...
...the projector. 6 By default, the input source of the projector if necessary. 7 If you have multiple sources connected to the projector, press the Source button on the remote control or control panel to properly turn on screen to select the desired source. See "Connecting Your Projector" on page 37 to the projector using the appropriate cable. The Power button light blinks blue until pressed. 1 Remove the lens cap. 2 Connect the power cord and appropriate signal cables to operate for instructions to connect your source to locate the Source button. See "Using the Control Panel...

Page 35
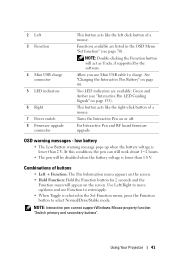
... the projector (+37/-40 degrees). Using Your Projector 35 If the LAMP amber indicator is on or blinking, one of the following problems could be occurring: • Lamp is reaching its end of usable life • Lamp module is not properly installed • Lamp driver failure • Color wheel failure For more information, see "Troubleshooting Your Projector" on page 126 and "Guiding Signals" on or off. Using the Control Panel 1 2 3 4 10 5 6 9 8 7 1 Power 2 Up / Keystone adjustment 3 LAMP warning light Turns the projector on...
... the projector (+37/-40 degrees). Using Your Projector 35 If the LAMP amber indicator is on or blinking, one of the following problems could be occurring: • Lamp is reaching its end of usable life • Lamp module is not properly installed • Lamp driver failure • Color wheel failure For more information, see "Troubleshooting Your Projector" on page 126 and "Guiding Signals" on or off. Using the Control Panel 1 2 3 4 10 5 6 9 8 7 1 Power 2 Up / Keystone adjustment 3 LAMP warning light Turns the projector on...

Page 36
... the remote control towards the IR receiver and press a button. 7 Right / Auto Adjust Press to navigate through the OSD. 36 Using Your Projector NOTE: Auto Adjust does not operate if the on-screen display (OSD) is too high • Color wheel failure For more information, see "Troubleshooting Your Projector" on page 126 and "Guiding Signals" on or blinking, one of the following problems could be occurring: • Internal temperature of the projector is displayed. 8 Down / Keystone adjustment...
... the remote control towards the IR receiver and press a button. 7 Right / Auto Adjust Press to navigate through the OSD. 36 Using Your Projector NOTE: Auto Adjust does not operate if the on-screen display (OSD) is too high • Color wheel failure For more information, see "Troubleshooting Your Projector" on page 126 and "Guiding Signals" on or blinking, one of the following problems could be occurring: • Internal temperature of the projector is displayed. 8 Down / Keystone adjustment...
Page 41
... Battery warning message pops up /down and use Mini USB cable to enter/apply. • When Toggle is lower than 1.8 V. This button acts like the left click button of a mouse. Use Left/Right to move up when the battery voltage is selected in the OSD Menu "Set function" (see "Interactive Pen LED Guiding Signals" on page 44. 2 Left 3 Function 4 Mini USB charge connector 5 LED indicators 6 Right 7 Power switch 8 Firmware upgrade...
... Battery warning message pops up /down and use Mini USB cable to enter/apply. • When Toggle is lower than 1.8 V. This button acts like the left click button of a mouse. Use Left/Right to move up when the battery voltage is selected in the OSD Menu "Set function" (see "Interactive Pen LED Guiding Signals" on page 44. 2 Left 3 Function 4 Mini USB charge connector 5 LED indicators 6 Right 7 Power switch 8 Firmware upgrade...
Page 55
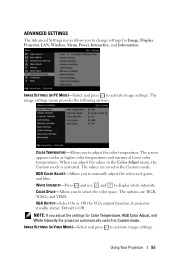
...image settings. The screen appears cooler at higher color temperatures and warmer at projector standby status. IMAGE SETTINGS (IN VIDEO MODE)-Select and press to activate image settings. Using Your Projector 55 VGA OUTPUT-Select On or Off the VGA output function at lower color temperatures. NOTE: If you to manually adjust the colors red, green, and blue. The image settings menu provides the following options: COLOR TEMPERATURE-Allows you to change settings for Color Temperature, RGB Color Adjust, and White Intensity the projector automatically switch to Custom mode. Default...
...image settings. The screen appears cooler at higher color temperatures and warmer at projector standby status. IMAGE SETTINGS (IN VIDEO MODE)-Select and press to activate image settings. Using Your Projector 55 VGA OUTPUT-Select On or Off the VGA output function at lower color temperatures. NOTE: If you to manually adjust the colors red, green, and blue. The image settings menu provides the following options: COLOR TEMPERATURE-Allows you to change settings for Color Temperature, RGB Color Adjust, and White Intensity the projector automatically switch to Custom mode. Default...

Page 61
.... 2. The projector reverses the image so that the input signal connected to capture the screen display. Select appropriate closed caption menu. You can project from behind a translucent screen. •Rear Projection-Wall Mount - You can manually select the input signal. STARTUP SCREEN-Default is used to automatically adjust image distortion caused by selecting Off, 1, or 2. The following message appears on , it automatically finds the next available input signal. AUTO SOURCE-Select Off (the default) to enable...
.... 2. The projector reverses the image so that the input signal connected to capture the screen display. Select appropriate closed caption menu. You can project from behind a translucent screen. •Rear Projection-Wall Mount - You can manually select the input signal. STARTUP SCREEN-Default is used to automatically adjust image distortion caused by selecting Off, 1, or 2. The following message appears on , it automatically finds the next available input signal. AUTO SOURCE-Select Off (the default) to enable...
Page 64
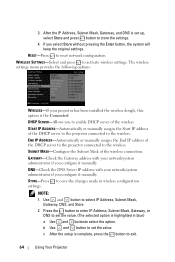
... Using Your Projector STORE-Press to store the settings. 4. c After the setup is the Connected. GATEWAY-Check the Gateway address with your network/system administrator if you configure it manually. b Use and button to set up, select Store and press button to save the changes made in blue) a Use and buttonto select the option. START IP ADDRESS-Automatically or manually assigns the Start IP address of the wireless connection. END IP ADDRESS-Automatically or manually...
... Using Your Projector STORE-Press to store the settings. 4. c After the setup is the Connected. GATEWAY-Check the Gateway address with your network/system administrator if you configure it manually. b Use and button to set up, select Store and press button to save the changes made in blue) a Use and buttonto select the option. START IP ADDRESS-Automatically or manually assigns the Start IP address of the wireless connection. END IP ADDRESS-Automatically or manually...
Page 69
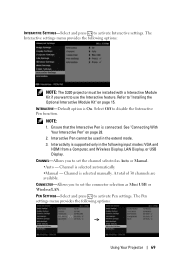
... supported only in the extend mode. 3. Channel is connected. Select Off to activate Pen settings. Ensure that the Interactive Pen is selected manually. PEN SETTINGS-Select and press to disable the Interactive Pen function. The Pen settings menu provides the following input modes: VGA and HDMI from a Computer, and Wireless Display, LAN Display, or USB Display. CONNECTOR-Allows you want to set the connector selection as Auto or Manual. •Auto - INTERACTIVE SETTINGS...
... supported only in the extend mode. 3. Channel is connected. Select Off to activate Pen settings. Ensure that the Interactive Pen is selected manually. PEN SETTINGS-Select and press to disable the Interactive Pen function. The Pen settings menu provides the following input modes: VGA and HDMI from a Computer, and Wireless Display, LAN Display, or USB Display. CONNECTOR-Allows you want to set the connector selection as Auto or Manual. •Auto - INTERACTIVE SETTINGS...
Page 89
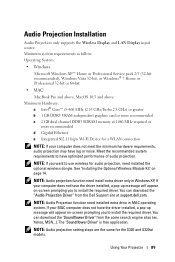
Audio Projection Installation Audio Projection only supports the Wireless Display and LAN Display input source. Minimum system requirements as follow: Operating System: • Windows Microsoft Windows XP™ Home or Professional Service pack 2/3 (32-bit recommended), Windows Vista 32-bit, or Windows® 7 Home or Professional 32-bit or 64-bit • MAC MacBook Pro and above, MacOS 10.5 and above Minimum Hardware: a Intel® Core™ i5-460 MHz (2.53 GHz/Turbo 2.8 GHz...
Audio Projection Installation Audio Projection only supports the Wireless Display and LAN Display input source. Minimum system requirements as follow: Operating System: • Windows Microsoft Windows XP™ Home or Professional Service pack 2/3 (32-bit recommended), Windows Vista 32-bit, or Windows® 7 Home or Professional 32-bit or 64-bit • MAC MacBook Pro and above, MacOS 10.5 and above Minimum Hardware: a Intel® Core™ i5-460 MHz (2.53 GHz/Turbo 2.8 GHz...
Page 94
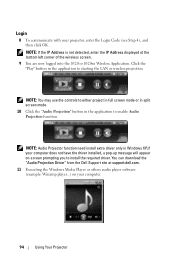
.... You can download the "Audio Projection Driver" from the Dell Support site at the bottom left corner of the wireless screen. 9 You are now logged into the S320 or S320wi Wireless Application. NOTE: You may use the controls to either project in full screen mode or in split screen mode. 10 Click the "Audio Projection" button in the application to install the required driver. Login 8 To communicate with your computer. 94 Using Your Projector
.... You can download the "Audio Projection Driver" from the Dell Support site at the bottom left corner of the wireless screen. 9 You are now logged into the S320 or S320wi Wireless Application. NOTE: You may use the controls to either project in full screen mode or in split screen mode. 10 Click the "Audio Projection" button in the application to install the required driver. Login 8 To communicate with your computer. 94 Using Your Projector
Page 102
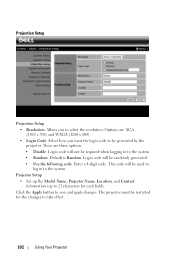
...: Default is Random. This code will not be randomly generated. • Use the following code: Enter a 4-digit code. Projector Setup • Set up the Model Name, Projector Name, Location, and Contact information (up to the system. There are : XGA (1024 x 768) and WXGA (1280 x 800). • Login Code: Select how you to select the resolution. The projector must be generated by the projector. Click the Apply button to...
...: Default is Random. This code will not be randomly generated. • Use the following code: Enter a 4-digit code. Projector Setup • Set up the Model Name, Projector Name, Location, and Contact information (up to the system. There are : XGA (1024 x 768) and WXGA (1280 x 800). • Login Code: Select how you to select the resolution. The projector must be generated by the projector. Click the Apply button to...
Page 107
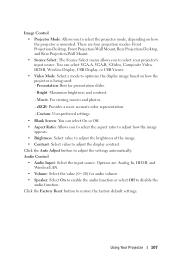
... projector is being used: - Click the Factory Reset button to select your projector's input source. There are : Analog In, HDMI, and Wireless/LAN. • Volume: Select the value (0~20) for presentation slides. - Movie: For viewing movies and photos. - Presentation: Best for audio volume. • Speaker: Select On to enable the audio function or select Off to adjust the display contrast. Click the Auto Adjust button to adjust the settings automatically. Image Control • Projector Mode...
... projector is being used: - Click the Factory Reset button to select your projector's input source. There are : Analog In, HDMI, and Wireless/LAN. • Volume: Select the value (0~20) for presentation slides. - Movie: For viewing movies and photos. - Presentation: Best for audio volume. • Speaker: Select On to enable the audio function or select Off to adjust the display contrast. Click the Auto Adjust button to adjust the settings automatically. Image Control • Projector Mode...

Page 128
... disrupted. The projector automatically detects the input signal format. When the lamp reaches its end of the Advanced Settings menu in the Display Settings of life, it is properly installed. If the LAMP light is still stretched, adjust the aspect ratio in the OSD. If the LAMP and TEMP lights are blinking amber, the lamp driver has failed and the projector will automatically shut down . Select Projector Settings of the projected image according to 12...
... disrupted. The projector automatically detects the input signal format. When the lamp reaches its end of the Advanced Settings menu in the Display Settings of life, it is properly installed. If the LAMP light is still stretched, adjust the aspect ratio in the OSD. If the LAMP and TEMP lights are blinking amber, the lamp driver has failed and the projector will automatically shut down . Select Projector Settings of the projected image according to 12...

Page 129
.... The display automatically shuts down. If the problem persists, contact Dell™. Problem (continued) Possible Solution (continued) TEMP light is blinking amber If the projector fan fails, the projector will automatically shut down. TEMP light is solid amber The projector has overheated. Try to clear the projector mode by pressing and holding the Power button for about 5 minutes and try to unlock the OSD. The remote control is not operating smoothly or works only...
.... The display automatically shuts down. If the problem persists, contact Dell™. Problem (continued) Possible Solution (continued) TEMP light is blinking amber If the projector fan fails, the projector will automatically shut down. TEMP light is solid amber The projector has overheated. Try to clear the projector mode by pressing and holding the Power button for about 5 minutes and try to unlock the OSD. The remote control is not operating smoothly or works only...
Page 130
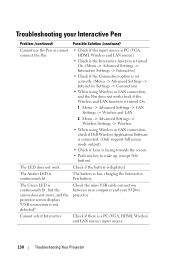
...; Check if the input source is PC (VGA, HDMI, Wireless and LAN source) • Check if the Interactive function is turned On. (Menu -> Advanced Settings -> Interactive Settings -> Interactive) • Check if the Connection option is facing towards the screen. • Push any key to wake up (except Nib button). Troubleshooting your S320wi projector. The Amber LED is continuously lit The Green LED is continuously lit, but the cursor does not move, and the projector screen displays "USB connection...
...; Check if the input source is PC (VGA, HDMI, Wireless and LAN source) • Check if the Interactive function is turned On. (Menu -> Advanced Settings -> Interactive Settings -> Interactive) • Check if the Connection option is facing towards the screen. • Push any key to wake up (except Nib button). Troubleshooting your S320wi projector. The Amber LED is continuously lit The Green LED is continuously lit, but the cursor does not move, and the projector screen displays "USB connection...

Page 132
... disrupted. Turn the display on again after three minutes and then turn on . Color wheel cannot start. Power supply has been interrupted. If this problem persists, contact Dell. If the problem persists, contact Dell. Ready to warm up mode Lamp on Cooling mode Cooling before entering Power Saving mode. The projector automatically shuts down . One of the fans has failed. Control Buttons Power BLUE Flashing BLUE BLUE BLUE AMBER OFF AMBER OFF AMBER Flashing BLUE OFF AMBER Flashing OFF Indicator TEMP (Amber) LAMP (Amber...
... disrupted. Turn the display on again after three minutes and then turn on . Color wheel cannot start. Power supply has been interrupted. If this problem persists, contact Dell. If the problem persists, contact Dell. Ready to warm up mode Lamp on Cooling mode Cooling before entering Power Saving mode. The projector automatically shuts down . One of the fans has failed. Control Buttons Power BLUE Flashing BLUE BLUE BLUE AMBER OFF AMBER OFF AMBER Flashing BLUE OFF AMBER Flashing OFF Indicator TEMP (Amber) LAMP (Amber...

Page 134
... lamp. 8 Replace the lamp cover and tighten the two screws. 134 Troubleshooting Your Projector Replace the lamp when the message "Lamp is approaching the end of the procedures in this problem persists after replacing the lamp, contact Dell™. For more information see Contacting Dell™on the screen. CAUTION: Use an original lamp to state, local, or federal law. CAUTION: The lamp becomes very hot when in the operation. NOTE: Dell...
... lamp. 8 Replace the lamp cover and tighten the two screws. 134 Troubleshooting Your Projector Replace the lamp when the message "Lamp is approaching the end of the procedures in this problem persists after replacing the lamp, contact Dell™. For more information see Contacting Dell™on the screen. CAUTION: Use an original lamp to state, local, or federal law. CAUTION: The lamp becomes very hot when in the operation. NOTE: Dell...

Page 135
... WWW.DELL.COM/HG OR CONTACT THE ELECTRONIC INDUSTRIES ALLIANCE AT WWW.EIAE.ORG. FOR LAMP-SPECIFIC DISPOSAL INFORMATION, CHECK WWW.LAMPRECYCLE.ORG. When a new lamp module has been changed, the projector will automatically detect and reset the lamp hours. CAUTION: Lamp Disposal (for Lamp Reset in the OSD Power Settings of the Advanced Setting menu (see Power Settings of the Advanced Setting menu on page 67). Troubleshooting Your Projector 135 9 Reset the lamp usage time by...
... WWW.DELL.COM/HG OR CONTACT THE ELECTRONIC INDUSTRIES ALLIANCE AT WWW.EIAE.ORG. FOR LAMP-SPECIFIC DISPOSAL INFORMATION, CHECK WWW.LAMPRECYCLE.ORG. When a new lamp module has been changed, the projector will automatically detect and reset the lamp hours. CAUTION: Lamp Disposal (for Lamp Reset in the OSD Power Settings of the Advanced Setting menu (see Power Settings of the Advanced Setting menu on page 67). Troubleshooting Your Projector 135 9 Reset the lamp usage time by...

Page 139
... image care Normal mode: Up to 4000 hours ECO mode: Up to fail and cease light output. Wireless Dongle (embedded for S320wi) Lamp Lamp life Wireless Standard: IEEE802.11b/g/n Wireless: One WiFi USB (type A) connector for any way. OS environment: Windows 7/Vista/XP/2000, MAC OS X Support: Presentation slides and projector control. Supports Audio Projection (driver installation may include dusty environments, under high temperatures, many hours per day, and abrupt powering-off will vary according to -1 split screen. Lamp life...
... image care Normal mode: Up to 4000 hours ECO mode: Up to fail and cease light output. Wireless Dongle (embedded for S320wi) Lamp Lamp life Wireless Standard: IEEE802.11b/g/n Wireless: One WiFi USB (type A) connector for any way. OS environment: Windows 7/Vista/XP/2000, MAC OS X Support: Presentation slides and projector control. Supports Audio Projection (driver installation may include dusty environments, under high temperatures, many hours per day, and abrupt powering-off will vary according to -1 split screen. Lamp life...


