User Guide
Page 3
Contents 1 Your Dell Projector 6 About Your Projector 7 2 Connecting Your Projector 9 Installing the Antenna 10 Connecting to a Computer 11 Connecting a Computer Using a VGA Cable . . . . 11 Monitor Loop-Through Connection Using VGA Cables 12 Connecting a Computer Using an RS232 cable . . . 13 Connecting a Computer Using an USB Display . . . 14 Connecting a Computer Using Wireless 15 Connecting a DVD...
Contents 1 Your Dell Projector 6 About Your Projector 7 2 Connecting Your Projector 9 Installing the Antenna 10 Connecting to a Computer 11 Connecting a Computer Using a VGA Cable . . . . 11 Monitor Loop-Through Connection Using VGA Cables 12 Connecting a Computer Using an RS232 cable . . . 13 Connecting a Computer Using an USB Display . . . 14 Connecting a Computer Using Wireless 15 Connecting a DVD...
User Guide
Page 4
... PC Mode 37 PICTURE (in Video Mode 38 DISPLAY (in PC Mode 40 DISPLAY (in Video Mode 42 LAMP 43 SET UP 43 OTHERS 48 Wireless Networking Installation 55 S300w Wireless Application Software 59 4 Contents
... PC Mode 37 PICTURE (in Video Mode 38 DISPLAY (in PC Mode 40 DISPLAY (in Video Mode 42 LAMP 43 SET UP 43 OTHERS 48 Wireless Networking Installation 55 S300w Wireless Application Software 59 4 Contents
User Guide
Page 8
... not look into the lens while the projector is on as it may cause injury to your projector. • S300w projector only can use the wireless projector near medical equipment. 11 Do not use in front of the projector or cover its lens while the projector is on as the heat... may cause the object to wall mount the projector yourself. For more information, see the Dell Support website at support.dell.com. • For more information, see the Safety Information that shipped with your eyes. 8 Do not place any objects near or in indoor...
... not look into the lens while the projector is on as it may cause injury to your projector. • S300w projector only can use the wireless projector near medical equipment. 11 Do not use in front of the projector or cover its lens while the projector is on as the heat... may cause the object to wall mount the projector yourself. For more information, see the Dell Support website at support.dell.com. • For more information, see the Safety Information that shipped with your eyes. 8 Do not place any objects near or in indoor...
User Guide
Page 10
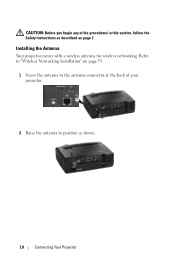
CAUTION: Before you begin any of your projector. 2 Raise the antenna to the antenna connector at the back of the procedures in this section, follow the Safety Instructions as shown. 10 Connecting Your Projector Refer to "Wireless Networking Installation" on page 55. 1 Screw the antenna to position as described on page 7. Installing the Antenna Your projector comes with a wireless antenna for wireless networking.
CAUTION: Before you begin any of your projector. 2 Raise the antenna to the antenna connector at the back of the procedures in this section, follow the Safety Instructions as shown. 10 Connecting Your Projector Refer to "Wireless Networking Installation" on page 55. 1 Screw the antenna to position as described on page 7. Installing the Antenna Your projector comes with a wireless antenna for wireless networking.
User Guide
Page 15
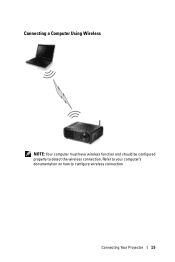
Connecting a Computer Using Wireless NOTE: Your computer must have wireless function and should be configured properly to configure wireless connection. Refer to your computer's documentation on how to detect the wireless connection. Connecting Your Projector 15
Connecting a Computer Using Wireless NOTE: Your computer must have wireless function and should be configured properly to configure wireless connection. Refer to your computer's documentation on how to detect the wireless connection. Connecting Your Projector 15
User Guide
Page 36
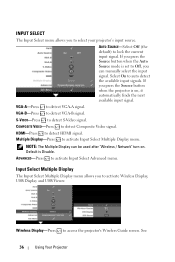
If you press the Source button when the Auto Source mode is set to Off, you can be used after "Wireless / Network" turn on , it automatically finds the next available input signal. HDMI-Press to auto detect the available input signals. Default is on . ...Projector NOTE: The Multiple Display can manually select the input signal. COMPOSITE VIDEO-Press to activate Input Select Multiple Display menu. VGA-A-Press to activate Wireless Display, USB Display and USB Viewer. Input Select Multiple Display The Input Select Multiple Display menu allows you to detect VGA-A signal. S-VIDEO-...
If you press the Source button when the Auto Source mode is set to Off, you can be used after "Wireless / Network" turn on , it automatically finds the next available input signal. HDMI-Press to auto detect the available input signals. Default is on . ...Projector NOTE: The Multiple Display can manually select the input signal. COMPOSITE VIDEO-Press to activate Input Select Multiple Display menu. VGA-A-Press to activate Wireless Display, USB Display and USB Viewer. Input Select Multiple Display The Input Select Multiple Display menu allows you to detect VGA-A signal. S-VIDEO-...
User Guide
Page 37
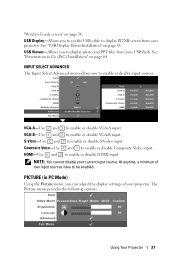
... enable or disable VGA-B input. VGA-A-Use and to enable or disable Composite Video input. COMPOSITE VIDEO-Use and to enable or disable VGA-A input. "Wireless Guide screen" on page 63. USB Display-Allows you to display PC/NB screen from your current input source. See "Presentation to enable or disable...
... enable or disable VGA-B input. VGA-A-Use and to enable or disable Composite Video input. COMPOSITE VIDEO-Use and to enable or disable VGA-A input. "Wireless Guide screen" on page 63. USB Display-Allows you to display PC/NB screen from your current input source. See "Presentation to enable or disable...
User Guide
Page 43
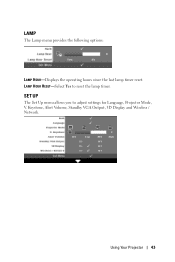
Using Your Projector 43 LAMP The Lamp menu provides the following options: LAMP HOUR-Displays the operating hours since the last lamp timer reset. Keystone, Alert Volume, Standby VGA Output, 3D Display and Wireless / Network. LAMP HOUR RESET-Select Yes to adjust settings for Language, Projector Mode, V. SET UP The Set Up menu allows you to reset the lamp timer.
Using Your Projector 43 LAMP The Lamp menu provides the following options: LAMP HOUR-Displays the operating hours since the last lamp timer reset. Keystone, Alert Volume, Standby VGA Output, 3D Display and Wireless / Network. LAMP HOUR RESET-Select Yes to adjust settings for Language, Projector Mode, V. SET UP The Set Up menu allows you to reset the lamp timer.
User Guide
Page 45
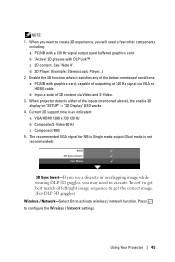
... Projector 45 b "Active" 3D glasses with graphics card, capable of outputting at 120 Hz signal via Video and S-Video. 3. Press to activate wireless / network function. Enable the 3D function when it satisfies any of 3D content via VGA or HDMI cable. The recommended VGA signal for NB is...Hz c Component 480i 5. When projector detects either of left/right image sequence to get the correct image. (For DLP 3D goggles) Wireless / Network-Select On to configure the Wireless / Network settings. b Input a suite of the below-mentioned conditions: a PC/NB with DLP Link™. When you want to...
... Projector 45 b "Active" 3D glasses with graphics card, capable of outputting at 120 Hz signal via Video and S-Video. 3. Press to activate wireless / network function. Enable the 3D function when it satisfies any of 3D content via VGA or HDMI cable. The recommended VGA signal for NB is...Hz c Component 480i 5. When projector detects either of left/right image sequence to get the correct image. (For DLP 3D goggles) Wireless / Network-Select On to configure the Wireless / Network settings. b Input a suite of the below-mentioned conditions: a PC/NB with DLP Link™. When you want to...
User Guide
Page 46
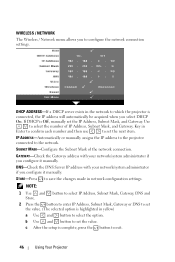
... your network/system administrator if you configure it manually. Use to set the value. (The selected option is Off, manually set the next item. WIRELESS / NETWORK The Wireless / Network menu allows you to save the changes made in network configuration settings. Key in Enter to confirm each number and then use to...
... your network/system administrator if you configure it manually. Use to set the value. (The selected option is Off, manually set the next item. WIRELESS / NETWORK The Wireless / Network menu allows you to save the changes made in network configuration settings. Key in Enter to confirm each number and then use to...
User Guide
Page 47
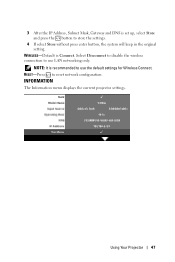
Using Your Projector 47 Select Disconnect to disable the wireless connection to reset network configuration. 3 After the IP Address, Subnet Mask, Gateway and DNS is recommended to use LAN networking only. NOTE: It is set up, select Store and press the button to store the settings. 4 If select Store without press enter button, the system will keep in the original setting. RESET-Press to use the default settings for Wireless Connect. INFORMATION The Information menu displays the current projector settings. WIRELESS-Default is Connect.
Using Your Projector 47 Select Disconnect to disable the wireless connection to reset network configuration. 3 After the IP Address, Subnet Mask, Gateway and DNS is recommended to use LAN networking only. NOTE: It is set up, select Store and press the button to store the settings. 4 If select Store without press enter button, the system will keep in the original setting. RESET-Press to use the default settings for Wireless Connect. INFORMATION The Information menu displays the current projector settings. WIRELESS-Default is Connect.
User Guide
Page 55
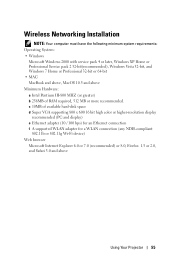
...) or 8.0, Firefox 1.5 or 2.0, and Safari 3.0 and above Minimum Hardware: a Intel Pentium III-800 MHZ (or greater) b 256MB of RAM required, 512 MB or more recommended. Wireless Networking Installation NOTE: Your computer must have the following minimum system requirements: Operating System: • Windows Microsoft Windows 2000 with service pack 4 or later, Windows...
...) or 8.0, Firefox 1.5 or 2.0, and Safari 3.0 and above Minimum Hardware: a Intel Pentium III-800 MHZ (or greater) b 256MB of RAM required, 512 MB or more recommended. Wireless Networking Installation NOTE: Your computer must have the following minimum system requirements: Operating System: • Windows Microsoft Windows 2000 with service pack 4 or later, Windows...
User Guide
Page 56
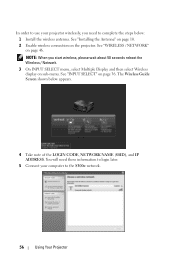
...need to the S300w network. 56 Using Your Projector See "Installing the Antenna" on page 10. 2 Enable wireless connection on page 36. The Wireless Guide Screen shown below : 1 Install the wireless antenna. See "INPUT SELECT" on the projector. In order to use your computer to complete the steps below... the LOGIN CODE, NETWORK NAME (SSID), and IP ADDRESS. You will need these information to login later. 5 Connect your projector wirelessly, you start wireless, please wait about 50 seconds reboot the Wireless / Network. 3 On INPUT SELECT menu, select Multiple Display and then select...
...need to the S300w network. 56 Using Your Projector See "Installing the Antenna" on page 10. 2 Enable wireless connection on page 36. The Wireless Guide Screen shown below : 1 Install the wireless antenna. See "INPUT SELECT" on the projector. In order to use your computer to complete the steps below... the LOGIN CODE, NETWORK NAME (SSID), and IP ADDRESS. You will need these information to login later. 5 Connect your projector wirelessly, you start wireless, please wait about 50 seconds reboot the Wireless / Network. 3 On INPUT SELECT menu, select Multiple Display and then select...
User Guide
Page 57
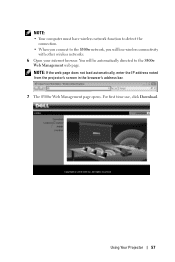
Using Your Projector 57 You will be automatically directed to the S300w network, you connect to the S300w Web Management web page. For first time use, click Download. NOTE: • Your computer must have wireless network function to detect the connection. • When you will lose wireless connectivity with other wireless networks. 6 Open your internet browser. NOTE: If the web page does not load automatically, enter the IP address noted from the projector's screen in the browser's address bar. 7 The S300w Web Management page opens.
Using Your Projector 57 You will be automatically directed to the S300w network, you connect to the S300w Web Management web page. For first time use, click Download. NOTE: • Your computer must have wireless network function to detect the connection. • When you will lose wireless connectivity with other wireless networks. 6 Open your internet browser. NOTE: If the web page does not load automatically, enter the IP address noted from the projector's screen in the browser's address bar. 7 The S300w Web Management page opens.

User Guide
Page 59
NOTE: If IP Address is complete, S300w Wireless Application software will launch and will launch. Login To communicate with your projector, enter the Login Code provided for the projector automatically. S300w Wireless Application Software Once the installation is not detected, enter the IP Address displayed at the bottom left corner of "Wireless Networking Installation, then click OK. Follow the on-screen instructions to complete setup. The screen below appears. 10 The installation software will search for in Step 4 of the screen. Using Your Projector 59
NOTE: If IP Address is complete, S300w Wireless Application software will launch and will launch. Login To communicate with your projector, enter the Login Code provided for the projector automatically. S300w Wireless Application Software Once the installation is not detected, enter the IP Address displayed at the bottom left corner of "Wireless Networking Installation, then click OK. Follow the on-screen instructions to complete setup. The screen below appears. 10 The installation software will search for in Step 4 of the screen. Using Your Projector 59
User Guide
Page 61
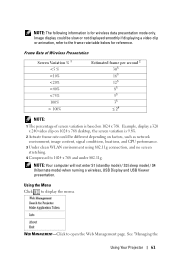
Frame Rate of Wireless Presentation Screen Variation % 1 NOTE: The following information is for reference. Image display could be slow or not displayed smoothly if displaying a video clip or animation, refer to the frame rate table below for wireless data presentation mode only.
Frame Rate of Wireless Presentation Screen Variation % 1 NOTE: The following information is for reference. Image display could be slow or not displayed smoothly if displaying a video clip or animation, refer to the frame rate table below for wireless data presentation mode only.
User Guide
Page 62
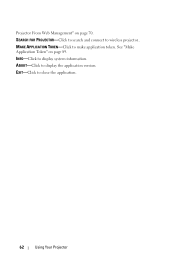
INFO-Click to close the application. 62 Using Your Projector EXIT-Click to display system information. See "Make Application Token" on page 70. SEARCH FOR PROJECTOR-Click to search and connect to make application token. MAKE APPLICATION TOKEN-Click to wireless projector.. ABOUT-Click to display the application version. Projector From Web Management" on page 89.
INFO-Click to close the application. 62 Using Your Projector EXIT-Click to display system information. See "Make Application Token" on page 70. SEARCH FOR PROJECTOR-Click to search and connect to make application token. MAKE APPLICATION TOKEN-Click to wireless projector.. ABOUT-Click to display the application version. Projector From Web Management" on page 89.
User Guide
Page 63
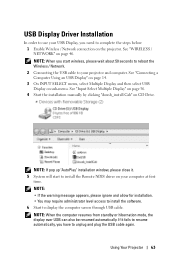
..." on CD Drive. If it . 5 System will start wireless, please wait about 50 seconds to reboot the Wireless / Network. 2 Connecting the USB cable to display the computer screen through USB cable. See "Input Select Multiple Display" on page 36. 4 Start the installation..."dousb_install.Cab" on page 46. USB Display Driver Installation In order to use your USB Display, you need to complete the steps below: 1 Enable Wireless / Network connection on sub-menu. NOTE: When the computer resumes from standby or hibernation mode, the display over USB can also be resumed automatically. NOTE...
..." on CD Drive. If it . 5 System will start wireless, please wait about 50 seconds to reboot the Wireless / Network. 2 Connecting the USB cable to display the computer screen through USB cable. See "Input Select Multiple Display" on page 36. 4 Start the installation..."dousb_install.Cab" on page 46. USB Display Driver Installation In order to use your USB Display, you need to complete the steps below: 1 Enable Wireless / Network connection on sub-menu. NOTE: When the computer resumes from standby or hibernation mode, the display over USB can also be resumed automatically. NOTE...
User Guide
Page 64
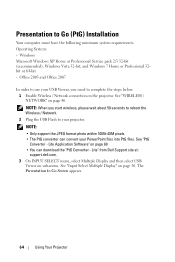
... site at: support.dell.com. 3 On INPUT SELECT menu, select Multiple Display and then select USB Viewer on sub-menu. Presentation to complete the steps below: 1 Enable Wireless / Network connection on the projector. NOTE: • Only support the JPEG format photo within 10Mb 40M pixels. • The PtG converter can download the...
... site at: support.dell.com. 3 On INPUT SELECT menu, select Multiple Display and then select USB Viewer on sub-menu. Presentation to complete the steps below: 1 Enable Wireless / Network connection on the projector. NOTE: • Only support the JPEG format photo within 10Mb 40M pixels. • The PtG converter can download the...
User Guide
Page 70
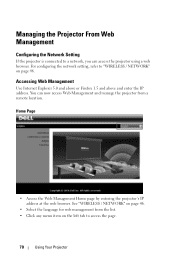
...Management Configuring the Network Setting If the projector is connected to access the page. 70 Using Your Projector For configuring the network setting, refer to "WIRELESS / NETWORK" on the left tab to a network, you can now access Web Management and manage the projector from the list. • ...at the web browser. Accessing Web Management Use Internet Explorer 5.0 and above or Firefox 1.5 and above and enter the IP address. See "WIRELESS / NETWORK" on page 46. • Select the language for web management from a remote location. You can access the projector using a web browser....
...Management Configuring the Network Setting If the projector is connected to access the page. 70 Using Your Projector For configuring the network setting, refer to "WIRELESS / NETWORK" on the left tab to a network, you can now access Web Management and manage the projector from the list. • ...at the web browser. Accessing Web Management Use Internet Explorer 5.0 and above or Firefox 1.5 and above and enter the IP address. See "WIRELESS / NETWORK" on page 46. • Select the language for web management from a remote location. You can access the projector using a web browser....


