
Monitor Users Guide
Page 3
Contents .About your monitor 5 Package contents 5 Product features 6 Identifying parts and controls 7 Monitor specifications 10 Plug and play capability 19 LCD monitor quality and pixel policy 19 Maintenance guidelines 19 .Setting up the monitor 20 Connecting the stand 20 Connecting your monitor 22 Organizing cables 23 Removing the stand 23 .Operating your monitor 25 Power on the monitor 25 Using the control buttons 25 Using the on-screen display (OSD) menu 27 Setting up your monitor 36 Using tilt 38 Contents | 3
Contents .About your monitor 5 Package contents 5 Product features 6 Identifying parts and controls 7 Monitor specifications 10 Plug and play capability 19 LCD monitor quality and pixel policy 19 Maintenance guidelines 19 .Setting up the monitor 20 Connecting the stand 20 Connecting your monitor 22 Organizing cables 23 Removing the stand 23 .Operating your monitor 25 Power on the monitor 25 Using the control buttons 25 Using the on-screen display (OSD) menu 27 Setting up your monitor 36 Using tilt 38 Contents | 3
Monitor Users Guide
Page 5
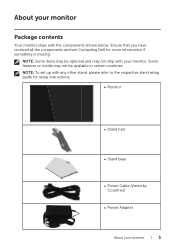
... below. NOTE: To set up with any other stand, please refer to the respective stand setup guide for more information if something is missing. Ensure that you have received all the components and see Contacting Dell for setup instructions. ∞∞ Monitor ∞∞ Stand riser ∞∞ Stand base ∞∞ Power Cable (Varies by Countries) ∞∞ Power Adapter About your monitor. Some features or...
... below. NOTE: To set up with any other stand, please refer to the respective stand setup guide for more information if something is missing. Ensure that you have received all the components and see Contacting Dell for setup instructions. ∞∞ Monitor ∞∞ Stand riser ∞∞ Stand base ∞∞ Power Cable (Varies by Countries) ∞∞ Power Adapter About your monitor. Some features or...
Monitor Users Guide
Page 6
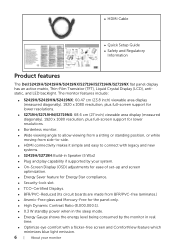
∞∞ HDMI Cable ∞∞ Quick Setup Guide ∞∞ Safety and Regulatory Information Product features The Dell S2419H/S2419HN/S2419NX/S2719H/S2719HN/S2719NX flat panel display has an active matrix, Thin-Film Transistor (TFT), Liquid Crystal Display (LCD), antistatic, and LED backlight. The monitor features include: ∞∞ S2419H/S2419HN/S2419NX: 60.47 cm (23.8 inch) viewable area display (measured diagonally). 1920 x 1080 resolution, plus full-screen support for lower...
∞∞ HDMI Cable ∞∞ Quick Setup Guide ∞∞ Safety and Regulatory Information Product features The Dell S2419H/S2419HN/S2419NX/S2719H/S2719HN/S2719NX flat panel display has an active matrix, Thin-Film Transistor (TFT), Liquid Crystal Display (LCD), antistatic, and LED backlight. The monitor features include: ∞∞ S2419H/S2419HN/S2419NX: 60.47 cm (23.8 inch) viewable area display (measured diagonally). 1920 x 1080 resolution, plus full-screen support for lower...
Monitor Users Guide
Page 8
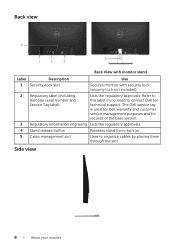
... used for Dell warranty and customer service management purposes and for technical support. Lists the regulatory approvals. 4 Stand release button Releases stand from monitor. 5 Cable management slot Uses to contact Dell for records of Mfg Nov. 2017 X.XXX Вт/см² X.X Вт X.XВт Q40G024N-700-14A 2 12V 3.33A S2419Hc S2419H CAN ICES-3 (B)/NMB-3(B) For applicable power supplies see user manual. Back view...
... used for Dell warranty and customer service management purposes and for technical support. Lists the regulatory approvals. 4 Stand release button Releases stand from monitor. 5 Cable management slot Uses to contact Dell for records of Mfg Nov. 2017 X.XXX Вт/см² X.X Вт X.XВт Q40G024N-700-14A 2 12V 3.33A S2419Hc S2419H CAN ICES-3 (B)/NMB-3(B) For applicable power supplies see user manual. Back view...

Monitor Users Guide
Page 10
Monitor specifications Model Screen type Panel type Viewable image Diagonal Horizontal, Active Area Vertical, Active Area Area Pixel pitch Pixel per inch (PPI) Viewing angle Brightness Contrast ratio Faceplate coating Backlight Response time Color depth Color gamut Dell display manager compatibility Connectivity Border width (edge of monitor to active area) Security Adjustability S2419H/S2419HN/ S2419NX Active matrix-TFT LCD In-Plane Switching S2719H/S2719HN/ S2719NX 604.70 mm (23.81 in) 686.00 mm (27 in) 527.04...
Monitor specifications Model Screen type Panel type Viewable image Diagonal Horizontal, Active Area Vertical, Active Area Area Pixel pitch Pixel per inch (PPI) Viewing angle Brightness Contrast ratio Faceplate coating Backlight Response time Color depth Color gamut Dell display manager compatibility Connectivity Border width (edge of monitor to active area) Security Adjustability S2419H/S2419HN/ S2419NX Active matrix-TFT LCD In-Plane Switching S2719H/S2719HN/ S2719NX 604.70 mm (23.81 in) 686.00 mm (27 in) 527.04...

Monitor Users Guide
Page 15
... monitor automatically resumes functioning. Power Indicator White White (Glowing ) Off 17 W 53.83 kWh Power Consumption 21 W (maximum) 18 W (typical) Less than 0.3 W Less than 0.3 W VESA Modes Normal operation Horizontal Vertical Sync Sync Active Active Video Active Active-off mode Switch off Inactive - Power Consumption PON Total Energy Consumption (TEC) Blanked - This is referred to as Power Save Mode*. The following table shows the power consumption and signaling of this automatic power saving...
... monitor automatically resumes functioning. Power Indicator White White (Glowing ) Off 17 W 53.83 kWh Power Consumption 21 W (maximum) 18 W (typical) Less than 0.3 W Less than 0.3 W VESA Modes Normal operation Horizontal Vertical Sync Sync Active Active Video Active Active-off mode Switch off Inactive - Power Consumption PON Total Energy Consumption (TEC) Blanked - This is referred to as Power Save Mode*. The following table shows the power consumption and signaling of this automatic power saving...

Monitor Users Guide
Page 19
.... LCD monitor quality and pixel policy During the LCD Monitor manufacturing process, it off with a cloth. ∞∞ Handle your screen, lightly dampen a soft, clean cloth with its Extended Display Identification Data (EDID) using detergent of any Plug and Play-compatible system. For best practices, follow the Safety Instructions before cleaning the monitor. For more information about changing the monitor settings, see Operating your monitor WARNING: Before cleaning the monitor, unplug the monitor power cable...
.... LCD monitor quality and pixel policy During the LCD Monitor manufacturing process, it off with a cloth. ∞∞ Handle your screen, lightly dampen a soft, clean cloth with its Extended Display Identification Data (EDID) using detergent of any Plug and Play-compatible system. For best practices, follow the Safety Instructions before cleaning the monitor. For more information about changing the monitor settings, see Operating your monitor WARNING: Before cleaning the monitor, unplug the monitor power cable...

Monitor Users Guide
Page 26
... '0' (-). Blinking white light indicates the power (with LED indicator) save mode. Solid white light indicates the monitor is On and fully Power On/Off button functional. OSD controls Use the buttons on and off. 2 Use the buttons to launch the On-Screen Display (OSD) and select the OSD Menu. Shortcut key/Input Source 3 Use the Menu button to adjust the volume. Exit 5 Use the Power button to turn the monitor on the bottom of the monitor to adjust the image settings. 1 2 34 Contorl Buttons Description 1 Use the Up button to confirm your monitor...
... '0' (-). Blinking white light indicates the power (with LED indicator) save mode. Solid white light indicates the monitor is On and fully Power On/Off button functional. OSD controls Use the buttons on and off. 2 Use the buttons to launch the On-Screen Display (OSD) and select the OSD Menu. Shortcut key/Input Source 3 Use the Menu button to adjust the volume. Exit 5 Use the Power button to turn the monitor on the bottom of the monitor to adjust the image settings. 1 2 34 Contorl Buttons Description 1 Use the Up button to confirm your monitor...
Monitor Users Guide
Page 28
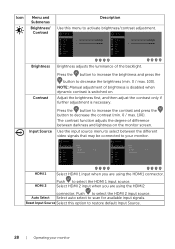
... different video signals that may be connected to your monitor Icon Menu and Submenus Brightness/ Contrast Description Use this option to restore default Input Source. 28 | Operating your monitor. NOTE: Manual adjustment of brightness is disabled when dynamic contrast is necessary. Dell 24 Monitor Brightness / Contrast HDMI 1 Input Source HDMI 2 Color Auto Select On Display Reset Input Source Audio Menu Personalize Others Dell 27 Monitor Brightness / Contrast HDMI 1 Input Source HDMI 2 Color Auto Select On Display Reset Input Source Audio Menu Personalize...
... different video signals that may be connected to your monitor Icon Menu and Submenus Brightness/ Contrast Description Use this option to restore default Input Source. 28 | Operating your monitor. NOTE: Manual adjustment of brightness is disabled when dynamic contrast is necessary. Dell 24 Monitor Brightness / Contrast HDMI 1 Input Source HDMI 2 Color Auto Select On Display Reset Input Source Audio Menu Personalize Others Dell 27 Monitor Brightness / Contrast HDMI 1 Input Source HDMI 2 Color Auto Select On Display Reset Input Source Audio Menu Personalize...
Monitor Users Guide
Page 29
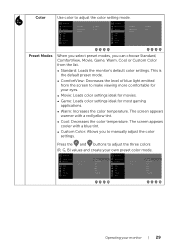
... from the screen to adjust the color setting mode. Dell 24 Monitor Brightness / Contrast Input Source Color Display Audio Menu Personalize Others Preset Modes Input Color Format Reset Color Standard RGB Dell 27 Monitor Brightness / Contrast Input Source Color Display Audio Menu Personalize Others Preset Modes Input Color Format Reset Color Standard RGB Preset Modes When you select preset modes, you to adjust the three colors (R, G, B) values and create your monitor | 29 This is the default preset mode. ∞∞ ComfortView: Decreases the level of blue light emitted from...
... from the screen to adjust the color setting mode. Dell 24 Monitor Brightness / Contrast Input Source Color Display Audio Menu Personalize Others Preset Modes Input Color Format Reset Color Standard RGB Dell 27 Monitor Brightness / Contrast Input Source Color Display Audio Menu Personalize Others Preset Modes Input Color Format Reset Color Standard RGB Preset Modes When you select preset modes, you to adjust the three colors (R, G, B) values and create your monitor | 29 This is the default preset mode. ∞∞ ComfortView: Decreases the level of blue light emitted from...
Monitor Users Guide
Page 30
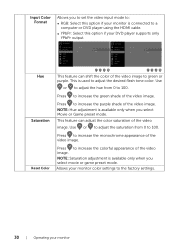
...Contrast Input Source Color Display Audio Menu Personalize Others Preset Modes Input Color Format Reset Color RGB YPbPr Dell 27 Monitor Brightness / Contrast Input Source Color Display Audio Menu Personalize Others Preset Modes Input Color Format Reset Color RGB YPbPr Hue Saturation Reset Color This feature can adjust the color saturation of the video image. Press to increase the green shade of the video image. Input Color Format Allows you to set the video input mode to: ∞∞ RGB: Select this option if your monitor is connected to a computer or DVD player using the HDMI...
...Contrast Input Source Color Display Audio Menu Personalize Others Preset Modes Input Color Format Reset Color RGB YPbPr Dell 27 Monitor Brightness / Contrast Input Source Color Display Audio Menu Personalize Others Preset Modes Input Color Format Reset Color RGB YPbPr Hue Saturation Reset Color This feature can adjust the color saturation of the video image. Press to increase the green shade of the video image. Input Color Format Allows you to set the video input mode to: ∞∞ RGB: Select this option if your monitor is connected to a computer or DVD player using the HDMI...
Monitor Users Guide
Page 31
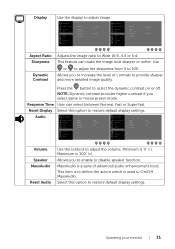
...button to adjust image. MaxxAudio is used to Wide 16:9, 4:3 or 5:4. Audio Dell 24 Monitor Brightness / Contrast Input Source Color Display Audio Menu Personalize Others Volume Speaker MaxxAudio Reset Audio 50 Enable On Dell 27 Monitor Brightness / Contrast Input Source Color Display Audio Menu Personalize Others Volume Speaker MaxxAudio Reset Audio 50 Enable On Volume Speaker MaxxAudio Reset Audio Use the buttons to restore default display settings. This feature can select between Normal, Fast or Super fast. Select this option to adjust the volume. Response Time User...
...button to adjust image. MaxxAudio is used to Wide 16:9, 4:3 or 5:4. Audio Dell 24 Monitor Brightness / Contrast Input Source Color Display Audio Menu Personalize Others Volume Speaker MaxxAudio Reset Audio 50 Enable On Dell 27 Monitor Brightness / Contrast Input Source Color Display Audio Menu Personalize Others Volume Speaker MaxxAudio Reset Audio 50 Enable On Volume Speaker MaxxAudio Reset Audio Use the buttons to restore default display settings. This feature can select between Normal, Fast or Super fast. Select this option to adjust the volume. Response Time User...
Monitor Users Guide
Page 33
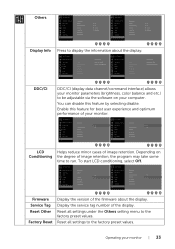
... Factory Reset Others LCD Conditioning Helps reduce minor cases of the display. To start LCD conditioning, select Off. You can disable this feature for best user experience and optimum performance of the firmware about the display. Reset all settings to the factory preset values. Reset all settings under the Others setting menu to the factory preset values. Depending on your monitor | 33 Display the service tag number of image retention. Operating your computer. Others Dell 24 Monitor Brightness / Contrast Input Source Color Display Audio Menu...
... Factory Reset Others LCD Conditioning Helps reduce minor cases of the display. To start LCD conditioning, select Off. You can disable this feature for best user experience and optimum performance of the firmware about the display. Reset all settings to the factory preset values. Reset all settings under the Others setting menu to the factory preset values. Depending on your monitor | 33 Display the service tag number of image retention. Operating your computer. Others Dell 24 Monitor Brightness / Contrast Input Source Color Display Audio Menu...
Monitor Users Guide
Page 37
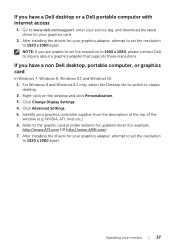
... you are unable to set the resolution to 1920 x 1080, please contact Dell to classic desktop. 2. Operating your graphics card. 2. Click Change Display Settings. 4. For Windows 8 and Windows 8.1 only, select the Desktop tile to switch to inquire about a graphics adapter that supports these resolutions. Go to www.dell.com/support, enter your service tag, and download the latest driver for your graphics adapter, attempt to set the resolution to 1920 x 1080...
... you are unable to set the resolution to 1920 x 1080, please contact Dell to classic desktop. 2. Operating your graphics card. 2. Click Change Display Settings. 4. For Windows 8 and Windows 8.1 only, select the Desktop tile to switch to inquire about a graphics adapter that supports these resolutions. Go to www.dell.com/support, enter your service tag, and download the latest driver for your graphics adapter, attempt to set the resolution to 1920 x 1080...

Monitor Users Guide
Page 39
... steps: 1. Disconnect all video cables from the monitor. then turn on the monitor. If your computer and the monitor. 2. While in 4 minutes. Self-Test Your monitor provides a self-test feature that there is functioning properly. No HDMI1 Cable The display will go into Power Save Mode in self-test mode, the power LED remains white. Turn Off your video controller and computer. www.dell.com/support/monitors Dell Dell 27 Monitor S2419H ? Troubleshooting | 39 If the...
... steps: 1. Disconnect all video cables from the monitor. then turn on the monitor. If your computer and the monitor. 2. While in 4 minutes. Self-Test Your monitor provides a self-test feature that there is functioning properly. No HDMI1 Cable The display will go into Power Save Mode in self-test mode, the power LED remains white. Turn Off your video controller and computer. www.dell.com/support/monitors Dell Dell 27 Monitor S2419H ? Troubleshooting | 39 If the...

Monitor Users Guide
Page 40
... display in green, blue, black, white and text screens. The test is in self-test mode. 1 2 34 5 To run the built-in diagnostics: 1. If you experience is an inherent problem with your monitor, or with your computer and video card. Unplug the video cable(s) from the back of the monitor again. Repeat steps 5 and 6 to red. 6. Press and hold Button 1 for abnormalities. 5. Check the video card and computer. 40 | Troubleshooting...
... display in green, blue, black, white and text screens. The test is in self-test mode. 1 2 34 5 To run the built-in diagnostics: 1. If you experience is an inherent problem with your monitor, or with your computer and video card. Unplug the video cable(s) from the back of the monitor again. Repeat steps 5 and 6 to red. 6. Press and hold Button 1 for abnormalities. 5. Check the video card and computer. 40 | Troubleshooting...

Monitor Users Guide
Page 41
... another room. No Video/Power LED on ∞∞ Increase brightness and contrast controls using any other electrical equipment. ∞∞ Ensure that the power button is selected via OSD. Shaky/Jittery Video ∞∞ Reset the monitor to Factory Settings (Factory Reset). ∞∞ Adjust horizontal & vertical controls via the Input Source menu. Geometric Distortion ∞∞ Reset the monitor to Factory Settings (Factory Reset). ∞∞ Check environmental factors. ∞∞ Relocate the monitor and test in LCD technology. ∞∞...
... another room. No Video/Power LED on ∞∞ Increase brightness and contrast controls using any other electrical equipment. ∞∞ Ensure that the power button is selected via OSD. Shaky/Jittery Video ∞∞ Reset the monitor to Factory Settings (Factory Reset). ∞∞ Adjust horizontal & vertical controls via the Input Source menu. Geometric Distortion ∞∞ Reset the monitor to Factory Settings (Factory Reset). ∞∞ Check environmental factors. ∞∞ Relocate the monitor and test in LCD technology. ∞∞...

Monitor Users Guide
Page 42
... the Color settings OSD. ∞∞ Run the built-in diagnostics. Safety Related Issues ∞∞ Do not perform any troubleshooting steps. ∞∞ Contact Dell immediately. Intermittent Problems ∞∞ Ensure that the video cable connecting the monitor to the computer is connected properly and is secure. ∞∞ Reset the monitor to Factory Settings (Factory Reset). ∞∞ Perform monitor self-test feature check to turn off the monitor...
... the Color settings OSD. ∞∞ Run the built-in diagnostics. Safety Related Issues ∞∞ Do not perform any troubleshooting steps. ∞∞ Contact Dell immediately. Intermittent Problems ∞∞ Ensure that the video cable connecting the monitor to the computer is connected properly and is secure. ∞∞ Reset the monitor to Factory Settings (Factory Reset). ∞∞ Perform monitor self-test feature check to turn off the monitor...

Monitor Users Guide
Page 43
... the OSD menu is locked. Cannot adjust the ∞∞ Turn Off the monitor, unplug the power cord, plug it back, and then monitor with the turn On the monitor. Product-specific problems Specific Symptoms Possible Solutions Screen image is plugged in properly. The picture does not fill the entire screen ∞∞ Due to different video formats (aspect ratio) of the panel button for 10 seconds to Factory Settings (Factory Reset). Troubleshooting | 43 Disconnect and reconnect the video cable...
... the OSD menu is locked. Cannot adjust the ∞∞ Turn Off the monitor, unplug the power cord, plug it back, and then monitor with the turn On the monitor. Product-specific problems Specific Symptoms Possible Solutions Screen image is plugged in properly. The picture does not fill the entire screen ∞∞ Due to different video formats (aspect ratio) of the panel button for 10 seconds to Factory Settings (Factory Reset). Troubleshooting | 43 Disconnect and reconnect the video cable...
Display Manager Users Guide
Page 4
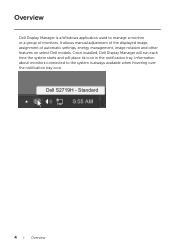
Information about monitors connected to the system is a Windows application used to manage a monitor or a group of automatic settings, energy management, image rotation and other features on select Dell models. Once installed, Dell Display Manager will run each time the system starts and will place its icon in the notification tray. Standard 4 | Overview Dell S2719H - Overview Dell Display Manager is always available when hovering over the notification tray icon. It allows manual adjustment of the displayed image, assignment of monitors.
Information about monitors connected to the system is a Windows application used to manage a monitor or a group of automatic settings, energy management, image rotation and other features on select Dell models. Once installed, Dell Display Manager will run each time the system starts and will place its icon in the notification tray. Standard 4 | Overview Dell S2719H - Overview Dell Display Manager is always available when hovering over the notification tray icon. It allows manual adjustment of the displayed image, assignment of monitors.


