

User Guide
Page 3
... Features 6 Identifying Parts and Controls 7 Monitor Specifications 10 Plug and Play Capability 17 Universal Serial Bus (USB) Interface 18 LCD Monitor Quality and Pixel Policy 18 Maintenance Guidelines 19 2 Setting Up the Monitor 21 Attaching the Stand 21 Connecting Your Monitor 21 Organizing Your Cables 23 Removing the Monitor Stand 24 Wall Mounting (Optional 24 3 Operating the Monitor 27 Power On the Monitor 27 Using the Side Panel Controls 27 Using the On-Screen Display (OSD) Menu 29 Setting the Maximum Resolution 41 Tilting the Monitor 42 4 Troubleshooting 43 Self...
... Features 6 Identifying Parts and Controls 7 Monitor Specifications 10 Plug and Play Capability 17 Universal Serial Bus (USB) Interface 18 LCD Monitor Quality and Pixel Policy 18 Maintenance Guidelines 19 2 Setting Up the Monitor 21 Attaching the Stand 21 Connecting Your Monitor 21 Organizing Your Cables 23 Removing the Monitor Stand 24 Wall Mounting (Optional 24 3 Operating the Monitor 27 Power On the Monitor 27 Using the Side Panel Controls 27 Using the On-Screen Display (OSD) Menu 29 Setting the Maximum Resolution 41 Tilting the Monitor 42 4 Troubleshooting 43 Self...
User Guide
Page 6
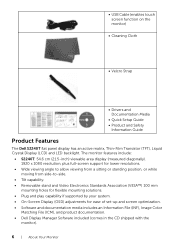
... flexible mounting solutions. • Plug and play capability if supported by your system. • On-Screen Display (OSD) adjustments for ease of set-up and screen optimization. • Software and documentation media includes an Information File (INF), Image Color Matching File (ICM), and product documentation. • Dell Display Manager Software included (comes in the CD shipped with the monitor). 6 | About Your Monitor • USB Cable (enables touch screen function on the monitor) • Cleaning...
... flexible mounting solutions. • Plug and play capability if supported by your system. • On-Screen Display (OSD) adjustments for ease of set-up and screen optimization. • Software and documentation media includes an Information File (INF), Image Color Matching File (ICM), and product documentation. • Dell Display Manager Software included (comes in the CD shipped with the monitor). 6 | About Your Monitor • USB Cable (enables touch screen function on the monitor) • Cleaning...

User Guide
Page 7
... Parts and Controls Front View Label Description 1 Function buttons (For more information, see Operating the Monitor) 2 Power On/Off button (with LED indicator) Side panel controls About Your Monitor | 7 • Energy Saver feature for Energy Star compliance. • Security lock slot. • Capability to switch from wide aspect to standard aspect ratio while maintaining the image quality. • EPEAT silver Rating. • Arsenic-Free glass and Mercury-Free...
... Parts and Controls Front View Label Description 1 Function buttons (For more information, see Operating the Monitor) 2 Power On/Off button (with LED indicator) Side panel controls About Your Monitor | 7 • Energy Saver feature for Energy Star compliance. • Security lock slot. • Capability to switch from wide aspect to standard aspect ratio while maintaining the image quality. • EPEAT silver Rating. • Arsenic-Free glass and Mercury-Free...

User Guide
Page 9
... speakers.* Connect the USB cable that came with a security cable lock. Connect your computer DVI cable (optional purchase). Connect your computer VGA cable (optional purchase). *Headphone usage is connected, you can use the touch screen function on the monitor. About Your Monitor | 9 Once this cable is not supported for the audio line out connector. Connect your computer HDMI cable. Connect the power cable. Bottom View Bottom view without monitor stand Label Description 1 Security lock slot 2 Audio Line-out 3 USB upstream port 4 DC power cord connector 5 HDMI connector...
... speakers.* Connect the USB cable that came with a security cable lock. Connect your computer DVI cable (optional purchase). Connect your computer VGA cable (optional purchase). *Headphone usage is connected, you can use the touch screen function on the monitor. About Your Monitor | 9 Once this cable is not supported for the audio line out connector. Connect your computer HDMI cable. Connect the power cable. Bottom View Bottom view without monitor stand Label Description 1 Security lock slot 2 Audio Line-out 3 USB upstream port 4 DC power cord connector 5 HDMI connector...

User Guide
Page 13
... Modes If you have VESA's DPM™ compliance display card or software installed in your PC, the monitor can automatically reduce its power consumption when not in use. The following table shows the power consumption and signaling of stand assembly Front frame gloss 6.9 kg (15.20 lb) 5.8 kg (12.78 lb) 3.4 kg (7.49 lb) 1.7 kg (3.74 lb) Black Frame - 5~8% gloss unit (max.) Environmental Characteristics Model...
... Modes If you have VESA's DPM™ compliance display card or software installed in your PC, the monitor can automatically reduce its power consumption when not in use. The following table shows the power consumption and signaling of stand assembly Front frame gloss 6.9 kg (15.20 lb) 5.8 kg (12.78 lb) 3.4 kg (7.49 lb) 1.7 kg (3.74 lb) Black Frame - 5~8% gloss unit (max.) Environmental Characteristics Model...

User Guide
Page 21
... Safety Instructions. NOTE: The VGA/DVI cable can be purchased separately. Connect the HDMI/DVI/VGA cable from the factory. 1 Attach the stand to the monitor. Setting Up the Monitor | 21 a. Place the monitor on a soft cloth or cushion. Connecting Your Monitor WARNING: Before you begin any of the monitor. Turn off your monitor to the computer at the same time. b. To connect your computer and disconnect the power cable. NOTE: Do not connect all cables...
... Safety Instructions. NOTE: The VGA/DVI cable can be purchased separately. Connect the HDMI/DVI/VGA cable from the factory. 1 Attach the stand to the monitor. Setting Up the Monitor | 21 a. Place the monitor on a soft cloth or cushion. Connecting Your Monitor WARNING: Before you begin any of the monitor. Turn off your monitor to the computer at the same time. b. To connect your computer and disconnect the power cable. NOTE: Do not connect all cables...
User Guide
Page 23
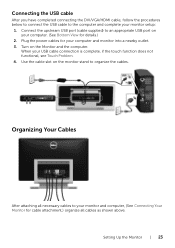
... Touch Problem. 4. Organizing Your Cables After attaching all cables as shown above. Setting Up the Monitor | 23 Connecting the USB cable After you have completed connecting the DVI/VGA/HDMI cable, follow the procedures below to connect the USB cable to the computer and complete your monitor and computer, (See Connecting Your Monitor for cable attachment,) organize all necessary cables to your monitor setup: 1. Connect the upstream USB port (cable supplied) to organize the cables. Use the cable slot on the monitor stand to...
... Touch Problem. 4. Organizing Your Cables After attaching all cables as shown above. Setting Up the Monitor | 23 Connecting the USB cable After you have completed connecting the DVI/VGA/HDMI cable, follow the procedures below to connect the USB cable to the computer and complete your monitor and computer, (See Connecting Your Monitor for cable attachment,) organize all necessary cables to your monitor setup: 1. Connect the upstream USB port (cable supplied) to organize the cables. Use the cable slot on the monitor stand to...

User Guide
Page 32
... analog (VGA) connector. Input Source Use the Input Source menu to select between the different video signals that may be connected to select the HDMI input source. 32 | Operating the Monitor VGA Select the VGA input when you are using the HDMI connector. HDMI Select the HDMI input when you are using the analog (VGA) connector. DVI-D Select the DVI-D input when you are using the Pixel Clock (Coarse) and Phase (Fine) controls under Display Settings. Press to your monitor. Press to select Auto Select, the monitor scans for available input sources. Auto Adjust...
... analog (VGA) connector. Input Source Use the Input Source menu to select between the different video signals that may be connected to select the HDMI input source. 32 | Operating the Monitor VGA Select the VGA input when you are using the HDMI connector. HDMI Select the HDMI input when you are using the analog (VGA) connector. DVI-D Select the DVI-D input when you are using the Pixel Clock (Coarse) and Phase (Fine) controls under Display Settings. Press to your monitor. Press to select Auto Select, the monitor scans for available input sources. Auto Adjust...
User Guide
Page 34
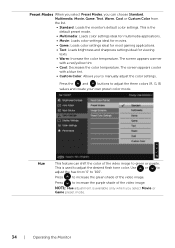
... or Custom Color from '0' to adjust the three colors (R, G, B) values and create your own preset color mode. Press to increase the green shade of the video image. The screen appears warmer with a blue tint. • Custom Color: Allows you can shift the color of the video image to green or purple. Preset Modes When you select Preset Modes, you to manually adjust the color settings. The screen appears cooler with a red/yellow tint...
... or Custom Color from '0' to adjust the three colors (R, G, B) values and create your own preset color mode. Press to increase the green shade of the video image. The screen appears warmer with a blue tint. • Custom Color: Allows you can shift the color of the video image to green or purple. Preset Modes When you select Preset Modes, you to manually adjust the color settings. The screen appears cooler with a red/yellow tint...

User Guide
Page 35
... monochrome appearance of the video Press to increase the colorful appearance of the video image. NOTE: Horizontal Position and Vertical Position adjustments are only available for viewing the images under the normal and enhanced Movie preset mode side by removing image fading and roughness of edge. Press image. NOTE: Image Enhance is '100' (+). Settings Aspect Ratio Adjusts the image ratio to the factory settings. Reset Color Reset your monitor color settings to Wide 16:9, 4:3, or 5:4. Position Maximum is available...
... monochrome appearance of the video Press to increase the colorful appearance of the video image. NOTE: Horizontal Position and Vertical Position adjustments are only available for viewing the images under the normal and enhanced Movie preset mode side by removing image fading and roughness of edge. Press image. NOTE: Image Enhance is '100' (+). Settings Aspect Ratio Adjusts the image ratio to the factory settings. Reset Color Reset your monitor color settings to Wide 16:9, 4:3, or 5:4. Position Maximum is available...

User Guide
Page 37
... to change the menu transparency by selecting Disable. When Lock is selected, no user adjustments are locked. NOTE: Lock function - Either soft lock (through the OSD menu) or hard lock (press and hold the button above the power button for 10 seconds) Energy Smart To turn on your monitor. DDC/CI DDC/CI (Display Data Channel/Command Interface) allows your monitor parameters (brightness, color balance, and etc.) to adjustments. Menu Timer OSD Hold Time: sets...
... to change the menu transparency by selecting Disable. When Lock is selected, no user adjustments are locked. NOTE: Lock function - Either soft lock (through the OSD menu) or hard lock (press and hold the button above the power button for 10 seconds) Energy Smart To turn on your monitor. DDC/CI DDC/CI (Display Data Channel/Command Interface) allows your monitor parameters (brightness, color balance, and etc.) to adjustments. Menu Timer OSD Hold Time: sets...

User Guide
Page 42
... support site for your computer and download the latest graphic drivers. • Go to the respective stand setup guide for a monitor with a stand. When any other stand is shipped from the factory. 42 | Operating the Monitor NOTE: The stand is attached when the monitor is bought, please refer to your graphics card website and download the latest graphic drivers. Tilting the Monitor NOTE: This is applicable for set up instructions...
... support site for your computer and download the latest graphic drivers. • Go to the respective stand setup guide for a monitor with a stand. When any other stand is shipped from the factory. 42 | Operating the Monitor NOTE: The stand is attached when the monitor is bought, please refer to your graphics card website and download the latest graphic drivers. Tilting the Monitor NOTE: This is applicable for set up instructions...

User Guide
Page 43
...-test mode, the power LED remains white. Turn on -screen (against a black background), if the monitor cannot sense a video signal and is functioning properly. If your computer and the monitor. 2. Also, depending upon the selected input, one of the computer. 4 Troubleshooting WARNING: Before you to check whether your monitor is working correctly. Turn off both your monitor and computer are properly connected but the monitor screen remains dark, run the monitor self...
...-test mode, the power LED remains white. Turn on -screen (against a black background), if the monitor cannot sense a video signal and is functioning properly. If your computer and the monitor. 2. Also, depending upon the selected input, one of the computer. 4 Troubleshooting WARNING: Before you to check whether your monitor is working correctly. Turn off both your monitor and computer are properly connected but the monitor screen remains dark, run the monitor self...

User Guide
Page 44
... and video card. then turn on the surface of the computer or monitor. Built-in Diagnostics Your monitor has a built-in diagnostic tool that the screen is an inherent problem with your monitor, or with your computer and the monitor. Ensure that helps you determine if the screen abnormality you use the previous procedure, check your video controller and computer, because your monitor and reconnect the video cable;
... and video card. then turn on the surface of the computer or monitor. Built-in Diagnostics Your monitor has a built-in diagnostic tool that the screen is an inherent problem with your monitor, or with your computer and the monitor. Ensure that helps you determine if the screen abnormality you use the previous procedure, check your video controller and computer, because your monitor and reconnect the video cable;

User Guide
Page 45
... InStore OSD Mode Detach/Disconnect all cables. The color of the screen changes to inspect the display in green, blue, black, white and text screens. The test is restored. Check the video card and computer. To exit InStore OSD Mode Press and hold Button 2 and Button 4 for 5 seconds. A gray screen appears. 4. Press and hold Button 2 and Button 4 for 5 seconds. Troubleshooting | 45 Press Button 4 on the side panel simultaneously for bent or broken pins in the video cable connector...
... InStore OSD Mode Detach/Disconnect all cables. The color of the screen changes to inspect the display in green, blue, black, white and text screens. The test is restored. Check the video card and computer. To exit InStore OSD Mode Press and hold Button 2 and Button 4 for 5 seconds. A gray screen appears. 4. Press and hold Button 2 and Button 4 for 5 seconds. Troubleshooting | 45 Press Button 4 on the side panel simultaneously for bent or broken pins in the video cable connector...
User Guide
Page 46
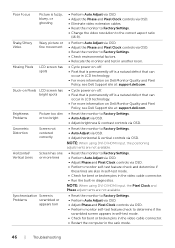
... and Pixel Clock controls via OSD. Brightness Problems Picture too dim or too bright • Reset the monitor to Factory Settings. • Auto Adjust via OSD. • Adjust brightness & contrast controls via OSD. • Eliminate video extension cables. • Reset the monitor to Factory Settings. • Change the video resolution to Factory Settings. • Check environmental factors. • Relocate the monitor and test in the safe mode. 46 | Troubleshooting NOTE: When using DVI-D/HDMI input, the positioning adjustments are not available. Synchronization Screen is...
... and Pixel Clock controls via OSD. Brightness Problems Picture too dim or too bright • Reset the monitor to Factory Settings. • Auto Adjust via OSD. • Adjust brightness & contrast controls via OSD. • Eliminate video extension cables. • Reset the monitor to Factory Settings. • Change the video resolution to Factory Settings. • Check environmental factors. • Relocate the monitor and test in the safe mode. 46 | Troubleshooting NOTE: When using DVI-D/HDMI input, the positioning adjustments are not available. Synchronization Screen is...
User Guide
Page 47
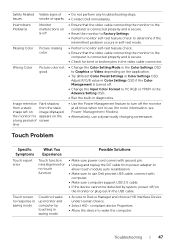
... & off Missing Color Picture missing color Wrong Color Picture color not good Image retention Faint shadow from a static from power adapter to allow touch module auto recalibration. • Make sure to use a dynamically changing screensaver. Adjust R/G/B value in Color Settings OSD if the Color Management is secure. • Check for bent or broken pins in the video cable connector. • Change the Color Setting Mode in the Color Settings OSD to Graphics or Video depending on the monitor or plug out/in saving mode •...
... & off Missing Color Picture missing color Wrong Color Picture color not good Image retention Faint shadow from a static from power adapter to allow touch module auto recalibration. • Make sure to use a dynamically changing screensaver. Adjust R/G/B value in Color Settings OSD if the Color Management is secure. • Check for bent or broken pins in the video cable connector. • Change the Color Setting Mode in the Color Settings OSD to Graphics or Video depending on the monitor or plug out/in saving mode •...
User Guide
Page 48
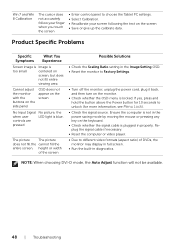
... viewing area Cannot adjust the monitor with the buttons on the side panel OSD does not appear on the monitor. • Check whether the OSD menu is locked. height or width of DVDs, the monitor may display in full screen. • Run the built-in the Image Setting OSD. • Reset the monitor to Factory Settings. • Turn off the monitor, unplug the power cord, plug it back, and then turn on the screen No Input Signal No picture, the when user LED light is plugged...
... viewing area Cannot adjust the monitor with the buttons on the side panel OSD does not appear on the monitor. • Check whether the OSD menu is locked. height or width of DVDs, the monitor may display in full screen. • Run the built-in the Image Setting OSD. • Reset the monitor to Factory Settings. • Turn off the monitor, unplug the power cord, plug it back, and then turn on the screen No Input Signal No picture, the when user LED light is plugged...
User Guide
Page 49
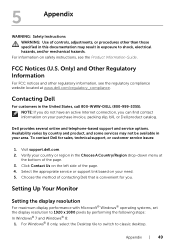
... have an active Internet connection, you . 5 Appendix WARNING: Safety Instructions WARNING: Use of the page. 4. For information on the left side of controls, adjustments, or procedures other regulatory information, see the Product Information Guide. Visit support.dell.com. 2. For Windows® 8 only, select the Desktop tile to switch to 1920 x 1080 pixels by country and product, and some services may result in...
... have an active Internet connection, you . 5 Appendix WARNING: Safety Instructions WARNING: Use of the page. 4. For information on the left side of controls, adjustments, or procedures other regulatory information, see the Product Information Guide. Visit support.dell.com. 2. For Windows® 8 only, select the Desktop tile to switch to 1920 x 1080 pixels by country and product, and some services may result in...

User Guide
Page 50
... access 1. Right-click on the desktop and click Screen Resolution. 3. NVIDIA, ATI, Intel etc.). 6. Refer to http://support.dell.com, enter your service tag, and download the latest driver for your graphics driver. Click OK. After installing the drivers for example, http://www.ATI.com OR http://www.NVIDIA.com). 7. Click Change Display Settings. 4. Click Advanced Settings. 5. Right-click on the desktop and click...
... access 1. Right-click on the desktop and click Screen Resolution. 3. NVIDIA, ATI, Intel etc.). 6. Refer to http://support.dell.com, enter your service tag, and download the latest driver for your graphics driver. Click OK. After installing the drivers for example, http://www.ATI.com OR http://www.NVIDIA.com). 7. Click Change Display Settings. 4. Click Advanced Settings. 5. Right-click on the desktop and click...


