Page 5
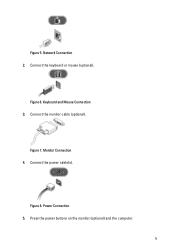
Keyboard and Mouse Connection 3. Connect the keyboard or mouse (optional). Connect the monitor cable (optional). Power Connection 5. Connect the power cable(s). Figure 8. Figure 6. Figure 7. Network Connection 2. Monitor Connection 4. Press the power buttons on the monitor (optional) and the computer. 5 Figure 5.
Keyboard and Mouse Connection 3. Connect the keyboard or mouse (optional). Connect the monitor cable (optional). Power Connection 5. Connect the power cable(s). Figure 8. Figure 6. Figure 7. Network Connection 2. Monitor Connection 4. Press the power buttons on the monitor (optional) and the computer. 5 Figure 5.

Owner's Manual
Page 13
... Hard Drive 1. Remove the hard-drive power supply cable and the hard-drive data cable from the hard drive. 4. Connect the thermal sensor cable to monitor the temperature, and secure it with it. 1. Follow the procedures in Before Working Inside Your Computer. 2. Connect the thermal sensor to the component that you...
... Hard Drive 1. Remove the hard-drive power supply cable and the hard-drive data cable from the hard drive. 4. Connect the thermal sensor cable to monitor the temperature, and secure it with it. 1. Follow the procedures in Before Working Inside Your Computer. 2. Connect the thermal sensor to the component that you...

Owner's Manual
Page 41
... and defines the serial port settings. The options are : • Disabled • ATA • AHCI (Default Setting) NOTE: SATA is part of the SMART (Self Monitoring Analysis and Reporting Technology) specification. • Enable SMART Reporting - This technology is configured to configure the integrated network controller. Allows you to support RAID mode...
... and defines the serial port settings. The options are : • Disabled • ATA • AHCI (Default Setting) NOTE: SATA is part of the SMART (Self Monitoring Analysis and Reporting Technology) specification. • Enable SMART Reporting - This technology is configured to configure the integrated network controller. Allows you to support RAID mode...

Owner's Manual
Page 43
...to always set . The options are set , change , or delete the administrator (admin) password. Enables or disables the Virtual Machine Monitor (VMM) from utilizing the additional hardware capabilities provided by default. NOTE: Deleting the admin password automatically deletes the system password. Default Setting:... Support Option Virtualization VT for Direct I /O Description Default Setting: Enabled Description This option specifies whether a Virtual Machine Monitor (VMM) can define the length of the processor. 43 NOTE: Successful password changes take effect immediately.
...to always set . The options are set , change , or delete the administrator (admin) password. Enables or disables the Virtual Machine Monitor (VMM) from utilizing the additional hardware capabilities provided by default. NOTE: Deleting the admin password automatically deletes the system password. Default Setting:... Support Option Virtualization VT for Direct I /O Description Default Setting: Enabled Description This option specifies whether a Virtual Machine Monitor (VMM) can define the length of the processor. 43 NOTE: Successful password changes take effect immediately.
Owner's Manual
Page 52
... 2x2 power connector from the power supply unit. • Ensure that no special requirements for memory module/connector placement exist. • Ensure that the display/ monitor is supported by your computer. • Re-seat all power and data cables. • Reinstall all USB devices and check all internal and external peripherals...
... 2x2 power connector from the power supply unit. • Ensure that no special requirements for memory module/connector placement exist. • Ensure that the display/ monitor is supported by your computer. • Re-seat all power and data cables. • Reinstall all USB devices and check all internal and external peripherals...

Owner's Manual
Page 53
... back one by one until you find the bad one . • If the problem persists, the system board is faulty. • Ensure that the display/ monitor is in recovery mode. • Indicates end of POST process. Once the hand-off to make sure it is functioning properly. • If the operating...
... back one by one until you find the bad one . • If the problem persists, the system board is faulty. • Ensure that the display/ monitor is in recovery mode. • Indicates end of POST process. Once the hand-off to make sure it is functioning properly. • If the operating...

Statement of Volatility
Page 2
...maintained and is the "soft" off state, coming back to enter S4, the OS will destroy system data in images exist, they can occur. Dell systems will require a complete boot when awakened. The system will be valid. All data is an input device only. temperatures) the DDR3 DIMMs ... ACPI power states S0, S1, S3, S4 and S5: S0 state is processed through cache (volatile) memory. The Monitor may retain their data for storing monitor calibration/configuration data & are used in any component on board coin-cell battery) will write the system context to S4 if the...
...maintained and is the "soft" off state, coming back to enter S4, the OS will destroy system data in images exist, they can occur. Dell systems will require a complete boot when awakened. The system will be valid. All data is an input device only. temperatures) the DDR3 DIMMs ... ACPI power states S0, S1, S3, S4 and S5: S0 state is processed through cache (volatile) memory. The Monitor may retain their data for storing monitor calibration/configuration data & are used in any component on board coin-cell battery) will write the system context to S4 if the...

