
User's Guide
Page 4
Dell OpenManage Client Instrumentation . . . . . 47 Power Management 47 About RAID Configurations 49 RAID Level 0 50 RAID Level 1 51 RAID Level 5 51 Configuring Your Computer for RAID 53 Configuring Your Computer for RAID Using the Intel Matrix Storage Manager 53 Configuring Your Computer for RAID Using the Intel® RAID Option ROM Utility 61 4 Setting Up Your Computer 65 Installing Your...
Dell OpenManage Client Instrumentation . . . . . 47 Power Management 47 About RAID Configurations 49 RAID Level 0 50 RAID Level 1 51 RAID Level 5 51 Configuring Your Computer for RAID 53 Configuring Your Computer for RAID Using the Intel Matrix Storage Manager 53 Configuring Your Computer for RAID Using the Intel® RAID Option ROM Utility 61 4 Setting Up Your Computer 65 Installing Your...

User's Guide
Page 49
... physical processor to take advantage of uses, Dell offers RAID level 0, RAID level 1, or RAID level 5 on page 290). About RAID Configurations This section provides an overview of the RAID configuration that can only create a RAID level 0 configuration using hyperthreading or multi-core...software manufacturer. While many RAID configurations available in its Dual-Core and Quad-Core processors. A RAID level 5 configuration is present, then that you purchased your Dell Precision computer. If a third drive is not inherently better or worse than a RAID level 0 configuration. Multicore...
... physical processor to take advantage of uses, Dell offers RAID level 0, RAID level 1, or RAID level 5 on page 290). About RAID Configurations This section provides an overview of the RAID configuration that can only create a RAID level 0 configuration using hyperthreading or multi-core...software manufacturer. While many RAID configurations available in its Dual-Core and Quad-Core processors. A RAID level 5 configuration is present, then that you purchased your Dell Precision computer. If a third drive is not inherently better or worse than a RAID level 0 configuration. Multicore...

User's Guide
Page 50
...larger drive does not contain unallocated (and therefore unusable) space. If you have two 120-GB drives installed, you use a RAID level 0 configuration. 50 Advanced Features If you have 240 GB on the other drive is a method of writing consecutive segments-or stripes-...of a RAID level 0 configuration is also inaccessible. Intel RAID configuration program. A RAID level 5 array must be mixed in a RAID level 1 configuration, the third drive can be the same size to create a large virtual drive...
...larger drive does not contain unallocated (and therefore unusable) space. If you have two 120-GB drives installed, you use a RAID level 0 configuration. 50 Advanced Features If you have 240 GB on the other drive is a method of writing consecutive segments-or stripes-...of a RAID level 0 configuration is also inaccessible. Intel RAID configuration program. A RAID level 5 array must be mixed in a RAID level 1 configuration, the third drive can be the same size to create a large virtual drive...
User's Guide
Page 51
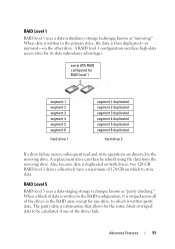
... data is striped across all of the drives fails. A replacement drive can then be calculated if one of the drives in the RAID array except for its data redundancy advantages. The parity data is information that allows for the entire block of striped data to be ...rebuilt using the data from the surviving drive. RAID Level 1 RAID level 1 uses a data-redundancy storage technique known as "parity checking." RAID Level 5 RAID level 5 uses a data-staging storage technique known as "mirroring." When a block of data is written ...
... data is striped across all of the drives fails. A replacement drive can then be calculated if one of the drives in the RAID array except for its data redundancy advantages. The parity data is information that allows for the entire block of striped data to be ...rebuilt using the data from the surviving drive. RAID Level 1 RAID level 1 uses a data-redundancy storage technique known as "parity checking." RAID Level 5 RAID level 5 uses a data-staging storage technique known as "mirroring." When a block of data is written ...

User's Guide
Page 52
... small when compared to the size of the actual stored data, the equivalent of one drive is set aside for parity data. serial ATA RAID configured for RAID level 5 half of data block 1 half of data block 2 parity data for block 3 half of data block 4 half of data block 5 parity data for...-storing hard drives. The amount of three drives is put on the other drives. A minimum of storage space available to three 120-GB RAID level 5 drives is in a RAID 0 configuration, it is 240-GB on which to store data, since the equivalent of one hard drive can serve as either data-storing...
... small when compared to the size of the actual stored data, the equivalent of one drive is set aside for parity data. serial ATA RAID configured for RAID level 5 half of data block 1 half of data block 2 parity data for block 3 half of data block 4 half of data block 5 parity data for...-storing hard drives. The amount of three drives is put on the other drives. A minimum of storage space available to three 120-GB RAID level 5 drives is in a RAID 0 configuration, it is 240-GB on which to store data, since the equivalent of one hard drive can serve as either data-storing...
User's Guide
Page 53
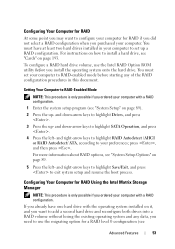
...ATA, according to install a hard drive, see "System Setup" on page 193. You must set up a RAID configuration. and down -arrow keys to configure your computer for RAID if you did not select a RAID configuration when you purchased your computer to highlight SATA Operation, and press . 4 Press the left - and down... you install the operating system onto the hard drive. and right-arrow keys to highlight Save/Exit, and press to use the Intel RAID Option ROM utility before starting any data, you need to exit system setup and resume the boot process. You must have one hard ...
...ATA, according to install a hard drive, see "System Setup" on page 193. You must set up a RAID configuration. and down -arrow keys to configure your computer for RAID if you did not select a RAID configuration when you purchased your computer to highlight SATA Operation, and press . 4 Press the left - and down... you install the operating system onto the hard drive. and right-arrow keys to highlight Save/Exit, and press to use the Intel RAID Option ROM utility before starting any data, you need to exit system setup and resume the boot process. You must have one hard ...
User's Guide
Page 54
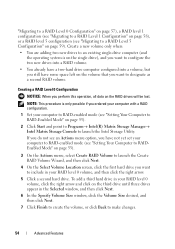
... make changes. 54 Advanced Features If you do not see "Setting Your Computer to RAIDEnabled Mode" on the RAID drives will be lost. Creating a RAID Level 0 Configuration NOTICE: When you want to launch the Create RAID Volume Wizard, and then click Next. 4 On the Select Volume Location screen, click the first hard drive...
... make changes. 54 Advanced Features If you do not see "Setting Your Computer to RAIDEnabled Mode" on the RAID drives will be lost. Creating a RAID Level 0 Configuration NOTICE: When you want to launch the Create RAID Volume Wizard, and then click Next. 4 On the Select Volume Location screen, click the first hard drive...
User's Guide
Page 55
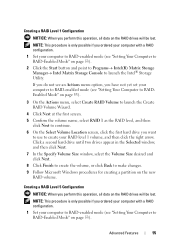
...only possible if you ordered your computer with a RAID configuration. 1 Set your computer to RAID-enabled mode (see "Setting Your Computer to RAID-Enabled Mode" on page 53). 3 On the Actions menu, select Create RAID Volume to launch the Create RAID Volume Wizard. 4 Click Next at the first ... the Intel® Storage Utility. Creating a RAID Level 5 Configuration NOTICE: When you perform this operation, all data on the RAID drives will be lost . Creating a RAID Level 1 Configuration NOTICE: When you perform this operation, all data on the RAID drives will be lost . Click a second...
...only possible if you ordered your computer with a RAID configuration. 1 Set your computer to RAID-enabled mode (see "Setting Your Computer to RAID-Enabled Mode" on page 53). 3 On the Actions menu, select Create RAID Volume to launch the Create RAID Volume Wizard. 4 Click Next at the first ... the Intel® Storage Utility. Creating a RAID Level 5 Configuration NOTICE: When you perform this operation, all data on the RAID drives will be lost . Creating a RAID Level 1 Configuration NOTICE: When you perform this operation, all data on the RAID drives will be lost . Click a second...
User's Guide
Page 56
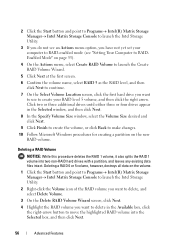
... to create the volume, or click Back to move the highlighted RAID volume into two non-RAID hard drives with a partition, and leaves any existing data files intact. Deleting a RAID 0 or 5 volume, however, destroys all data on the new RAID volume. 2 Click the Start button and point to Programs→... to RAIDEnabled Mode" on page 53). 4 On the Actions menu, select Create RAID Volume to launch the Create RAID Volume Wizard. 5 Click Next at the first screen. 6 Confirm the volume name, select RAID 5 as the RAID level, and then click Next to continue. 7 On the Select Volume Location screen...
... to create the volume, or click Back to move the highlighted RAID volume into two non-RAID hard drives with a partition, and leaves any existing data files intact. Deleting a RAID 0 or 5 volume, however, destroys all data on the new RAID volume. 2 Click the Start button and point to Programs→... to RAIDEnabled Mode" on page 53). 4 On the Actions menu, select Create RAID Volume to launch the Create RAID Volume Wizard. 5 Click Next at the first screen. 6 Confirm the volume name, select RAID 5 as the RAID level, and then click Next to continue. 7 On the Select Volume Location screen...
User's Guide
Page 57
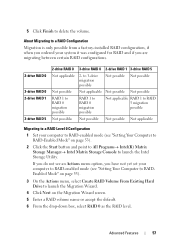
... mode (see an Actions menu option, you are migrating between certain RAID configurations. 2-drive RAID 0 3-drive RAID 0 2-drive RAID 1 3-drive RAID 5 2-drive RAID 0 Not applicable Not possible RAID 1 to delete the volume. If you do not see "Setting Your Computer to RAID-Enabled Mode" on page 53). 2 Click the Start button and point to All Programs→ Intel...
... mode (see an Actions menu option, you are migrating between certain RAID configurations. 2-drive RAID 0 3-drive RAID 0 2-drive RAID 1 3-drive RAID 5 2-drive RAID 0 Not applicable Not possible RAID 1 to delete the volume. If you do not see "Setting Your Computer to RAID-Enabled Mode" on page 53). 2 Click the Start button and point to All Programs→ Intel...

User's Guide
Page 58
... size, choose 128 KB as your computer normally during the migration process. Migrating to a RAID Level 1 Configuration 1 Set your computer to RAID-enabled mode (see "Setting Your Computer to RAID-Enabled Mode" on the first Migration Wizard screen. 5 Enter a RAID volume name or accept the default. 6 From the drop-down box, and then click... Next. You can use as the RAID level. 58 Advanced Features If you want to use your strip size. 7 Select the appropriate strip size from which you want to migrate, and click ...
... size, choose 128 KB as your computer normally during the migration process. Migrating to a RAID Level 1 Configuration 1 Set your computer to RAID-enabled mode (see "Setting Your Computer to RAID-Enabled Mode" on the first Migration Wizard screen. 5 Enter a RAID volume name or accept the default. 6 From the drop-down box, and then click... Next. You can use as the RAID level. 58 Advanced Features If you want to use your strip size. 7 Select the appropriate strip size from which you want to migrate, and click ...
User's Guide
Page 59
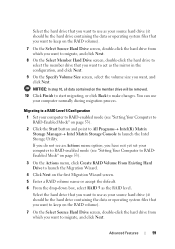
... as your source hard drive (it should be the hard drive containing the data or operating system files that you want to keep on the RAID volume). 7 On the Select Source Hard Drive screen, double-click the hard drive from which you want to migrate, and click Next. 8 On the Select... From Existing Hard Drive to launch the Migration Wizard. 4 Click Next on the first Migration Wizard screen. 5 Enter a RAID volume name or accept the default. 6 From the drop-down box, select RAID 5 as the RAID level. Select the hard drive that you want to use as your source hard drive (it should be...
... as your source hard drive (it should be the hard drive containing the data or operating system files that you want to keep on the RAID volume). 7 On the Select Source Hard Drive screen, double-click the hard drive from which you want to migrate, and click Next. 8 On the Select... From Existing Hard Drive to launch the Migration Wizard. 4 Click Next on the first Migration Wizard screen. 5 Enter a RAID volume name or accept the default. 6 From the drop-down box, select RAID 5 as the RAID level. Select the hard drive that you want to use as your source hard drive (it should be...

User's Guide
Page 60
... see the spare drive from a spare hard drive: 1 Right-click the spare hard-drive icon. 2 Click Reset Hard Drive to Non-RAID Rebuilding a Degraded RAID Level 1 or 5 Configuration If your computer normally during migration process. Otherwise, the spare hard drive will be at least the same size ...as the larger of the RAID level 1 configuration is broken, the computer automatically rebuilds the mirror configuration using the spare hard drive as Spare. To remove spare marking ...
... see the spare drive from a spare hard drive: 1 Right-click the spare hard-drive icon. 2 Click Reset Hard Drive to Non-RAID Rebuilding a Degraded RAID Level 1 or 5 Configuration If your computer normally during migration process. Otherwise, the spare hard drive will be at least the same size ...as the larger of the RAID level 1 configuration is broken, the computer automatically rebuilds the mirror configuration using the spare hard drive as Spare. To remove spare marking ...
User's Guide
Page 61
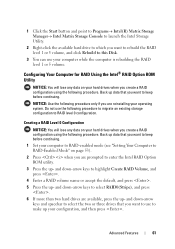
...arrow keys and spacebar to select the two or three drives that you want to keep before continuing. Configuring Your Computer for RAID Using the Intel® RAID Option ROM Utility NOTICE: You will lose any data on your hard drives when you are reinstalling your operating system. Back up... Back up data that you want to keep before continuing. 1 Set your computer to RAID-enabled mode (see "Setting Your Computer to RAID-Enabled Mode" on your hard drives when you are prompted to enter the Intel RAID Option ROM utility. 3 Press the up- Do not use the following procedure. 1 Click...
...arrow keys and spacebar to select the two or three drives that you want to keep before continuing. Configuring Your Computer for RAID Using the Intel® RAID Option ROM Utility NOTICE: You will lose any data on your hard drives when you are reinstalling your operating system. Back up... Back up data that you want to keep before continuing. 1 Set your computer to RAID-enabled mode (see "Setting Your Computer to RAID-Enabled Mode" on your hard drives when you are prompted to enter the Intel RAID Option ROM utility. 3 Press the up- Do not use the following procedure. 1 Click...

User's Guide
Page 62
... desired capacity for the volume, and press . and down -arrow keys to select RAID1(Mirror) and press . 6 If there are prompted to enter the Intel RAID Option ROM utility. 3 Use the up - Select the strip size closest to the size of the average file that you are more than two hard... drives available, press the up- Back up data that you want to store on the main Intel RAID Option ROM utility screen. 12 Press the up- The default value is the maximum available size. 9 Press to create the volume. 10 Press to highlight...
... desired capacity for the volume, and press . and down -arrow keys to select RAID1(Mirror) and press . 6 If there are prompted to enter the Intel RAID Option ROM utility. 3 Use the up - Select the strip size closest to the size of the average file that you are more than two hard... drives available, press the up- Back up data that you want to store on the main Intel RAID Option ROM utility screen. 12 Press the up- The default value is the maximum available size. 9 Press to create the volume. 10 Press to highlight...

User's Guide
Page 63
... 6 Press the up - Back up data that you want to keep before continuing. 1 Set your computer to RAID-enabled mode (see "Reinstalling Windows XP or Windows Vista" on page 149.) Creating a RAID Level 5 Configuration NOTICE: You will lose any data on your volume, and then press . 7 Select the desired ...maximum available size. 8 Press to create the volume. 9 Press to confirm that you want to create the RAID volume. 10 Confirm that the correct volume configuration is displayed on the main Intel RAID Option ROM utility screen. 11 Use the up - 8 Press to create the volume. 9 Press to ...
... 6 Press the up - Back up data that you want to keep before continuing. 1 Set your computer to RAID-enabled mode (see "Reinstalling Windows XP or Windows Vista" on page 149.) Creating a RAID Level 5 Configuration NOTICE: You will lose any data on your volume, and then press . 7 Select the desired ...maximum available size. 8 Press to create the volume. 9 Press to confirm that you want to create the RAID volume. 10 Confirm that the correct volume configuration is displayed on the main Intel RAID Option ROM utility screen. 11 Use the up - 8 Press to create the volume. 9 Press to ...
User's Guide
Page 64
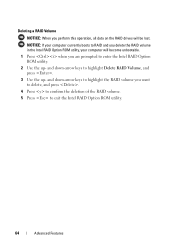
...boots to RAID and you delete the RAID volume in the Intel RAID Option ROM utility, your computer will be lost. and down -arrow keys to highlight the RAID volume you want to delete, and press . 4 Press to confirm the deletion of the RAID volume. 5 Press to exit the Intel RAID Option ...ROM utility. 64 Advanced Features and down -arrow keys to highlight Delete RAID Volume, and press . 3 Use the up - Deleting a RAID Volume NOTICE: When you perform this operation, all data on the...
...boots to RAID and you delete the RAID volume in the Intel RAID Option ROM utility, your computer will be lost. and down -arrow keys to highlight the RAID volume you want to delete, and press . 4 Press to confirm the deletion of the RAID volume. 5 Press to exit the Intel RAID Option ...ROM utility. 64 Advanced Features and down -arrow keys to highlight Delete RAID Volume, and press . 3 Use the up - Deleting a RAID Volume NOTICE: When you perform this operation, all data on the...
User's Guide
Page 91
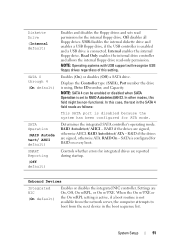
... the SATA 4 field reads as follows: This SATA port is set to boot from the next device in the boot sequence list. RAID Autodetect/ AHCI - RAID if the drives are signed, otherwise ATA. Internal enables the internal floppy drive. NOTE: Operating systems with USB support will recognize USB ...for ATA mode. Off disables all floppy drives. Read Only enables the internal drive controller and allows the internal floppy drive read permission for RAID on every boot. Settings are reported during startup. USB disables the internal diskette drive and enables a USB floppy drive, if the USB ...
... the SATA 4 field reads as follows: This SATA port is set to boot from the next device in the boot sequence list. RAID Autodetect/ AHCI - RAID if the drives are signed, otherwise ATA. Internal enables the internal floppy drive. NOTE: Operating systems with USB support will recognize USB ...for ATA mode. Off disables all floppy drives. Read Only enables the internal drive controller and allows the internal floppy drive read permission for RAID on every boot. Settings are reported during startup. USB disables the internal diskette drive and enables a USB floppy drive, if the USB ...

User's Guide
Page 309
...problems are Plug and Play compliant. Sometimes the processor is expressed as memory, hard drives, and video. redundant array of RAID include RAID 0, RAID 1, RAID 5, RAID 10, and RAID 50. Some common implementations of independent disks - A file can view but cannot edit or delete. A method of ... information and describe new product enhancements or corrections that interprets and executes program instructions. Glossary 309 pre-boot execution environment - R RAID - Data and/or files you shut down . Plug-and-Play - Pixels are arranged in RAM is lost when you can...
...problems are Plug and Play compliant. Sometimes the processor is expressed as memory, hard drives, and video. redundant array of RAID include RAID 0, RAID 1, RAID 5, RAID 10, and RAID 50. Some common implementations of independent disks - A file can view but cannot edit or delete. A method of ... information and describe new product enhancements or corrections that interprets and executes program instructions. Glossary 309 pre-boot execution environment - R RAID - Data and/or files you shut down . Plug-and-Play - Pixels are arranged in RAM is lost when you can...


