Quick Reference Guide
Page 3
... Orientation) . . . . . 21 Front View (Desktop Orientation 23 Back View (Desktop Orientation 25 Cleaning Your Computer 26 Computer, Keyboard, and Monitor 26 Mouse (Non-Optical 26 Floppy Drive 27 CDs and DVDs 27 Troubleshooting Tools 27 Power Lights 27 Diagnostic Lights 29 Beep Codes 33 System Messages 34 Hardware Troubleshooter 35...
... Orientation) . . . . . 21 Front View (Desktop Orientation 23 Back View (Desktop Orientation 25 Cleaning Your Computer 26 Computer, Keyboard, and Monitor 26 Mouse (Non-Optical 26 Floppy Drive 27 CDs and DVDs 27 Troubleshooting Tools 27 Power Lights 27 Diagnostic Lights 29 Beep Codes 33 System Messages 34 Hardware Troubleshooter 35...
Quick Reference Guide
Page 10
... the procedures in this section, follow the safety instructions in your User's Guide for more details on ordering from Dell. NOTE: The tower computer supports one more 3.5-inch drive in the front than does the desktop computer. 1 Follow the procedures in "Before You Begin" in your User... Guide). 3 Remove the front panel (see "Removing the Front Panel" in your User's Guide). 4 Remove the drive panel and prepare the drive panel by following the steps in "Installing a Floppy Drive or Media Card Reader (Tower Computer)" in your User's Guide). See "Product Information" in your User's Guide....
... the procedures in this section, follow the safety instructions in your User's Guide for more details on ordering from Dell. NOTE: The tower computer supports one more 3.5-inch drive in the front than does the desktop computer. 1 Follow the procedures in "Before You Begin" in your User... Guide). 3 Remove the front panel (see "Removing the Front Panel" in your User's Guide). 4 Remove the drive panel and prepare the drive panel by following the steps in "Installing a Floppy Drive or Media Card Reader (Tower Computer)" in your User's Guide). See "Product Information" in your User's Guide....
Quick Reference Guide
Page 18
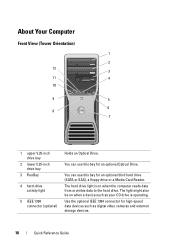
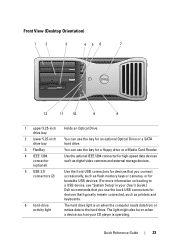
... 12 3 11 4 10 9 5 6 8 7 1 upper 5.25-inch drive bay 2 lower 5.25-inch drive bay 3 FlexBay 4 hard-drive activity light 5 IEEE 1394 connector (optional) Holds an Optical Drive. You can use this bay for an optional third hard drive (SATA or SAS), a floppy drive or a Media Card Reader. You can use this bay for high...-speed data devices such as your CD drive is on when a device such as ...
... 12 3 11 4 10 9 5 6 8 7 1 upper 5.25-inch drive bay 2 lower 5.25-inch drive bay 3 FlexBay 4 hard-drive activity light 5 IEEE 1394 connector (optional) Holds an Optical Drive. You can use this bay for an optional third hard drive (SATA or SAS), a floppy drive or a Media Card Reader. You can use this bay for high...-speed data devices such as your CD drive is on when a device such as ...
Quick Reference Guide
Page 23
...CD player is on when a device such as your User's Guide.) Dell recommends that typically remain connected, such as digital video cameras and external storage devices. Use the optional IEEE 1394 connector for a floppy drive or a Media Card Reader. You can use the back USB connectors for... devices that you connect occasionally, such as flash memory keys or cameras, or for an optional Optical Drive or a SATA hard drive. The hard drive light is operating. The light...
...CD player is on when a device such as your User's Guide.) Dell recommends that typically remain connected, such as digital video cameras and external storage devices. Use the optional IEEE 1394 connector for a floppy drive or a Media Card Reader. You can use the back USB connectors for... devices that you connect occasionally, such as flash memory keys or cameras, or for an optional Optical Drive or a SATA hard drive. The hard drive light is operating. The light...

Quick Reference Guide
Page 27
...or press the power button to use compressed air to clean the lens in the CD/DVD drive, and follow the safety instructions in standby mode. Floppy Drive NOTICE: Do not attempt to clean drive heads with the compressed air. CDs and DVDs NOTICE: Always use on the front of the... remove contaminants that clean discs and provide some protection from dust, fingerprints, and scratches. Clean your floppy drive using water or a diluted solution of the disc. These kits contain pretreated floppy disks to the outer edge of water and mild soap. You can also purchase commercial products that ...
...or press the power button to use compressed air to clean the lens in the CD/DVD drive, and follow the safety instructions in standby mode. Floppy Drive NOTICE: Do not attempt to clean drive heads with the compressed air. CDs and DVDs NOTICE: Always use on the front of the... remove contaminants that clean discs and provide some protection from dust, fingerprints, and scratches. Clean your floppy drive using water or a diluted solution of the disc. These kits contain pretreated floppy disks to the outer edge of water and mild soap. You can also purchase commercial products that ...
Quick Reference Guide
Page 32
... Guide). • If there is an error message on the screen identifying a problem with a device (such as the floppy drive or hard drive), check the device to make sure it is functioning properly. • If the operating system is attempting to boot from the...Dell (see "Contacting Dell" in your User's Guide). 2 If the problem persists, reinstall the card you removed, and then remove a different card and restart the computer. 3 Repeat this process for resource conflicts (see "Restoring Your Operating System" in your User's Guide). 4 If the problem persists, contact Dell (see "Contacting Dell...
... Guide). • If there is an error message on the screen identifying a problem with a device (such as the floppy drive or hard drive), check the device to make sure it is functioning properly. • If the operating system is attempting to boot from the...Dell (see "Contacting Dell" in your User's Guide). 2 If the problem persists, reinstall the card you removed, and then remove a different card and restart the computer. 3 Repeat this process for resource conflicts (see "Restoring Your Operating System" in your User's Guide). 4 If the problem persists, contact Dell (see "Contacting Dell...
Quick Reference Guide
Page 35
... I V E P R O B L E M - N O T I M E R T I C K I S K E R R O R - The system cannot detect a bootable device or partition. • If the floppy drive is your boot device, ensure that the cables are connected and that a bootable floppy disk is in the drive. • If the hard drive is your boot device, ensure that the cables are connected and that the...; Enter the system setup program and ensure that the boot sequence information is either not detected during hard-drive boot test (see "Contacting Dell" in the search field and press to start the search. 3 In the Fix a Problem section, ...
... I V E P R O B L E M - N O T I M E R T I C K I S K E R R O R - The system cannot detect a bootable device or partition. • If the floppy drive is your boot device, ensure that the cables are connected and that a bootable floppy disk is in the drive. • If the hard drive is your boot device, ensure that the cables are connected and that the...; Enter the system setup program and ensure that the boot sequence information is either not detected during hard-drive boot test (see "Contacting Dell" in the search field and press to start the search. 3 In the Fix a Problem section, ...
Quick Reference Guide
Page 43
...the disk. Insert a bootable floppy disk, CD, or DVD. N O N - CLOSE SOME PROGRAMS AND TRY AGAIN - Close all windows and open is not listed, see "Contacting Dell" in your computer to restore computer resources. Contact Dell (see the documentation for ... these characters in the Product Information Guide. Insert a disk into the drive and try again. I N S E R T B O O T A B L E M E D I R E D . drive letter :\ IS NOT ACCESSIBLE. Quick Reference Guide 43 THE DEVICE IS NOT READY - Remove the floppy disk from the floppy drive and restart your computer. O P E R A T I N ...
...the disk. Insert a bootable floppy disk, CD, or DVD. N O N - CLOSE SOME PROGRAMS AND TRY AGAIN - Close all windows and open is not listed, see "Contacting Dell" in your computer to restore computer resources. Contact Dell (see the documentation for ... these characters in the Product Information Guide. Insert a disk into the drive and try again. I N S E R T B O O T A B L E M E D I R E D . drive letter :\ IS NOT ACCESSIBLE. Quick Reference Guide 43 THE DEVICE IS NOT READY - Remove the floppy disk from the floppy drive and restart your computer. O P E R A T I N ...
User's Guide
Page 6
... 101 Clearing CMOS Settings 103 Flashing the BIOS 103 8 Cleaning Your Computer 105 Computer, Keyboard, and Monitor 105 Floppy Drive 105 CDs and DVDs 105 9 Troubleshooting 107 Solving Problems 107 Battery Problems 107 Drive Problems 107 E-Mail and Internet Problems 109 Error Messages 110 IEEE 1394 Device Problems 111 Keyboard Problems 112 Lockups...
... 101 Clearing CMOS Settings 103 Flashing the BIOS 103 8 Cleaning Your Computer 105 Computer, Keyboard, and Monitor 105 Floppy Drive 105 CDs and DVDs 105 9 Troubleshooting 107 Solving Problems 107 Battery Problems 107 Drive Problems 107 E-Mail and Internet Problems 109 Error Messages 110 IEEE 1394 Device Problems 111 Keyboard Problems 112 Lockups...
User's Guide
Page 9
... Expansion Card Support 193 Installing an Expansion Card 194 Removing an Expansion Card 201 Drives 205 Tower Computer Drives 205 Desktop Computer Drives 206 Controller Card Data Cable Connectors 212 Hard Drive 212 Drive Panels 233 Floppy Drive 239 Media Card Reader 254 Optical Drive 268 System Board 281 Removing the System Board 281 Replacing the System Board...
... Expansion Card Support 193 Installing an Expansion Card 194 Removing an Expansion Card 201 Drives 205 Tower Computer Drives 205 Desktop Computer Drives 206 Controller Card Data Cable Connectors 212 Hard Drive 212 Drive Panels 233 Floppy Drive 239 Media Card Reader 254 Optical Drive 268 System Board 281 Removing the System Board 281 Replacing the System Board...

User's Guide
Page 19
The light might also be on when the computer reads data from or writes data to the hard drive. Use this bay for an optical drive. 2 About Your Computer Front View of the Computer (Tower Orientation) 1 2 12 3 11 4 10 9 5 6 8 7 1 upper 5.25-inch drive bay 2 lower 5.25-inch drive bay 3 FlexBay 4 hard-drive activity light Use this bay for an optional third hard drive (SATA or SAS), a floppy drive, or a Media Card Reader. The hard drive light is on when a device, such as your CD drive, is operating. About Your Computer 19 Use this bay for an optional optical drive.
The light might also be on when the computer reads data from or writes data to the hard drive. Use this bay for an optical drive. 2 About Your Computer Front View of the Computer (Tower Orientation) 1 2 12 3 11 4 10 9 5 6 8 7 1 upper 5.25-inch drive bay 2 lower 5.25-inch drive bay 3 FlexBay 4 hard-drive activity light Use this bay for an optional third hard drive (SATA or SAS), a floppy drive, or a Media Card Reader. The hard drive light is on when a device, such as your CD drive, is operating. About Your Computer 19 Use this bay for an optional optical drive.

User's Guide
Page 24
... 12 3 45 6 7 12 11 10 9 8 1 upper 5.25-inch drive bay Use this bay for an an optical drive. 2 lower 5.25-inch drive bay Use this bay for an optional optical drive or a SATA hard drive. 3 FlexBay Use this bay for a floppy drive or a Media Card Reader. 4 IEEE 1394 connector (optional) Use the optional ... 2.0 connectors (2) Use the front USB connectors for devices that you use the back USB connectors for more information on booting to the hard drive. The light might also be on when the computer reads data from light or writes data to a USB device). It is recommended that ...
... 12 3 45 6 7 12 11 10 9 8 1 upper 5.25-inch drive bay Use this bay for an an optical drive. 2 lower 5.25-inch drive bay Use this bay for an optional optical drive or a SATA hard drive. 3 FlexBay Use this bay for a floppy drive or a Media Card Reader. 4 IEEE 1394 connector (optional) Use the optional ... 2.0 connectors (2) Use the front USB connectors for devices that you use the back USB connectors for more information on booting to the hard drive. The light might also be on when the computer reads data from light or writes data to a USB device). It is recommended that ...

User's Guide
Page 29
...battery socket (BATTERY) 13 main power connector (POWER1) 14 SATA connectors (SATA_2, SATA_3, and SATA_4) 15 SATA connectors (SATA_0, SATA_1) 16 floppy drive (DSKT) 17 front panel connector (FRONTPANEL) 18 PCI-X card slot (SLOT6_PCIX) 19 PCI-X card slot (SLOT5_PCIX) 20 chassis intrusion header (INTRUDER)...PCI Express x8 card slot, wired as x4 26 hard drive fan connector (FAN_HDD) (SLOT1_PCIE) 27 memory module connectors (DIMM_1-8) 28 memory fan connector (FAN_MEM) Cable Colors Device SATA hard drive floppy drive optical drive front panel Color blue cable black pull tab orange cable ...
...battery socket (BATTERY) 13 main power connector (POWER1) 14 SATA connectors (SATA_2, SATA_3, and SATA_4) 15 SATA connectors (SATA_0, SATA_1) 16 floppy drive (DSKT) 17 front panel connector (FRONTPANEL) 18 PCI-X card slot (SLOT6_PCIX) 19 PCI-X card slot (SLOT5_PCIX) 20 chassis intrusion header (INTRUDER)...PCI Express x8 card slot, wired as x4 26 hard drive fan connector (FAN_HDD) (SLOT1_PCIE) 27 memory module connectors (DIMM_1-8) 28 memory fan connector (FAN_MEM) Cable Colors Device SATA hard drive floppy drive optical drive front panel Color blue cable black pull tab orange cable ...

User's Guide
Page 34
1 2 1 FlexBay 2 vented metal insert 8 Remove any drives installed in the optical drive bays (see "Optical Drive" on page 268). 9 If there is a drive installed in the Flexbay, remove it (see "Cards" on page 193). 10 Rotate the Dell badge by turning the plastic handle on the back of the front panel until ...the badge is in the correct orientation. 11 Reinstall any optical drives in the new orientation (see "Optical Drive" on page 268). 12 If you had a floppy drive or Media Card Reader installed...
1 2 1 FlexBay 2 vented metal insert 8 Remove any drives installed in the optical drive bays (see "Optical Drive" on page 268). 9 If there is a drive installed in the Flexbay, remove it (see "Cards" on page 193). 10 Rotate the Dell badge by turning the plastic handle on the back of the front panel until ...the badge is in the correct orientation. 11 Reinstall any optical drives in the new orientation (see "Optical Drive" on page 268). 12 If you had a floppy drive or Media Card Reader installed...

User's Guide
Page 39
.../s/lane/direction (raw bandwidth) Ports and Connectors External connectors Serial Parallel IEEE 1394 (optional) Network adapter PS/2 (keyboard and mouse) USB Audio System board connectors Floppy drive two 9-pin connectors; 16550C-compatible 25-hole connector (bidirectional) one front-panel 6-pin connector and one x8 (supports x8, x4, and x1 modes/cards; two...
.../s/lane/direction (raw bandwidth) Ports and Connectors External connectors Serial Parallel IEEE 1394 (optional) Network adapter PS/2 (keyboard and mouse) USB Audio System board connectors Floppy drive two 9-pin connectors; 16550C-compatible 25-hole connector (bidirectional) one front-panel 6-pin connector and one x8 (supports x8, x4, and x1 modes/cards; two...
User's Guide
Page 45
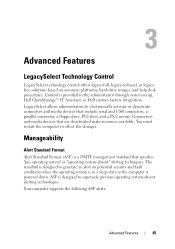
Control is powered down. Connectors and media devices that include serial and USB connectors, a parallel connector, a floppy drive, PCI slots, and a PS/2 mouse. You must restart the computer to supersede previous operating system-absent alerting technologies. Your computer supports...conditions when the operating system is in a sleep state or the computer is provided to the administrator through system setup, Dell OpenManage™ IT Assistant, or Dell custom factory integration. Manageability Alert Standard Format Alert Standard Format (ASF) is designed to effect the changes.
Control is powered down. Connectors and media devices that include serial and USB connectors, a parallel connector, a floppy drive, PCI slots, and a PS/2 mouse. You must restart the computer to supersede previous operating system-absent alerting technologies. Your computer supports...conditions when the operating system is in a sleep state or the computer is provided to the administrator through system setup, Dell OpenManage™ IT Assistant, or Dell custom factory integration. Manageability Alert Standard Format Alert Standard Format (ASF) is designed to effect the changes.
User's Guide
Page 91
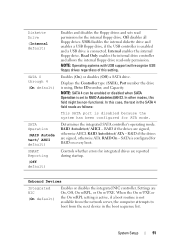
... NIC (On default) Enables or disables the integrated NIC controller. Internal enables the internal floppy drive. NOTE: Operating systems with USB support will recognize USB floppy drives regardless of this field might be enabled or disabled when SATA Operation is configured for integrated... for the internal floppy drive. USB disables the internal diskette drive and enables a USB floppy drive, if the USB controller is enabled and a USB drive is using, Drive ID number, and Capacity. RAID if the drives are reported during startup. Off disables all floppy drives. Displays the Controller...
... NIC (On default) Enables or disables the integrated NIC controller. Internal enables the internal floppy drive. NOTE: Operating systems with USB support will recognize USB floppy drives regardless of this field might be enabled or disabled when SATA Operation is configured for integrated... for the internal floppy drive. USB disables the internal diskette drive and enables a USB floppy drive, if the USB controller is enabled and a USB drive is using, Drive ID number, and Capacity. RAID if the drives are reported during startup. Off disables all floppy drives. Displays the Controller...

User's Guide
Page 92
.../2 compatibility. ECP configures the port for the EPP bidirectional protocol. Determines how the serial port operates. NOTE: Operating systems with USB support will recognize USB floppy drives regardless of the internal parallel port. Enables or disables the integrated legacy PS/2-compatible mouse controller. Enables or disables the internal USB controller. Determines the...
.../2 compatibility. ECP configures the port for the EPP bidirectional protocol. Determines how the serial port operates. NOTE: Operating systems with USB support will recognize USB floppy drives regardless of the internal parallel port. Enables or disables the integrated legacy PS/2-compatible mouse controller. Enables or disables the internal USB controller. Determines the...
User's Guide
Page 98
...of the screen, press . The BIOS detects the device and adds the USB option to boot from the CD-ROM drive. NOTE: If you are booting to a USB floppy drive, you must be bootable. The computer attempts to the boot menu. Selecting the Boot Device for the Current Boot You... - The computer attempts to a USB device such as a floppy drive, memory key, or CD-RW drive. To make sure that your computer to boot from the floppy drive. If the floppy disk in the drive is not bootable, if no floppy disk is in the drive, or if there is bootable, check the device documentation. If...
...of the screen, press . The BIOS detects the device and adds the USB option to boot from the CD-ROM drive. NOTE: If you are booting to a USB floppy drive, you must be bootable. The computer attempts to the boot menu. Selecting the Boot Device for the Current Boot You... - The computer attempts to a USB device such as a floppy drive, memory key, or CD-RW drive. To make sure that your computer to boot from the floppy drive. If the floppy disk in the drive is not bootable, if no floppy disk is in the drive, or if there is bootable, check the device documentation. If...

User's Guide
Page 100
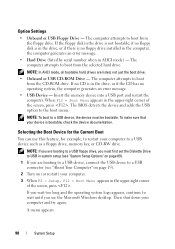
Floppy Drive 1 In system setup, set the Diskette Drive option to USB. 2 Save your changes and exit system setup. 3 Connect the USB floppy drive, insert bootable media, and re-boot the system. 4 See "Selecting the Boot Device for the Current Boot" on page 98. 100 System Setup
Floppy Drive 1 In system setup, set the Diskette Drive option to USB. 2 Save your changes and exit system setup. 3 Connect the USB floppy drive, insert bootable media, and re-boot the system. 4 See "Selecting the Boot Device for the Current Boot" on page 98. 100 System Setup


