Quick Reference Guide
Page 3
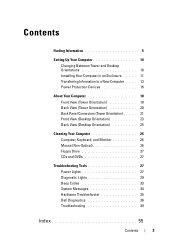
... 25 Cleaning Your Computer 26 Computer, Keyboard, and Monitor 26 Mouse (Non-Optical 26 Floppy Drive 27 CDs and DVDs 27 Troubleshooting Tools 27 Power Lights 27 Diagnostic Lights 29 Beep Codes 33 System Messages 34 Hardware Troubleshooter 35 Dell Diagnostics 36 Troubleshooting 39 Index 55 Contents 3
... 25 Cleaning Your Computer 26 Computer, Keyboard, and Monitor 26 Mouse (Non-Optical 26 Floppy Drive 27 CDs and DVDs 27 Troubleshooting Tools 27 Power Lights 27 Diagnostic Lights 29 Beep Codes 33 System Messages 34 Hardware Troubleshooter 35 Dell Diagnostics 36 Troubleshooting 39 Index 55 Contents 3
Quick Reference Guide
Page 18
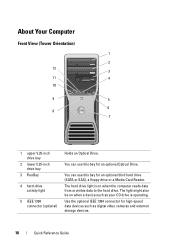
The hard drive light is operating. The light might also be on when a device such as digital video cameras and external storage devices. 18 Quick Reference Guide You can use this bay for ... drive. About Your Computer Front View (Tower Orientation) 1 2 12 3 11 4 10 9 5 6 8 7 1 upper 5.25-inch drive bay 2 lower 5.25-inch drive bay 3 FlexBay 4 hard-drive activity light 5 IEEE 1394 connector (optional) Holds an Optical Drive.
The hard drive light is operating. The light might also be on when a device such as digital video cameras and external storage devices. 18 Quick Reference Guide You can use this bay for ... drive. About Your Computer Front View (Tower Orientation) 1 2 12 3 11 4 10 9 5 6 8 7 1 upper 5.25-inch drive bay 2 lower 5.25-inch drive bay 3 FlexBay 4 hard-drive activity light 5 IEEE 1394 connector (optional) Holds an Optical Drive.
Quick Reference Guide
Page 19
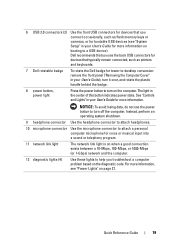
... the front USB connectors for devices that typically remain connected, such as flash memory keys or cameras, or for bootable USB devices (see "Power Lights" on page 27. Dell recommends that you troubleshoot a computer problem based on the diagnostic code. Instead, perform an operating system shutdown. 9 headphone connector Use the headphone connector...
... the front USB connectors for devices that typically remain connected, such as flash memory keys or cameras, or for bootable USB devices (see "Power Lights" on page 27. Dell recommends that you troubleshoot a computer problem based on the diagnostic code. Instead, perform an operating system shutdown. 9 headphone connector Use the headphone connector...

Quick Reference Guide
Page 21
... card containing a parallel connector configured to attach most speakers with integrated amplifiers. On computers with a sound card, use the connector on the card. 5 link integrity light Green - Off - If you connect a mouse to the parallel connector. A good connection exists between a 100-Mbps network and the computer. On computers with a sound card...
... card containing a parallel connector configured to attach most speakers with integrated amplifiers. On computers with a sound card, use the connector on the card. 5 link integrity light Green - Off - If you connect a mouse to the parallel connector. A good connection exists between a 100-Mbps network and the computer. On computers with a sound card...

Quick Reference Guide
Page 22
..., such as flash memory keys or cameras, or for this light appear to the serial port. Flashes a yellow light when the computer is transmitting or receiving network data. A high volume of network traffic may make this port can be in your computer. Dell recommends that you connect occasionally, such as printers and keyboards...
..., such as flash memory keys or cameras, or for this light appear to the serial port. Flashes a yellow light when the computer is transmitting or receiving network data. A high volume of network traffic may make this port can be in your computer. Dell recommends that you connect occasionally, such as printers and keyboards...
Quick Reference Guide
Page 23
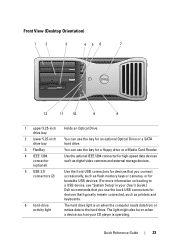
...7 12 11 10 9 8 1 upper 5.25-inch drive bay 2 lower 5.25-inch drive bay 3 FlexBay 4 IEEE 1394 connector (optional) 5 USB 2.0 connectors (2) 6 hard-drive activity light Holds an Optical Drive. You can use the bay for bootable USB devices. (For more information on booting to the hard drive. The...Setup" in your CD player is on when a device such as your User's Guide.) Dell recommends that you connect occasionally, such as digital video cameras and external storage devices. The hard drive light is operating. Use the optional IEEE 1394 connector for a floppy drive or a Media Card...
...7 12 11 10 9 8 1 upper 5.25-inch drive bay 2 lower 5.25-inch drive bay 3 FlexBay 4 IEEE 1394 connector (optional) 5 USB 2.0 connectors (2) 6 hard-drive activity light Holds an Optical Drive. You can use the bay for bootable USB devices. (For more information on booting to the hard drive. The...Setup" in your CD player is on when a device such as your User's Guide.) Dell recommends that you connect occasionally, such as digital video cameras and external storage devices. The hard drive light is operating. Use the optional IEEE 1394 connector for a floppy drive or a Media Card...

Quick Reference Guide
Page 24
... badge. 8 power button, power light Press the power button to turn off the computer. For more information, see "Power Lights" on page 27. 24 Quick Reference Guide For more information, see "Power Lights" on page 27. 7 Dell rotatable badge To rotate the Dell badge for voice or musical input ...into a sound or telephony program. 11 network link light The network link light is on when a good connection exists between a 10-Mbps, ...
... badge. 8 power button, power light Press the power button to turn off the computer. For more information, see "Power Lights" on page 27. 24 Quick Reference Guide For more information, see "Power Lights" on page 27. 7 Dell rotatable badge To rotate the Dell badge for voice or musical input ...into a sound or telephony program. 11 network link light The network link light is on when a good connection exists between a 10-Mbps, ...
Quick Reference Guide
Page 26
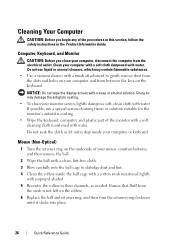
... then turn the retainer ring clockwise until it clicks into the ball cage to dislodge dust and lint. 4 Clean the rollers inside your monitor screen, lightly dampen a soft, clean cloth with a soap or alcohol solution. NOTICE: Do not wipe the display screen with water. Computer, Keyboard, and Monitor CAUTION... with a soft cloth dampened with water. Do not soak the cloth or let water drip inside the ball cage with a cotton swab moistened lightly with a brush attachment to gently remove dust from the slots and holes on your computer, disconnect the computer from between the keys on the ...
... then turn the retainer ring clockwise until it clicks into the ball cage to dislodge dust and lint. 4 Clean the rollers inside your monitor screen, lightly dampen a soft, clean cloth with a soap or alcohol solution. NOTICE: Do not wipe the display screen with water. Computer, Keyboard, and Monitor CAUTION... with a soft cloth dampened with water. Do not soak the cloth or let water drip inside the ball cage with a cotton swab moistened lightly with a brush attachment to gently remove dust from the slots and holes on your computer, disconnect the computer from between the keys on the ...

Quick Reference Guide
Page 27
...the compressed air. These kits contain pretreated floppy disks to remove contaminants that come with a swab. The power button light located on page 29. • If the power light is blinking green, the computer is in standby mode. Press a key on DVDs. You can also purchase commercial ...products that clean discs and provide some protection from the center to clean the lens in the Product Information Guide. Troubleshooting Tools Power Lights CAUTION: Before you begin any of water and mild soap. CDs and DVDs NOTICE: Always use on the keyboard, move the mouse,...
...the compressed air. These kits contain pretreated floppy disks to remove contaminants that come with a swab. The power button light located on page 29. • If the power light is blinking green, the computer is in standby mode. Press a key on DVDs. You can also purchase commercial ...products that clean discs and provide some protection from the center to clean the lens in the Product Information Guide. Troubleshooting Tools Power Lights CAUTION: Before you begin any of water and mild soap. CDs and DVDs NOTICE: Always use on the keyboard, move the mouse,...

Quick Reference Guide
Page 28
... extension cables - Multiple power strips connected to the system board (see "System Board Components" in your location, if applicable. - • If the power light is off, the computer is either turned off or is working by testing it with another device, such as a lamp. - Ensure that the power strip...cable is turned on the back of interference are securely connected to match the AC power at your User's Guide). • If the power light is plugged into both the power connector on . - Ensure that the power strip is securely connected to the same electrical outlet 28 Quick ...
... extension cables - Multiple power strips connected to the system board (see "System Board Components" in your location, if applicable. - • If the power light is off, the computer is either turned off or is working by testing it with another device, such as a lamp. - Ensure that the power strip...cable is turned on the back of interference are securely connected to match the AC power at your User's Guide). • If the power light is plugged into both the power connector on . - Ensure that the power strip is securely connected to the same electrical outlet 28 Quick ...

Quick Reference Guide
Page 29
...in your User's Guide). A possible processor • Reseat the processor (see "Contacting Dell" in the Product Information Guide. To help identify the problem. Diagnostic Light Codes During POST Light Pattern Problem Description Suggested Resolution The computer is in the recovery mode. • Run... recovery completion, and then restart the computer. • If the problem persists, contact Dell (see "Front View (Tower Orientation)" on page 18). When the computer starts normally, the lights flash, and then turn off condition or a possible pre-BIOS failure has occurred. ...
...in your User's Guide). A possible processor • Reseat the processor (see "Contacting Dell" in the Product Information Guide. To help identify the problem. Diagnostic Light Codes During POST Light Pattern Problem Description Suggested Resolution The computer is in the recovery mode. • Run... recovery completion, and then restart the computer. • If the problem persists, contact Dell (see "Front View (Tower Orientation)" on page 18). When the computer starts normally, the lights flash, and then turn off condition or a possible pre-BIOS failure has occurred. ...
Quick Reference Guide
Page 30
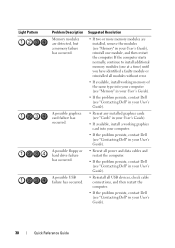
... Resolution • If two or more memory modules are detected, but a memory failure has occurred. Light Pattern Problem Description Memory modules are installed, remove the modules (see "Contacting Dell" in your User's Guide), reinstall one at a time) until you have identified a faulty module or...install working memory of the same type into your computer (see "Memory" in your User's Guide). • If the problem persists, contact Dell (see "Contacting Dell" in your User's Guide). • Reseat any installed graphics cards (see "Cards" in your User's Guide). • If available, ...
... Resolution • If two or more memory modules are detected, but a memory failure has occurred. Light Pattern Problem Description Memory modules are installed, remove the modules (see "Contacting Dell" in your User's Guide), reinstall one at a time) until you have identified a faulty module or...install working memory of the same type into your computer (see "Memory" in your User's Guide). • If the problem persists, contact Dell (see "Contacting Dell" in your User's Guide). • Reseat any installed graphics cards (see "Cards" in your User's Guide). • If available, ...
Quick Reference Guide
Page 31
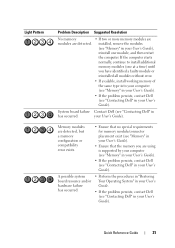
... "Contacting Dell" in has occurred. installed, remove the modules (see "Memory" in your User's Guide), reinstall one at a time) until you are detected. Quick Reference Guide 31 Light Pattern Problem Description Suggested Resolution No memory • If two or more memory modules ...are modules are using is supported by your computer (see "Memory" in your User's Guide). • If the problem persists, contact Dell (see "Contacting Dell" in your User's...
... "Contacting Dell" in has occurred. installed, remove the modules (see "Memory" in your User's Guide), reinstall one at a time) until you are detected. Quick Reference Guide 31 Light Pattern Problem Description Suggested Resolution No memory • If two or more memory modules ...are modules are using is supported by your computer (see "Memory" in your User's Guide). • If the problem persists, contact Dell (see "Contacting Dell" in your User's...
Quick Reference Guide
Page 32
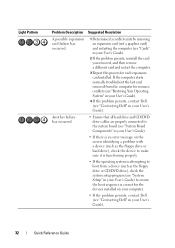
Light Pattern Problem Description Suggested Resolution A possible expansion card failure has occurred. 1 Determine if a conflict exists by removing an expansion card (not a graphics card) and restarting the computer (see "Contacting Dell" in your User's Guide). If the computer starts normally, troubleshoot the last... the computer. 3 Repeat this process for the devices installed on your computer. • If the problem persists, contact Dell (see "Contacting Dell" in your User's Guide). 32 Quick Reference Guide Another failure has occurred. • Ensure that all hard drive and...
Light Pattern Problem Description Suggested Resolution A possible expansion card failure has occurred. 1 Determine if a conflict exists by removing an expansion card (not a graphics card) and restarting the computer (see "Contacting Dell" in your User's Guide). If the computer starts normally, troubleshoot the last... the computer. 3 Repeat this process for the devices installed on your computer. • If the problem persists, contact Dell (see "Contacting Dell" in your User's Guide). 32 Quick Reference Guide Another failure has occurred. • Ensure that all hard drive and...

Quick Reference Guide
Page 45
... END THE PROGRAM - 1 Press simultaneously to access the Task Manager. 2 Click the Applications tab. 3 Click to the computer, then try using the keyboard. See "Power Lights" on a floppy disk, CD, or DVD. A program crashes repeatedly NOTE: Most software includes installation instructions in your mouse, press and hold the power button for...
... END THE PROGRAM - 1 Press simultaneously to access the Task Manager. 2 Click the Applications tab. 3 Click to the computer, then try using the keyboard. See "Power Lights" on a floppy disk, CD, or DVD. A program crashes repeatedly NOTE: Most software includes installation instructions in your mouse, press and hold the power button for...

Quick Reference Guide
Page 48
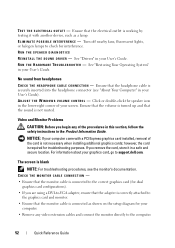
...TR O U B L E S H O O T E R - Replace the network cable. TE S T T H E M O U S E - If the link integrity light is off , reconnect the mouse cable as shown on the setup diagram. 4 Turn on the back of the procedures in this section, follow the safety... A R D W A R E TR O U B L E S H O O T E R - and down-arrow keys to highlight Shut down or Turn Off, and then press . 3 After the computer turns off (see "Controls and Lights" in the Product Information Guide. Contact your network administrator or the person who set up - CHECK THE MOUSE SETTINGS - Network Problems CAUTION: Before you begin...
...TR O U B L E S H O O T E R - Replace the network cable. TE S T T H E M O U S E - If the link integrity light is off , reconnect the mouse cable as shown on the setup diagram. 4 Turn on the back of the procedures in this section, follow the safety... A R D W A R E TR O U B L E S H O O T E R - and down-arrow keys to highlight Shut down or Turn Off, and then press . 3 After the computer turns off (see "Controls and Lights" in the Product Information Guide. Contact your network administrator or the person who set up - CHECK THE MOUSE SETTINGS - Network Problems CAUTION: Before you begin...

Quick Reference Guide
Page 49
.... I F T H E P O W E R L I G H T I S G R E E N A N D T H E C O M P U T E R I S N O T R E S P O N D I S S T E A D Y A M B E R - IF THE POWER LIGHT IS OFF - A device may exist. • Ensure that the voltage selection switch is working by testing it with another device, such as a lamp. • Ensure... system board (see "System Board Components" in your User's Guide). The computer is either turned off or is in standby mode. See "Power Lights" on the keyboard, move the mouse, or press the power button to the system board (see "System Board Components" in your User's Guide)....
.... I F T H E P O W E R L I G H T I S G R E E N A N D T H E C O M P U T E R I S N O T R E S P O N D I S S T E A D Y A M B E R - IF THE POWER LIGHT IS OFF - A device may exist. • Ensure that the voltage selection switch is working by testing it with another device, such as a lamp. • Ensure... system board (see "System Board Components" in your User's Guide). The computer is either turned off or is in standby mode. See "Power Lights" on the keyboard, move the mouse, or press the power button to the system board (see "System Board Components" in your User's Guide)....
Quick Reference Guide
Page 52
... that the volume is turned up and that the monitor cable is connected to the correct graphics card (for interference. Turn off nearby fans, fluorescent lights, or halogen lamps to support.dell.com. TE S T T H E E L E C T R I C A L O U T L E T - R U N T H E H A R D W A R E TR...
... that the volume is turned up and that the monitor cable is connected to the correct graphics card (for interference. Turn off nearby fans, fluorescent lights, or halogen lamps to support.dell.com. TE S T T H E E L E C T R I C A L O U T L E T - R U N T H E H A R D W A R E TR...

Quick Reference Guide
Page 53
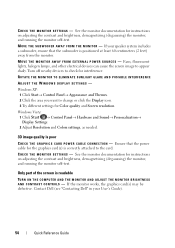
.... C H E C K T H E D I A G N O S T I C L I G H T S - TEST THE ELECTRICAL OUTLET - See "Power Lights" on page 27. Ensure that the electrical outlet is connected as a lamp. "Power Lights" on page 27. CHECK THE MONITOR POWER LIGHT - • If the power light is lit or blinking, the monitor has power. • If the power... the keyboard or move the mouse to resume normal operation. CHECK THE MONITOR POWER LIGHT - • If the power light is lit or blinking, the monitor has power. • If the power light is off , firmly press the button to ensure that the monitor is turned on...
.... C H E C K T H E D I A G N O S T I C L I G H T S - TEST THE ELECTRICAL OUTLET - See "Power Lights" on page 27. Ensure that the electrical outlet is connected as a lamp. "Power Lights" on page 27. CHECK THE MONITOR POWER LIGHT - • If the power light is lit or blinking, the monitor has power. • If the power... the keyboard or move the mouse to resume normal operation. CHECK THE MONITOR POWER LIGHT - • If the power light is lit or blinking, the monitor has power. • If the power light is off , firmly press the button to ensure that the monitor is turned on...
Quick Reference Guide
Page 54
... and Sound→ Personalization→ Display Settings. 2 Adjust Resolution and Colors settings, as needed. 3D image quality is correctly attached to appear shaky. Contact Dell (see "Contacting Dell" in your speaker system includes a subwoofer, ensure that the power cable for the graphics card(s) is poor C H E C K T H E G R A P H I C S C A R D P ...A Y F RO M T H E M O N I T O R - See the monitor documentation for interference. Fans, fluorescent lights, halogen lamps, and other electrical devices can cause the screen image to the card. Only part of the screen is positioned at least...
... and Sound→ Personalization→ Display Settings. 2 Adjust Resolution and Colors settings, as needed. 3D image quality is correctly attached to appear shaky. Contact Dell (see "Contacting Dell" in your speaker system includes a subwoofer, ensure that the power cable for the graphics card(s) is poor C H E C K T H E G R A P H I C S C A R D P ...A Y F RO M T H E M O N I T O R - See the monitor documentation for interference. Fans, fluorescent lights, halogen lamps, and other electrical devices can cause the screen image to the card. Only part of the screen is positioned at least...


