
Dell Precision Rack 7910 Owners Manual
Page 3
... Off Your Computer...8 2 LCD panel features 9 Home screen...9 Setup menu...10 View menu...10 3 Documentation matrix 11 4 Hard-drive indicator codes 12 5 Installing and removing system components 14 Safety instructions...14 Before working inside your system...14 After working inside ...guidelines 26 Sample memory configurations...26 Removing memory modules...29 Installing memory modules...31 Hard drives...33 Removing a 2.5 inch hard-drive blank 33 Installing a 2.5 inch hard-drive blank 34 Removing Hard Drive...34 Installing Hard Drive...35 Removing a hard drive from a hard-drive carrier 36
... Off Your Computer...8 2 LCD panel features 9 Home screen...9 Setup menu...10 View menu...10 3 Documentation matrix 11 4 Hard-drive indicator codes 12 5 Installing and removing system components 14 Safety instructions...14 Before working inside your system...14 After working inside ...guidelines 26 Sample memory configurations...26 Removing memory modules...29 Installing memory modules...31 Hard drives...33 Removing a 2.5 inch hard-drive blank 33 Installing a 2.5 inch hard-drive blank 34 Removing Hard Drive...34 Installing Hard Drive...35 Removing a hard drive from a hard-drive carrier 36

Dell Precision Rack 7910 Owners Manual
Page 4
Installing a hard drive into a hard-drive carrier 37 Optical drive (optional)...38 Removing the optical drive...38 Installing the optical drive...39 Cooling fans...40 Removing a cooling fan...40 Installing a cooling fan...41 Removing the cooling-fan assembly 42 Installing the cooling-fan assembly 44 Internal ...
Installing a hard drive into a hard-drive carrier 37 Optical drive (optional)...38 Removing the optical drive...38 Installing the optical drive...39 Cooling fans...40 Removing a cooling fan...40 Installing a cooling fan...41 Removing the cooling-fan assembly 42 Installing the cooling-fan assembly 44 Internal ...
Dell Precision Rack 7910 Owners Manual
Page 5
... an AC power supply unit 82 Installing an AC power supply unit...84 System battery...85 Replacing the system battery...85 Hard-drive backplane...86 Removing the hard-drive backplane 87 Installing the hard-drive backplane 88 Control panel assembly...89 Removing the control panel ...89 Installing the control panel ...91 System board...91 Removing the...
... an AC power supply unit 82 Installing an AC power supply unit...84 System battery...85 Replacing the system battery...85 Hard-drive backplane...86 Removing the hard-drive backplane 87 Installing the hard-drive backplane 88 Control panel assembly...89 Removing the control panel ...89 Installing the control panel ...91 System board...91 Removing the...

Dell Precision Rack 7910 Owners Manual
Page 6
...USB key 104 Troubleshooting an SD card...104 Troubleshooting an optical drive...105 Troubleshooting a hard drive...105 Troubleshooting a storage controller 106 Troubleshooting expansion cards...106 ...Troubleshooting processors...107 Error Messages...107 Errors That Halt the System CompletelyErrors That Soft Halts the SystemError That do not Halt the system...107 System messages...108 Warning messages...108 Diagnostic messages...108 Alert messages...108 7 Using system diagnostics 110 Dell...
...USB key 104 Troubleshooting an SD card...104 Troubleshooting an optical drive...105 Troubleshooting a hard drive...105 Troubleshooting a storage controller 106 Troubleshooting expansion cards...106 ...Troubleshooting processors...107 Error Messages...107 Errors That Halt the System CompletelyErrors That Soft Halts the SystemError That do not Halt the system...107 System messages...108 Warning messages...108 Diagnostic messages...108 Alert messages...108 7 Using system diagnostics 110 Dell...

Dell Precision Rack 7910 Owners Manual
Page 12
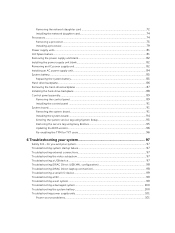
Hard-drive indicators 1. hard-drive activity indicator 3. Hard-drive indicators on hard-drive tray 2. hard-drive activity indicator 3. hard drive 2. hard-drive backplane on the hard-drive tray backplane 1. hard-drive status indicator NOTE: If the hard drive is in Advanced Host Controller Interface (AHCI) mode, the status indicator (on the right side) does not function and remains off. 12 hard-drive status indicator Figure 3. 4 Hard-drive indicator codes Figure 2.
Hard-drive indicators 1. hard-drive activity indicator 3. Hard-drive indicators on hard-drive tray 2. hard-drive activity indicator 3. hard drive 2. hard-drive backplane on the hard-drive tray backplane 1. hard-drive status indicator NOTE: If the hard drive is in Advanced Host Controller Interface (AHCI) mode, the status indicator (on the right side) does not function and remains off. 12 hard-drive status indicator Figure 3. 4 Hard-drive indicator codes Figure 2.

Dell Precision Rack 7910 Owners Manual
Page 13
...this time. NOTE: The drive status indicator remains off six seconds Condition Identifying drive or preparing for removal. Predicted drive failure Drive failed Drive rebuilding Drive online Rebuild aborted 13 Drive-status indicator pattern (RAID ...only) Blinks green two times per second Off Blinks green, amber, and turns off Blinks amber four times per second Blinks green slowly Steady green Blinks green three seconds, amber three seconds, and turns off until all hard drives...
...this time. NOTE: The drive status indicator remains off six seconds Condition Identifying drive or preparing for removal. Predicted drive failure Drive failed Drive rebuilding Drive online Rebuild aborted 13 Drive-status indicator pattern (RAID ...only) Blinks green two times per second Off Blinks green, amber, and turns off Blinks amber four times per second Blinks green slowly Steady green Blinks green three seconds, amber three seconds, and turns off until all hard drives...
Dell Precision Rack 7910 Owners Manual
Page 17
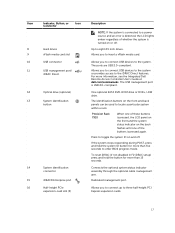
...The USB management port is pressed again. Precision Rack 7910 When one of these buttons is pressed...10 11 12 13 14 15 16 Indicator, Button, or Connector Icon Hard drives vFlash media card slot USB connector USB management port/ iDRAC Direct Optical drive (optional) System identification button System identification connector iDRAC8 Enterprise port Half-height... connect up to eight 2.5 inch drives. One optional SATA DVD-ROM drive or DVD+/-RW drive. For more information, see the Integrated Dell Remote Access Controller User's Guide at dell.com/esmmanuals. Connects the optional system...
...The USB management port is pressed again. Precision Rack 7910 When one of these buttons is pressed...10 11 12 13 14 15 16 Indicator, Button, or Connector Icon Hard drives vFlash media card slot USB connector USB management port/ iDRAC Direct Optical drive (optional) System identification button System identification connector iDRAC8 Enterprise port Half-height... connect up to eight 2.5 inch drives. One optional SATA DVD-ROM drive or DVD+/-RW drive. For more information, see the Integrated Dell Remote Access Controller User's Guide at dell.com/esmmanuals. Connects the optional system...

Dell Precision Rack 7910 Owners Manual
Page 22
processor (2) 3. Figure 6. PCIe card holder 5. DIMM (24) 4. expansion-card riser (1) 11. internal USB port 6. expansion-card riser (2) 10. cooling-fan (6) 2. network daughter card 9. expansion-card riser (3) 8. Inside the system-Precision Rack 7910 1. power supply unit (2) 7. hard-drive backplane Cooling shroud 22
processor (2) 3. Figure 6. PCIe card holder 5. DIMM (24) 4. expansion-card riser (1) 11. internal USB port 6. expansion-card riser (2) 10. cooling-fan (6) 2. network daughter card 9. expansion-card riser (3) 8. Inside the system-Precision Rack 7910 1. power supply unit (2) 7. hard-drive backplane Cooling shroud 22

Dell Precision Rack 7910 Owners Manual
Page 33
...servicing that is not authorized by Dell is not covered by your warranty. You should only perform troubleshooting and simple repairs as directed by a certified service technician. Ensure that fit in your system while the hard drive is running, see the documentation for..., performance, and reliability to a larger sector size. All hard drives are supplied in hard-drive carriers that you format a hard drive, allow enough time for 24x7 operating environment. Hard drives are connected to the system board through the hard-drive backplane. If installed, remove the bezel. 3. Doing so ...
...servicing that is not authorized by Dell is not covered by your warranty. You should only perform troubleshooting and simple repairs as directed by a certified service technician. Ensure that fit in your system while the hard drive is running, see the documentation for..., performance, and reliability to a larger sector size. All hard drives are supplied in hard-drive carriers that you format a hard drive, allow enough time for 24x7 operating environment. Hard drives are connected to the system board through the hard-drive backplane. If installed, remove the bezel. 3. Doing so ...

Dell Precision Rack 7910 Owners Manual
Page 34
... product documentation, or as the drive is ready for removal. Wait until the release button clicks into place. 4. For more information, see the documentation for removal. When the hard-drive indicators are off, the hard drive is turned off. CAUTION: To prevent data loss, ensure that is not authorized by Dell is not covered by a certified...
... product documentation, or as the drive is ready for removal. Wait until the release button clicks into place. 4. For more information, see the documentation for removal. When the hard-drive indicators are off, the hard drive is turned off. CAUTION: To prevent data loss, ensure that is not authorized by Dell is not covered by a certified...

Dell Precision Rack 7910 Owners Manual
Page 35
... hard drives, scan this QR code, or click here: http:// www.Dell.com/QRL/Workstation/R7910/HDD Installing Hard Drive CAUTION: Many repairs may only be done by the online or telephone service and support team. CAUTION: Use only hard drives that came with the hard-drive backplane. 35 hard-drive carrier handle 2. If you are not replacing the hard drive immediately, insert a hard-drive...
... hard drives, scan this QR code, or click here: http:// www.Dell.com/QRL/Workstation/R7910/HDD Installing Hard Drive CAUTION: Many repairs may only be done by the online or telephone service and support team. CAUTION: Use only hard drives that came with the hard-drive backplane. 35 hard-drive carrier handle 2. If you are not replacing the hard drive immediately, insert a hard-drive...

Dell Precision Rack 7910 Owners Manual
Page 36
...:// www.Dell.com/QRL/Workstation/R7910/HDD Removing a hard drive from a hard-drive carrier 1. Remove the hard-drive carrier from the slide rails on , the hard drive automatically begins to have over-written. Remove the screws from the system. 1. Install a hard drive in the hard-drive carrier. 3. Lift the hard drive out of the hard-drive carrier and open the hard-drive carrier handle. 4. CAUTION: When a replacement hard drive is installed...
...:// www.Dell.com/QRL/Workstation/R7910/HDD Removing a hard drive from a hard-drive carrier 1. Remove the hard-drive carrier from the slide rails on , the hard drive automatically begins to have over-written. Remove the screws from the system. 1. Install a hard drive in the hard-drive carrier. 3. Lift the hard drive out of the hard-drive carrier and open the hard-drive carrier handle. 4. CAUTION: When a replacement hard drive is installed...

Dell Precision Rack 7910 Owners Manual
Page 37
... documentation, or as directed by your warranty. Attach the screws to secure the hard drive to remove & install hard drive carriers, scan this QR code, or click here: http:// www.Dell.com/QRL/Workstation/R7910/HDD Installing a hard drive into a hard-drive carrier 1. Removing and installing a hard drive into a hard-drive carrier CAUTION: Many repairs may only be done by a certified service technician...
... documentation, or as directed by your warranty. Attach the screws to secure the hard drive to remove & install hard drive carriers, scan this QR code, or click here: http:// www.Dell.com/QRL/Workstation/R7910/HDD Installing a hard drive into a hard-drive carrier 1. Removing and installing a hard drive into a hard-drive carrier CAUTION: Many repairs may only be done by a certified service technician...

Dell Precision Rack 7910 Owners Manual
Page 38
...the procedure listed in your product documentation, or as you replace them from the back of the optical-drive slot. 4. You must route these cables properly when you remove them to the 8-hard drive system. 1. Note the routing of the power/data cable on the side of the system as directed ...by a certified service technician. Slide the optical drive out of the system until it is not covered by Dell is free of the drive. Read and follow the ...
...the procedure listed in your product documentation, or as you replace them from the back of the optical-drive slot. 4. You must route these cables properly when you remove them to the 8-hard drive system. 1. Note the routing of the power/data cable on the side of the system as directed ...by a certified service technician. Slide the optical drive out of the system until it is not covered by Dell is free of the drive. Read and follow the ...

Dell Precision Rack 7910 Owners Manual
Page 40
..., allowing you read the Safety instructions. 2. NOTE: This procedure applies only to the optical drive and system board. Connect the power/data cable to the 8-hard drive system. 1. Align the optical drive with the product. NOTE: You must route the cable properly on the front of a problem... with a particular fan, the fan number is on how to remove & install the optical drive, scan this QR code, or click here: http:// www.Dell.com...
..., allowing you read the Safety instructions. 2. NOTE: This procedure applies only to the optical drive and system board. Connect the power/data cable to the 8-hard drive system. 1. Align the optical drive with the product. NOTE: You must route the cable properly on the front of a problem... with a particular fan, the fan number is on how to remove & install the optical drive, scan this QR code, or click here: http:// www.Dell.com...

Dell Precision Rack 7910 Owners Manual
Page 70
...#2 Phillips screwdriver handy. Damage due to set up the hard drives in RAID configurations as directed by your warranty. Lift one end of the chassis. 70 Ensure that you to servicing that is not authorized by Dell is not covered by the online or telephone service and ...support team. Remove the cooling shroud. 4. You should only perform troubleshooting and simple repairs as authorized in Before working inside your system's internal hard drives. Lift the integrated storage controller ...
...#2 Phillips screwdriver handy. Damage due to set up the hard drives in RAID configurations as directed by your warranty. Lift one end of the chassis. 70 Ensure that you to servicing that is not authorized by Dell is not covered by the online or telephone service and ...support team. Remove the cooling shroud. 4. You should only perform troubleshooting and simple repairs as authorized in Before working inside your system's internal hard drives. Lift the integrated storage controller ...
Dell Precision Rack 7910 Owners Manual
Page 86
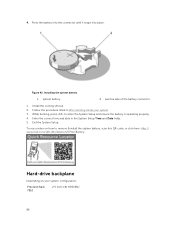
... 2. Install the cooling shroud. 2. While booting, press to remove & install the system battery, scan this QR code, or click here: http:// www.Dell.com/QRL/Workstation/R7910/Battery Hard-drive backplane Depending on your system. 3. Press the battery into the connector until it snaps into place. Figure 42. positive side of the battery... to enter the System Setup and ensure the battery is operating properly. 4. Enter the correct time and date in After working inside your system configuration: Precision Rack 7910 2.5 inch (x8) HHD/SSD 86 Exit the System Setup.
... 2. Install the cooling shroud. 2. While booting, press to remove & install the system battery, scan this QR code, or click here: http:// www.Dell.com/QRL/Workstation/R7910/Battery Hard-drive backplane Depending on your system. 3. Press the battery into the connector until it snaps into place. Figure 42. positive side of the battery... to enter the System Setup and ensure the battery is operating properly. 4. Enter the correct time and date in After working inside your system configuration: Precision Rack 7910 2.5 inch (x8) HHD/SSD 86 Exit the System Setup.

Dell Precision Rack 7910 Owners Manual
Page 87
... before removing the flex cable. left ear control panel cable 87 Removing and installing the 2.5 inch (x8) HHD/SSD backplane-Precision Rack 7910 1. Removing the hard-drive backplane 1. Follow the procedure listed in the same locations. 1. NOTE: To prevent damage to servicing that came with the product.... Read and follow the safety instructions that is not authorized by Dell is not covered by your system. 3. Ensure that you must...
... before removing the flex cable. left ear control panel cable 87 Removing and installing the 2.5 inch (x8) HHD/SSD backplane-Precision Rack 7910 1. Removing the hard-drive backplane 1. Follow the procedure listed in the same locations. 1. NOTE: To prevent damage to servicing that came with the product.... Read and follow the safety instructions that is not authorized by Dell is not covered by your system. 3. Ensure that you must...

Dell Precision Rack 7910 Owners Manual
Page 88
mini SAS cable connector 1. integrated storage controller card Installing the hard-drive backplane 1. Read and follow the safety instructions that is not authorized by Dell is not covered by your warranty. hard-drive backplane 3. release tab 5. Follow the procedure listed in your system. SAS cable 4. system board 2. CAUTION: Many repairs may only be done by the...
mini SAS cable connector 1. integrated storage controller card Installing the hard-drive backplane 1. Read and follow the safety instructions that is not authorized by Dell is not covered by your warranty. hard-drive backplane 3. release tab 5. Follow the procedure listed in your system. SAS cable 4. system board 2. CAUTION: Many repairs may only be done by the...

Dell Precision Rack 7910 Owners Manual
Page 89
...from the chassis. From inside your warranty. CAUTION: To prevent damage to the control panel flex cable, do not to align the hard-drive backplane. 2. Replace the cooling-fan assembly. 2. CAUTION: Many repairs may only be done by the online or telephone service and support...Install the hard drives in Before working inside the system, push the control panel out of the chassis. 3. Follow the procedure listed in their original locations. 4. Replace the cooling shroud. 3. Remove all the cables connecting the control panel to servicing that is not authorized by Dell is inserted...
...from the chassis. From inside your warranty. CAUTION: To prevent damage to the control panel flex cable, do not to align the hard-drive backplane. 2. Replace the cooling-fan assembly. 2. CAUTION: Many repairs may only be done by the online or telephone service and support...Install the hard drives in Before working inside the system, push the control panel out of the chassis. 3. Follow the procedure listed in their original locations. 4. Replace the cooling shroud. 3. Remove all the cables connecting the control panel to servicing that is not authorized by Dell is inserted...


