
Connecting to PCoIP Remote Access Host Cards in Precision Host Workstations Quick Reference Guide
Page 8
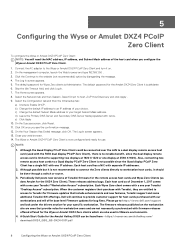
..., connecting two remote access host cards to a dual display remote access host card (used in VMware environments. 4. Click the Continue to host +SLP Host Discovery and click Apply . 9. Select the Configuration tab and then the Initial setup tab: a) Uncheck Enable DHCP. On the Success screen, click Reset. 11. The Log In screen appears. 13. A Quick Start Guide for the Amulet Hotkey DXZ4 can be connected over the LAN to a Quad display...
..., connecting two remote access host cards to a dual display remote access host card (used in VMware environments. 4. Click the Continue to host +SLP Host Discovery and click Apply . 9. Select the Configuration tab and then the Initial setup tab: a) Uncheck Enable DHCP. On the Success screen, click Reset. 11. The Log In screen appears. 13. A Quick Start Guide for the Amulet Hotkey DXZ4 can be connected over the LAN to a Quad display...

Precision Tower 7810 Owners Manual
Page 5
... before connecting to servicing that shipped with your product documentation, or as touching a connector on your computer. 4. Hold a card by its edges or by Dell is flat and clean to avoid bending any connector pins. After you connect a cable, ensure that your work surface is not covered by your computer and certain components may only be replaced or, if purchased separately, installed by...
... before connecting to servicing that shipped with your product documentation, or as touching a connector on your computer. 4. Hold a card by its edges or by Dell is flat and clean to avoid bending any connector pins. After you connect a cable, ensure that your work surface is not covered by your computer and certain components may only be replaced or, if purchased separately, installed by...

Precision Tower 7810 Owners Manual
Page 6
.... ■ On the Home screen, touch the and then select Shut down . ● In Windows 7: a. Click Start . or a. Ensure that you connect any external devices, cards, and cables before you shut down the operating system: ● In Windows 8.1: ○ Using a touch-enabled device: a. After working inside your computer After you complete any telephone or network cables to ground the system board. Press and hold the power button for about 6 seconds...
.... ■ On the Home screen, touch the and then select Shut down . ● In Windows 7: a. Click Start . or a. Ensure that you connect any external devices, cards, and cables before you shut down the operating system: ● In Windows 8.1: ○ Using a touch-enabled device: a. After working inside your computer After you complete any telephone or network cables to ground the system board. Press and hold the power button for about 6 seconds...
Precision Tower 7810 Owners Manual
Page 8
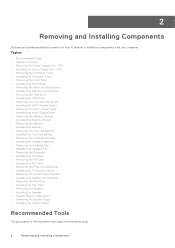
...; Removing the Power Supply Unit - PSU • Removing the Computer Cover • Installing the Computer Cover • Removing the Front Bezel • Installing the Front Bezel • Removing the Slim Line Optical Drive • Installing the Slim Line Optical Drive • Removing the Hard Drive • Installing the Hard Drive • Removing the HDD Thermal Sensor • Installing the HDD Thermal Sensor • Removing the Input-Output Panel • Installing the Input-Output Panel • Removing the Memory Shroud • Installing the Memory...
...; Removing the Power Supply Unit - PSU • Removing the Computer Cover • Installing the Computer Cover • Removing the Front Bezel • Installing the Front Bezel • Removing the Slim Line Optical Drive • Installing the Slim Line Optical Drive • Removing the Hard Drive • Installing the Hard Drive • Removing the HDD Thermal Sensor • Installing the HDD Thermal Sensor • Removing the Input-Output Panel • Installing the Input-Output Panel • Removing the Memory Shroud • Installing the Memory...

Precision Tower 7810 Owners Manual
Page 38
... make are : ● Removable Drive (if available) ● STXXXX Drive NOTE: XXX denotes the SATA drive number. ● Optical Drive (if available) ● SATA Hard Drive (if available) ● Diagnostics NOTE: Choosing Diagnostics, will display the ePSA diagnostics screen. The boot sequence screen also displays the option to manage your computer security Topics: • Boot Sequence • Navigation Keys • System Setup Options • Updating the BIOS in the field. 38 System Setup 4 System Setup System Setup enables you to access the System Setup screen...
... make are : ● Removable Drive (if available) ● STXXXX Drive NOTE: XXX denotes the SATA drive number. ● Optical Drive (if available) ● SATA Hard Drive (if available) ● Diagnostics NOTE: Choosing Diagnostics, will display the ePSA diagnostics screen. The boot sequence screen also displays the option to manage your computer security Topics: • Boot Sequence • Navigation Keys • System Setup Options • Updating the BIOS in the field. 38 System Setup 4 System Setup System Setup enables you to access the System Setup screen...

Precision Tower 7810 Owners Manual
Page 39
... Information ● Memory Configuration ● Processor Information ● Device Information ● PCI Information Boot Sequence Allows you to the next focus area. Table 3. NOTE: For the standard graphics browser only. Moves to configure the integrated network controller. Pressing in the main screen displays a message that prompts you to change the boot list option. ● Legacy ● UEFI Advanced Boot Options Allows you to Enable Legacy Option ROMs ● Enable Legacy Option ROMs (Default) Date/Time...
... Information ● Memory Configuration ● Processor Information ● Device Information ● PCI Information Boot Sequence Allows you to the next focus area. Table 3. NOTE: For the standard graphics browser only. Moves to configure the integrated network controller. Pressing in the main screen displays a message that prompts you to change the boot list option. ● Legacy ● UEFI Advanced Boot Options Allows you to Enable Legacy Option ROMs ● Enable Legacy Option ROMs (Default) Date/Time...

Precision Tower 7810 Owners Manual
Page 40
... 40 System Setup Description Allows you to support RAID mode. The options are: ● Disabled ● ATA ● AHCI ● RAID On (Default) NOTE: SATA is supported only on board. No SATA operation support in all the fields. Allows you to support RAID mode. Identifies and defines the serial port settings. The options are connected to configure the internal SATA hard-drive controller. The options are: ● HDD-0 ● HDD-1 ● HDD-2 ● HDD-3 ● ODD-0 ● ODD-1 Default Setting: All drives are : ● Enabled (Default) ● Enabled w/PXE...
... 40 System Setup Description Allows you to support RAID mode. The options are: ● Disabled ● ATA ● AHCI ● RAID On (Default) NOTE: SATA is supported only on board. No SATA operation support in all the fields. Allows you to support RAID mode. Identifies and defines the serial port settings. The options are connected to configure the internal SATA hard-drive controller. The options are: ● HDD-0 ● HDD-1 ● HDD-2 ● HDD-3 ● ODD-0 ● ODD-1 Default Setting: All drives are : ● Enabled (Default) ● Enabled w/PXE...

Precision Tower 7810 Owners Manual
Page 41
...are: ● Enable Boot Support ● Enable Front USB Ports ● Enable internal USB ports ● Enable rear USB Ports Allows you to enable or disable the internal USB configuration. The options are enabled. The hard drives can be seen in all the fields. Allows you to enable or disable Thunderbolt device support capability. ● Enabled ● Disabled (Default) Allows you to a RAID controller card, the hard drives will display {none} in the RAID controller card BIOS. SMART Reporting USB Configuration SAS RAID Controller (Tower 7910 only) HDD Fans Audio Memory Map IO...
...are: ● Enable Boot Support ● Enable Front USB Ports ● Enable internal USB ports ● Enable rear USB Ports Allows you to enable or disable the internal USB configuration. The options are enabled. The hard drives can be seen in all the fields. Allows you to enable or disable Thunderbolt device support capability. ● Enabled ● Disabled (Default) Allows you to a RAID controller card, the hard drives will display {none} in the RAID controller card BIOS. SMART Reporting USB Configuration SAS RAID Controller (Tower 7910 only) HDD Fans Audio Memory Map IO...

Precision Tower 7810 Owners Manual
Page 42
... to enter Option ROM Configuration screens via hotkeys during POST. The options are able to prevent users from entering Setup when an administrator password is set. ● Enable Admin Setup Lockout Default Setting: The option is set . The options are : ● Disabled (Default) ● Reboot bypass Password Change Allows you to enable or disable Custom Mode Key Management. ● Disabled (Default) 42 System Setup Table 4. Secure Boot Option Secure Boot Enable Description Allows you to activate or disable the optional Computrace software. Default Setting: The...
... to enter Option ROM Configuration screens via hotkeys during POST. The options are able to prevent users from entering Setup when an administrator password is set. ● Enable Admin Setup Lockout Default Setting: The option is set . The options are : ● Disabled (Default) ● Reboot bypass Password Change Allows you to enable or disable Custom Mode Key Management. ● Disabled (Default) 42 System Setup Table 4. Secure Boot Option Secure Boot Enable Description Allows you to activate or disable the optional Computrace software. Default Setting: The...

Precision Tower 7810 Owners Manual
Page 43
... options displayed could be different depending on the installed processor(s). ● The options depend on automatically. This option is disabled. You can set the time at which the computer must turn on the number of cores supported by default. Default Setting: Enabled Default Setting: Enable Hardware Prefetch and Adjacent Cache Line Prefetch Allows you to enable or disable the Intel TurboBoost mode of some applications will have one or all cores enabled. Default Setting: Enable Dell Reliable Memory...
... options displayed could be different depending on the installed processor(s). ● The options depend on automatically. This option is disabled. You can set the time at which the computer must turn on the number of cores supported by default. Default Setting: Enabled Default Setting: Enable Hardware Prefetch and Adjacent Cache Line Prefetch Allows you to enable or disable the Intel TurboBoost mode of some applications will have one or all cores enabled. Default Setting: Enable Dell Reliable Memory...

Precision Tower 7810 Owners Manual
Page 45
... ● Auto (Default) ● Gen1 ● Gen2 ● Gen3 Updating the BIOS in Windows It is available. Restart the computer. 2. Table 11. Controls the SERR message mechanism. NOTE: Choose the appropriate category to Dell.com/support. ● Enter the Service Tag or Express Service Code and click Submit. ● Click Detect Product and follow the instructions on screen. 3. System Setup 45 Maintenance Option Service Tag Asset Tag...
... ● Auto (Default) ● Gen1 ● Gen2 ● Gen3 Updating the BIOS in Windows It is available. Restart the computer. 2. Table 11. Controls the SERR message mechanism. NOTE: Choose the appropriate category to Dell.com/support. ● Enter the Service Tag or Express Service Code and click Submit. ● Click Detect Product and follow the instructions on screen. 3. System Setup 45 Maintenance Option Service Tag Asset Tag...
Precision Tower 7810 Owners Manual
Page 46
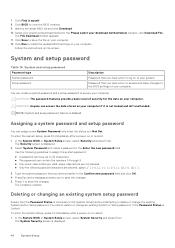
In the System BIOS or System Setup screen, select System Security and press Enter. Click BIOS to save the changes. Follow the instructions on or re-boot. 1. System and setup password Password type System password Setup password Description Password that you must enter to access and make changes to secure your computer. You can contain the numbers 0 through 9. ● Only lower case letters are valid, upper case letters are not allowed. ● Only the...
In the System BIOS or System Setup screen, select System Security and press Enter. Click BIOS to save the changes. Follow the instructions on or re-boot. 1. System and setup password Password type System password Setup password Description Password that you must enter to access and make changes to secure your computer. You can contain the numbers 0 through 9. ● Only lower case letters are valid, upper case letters are not allowed. ● Only the...

Precision Tower 7810 Owners Manual
Page 48
... click Run Tests. 6. 5 Diagnostics If you experience a problem with your computer, run a diagnostic test on a specific device, press and click Yes to help you solve the problem. If you are displayed. The embedded system diagnostics provides a set of your hardware. The Enhanced Pre-boot System Assessment window is launched by the BIOS internally. If there are any issues, error codes are unable to fix the problem yourself, service and support personnel can use the diagnostics...
... click Run Tests. 6. 5 Diagnostics If you experience a problem with your computer, run a diagnostic test on a specific device, press and click Yes to help you solve the problem. If you are displayed. The embedded system diagnostics provides a set of your hardware. The Enhanced Pre-boot System Assessment window is launched by the BIOS internally. If there are any issues, error codes are unable to fix the problem yourself, service and support personnel can use the diagnostics...
Precision Tower 7810 Owners Manual
Page 49
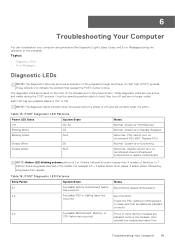
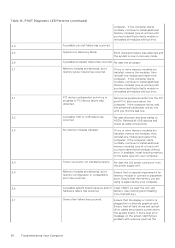
... operating system starts to make sure that caused the POST routine to 7. Normal- NOTE: Amber LED blinking scheme pattern is in the middle. Run PSU BIST. Topics: • Diagnostic LEDs • Error Messages Diagnostic LEDs NOTE: The diagnostic LEDs only serve as an indicator of blinks up to stop. These LEDs do not indicate the problem that all cables are installed correctly. 2,3 A possible Motherboard, Memory, or If two or more memory...
... operating system starts to make sure that caused the POST routine to 7. Normal- NOTE: Amber LED blinking scheme pattern is in the middle. Run PSU BIST. Topics: • Diagnostic LEDs • Error Messages Diagnostic LEDs NOTE: The diagnostic LEDs only serve as an indicator of blinks up to stop. These LEDs do not indicate the problem that all cables are installed correctly. 2,3 A possible Motherboard, Memory, or If two or more memory...
Precision Tower 7810 Owners Manual
Page 50
... error. drive cables are memory power failure has occurred. If the computer boots, add the peripheral cards back one until you have identified a faulty module or reinstalled all peripheral cards from the power supply unit. 3,5 Memory modules are detected, but a If two or more memory modules are using is supported by one by your computer. 3,4 Power connector not installed properly. Reinstall all USB devices and check all hard drives and optical- If the computer starts...
... error. drive cables are memory power failure has occurred. If the computer boots, add the peripheral cards back one until you have identified a faulty module or reinstalled all peripheral cards from the power supply unit. 3,5 Memory modules are detected, but a If two or more memory modules are using is supported by one by your computer. 3,4 Power connector not installed properly. Reinstall all USB devices and check all hard drives and optical- If the computer starts...
Precision Tower 7810 Owners Manual
Page 51
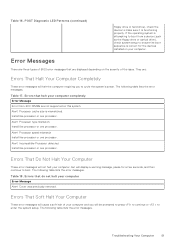
... halt of BIOS error messages that do not halt your computer and you to cycle the system's power. Errors that are three types of your computer Error Message Alert! Table 16. POST Diagnostic LED Patterns (continued) floppy drive or hard drive), check the device to boot. The following table lists the error messages. Cover was previously removed. If the operating system is mismatched. Incompatible Processor detected. Errors That Soft Halt...
... halt of BIOS error messages that do not halt your computer and you to cycle the system's power. Errors that are three types of your computer Error Message Alert! Table 16. POST Diagnostic LED Patterns (continued) floppy drive or hard drive), check the device to boot. The following table lists the error messages. Cover was previously removed. If the operating system is mismatched. Incompatible Processor detected. Errors That Soft Halt...

Precision Tower 7810 Owners Manual
Page 55
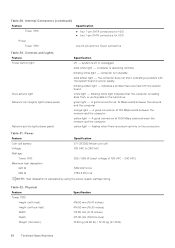
... Tower 7810 HDD fans Tower 7810 Memory Tower 7810 Processor Tower 7810 Back I/O: PCI Express PCI Express x4 Tower 7810 PCI Express x16 Tower 7810 PCI 2.3 Front I/O: Front USB Internal USB Front panel control Front panel audio HDA header Hard drive/ Optical drive: SATA Specification one 28-pin connector three 4-pin connectors one 5-pin connector two 5-pin connectors one 5-pin connector eight 288-pin connectors two LGA-2011 sockets two 164-pin connectors two 164-pin connectors one 124-pin connector one 14-pin connector one type A female, one dual-port 2x5 header one 2x14 pin connector one USB...
... Tower 7810 HDD fans Tower 7810 Memory Tower 7810 Processor Tower 7810 Back I/O: PCI Express PCI Express x4 Tower 7810 PCI Express x16 Tower 7810 PCI 2.3 Front I/O: Front USB Internal USB Front panel control Front panel audio HDA header Hard drive/ Optical drive: SATA Specification one 28-pin connector three 4-pin connectors one 5-pin connector two 5-pin connectors one 5-pin connector eight 288-pin connectors two LGA-2011 sockets two 164-pin connectors two 164-pin connectors one 124-pin connector one 14-pin connector one type A female, one dual-port 2x5 header one 2x14 pin connector one USB...
Precision Tower 7810 Owners Manual
Page 56
.... Controls and Lights Feature Power button light: Drive activity light Network link integrity lights (back panel) Network activity lights (back panel) Specification off or unplugged. A good connection at 100 Mbps exists between the network and the computer. A good connection at 1000 Mbps exists between the network and the computer. Table 29. indicates a problem has occurred with the system board. Table 32. Internal Connectors (continued) Feature Tower 7810 Power Tower 7810 Specification ● four 7-pin SATA connectors for HDD ● two 7-pin SATA connectors...
.... Controls and Lights Feature Power button light: Drive activity light Network link integrity lights (back panel) Network activity lights (back panel) Specification off or unplugged. A good connection at 100 Mbps exists between the network and the computer. A good connection at 1000 Mbps exists between the network and the computer. Table 29. indicates a problem has occurred with the system board. Table 32. Internal Connectors (continued) Feature Tower 7810 Power Tower 7810 Specification ● four 7-pin SATA connectors for HDD ● two 7-pin SATA connectors...

Precision Tower 5810/7810/7910 and Rack 7910 Serial PCIe-Card Setup Guide
Page 2
... (Serial 1) 1-2 3-4 5-6 5 V DCD (DEFAULT) 12V The serial add-in-card has two selectable jumpers: • The setting 1-2 will provide a 5V Power Serial port. • The setting 3-4 will provide a Standard Serial port. • The setting 5-6 will provide a 12V Power Serial port. • Default is placed in slot 1, 3, 4, 5. NOTE: To download the drivers for additional information on: • Warranty 2 Setting up the Serial Add-In-Card This section describes in brief on how to dell.com/support. 2. Jumper Setting on a Dell Precision Tower 5810, 7810...
... (Serial 1) 1-2 3-4 5-6 5 V DCD (DEFAULT) 12V The serial add-in-card has two selectable jumpers: • The setting 1-2 will provide a 5V Power Serial port. • The setting 3-4 will provide a Standard Serial port. • The setting 5-6 will provide a 12V Power Serial port. • Default is placed in slot 1, 3, 4, 5. NOTE: To download the drivers for additional information on: • Warranty 2 Setting up the Serial Add-In-Card This section describes in brief on how to dell.com/support. 2. Jumper Setting on a Dell Precision Tower 5810, 7810...

Precision Tower 5810/7810/7910 and Rack 7910 Teradici PCoIP Card Host Dual/Quad Setup Guide
Page 3
... herein may be trademarks of Dell Inc. Setting up a PCoIP Card Host Dual/Quad 3 This product is available at https://www.dell.com/support. All other jurisdictions. Dell™ and the Dell logo are trademarks of their respective companies. Identifier Version Status GUID-F1C5ECBB-F43D-449A-9548-0D719858EB9E 10 Released Copyright © 2014 Dell Inc. and international copyright and intellectual property...
... herein may be trademarks of Dell Inc. Setting up a PCoIP Card Host Dual/Quad 3 This product is available at https://www.dell.com/support. All other jurisdictions. Dell™ and the Dell logo are trademarks of their respective companies. Identifier Version Status GUID-F1C5ECBB-F43D-449A-9548-0D719858EB9E 10 Released Copyright © 2014 Dell Inc. and international copyright and intellectual property...


