
Connecting to PCoIP Remote Access Host Cards in Precision Host Workstations Quick Reference Guide
Page 6
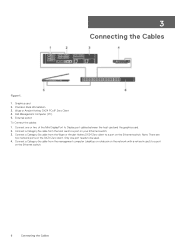
... 4. Connect one port needs to be used. 4. Note: There are two network ports on your Ethernet switch. 3. Precision Rack Workstation 3. Dell Management Computer (PC) 5. Only one or two of the Mini DisplayPort to a port on the DXZ4 Zero client. External switch To Connect the cables: 1. Connect a Category 5e cable from the host card to Display port cables between the host card and the graphics card. 2. Connect a Category 5e cable from the management computer (desktop or notebook on the network with a network card...
... 4. Connect one port needs to be used. 4. Note: There are two network ports on your Ethernet switch. 3. Precision Rack Workstation 3. Dell Management Computer (PC) 5. Only one or two of the Mini DisplayPort to a port on the DXZ4 Zero client. External switch To Connect the cables: 1. Connect a Category 5e cable from the host card to Display port cables between the host card and the graphics card. 2. Connect a Category 5e cable from the management computer (desktop or notebook on the network with a network card...

Connecting to PCoIP Remote Access Host Cards in Precision Host Workstations Quick Reference Guide
Page 7
... address. The Log In screen appears. 7. There is no default password on the host card. 14. To configure the network: a) Uncheck Enable DHCP. c) Change the default Subnet Mask address to the next step. 4. The Version screen appears. 13. On the Success message, click Reset. 17. Click OK when the pop-up message appears. 18. Configuring the Remote Access Host Card 7 To configure the session: a) Leave the...
... address. The Log In screen appears. 7. There is no default password on the host card. 14. To configure the network: a) Uncheck Enable DHCP. c) Change the default Subnet Mask address to the next step. 4. The Version screen appears. 13. On the Success message, click Reset. 17. Click OK when the pop-up message appears. 18. Configuring the Remote Access Host Card 7 To configure the session: a) Leave the...
Connecting to PCoIP Remote Access Host Cards in Precision Host Workstations Quick Reference Guide
Page 8
... Success screen, click Reset. 11. The Log In screen appears. 13. NOTE: 1. Also, connecting two remote access host cards to provide customer support for host cards purchased with a one year Teradici "Desktop Access" subscription. On the management computer, launch the Web browser and type 192.168.1.50 . 3. The default password for bug fixes. On the Your Session Has Ended message, click OK. Close your specific workstation...
... Success screen, click Reset. 11. The Log In screen appears. 13. NOTE: 1. Also, connecting two remote access host cards to provide customer support for host cards purchased with a one year Teradici "Desktop Access" subscription. On the management computer, launch the Web browser and type 192.168.1.50 . 3. The default password for bug fixes. On the Your Session Has Ended message, click OK. Close your specific workstation...

Precision Tower 3620 Owners Manual
Page 3
... Safety instructions...5 Before working inside your computer...5 Turning off your computer...6 After working inside your computer...6 2 Removing and installing components...7 Recommended tools...7 Removing the cover...7 Installing the cover...7 Removing the front bezel...7 Installing the front bezel...8 Removing the hard drive assembly...8 Installing the hard drive assembly...9 Removing the optical drive...9 Installing the optical drive...10 Removing power switch...10 Installing the power switch...12 Removing the intrusion switch...12 Installing the intrusion switch...13 Removing the memory...
... Safety instructions...5 Before working inside your computer...5 Turning off your computer...6 After working inside your computer...6 2 Removing and installing components...7 Recommended tools...7 Removing the cover...7 Installing the cover...7 Removing the front bezel...7 Installing the front bezel...8 Removing the hard drive assembly...8 Installing the hard drive assembly...9 Removing the optical drive...9 Installing the optical drive...10 Removing power switch...10 Installing the power switch...12 Removing the intrusion switch...12 Installing the intrusion switch...13 Removing the memory...
Precision Tower 3620 Owners Manual
Page 4
Boot Sequence...25 Navigation keys...26 System Setup options...26 Updating the BIOS ...33 Jumper settings...34 System and setup password...34 Assigning a system password and setup password 34 Deleting or changing an existing system and or setup password 35 Disabling a system password...35 4 Diagnostics...37 Enhanced Pre-Boot System Assessment - ePSA diagnostics 37 Troubleshooting your computer...37 Power LED diagnostics...37 Beep code...38 Error messages...38 5 Specifications...42 6 Contacting Dell...47 4 Contents
Boot Sequence...25 Navigation keys...26 System Setup options...26 Updating the BIOS ...33 Jumper settings...34 System and setup password...34 Assigning a system password and setup password 34 Deleting or changing an existing system and or setup password 35 Disabling a system password...35 4 Diagnostics...37 Enhanced Pre-Boot System Assessment - ePSA diagnostics 37 Troubleshooting your computer...37 Power LED diagnostics...37 Beep code...38 Error messages...38 5 Specifications...42 6 Contacting Dell...47 4 Contents

Precision Tower 3620 Owners Manual
Page 5
... the system board. 7 Remove the cover. Do not touch the components or contacts on the back of your computer. CAUTION: To disconnect a network cable, first unplug the cable from your computer and then unplug the cable from the network device. 4 Disconnect all power sources before you work surface is not covered by the online or telephone service and support team. While you connect a cable, ensure that...
... the system board. 7 Remove the cover. Do not touch the components or contacts on the back of your computer. CAUTION: To disconnect a network cable, first unplug the cable from your computer and then unplug the cable from the network device. 4 Disconnect all power sources before you work surface is not covered by the online or telephone service and support team. While you connect a cable, ensure that...

Precision Tower 3620 Owners Manual
Page 6
... you connect any external devices, cards, and cables before turning on your computer or 1 Click Start. 2 Click the arrow in from the right edge of the screen, opening the Charms menu and select Settings. 2 Tap and then tap Shut down • In Windows 8 (using a touch enabled device): 1 Swipe in the lower-right corner of the screen and click Settings. 2 Click and then click Shut down your operating system...
... you connect any external devices, cards, and cables before turning on your computer or 1 Click Start. 2 Click the arrow in from the right edge of the screen, opening the Charms menu and select Settings. 2 Tap and then tap Shut down • In Windows 8 (using a touch enabled device): 1 Swipe in the lower-right corner of the screen and click Settings. 2 Click and then click Shut down your operating system...

Precision Tower 3620 Owners Manual
Page 23
...header 29 SATA 0 connector 31 SATA 3 connector 33 service Mode jumper connector 35 CMCLR jumper 2 PCI express x4 slot 4 PCI express x16 Gen 3 slot 6 USB 3.0 connector 8 serial port connector 10 USB 2.0 with network connector 12 intrusion switch connector 14 system fan connector 16 CPU fan connector 18 memory slot 20 8-pin power connector 22 SATA 2 connector 24 hard drive and optical drive power cable connector 26 USB 3.0 connector 28 M.2 SSD slot 30 front I/O connector 32 password reset jumper 34 speaker connector 36 CLINK header Removing and installing components 23 System board components...
...header 29 SATA 0 connector 31 SATA 3 connector 33 service Mode jumper connector 35 CMCLR jumper 2 PCI express x4 slot 4 PCI express x16 Gen 3 slot 6 USB 3.0 connector 8 serial port connector 10 USB 2.0 with network connector 12 intrusion switch connector 14 system fan connector 16 CPU fan connector 18 memory slot 20 8-pin power connector 22 SATA 2 connector 24 hard drive and optical drive power cable connector 26 USB 3.0 connector 28 M.2 SSD slot 30 front I/O connector 32 password reset jumper 34 speaker connector 36 CLINK header Removing and installing components 23 System board components...

Precision Tower 3620 Owners Manual
Page 25
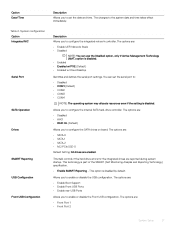
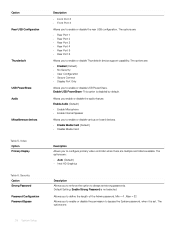
...Jumper settings • System and setup password Boot Sequence Boot Sequence allows you to bypass the System Setup‐defined boot device order and boot directly to access the System Setup screen. Boot Sequence Option Legacy Boot UEFI Boot Other options Description • ST2000DM001-1ER164 • CD/DVD/CD-RW Drive • Onboard NIC Windows Boot Manager • BIOS Setup • BIOS Flash Update • Diagnostics • Intel (R) Management Engine BIOS Extension (MEBx) • Change Boot Mode Settings The boot sequence screen also displays the option to a specific device...
...Jumper settings • System and setup password Boot Sequence Boot Sequence allows you to bypass the System Setup‐defined boot device order and boot directly to access the System Setup screen. Boot Sequence Option Legacy Boot UEFI Boot Other options Description • ST2000DM001-1ER164 • CD/DVD/CD-RW Drive • Onboard NIC Windows Boot Manager • BIOS Setup • BIOS Flash Update • Diagnostics • Intel (R) Management Engine BIOS Extension (MEBx) • Change Boot Mode Settings The boot sequence screen also displays the option to a specific device...
Precision Tower 3620 Owners Manual
Page 27
...8226; Enable Boot Support • Enable Front USB Ports • Enable rear USB Ports Allows you to configure the internal SATA hard-drive controller. The options are: • SATA-0 • SATA-1 • SATA-2 • M.2 PCIe SSD-0 Default Setting: All drives are reported during system startup. Allows you to configure the SATA drives on board. This technology is disabled. • Enabled • Enabled w/PXE (Default) • Enabled w/Cloud Desktop Identifies and defines the serial port settings. Table 4. This field controls if the hard drive errors for the integrated drives are...
...8226; Enable Boot Support • Enable Front USB Ports • Enable rear USB Ports Allows you to configure the internal SATA hard-drive controller. The options are: • SATA-0 • SATA-1 • SATA-2 • M.2 PCIe SSD-0 Default Setting: All drives are reported during system startup. Allows you to configure the SATA drives on board. This technology is disabled. • Enabled • Enabled w/PXE (Default) • Enabled w/Cloud Desktop Identifies and defines the serial port settings. Table 4. This field controls if the hard drive errors for the integrated drives are...
Precision Tower 3620 Owners Manual
Page 28
...to enable or disable the permission to always set . Min = 4 , Max = 32 Allows you to enable or disable the rear USB configuration. The options are multiple controllers available. The options are : • Auto (Default) • Intel HD Graphics Description Allows you to enable or disable Thunderbolt device support capability. Enable Audio (Default) • Enable Microphone • Enable Internal Speaker Allows you to enable or disable various on board devices. • Enable Media Card (Default) • Disable Media Card Description Allows you to configure primary video...
...to enable or disable the permission to always set . Min = 4 , Max = 32 Allows you to enable or disable the rear USB configuration. The options are multiple controllers available. The options are : • Auto (Default) • Intel HD Graphics Description Allows you to enable or disable Thunderbolt device support capability. Enable Audio (Default) • Enable Microphone • Enable Internal Speaker Allows you to enable or disable various on board devices. • Enable Media Card (Default) • Disable Media Card Description Allows you to configure primary video...

Precision Tower 3620 Owners Manual
Page 29
... control whether the Trusted Platform Module (TPM) is disabled. Option Password Change TPM 1.2 Security Computrace (R) Chassis Intrusion CPU XD Support OROM Keyboard Access Admin Setup Lockout Table 7. Default Setting: Allow Non-Admin Password Changes is set . • Enable Admin Setup Lockout Default Setting: The option is visible to enable or disable the Secure Boot Feature. The options are : • Enable (Default) • One Time Enable • Disable Allows you to enable or disable Custom Mode Key Management. • Enable Custom Mode (This option is not enabled by default...
... control whether the Trusted Platform Module (TPM) is disabled. Option Password Change TPM 1.2 Security Computrace (R) Chassis Intrusion CPU XD Support OROM Keyboard Access Admin Setup Lockout Table 7. Default Setting: Allow Non-Admin Password Changes is set . • Enable Admin Setup Lockout Default Setting: The option is visible to enable or disable the Secure Boot Feature. The options are : • Enable (Default) • One Time Enable • Disable Allows you to enable or disable Custom Mode Key Management. • Enable Custom Mode (This option is not enabled by default...
Precision Tower 3620 Owners Manual
Page 33
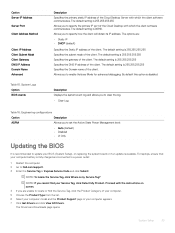
.... 5 Choose the Product Type from the list. 6 Select your computer battery is my Service Tag? For laptops, ensure that your computer model and the Product Support page of the client. NOTE: To locate the Service Tag, click Where is fully charged and connected to a power outlet 1 Restart the computer. 2 Go to Dell.com/support. 3 Enter the Service Tag or Express Service Code and click Submit. NOTE...
.... 5 Choose the Product Type from the list. 6 Select your computer battery is my Service Tag? For laptops, ensure that your computer model and the Product Support page of the client. NOTE: To locate the Service Tag, click Where is fully charged and connected to a power outlet 1 Restart the computer. 2 Go to Dell.com/support. 3 Enter the Service Tag or Express Service Code and click Submit. NOTE...
Precision Tower 3620 Owners Manual
Page 34
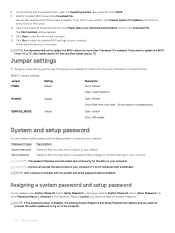
... install the updated BIOS settings on your system. If the Password Status is Locked, you need an update. For example: If you must enter to access and make changes to the BIOS settings of security for troubleshooting SERVICE_MODE Default Open: Default Short: ME disable System and setup password You can also analyze which drivers need not provide the system password to log on to your computer. Table 17. Jumper settings Jumper PSWD Setting Default Description Short: Default Open: Clear Password RTCRST Default Open: Default Short...
... install the updated BIOS settings on your system. If the Password Status is Locked, you need an update. For example: If you must enter to access and make changes to the BIOS settings of security for troubleshooting SERVICE_MODE Default Open: Default Short: ME disable System and setup password You can also analyze which drivers need not provide the system password to log on to your computer. Table 17. Jumper settings Jumper PSWD Setting Default Description Short: Default Open: Clear Password RTCRST Default Open: Default Short...

Precision Tower 3620 Owners Manual
Page 37
... the problem yourself, service and support personnel can troubleshoot your computer, run the ePSA diagnostics before contacting Dell for specific devices require user interaction. The embedded system diagnostics provides a set of running diagnostics is to load, it is 2 or 3 blinks followed by long pause then repeats. Using this program with other computers may cause invalid results or error messages. NOTE: Some tests for technical assistance. Once the operating system starts to test...
... the problem yourself, service and support personnel can troubleshoot your computer, run the ePSA diagnostics before contacting Dell for specific devices require user interaction. The embedded system diagnostics provides a set of running diagnostics is to load, it is 2 or 3 blinks followed by long pause then repeats. Using this program with other computers may cause invalid results or error messages. NOTE: Some tests for technical assistance. Once the operating system starts to test...
Precision Tower 3620 Owners Manual
Page 38
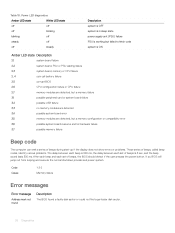
... off blinking blinking off steady off off steady Description system is OFF system is in sleep state power supply unit (PSU) failure PSU is working but failed to fetch code system is ON Amber LED state Description 2,1 system board failure 2,2 system board, PSU or PSU cabling failure 2,3 system board, memory or CPU failure 2, 4 coin cell battery failure 2,5 corrupt BIOS 2,6 CPU configuration failure or CPU failure 2,7 memory modules are detected, but a memory failure 3,1 possible peripheral card or system board failure 3,2 possible USB failure 3,3 no memory modules...
... off blinking blinking off steady off off steady Description system is OFF system is in sleep state power supply unit (PSU) failure PSU is working but failed to fetch code system is ON Amber LED state Description 2,1 system board failure 2,2 system board, PSU or PSU cabling failure 2,3 system board, memory or CPU failure 2, 4 coin cell battery failure 2,5 corrupt BIOS 2,6 CPU configuration failure or CPU failure 2,7 memory modules are detected, but a memory failure 3,1 possible peripheral card or system board failure 3,2 possible USB failure 3,3 no memory modules...
Precision Tower 3620 Owners Manual
Page 39
... Dell Technical Support. respond Bad command or file Ensure that you have spelled the command correctly, put spaces in resolving this problem, please note this system have failed at checkpoint [nnnn]. For the Windows operating system, run the chkdsk utility to complete the boot routine three consecutive times for example, Printer out of the floppy or hard drive. If the drive access light turns on disk...
... Dell Technical Support. respond Bad command or file Ensure that you have spelled the command correctly, put spaces in resolving this problem, please note this system have failed at checkpoint [nnnn]. For the Windows operating system, run the chkdsk utility to complete the boot routine three consecutive times for example, Printer out of the floppy or hard drive. If the drive access light turns on disk...
Precision Tower 3620 Owners Manual
Page 40
... the memory test. No boot sector on the disk, or the requested sector is conflicting with one or more cards. configuration error Read fault The operating system cannot read from drive A and restart the computer. The module should be malfunctioning. Reinstall the memory modules and, if necessary, replace failure at address, them . configuration, please populate DIMM1 Keyboard failure A cable or connector may be loose, or the keyboard or keyboard/mouse controller...
... the memory test. No boot sector on the disk, or the requested sector is conflicting with one or more cards. configuration error Read fault The operating system cannot read from drive A and restart the computer. The module should be malfunctioning. Reinstall the memory modules and, if necessary, replace failure at address, them . configuration, please populate DIMM1 Keyboard failure A cable or connector may be loose, or the keyboard or keyboard/mouse controller...

Precision Tower 3620 Owners Manual
Page 41
... and replace your hard drive (for installation procedures, see "Adding and Removing Parts" for your support desk or Dell. please run the System Setup program Timer chip counter 2 A chip on the [primary/secondary] EIDE controller is not the only bootable drive, enter System Setup and change the appropriate drive setting to the floppy or hard drive. WARNING: Dell's Disk Monitoring System has detected that drive [0/1] on the system board may be dead. Diagnostics 41 Then remove the drive...
... and replace your hard drive (for installation procedures, see "Adding and Removing Parts" for your support desk or Dell. please run the System Setup program Timer chip counter 2 A chip on the [primary/secondary] EIDE controller is not the only bootable drive, enter System Setup and change the appropriate drive setting to the floppy or hard drive. WARNING: Dell's Disk Monitoring System has detected that drive [0/1] on the system board may be dead. Diagnostics 41 Then remove the drive...
Precision Tower 3620 Owners Manual
Page 45
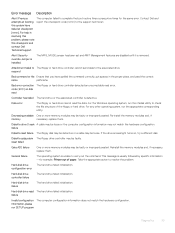
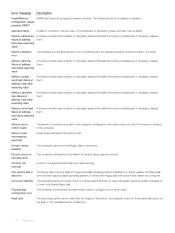
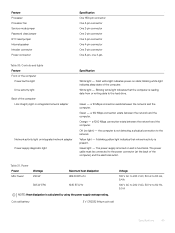
...physical connection to 60 Hz, 5.0 A Specifications 45 Feature Processor Processor fan Service mode jumper Password clear jumper RTC reset jumper Internal speaker Intruder connector Power connector: Specification One 1150-pin connector One 4-pin connector One 2-pin connector One 2-pin connector One 2-pin connector One 4-pin connector One 3-pin connector One 8-pin. Controls and lights Feature Front of the computer Power button light Drive activity light Back of the computer Link integrity light on integrated network adapter Network activity light on state; Blinking white light indicates...
...physical connection to 60 Hz, 5.0 A Specifications 45 Feature Processor Processor fan Service mode jumper Password clear jumper RTC reset jumper Internal speaker Intruder connector Power connector: Specification One 1150-pin connector One 4-pin connector One 2-pin connector One 2-pin connector One 2-pin connector One 4-pin connector One 3-pin connector One 8-pin. Controls and lights Feature Front of the computer Power button light Drive activity light Back of the computer Link integrity light on integrated network adapter Network activity light on state; Blinking white light indicates...


