
Getting Started Guide
Page 5
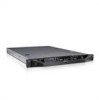
Installing the Rails and System in a Rack Assemble the rails and install the system in the rack following procedure, review the safety instructions that came with your system and identify each item. Unpacking the System Unpack your system. Getting Started With Your System 3 Installation and Configuration WARNING: Before performing the following the safety instructions and the rack installation instructions provided with the system.
Installing the Rails and System in a Rack Assemble the rails and install the system in the rack following procedure, review the safety instructions that came with your system and identify each item. Unpacking the System Unpack your system. Getting Started With Your System 3 Installation and Configuration WARNING: Before performing the following the safety instructions and the rack installation instructions provided with the system.

Hardware Owner's Manual
Page 87
...the drive bay until the carrier contacts the backplane. Removing a Hard Drive From a Hard-Drive Carrier Remove the screws from the slide rails on the hard drive carrier open, slide the hard drive into the drive bay until the carrier contacts the backplane (see Figure 3-5). ...Installing System Components 87 With the lever on the hard-drive carrier and separate the hard drive from Dell. Installing a Hard Drive Into a Drive Carrier 2 3 1 4 1 drive carrier 3 hard drive 2 screws (4)* 4 SAS/SATA screw hole *Screws are supplied ...
...the drive bay until the carrier contacts the backplane. Removing a Hard Drive From a Hard-Drive Carrier Remove the screws from the slide rails on the hard drive carrier open, slide the hard drive into the drive bay until the carrier contacts the backplane (see Figure 3-5). ...Installing System Components 87 With the lever on the hard-drive carrier and separate the hard drive from Dell. Installing a Hard Drive Into a Drive Carrier 2 3 1 4 1 drive carrier 3 hard drive 2 screws (4)* 4 SAS/SATA screw hole *Screws are supplied ...

