

Rack Installation Guide
Page 3
... Instructions 1-2 RapidRails Rack Kit Contents 1-2 Dell Rack Requirements 1-3 VersaRails Rack Kit Contents 1-3 Non-Dell Rack Requirements 1-4 Before You Begin 1-4 Important Safety Information 1-4 Rack Stabilizer Feet 1-4 Recommended Tools and Supplies 1-5 Installation Tasks 1-5 Removing the Rack Doors 1-5 Marking the Rack 1-5 Installing the RapidRails Mounting Rails 1-7 Installing the VersaRails Mounting Rails 1-9 Installing the Tower-to-Rack Conversion...
... Instructions 1-2 RapidRails Rack Kit Contents 1-2 Dell Rack Requirements 1-3 VersaRails Rack Kit Contents 1-3 Non-Dell Rack Requirements 1-4 Before You Begin 1-4 Important Safety Information 1-4 Rack Stabilizer Feet 1-4 Recommended Tools and Supplies 1-5 Installation Tasks 1-5 Removing the Rack Doors 1-5 Marking the Rack 1-5 Installing the RapidRails Mounting Rails 1-7 Installing the VersaRails Mounting Rails 1-9 Installing the Tower-to-Rack Conversion...

Rack Installation Guide
Page 4
Figures Figure 1-1. Figure 1-5. Figure 1-9. Figure 1-3. Figure 1-7. Figure 1-6. Figure 1-8. Figure 1-10. Figure 1-4. Figure 1-2. RapidRails Rack Kit Contents 1-3 VersaRails Rack Kit Contents 1-3 One Rack Unit 1-6 Marking the Vertical Rails 1-7 Installing the RapidRails Mounting Rails 1-8 Installing the VersaRails Mounting Rails 1-9 Removing the Front Bezel 1-11 Removing the Tower System Cover 1-12 Installing the Rack Front Panel 1-14 Installing the System in the Rack 1-15 4 Contents
Figures Figure 1-1. Figure 1-5. Figure 1-9. Figure 1-3. Figure 1-7. Figure 1-6. Figure 1-8. Figure 1-10. Figure 1-4. Figure 1-2. RapidRails Rack Kit Contents 1-3 VersaRails Rack Kit Contents 1-3 One Rack Unit 1-6 Marking the Vertical Rails 1-7 Installing the RapidRails Mounting Rails 1-8 Installing the VersaRails Mounting Rails 1-9 Removing the Front Bezel 1-11 Removing the Tower System Cover 1-12 Installing the Rack Front Panel 1-14 Installing the System in the Rack 1-15 4 Contents

Rack Installation Guide
Page 6
...in this kit are similar. NOTE: If your system. RapidRails Rack Kit Contents The RapidRails rack kit consists of RapidRails mounting rails (see Figure 1-1). 1-2 Rack Installation Guide Installation Instructions This installation guide provides instructions for trained service technicians installing one pair of... VersaRails rack kits are included in most industry-standard rack cabinets. www.dell.com | support.dell.com • Always load the rack from the rack. • Use caution when pressing the component rail release latches and sliding a component into the rack. • Do ...
...in this kit are similar. NOTE: If your system. RapidRails Rack Kit Contents The RapidRails rack kit consists of RapidRails mounting rails (see Figure 1-1). 1-2 Rack Installation Guide Installation Instructions This installation guide provides instructions for trained service technicians installing one pair of... VersaRails rack kits are included in most industry-standard rack cabinets. www.dell.com | support.dell.com • Always load the rack from the rack. • Use caution when pressing the component rail release latches and sliding a component into the rack. • Do ...

Rack Installation Guide
Page 7
...trained service technicians. For example, a #10 Phillips-head screw with 32 threads per -inch. RapidRails Rack Kit Contents RapidRails mounting rails Dell Rack Requirements NOTICE: This rack kit is intended to be sure that is required for each system that the rack meets the specifications... of threads-per inch is identified as a 10-32 screw. One rack kit is installed in a Dell rack by size and number of American National Standards Institute (ANSI)/Electronic Industries Association (EIA) standard ANSI/EIA-310-D-92, International Electrotechnical...
...trained service technicians. For example, a #10 Phillips-head screw with 32 threads per -inch. RapidRails Rack Kit Contents RapidRails mounting rails Dell Rack Requirements NOTICE: This rack kit is intended to be sure that is required for each system that the rack meets the specifications... of threads-per inch is identified as a 10-32 screw. One rack kit is installed in a Dell rack by size and number of American National Standards Institute (ANSI)/Electronic Industries Association (EIA) standard ANSI/EIA-310-D-92, International Electrotechnical...
Rack Installation Guide
Page 9
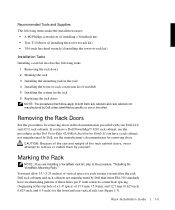
.... CAUTION: Because of the size and weight of the rack cabinet doors, never attempt to the procedure, "Installing the VersaRails Mounting Rails." Marking the Rack NOTE: If you have a Dell PowerEdge™ 4210 rack cabinet, see the procedures in the documentation provided with center-to-center hole spacing (beginning at the top...
.... CAUTION: Because of the size and weight of the rack cabinet doors, never attempt to the procedure, "Installing the VersaRails Mounting Rails." Marking the Rack NOTE: If you have a Dell PowerEdge™ 4210 rack cabinet, see the procedures in the documentation provided with center-to-center hole spacing (beginning at the top...

Rack Installation Guide
Page 10
...mark the rack, perform the following steps: 1 Place a mark on the rack's front vertical rails where you want to locate the bottom of the narrowest metal space between holes (marked with a horizontal line on the Dell website at the middle of the system you are installing in the rack cabinet. One... Rack Unit 1-U (4.4 centimeters or 1.75) inches) 12.7 mm (0.5 inch) 15.9 mm (0.625 inch) 15.9 mm (0.625 inch) 12.7 mm (0.5 inch) For more than one system, install the mounting rails so that ...
...mark the rack, perform the following steps: 1 Place a mark on the rack's front vertical rails where you want to locate the bottom of the narrowest metal space between holes (marked with a horizontal line on the Dell website at the middle of the system you are installing in the rack cabinet. One... Rack Unit 1-U (4.4 centimeters or 1.75) inches) 12.7 mm (0.5 inch) 15.9 mm (0.625 inch) 15.9 mm (0.625 inch) 12.7 mm (0.5 inch) For more than one system, install the mounting rails so that ...

Rack Installation Guide
Page 11
... scale) tape marking locations for top and bottom of system Installing the RapidRails Mounting Rails NOTE: If you placed on the rack (see Figure 1-5). 2 Align the rail mounting-bracket flange (on the front of the rail) with a felt-tipped marker or place masking tape where the system's upper edge... in a rack that its mounting-bracket flange fits between the marks or tape you are installing VersaRails rails, see "Installing the VersaRails Mounting Rails." 1 At the front of the rack cabinet, position one of the mounting rails so that meets EIA-310 standards) and mark the rack's front vertical...
... scale) tape marking locations for top and bottom of system Installing the RapidRails Mounting Rails NOTE: If you placed on the rack (see Figure 1-5). 2 Align the rail mounting-bracket flange (on the front of the rail) with a felt-tipped marker or place masking tape where the system's upper edge... in a rack that its mounting-bracket flange fits between the marks or tape you are installing VersaRails rails, see "Installing the VersaRails Mounting Rails." 1 At the front of the rack cabinet, position one of the mounting rails so that meets EIA-310 standards) and mark the rack's front vertical...
Rack Installation Guide
Page 12
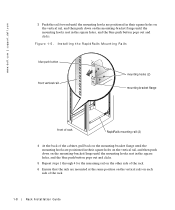
www.dell.com | support.dell.com 3 Push the rail forward until the mounting hooks are mounted at the same position on the vertical rails on the mounting-bracket flange until the mounting hooks seat in the square holes, and the blue push button pops out and clicks. Figure 1-5. Installing the RapidRails Mounting Rails blue push button...
www.dell.com | support.dell.com 3 Push the rail forward until the mounting hooks are mounted at the same position on the vertical rails on the mounting-bracket flange until the mounting hooks seat in the square holes, and the blue push button pops out and clicks. Figure 1-5. Installing the RapidRails Mounting Rails blue push button...

Rack Installation Guide
Page 13
... the mounting holes are aligned with the holes on the front vertical rail. 3 Using two 10-32 x 0.5 Phillips screws, secure the front mounting-bracket flange to the front vertical rail. 4 At the back of the mounting rails so that its mounting-bracket flange fits at the location you have ...selected in rack cabinets may be round or square. Rack Installation Guide 1-9 Installing the VersaRails Mounting Rails NOTE: If you have already installed RapidRails mounting rails, skip this section. 1 At the front of the rack cabinet, position one of the cabinet, pull back on the...
... the mounting holes are aligned with the holes on the front vertical rail. 3 Using two 10-32 x 0.5 Phillips screws, secure the front mounting-bracket flange to the front vertical rail. 4 At the back of the mounting rails so that its mounting-bracket flange fits at the location you have ...selected in rack cabinets may be round or square. Rack Installation Guide 1-9 Installing the VersaRails Mounting Rails NOTE: If you have already installed RapidRails mounting rails, skip this section. 1 At the front of the rack cabinet, position one of the cabinet, pull back on the...

Rack Installation Guide
Page 14
... mounted at the same position on the vertical rails on each side of the rack. 7 Ensure that secure the bezel hinge to -rack conversion kit includes a rack front panel with rack handles and thumbscrews. www.dell.com | support.dell.com 5 Using two 10-32 x 0.5 Phillips screws, secure the back mounting-bracket flange to...
... mounted at the same position on the vertical rails on each side of the rack. 7 Ensure that secure the bezel hinge to -rack conversion kit includes a rack front panel with rack handles and thumbscrews. www.dell.com | support.dell.com 5 Using two 10-32 x 0.5 Phillips screws, secure the back mounting-bracket flange to...
Rack Installation Guide
Page 18
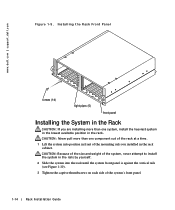
CAUTION: Because of the size and weight of the system, never attempt to install the system in the rails by yourself. 2 Slide the system into position in the rack cabinet. Installing the Rack Front Panel screws (14) light pipes (5) front panel Installing the System ... rack at a time. 1 Lift the system into the rack until the system front panel is against the vertical rails (see Figure 1-10). 3 Tighten the captive thumbscrews on each side of the mounting rails you are installing more than one system, install the heaviest system in the lowest available position in the rack...
CAUTION: Because of the size and weight of the system, never attempt to install the system in the rails by yourself. 2 Slide the system into position in the rack cabinet. Installing the Rack Front Panel screws (14) light pipes (5) front panel Installing the System ... rack at a time. 1 Lift the system into the rack until the system front panel is against the vertical rails (see Figure 1-10). 3 Tighten the captive thumbscrews on each side of the mounting rails you are installing more than one system, install the heaviest system in the lowest available position in the rack...

Rack Installation Guide
Page 21
... site, 1-6 doors removing, 1-5 replacing, 1-15 I installation tasks, 1-5 installing rack front panel, 1-13 RapidRails mounting rails, 1-7, 1-8 system in rack, 1-14, 1-15 tower-to-rack kit, 1-10 VersaRails mounting rails, 1-9 K kit contents illustrated, 1-3 list of, 1-2, 1-3 RapidRails kit, 1-2 VersaRails kit, 1-3 N non-Dell rack requirements, 1-4 R rack marking, 1-5 stabilizer feet, 1-4 rack kit contents illustrated, 1-3 installing, 1-5 list of, 1-2 rack...
... site, 1-6 doors removing, 1-5 replacing, 1-15 I installation tasks, 1-5 installing rack front panel, 1-13 RapidRails mounting rails, 1-7, 1-8 system in rack, 1-14, 1-15 tower-to-rack kit, 1-10 VersaRails mounting rails, 1-9 K kit contents illustrated, 1-3 list of, 1-2, 1-3 RapidRails kit, 1-2 VersaRails kit, 1-3 N non-Dell rack requirements, 1-4 R rack marking, 1-5 stabilizer feet, 1-4 rack kit contents illustrated, 1-3 installing, 1-5 list of, 1-2 rack...

Rack-to-Tower Conversion Guide
Page 4
...Do not step on or stand on the rack. • Always load the rack from the rack. • Use caution when pressing the component rail release latches and sliding a component into the rack. • Do not overload the AC supply branch circuit that provides power to the rack. The...circuit rating. • Ensure that proper airflow is inserted into the rack, carefully extend the rail into a locking position, and then slide the component into or out of a rack; www.dell.com | support.dell.com • Before working on any system/component when servicing other systems/components in the ...
...Do not step on or stand on the rack. • Always load the rack from the rack. • Use caution when pressing the component rail release latches and sliding a component into the rack. • Do not overload the AC supply branch circuit that provides power to the rack. The...circuit rating. • Ensure that proper airflow is inserted into the rack, carefully extend the rail into a locking position, and then slide the component into or out of a rack; www.dell.com | support.dell.com • Before working on any system/component when servicing other systems/components in the ...
Rack-to-Tower Conversion Guide
Page 6
...VersaRails™ rack mounting hardware from the rack cabinet includes the following tools are required to a tower system, carefully read "Safety Instructions." www.dell.com | support.dell.com Before You Begin Before you begin removing your system from the rack and converting it to perform the conversion: • A #2 Phillips screwdriver... front panel • Installing the tower front panel • Installing the base, covers, and bezel • Removing the RapidRails or VersaRails mounting rail assemblies • Replacing the rack doors 1-4 Rac k -t o -Tow er C on v e r si on Guide
...VersaRails™ rack mounting hardware from the rack cabinet includes the following tools are required to a tower system, carefully read "Safety Instructions." www.dell.com | support.dell.com Before You Begin Before you begin removing your system from the rack and converting it to perform the conversion: • A #2 Phillips screwdriver... front panel • Installing the tower front panel • Installing the base, covers, and bezel • Removing the RapidRails or VersaRails mounting rail assemblies • Replacing the rack doors 1-4 Rac k -t o -Tow er C on v e r si on Guide

Rack-to-Tower Conversion Guide
Page 7
... system from the back of the system. 3 Loosen the thumbscrews that the front panel extends 2.54 centimeters (1 inch) beyond the edge of the rack mounting rails (see the documentation provided with the rack for instructions. 2 Disconnect the cables and power cord from the rack at each front handle and slide the... the front of the rack and to prevent damage to the system. 1 Shut down and turn off the system. For Dell rack cabinets, see Figure 1-2). 5 Place the system on which to four people and might also be useful. Never extend more than one system from a position ...
... system from the back of the system. 3 Loosen the thumbscrews that the front panel extends 2.54 centimeters (1 inch) beyond the edge of the rack mounting rails (see the documentation provided with the rack for instructions. 2 Disconnect the cables and power cord from the rack at each front handle and slide the... the front of the rack and to prevent damage to the system. 1 Shut down and turn off the system. For Dell rack cabinets, see Figure 1-2). 5 Place the system on which to four people and might also be useful. Never extend more than one system from a position ...
Rack-to-Tower Conversion Guide
Page 8
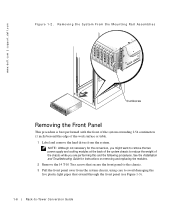
www.dell.com | support.dell.com Figure 1-2. NOTE: Although not necessary for instructions on removing and replacing the modules. 2 Remove the 14 T-10 Torx screws that secure the front panel ... five plastic light pipes that extend through the front panel (see Figure 1-3). 1-6 Rac k -t o -Tow er C on v e r si on Guide Removing the System From the Mounting Rail Assemblies thumbscrew Removing the Front Panel This procedure is best performed with the front of the system extending 2.54 centimeters (1 inch) beyond the edge of...
www.dell.com | support.dell.com Figure 1-2. NOTE: Although not necessary for instructions on removing and replacing the modules. 2 Remove the 14 T-10 Torx screws that secure the front panel ... five plastic light pipes that extend through the front panel (see Figure 1-3). 1-6 Rac k -t o -Tow er C on v e r si on Guide Removing the System From the Mounting Rail Assemblies thumbscrew Removing the Front Panel This procedure is best performed with the front of the system extending 2.54 centimeters (1 inch) beyond the edge of...

Rack-to-Tower Conversion Guide
Page 13
Removing the Mounting Rails mounting hooks blue release push button rail mounting-bracket flange VersaRails RapidRails front of rack mounting rails (2) Rack-to the procedure, "Removing the VersaRails Mounting Rails." 1 At the front of the RapidRails mounting rail's mounting-bracket flanges (see Figure 1-6). Removing the RapidRails Mounting Rails NOTE: If you have VersaRails mounting rails in your rack cabinet, skip to -Tower C onversi on one of the rack cabinet, locate the blue release push button on Gui de 1-11 Figure 1-6.
Removing the Mounting Rails mounting hooks blue release push button rail mounting-bracket flange VersaRails RapidRails front of rack mounting rails (2) Rack-to the procedure, "Removing the VersaRails Mounting Rails." 1 At the front of the RapidRails mounting rail's mounting-bracket flanges (see Figure 1-6). Removing the RapidRails Mounting Rails NOTE: If you have VersaRails mounting rails in your rack cabinet, skip to -Tower C onversi on one of the rack cabinet, locate the blue release push button on Gui de 1-11 Figure 1-6.

Rack-to-Tower Conversion Guide
Page 14
...3 Repeat step 2 at the back of the cabinet for this mounting rail. 4 Repeat steps 1 through 3 for the remaining mounting rail on the other side of the rack. 5 Place the mounting rails and all fastener hardware in a box. www.dell.com | support.dell.com 2 From the front of the rack cabinet, press in on the... blue release push button, grasp the rail and lift up, and push the slide assembly back 2.54 centimeters (1 ...
...3 Repeat step 2 at the back of the cabinet for this mounting rail. 4 Repeat steps 1 through 3 for the remaining mounting rail on the other side of the rack. 5 Place the mounting rails and all fastener hardware in a box. www.dell.com | support.dell.com 2 From the front of the rack cabinet, press in on the... blue release push button, grasp the rail and lift up, and push the slide assembly back 2.54 centimeters (1 ...

