User Manual
Page 7
... is your system. If you install the kit in any other rack cabinet has not been approved by trained service technicians. After installing system/components in a rack by any system as well as a component for specific caution statements and procedures. Dell™ PowerEdge™ 4210 Installation Guide 5 For complete safety and regulatory information, see the Product...
... is your system. If you install the kit in any other rack cabinet has not been approved by trained service technicians. After installing system/components in a rack by any system as well as a component for specific caution statements and procedures. Dell™ PowerEdge™ 4210 Installation Guide 5 For complete safety and regulatory information, see the Product...
User Manual
Page 9
... more than one system out of more than one time. Dell™ PowerEdge™ 4210 Installation Guide 7 This becomes increasingly important when systems are important to prevent injury to yourself and to install the next system. Retract the leveling feet when relocating the rack cabinet. CAUTION: When installing multiple systems in bodily injury under certain...
... more than one system out of more than one time. Dell™ PowerEdge™ 4210 Installation Guide 7 This becomes increasingly important when systems are important to prevent injury to yourself and to install the next system. Retract the leveling feet when relocating the rack cabinet. CAUTION: When installing multiple systems in bodily injury under certain...
User Manual
Page 10
... in kit) • Keys to the rack doors and side panels Removing and Replacing the Rack Doors CAUTION: Because of the size and weight of the rack cabinet doors, never attempt to release the door handle, then open the front door all the way (see Figure 1-1). 8 Dell™ PowerEdge™ 4210 Installation Guide CAUTION: Store the doors...
... in kit) • Keys to the rack doors and side panels Removing and Replacing the Rack Doors CAUTION: Because of the size and weight of the rack cabinet doors, never attempt to release the door handle, then open the front door all the way (see Figure 1-1). 8 Dell™ PowerEdge™ 4210 Installation Guide CAUTION: Store the doors...
User Manual
Page 12
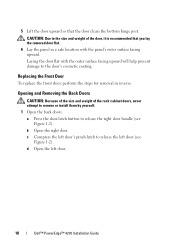
CAUTION: Due to the size and weight of the rack cabinet doors, never attempt to the door's cosmetic coating. Replacing the Front Door To replace the front door, perform the steps for removal in a safe location ... of the door, it is recommended that the door clears the bottom hinge post. a Press the door-latch button to release the left door. 10 Dell™ PowerEdge™ 4210 Installation Guide 5 Lift the door upward so that you lay the removed door flat. 6 Lay the panel in reverse.
CAUTION: Due to the size and weight of the rack cabinet doors, never attempt to the door's cosmetic coating. Replacing the Front Door To replace the front door, perform the steps for removal in a safe location ... of the door, it is recommended that the door clears the bottom hinge post. a Press the door-latch button to release the left door. 10 Dell™ PowerEdge™ 4210 Installation Guide 5 Lift the door upward so that you lay the removed door flat. 6 Lay the panel in reverse.

User Manual
Page 15
... left and right edges of the rack cabinet side panels, never attempt to install the side stabilizer feet. Also, although removing the side panels is not mandatory for removal in order to remove or install them by yourself. Removing a Side Panel 1 2 3 1 side panel (2) 3 handles (2) 2 locks (2) Dell™ PowerEdge™ 4210 Installation Guide 13 Figure 1-4. Removing...
... left and right edges of the rack cabinet side panels, never attempt to install the side stabilizer feet. Also, although removing the side panels is not mandatory for removal in order to remove or install them by yourself. Removing a Side Panel 1 2 3 1 side panel (2) 3 handles (2) 2 locks (2) Dell™ PowerEdge™ 4210 Installation Guide 13 Figure 1-4. Removing...

User Manual
Page 16
...Place the panel in reverse. Replacing the Side Panels CAUTION: Because of the size and weight of the rack cabinet side panels, never attempt to remove the front-door hinge bodies from the rack. For instructions, see "Removing the Front Door." 2 Remove the side panels. 2 Allow the side ...CAUTION: Because of the size and weight of the rack cabinet side panels, never attempt to swing outward slightly from the bottom. 3 Grasp the panel firmly using the handles. 4 Lift the panel upward until it clears the top of the hinge body. 14 Dell™ PowerEdge™ 4210 Installation Guide
...Place the panel in reverse. Replacing the Side Panels CAUTION: Because of the size and weight of the rack cabinet side panels, never attempt to remove the front-door hinge bodies from the rack. For instructions, see "Removing the Front Door." 2 Remove the side panels. 2 Allow the side ...CAUTION: Because of the size and weight of the rack cabinet side panels, never attempt to swing outward slightly from the bottom. 3 Grasp the panel firmly using the handles. 4 Lift the panel upward until it clears the top of the hinge body. 14 Dell™ PowerEdge™ 4210 Installation Guide
User Manual
Page 28
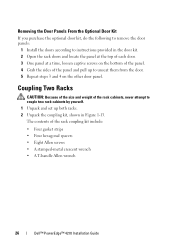
.... 3 One panel at a time, loosen captive screws on the other door panel. Coupling Two Racks CAUTION: Because of the size and weight of the rack cabinets, never attempt to unseat them from the door. 5 Repeat steps 3 and 4 on the bottom... of the panel. 4 Grab the sides of the rack coupling kit include: • Four gasket strips • Four hexagonal spacers • Eight Allen screws • A stamped-metal crescent wrench • A T-handle Allen wrench 26 Dell™ PowerEdge™ 4210...
.... 3 One panel at a time, loosen captive screws on the other door panel. Coupling Two Racks CAUTION: Because of the size and weight of the rack cabinets, never attempt to unseat them from the door. 5 Repeat steps 3 and 4 on the bottom... of the panel. 4 Grab the sides of the rack coupling kit include: • Four gasket strips • Four hexagonal spacers • Eight Allen screws • A stamped-metal crescent wrench • A T-handle Allen wrench 26 Dell™ PowerEdge™ 4210...
Best Practices Guide for Rack Enclosures
Page 4
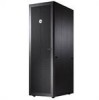
... storage, PowerConnect™ or other networking equipment like routers, switches, and etc. The Dell 2420 and 4220 Rack Enclosure feature an array of enhancements over traditional cabinets to provide guidance for 19" rackmount equipment. Executive Summary The Dell™ PowerEdge™ Rack Enclosures are offered in any environment: a data center, a remote office, a wiring closet, or even a factory floor...
... storage, PowerConnect™ or other networking equipment like routers, switches, and etc. The Dell 2420 and 4220 Rack Enclosure feature an array of enhancements over traditional cabinets to provide guidance for 19" rackmount equipment. Executive Summary The Dell™ PowerEdge™ Rack Enclosures are offered in any environment: a data center, a remote office, a wiring closet, or even a factory floor...


