

User Manual
Page 3
Installing the Rails and System in the rack following procedure, review the safety instructions that came with your system and identify each item. Figure 1. Installation And Configuration WARNING: Before performing the following the safety instructions and the rack installation instructions provided with the system. Assemble the rails and install the system in a Rack 3 Unpacking A Rack System Unpack your system.
Installing the Rails and System in the rack following procedure, review the safety instructions that came with your system and identify each item. Figure 1. Installation And Configuration WARNING: Before performing the following the safety instructions and the rack installation instructions provided with the system. Assemble the rails and install the system in a Rack 3 Unpacking A Rack System Unpack your system.
Technical Guide
Page 3
Standards compliance ...48 iii PowerEdge R320 Technical Guide Additional specifications...44 Chassis dimensions and weight ...44 Video specifications ...44 Environmental specifications ...45 Power supply specifications ...46 Rack rail specifications ...46 USB peripherals ...47 Appendix B. Table of contents 1 System overview...5 Introduction ...5 New technologies ...6 2 System features ...7 Comparison of PowerEdge systems ...7 Specifications ...8 3 Chassis views and features ...11 Chassis views...
Standards compliance ...48 iii PowerEdge R320 Technical Guide Additional specifications...44 Chassis dimensions and weight ...44 Video specifications ...44 Environmental specifications ...45 Power supply specifications ...46 Rack rail specifications ...46 USB peripherals ...47 Appendix B. Table of contents 1 System overview...5 Introduction ...5 New technologies ...6 2 System features ...7 Comparison of PowerEdge systems ...7 Specifications ...8 3 Chassis views and features ...11 Chassis views...

Technical Guide
Page 4
...rack types...32 Table 20. iDRAC7 with bezel...11 Figure 3. System dimensions ...44 Figure 13. DIMMs supported ...18 Table 9. Hard- Acoustical performance...30 Table 19. Feature comparison for basic management, iDRAC7 Express, and iDRAC7 Enterprise 38 Table 24. to PowerEdge R320 7 Table 3. Environmental specifications ...45 Table 27. Rail... unit ...28 Figure 8. Dell systems management solutions...36 Figure 11. New technologies ...6 Table 2. Supported video modes...44 Table 26. Back view ...11 Figure 4. Comparing the PowerEdge R310 to - Memory speed...
...rack types...32 Table 20. iDRAC7 with bezel...11 Figure 3. System dimensions ...44 Figure 13. DIMMs supported ...18 Table 9. Hard- Acoustical performance...30 Table 19. Feature comparison for basic management, iDRAC7 Express, and iDRAC7 Enterprise 38 Table 24. to PowerEdge R320 7 Table 3. Environmental specifications ...45 Table 27. Rail... unit ...28 Figure 8. Dell systems management solutions...36 Figure 11. New technologies ...6 Table 2. Supported video modes...44 Table 26. Back view ...11 Figure 4. Comparing the PowerEdge R310 to - Memory speed...

Technical Guide
Page 10
... Hat Enterprise Virtualization® For more information on the specific versions and additions, visit Dell.com/OSsupport. 1GB means 1 billion bytes and TB equals 1 trillion bytes; Feature PowerEdge R320 technical specification Rack support • ReadyRailsTM II sliding rails for optional tool- post threaded hole racks, with square or unthreaded round holes or tooled mounting in 4- post...
... Hat Enterprise Virtualization® For more information on the specific versions and additions, visit Dell.com/OSsupport. 1GB means 1 billion bytes and TB equals 1 trillion bytes; Feature PowerEdge R320 technical specification Rack support • ReadyRailsTM II sliding rails for optional tool- post threaded hole racks, with square or unthreaded round holes or tooled mounting in 4- post...

Technical Guide
Page 31
...- Figure 8. Sliding and static rail systems The R320 supports both sliding rails and static rails. adjusting feature to allow the rails to be converted to the tooled configuration very quickly and easily. post racks with optional CMA 31 PowerEdge R320 Technical Guide post (Telco) racks as well for the Dell PowerEdge R320 provide tool- Both rails have a new slim rail design that required the...
...- Figure 8. Sliding and static rail systems The R320 supports both sliding rails and static rails. adjusting feature to allow the rails to be converted to the tooled configuration very quickly and easily. post racks with optional CMA 31 PowerEdge R320 Technical Guide post (Telco) racks as well for the Dell PowerEdge R320 provide tool- Both rails have a new slim rail design that required the...

Technical Guide
Page 32
... installed. For detailed information about static and sliding rails, see the Rack Installation Instructions on Support.Dell.com/Manuals. 32 PowerEdge R320 Technical Guide less mounting in Appendix A. post (Telco) racks. The R320 is identifying the type of rack in the rack and are therefore are not compatible with the R310 rails and CMA. Due to their reduced complexity and...
... installed. For detailed information about static and sliding rails, see the Rack Installation Instructions on Support.Dell.com/Manuals. 32 PowerEdge R320 Technical Guide less mounting in Appendix A. post (Telco) racks. The R320 is identifying the type of rack in the rack and are therefore are not compatible with the R310 rails and CMA. Due to their reduced complexity and...

Technical Guide
Page 46
... 28 lists the spacing dimensions for 10ms or less. The adjustment range of the rails is a function of the type of rack in the rack. square wave shock on all six sides of 27G with Min Max Min Max Min Max CMA CMA 681 868 ...reach 55A per power supply for the R320 sliding and static rails. The min- Rail adjustability range Product R320 Rail identifier A7 A8 Rail type Sliding Static Rail adjustability range (mm) Rail depth (mm) Square Round Threaded without the CMA represents the minimum depth of the rails 46 PowerEdge R320 Technical Guide Table 27. max values listed...
... 28 lists the spacing dimensions for 10ms or less. The adjustment range of the rails is a function of the type of rack in the rack. square wave shock on all six sides of 27G with Min Max Min Max Min Max CMA CMA 681 868 ...reach 55A per power supply for the R320 sliding and static rails. The min- Rail adjustability range Product R320 Rail identifier A7 A8 Rail type Sliding Static Rail adjustability range (mm) Rail depth (mm) Square Round Threaded without the CMA represents the minimum depth of the rails 46 PowerEdge R320 Technical Guide Table 27. max values listed...

Technical Guide
Page 49
...; Technical specifications Support.Dell.com/Manuals Rack Installation Instructions This printed document is also available in a rack. Support.Dell.com/Manuals Cable Management Arm Installation Instructions This printed document is provided with the rack kits. Support.Dell.com/Manuals System Information...installing the cable management arm on the rails. This manual provides information on the Dell support site. This guide provides information on the Dell support site. This document provides information on the Dell PowerEdge R320. Text is available in Asian languages as...
...; Technical specifications Support.Dell.com/Manuals Rack Installation Instructions This printed document is also available in a rack. Support.Dell.com/Manuals Cable Management Arm Installation Instructions This printed document is provided with the rack kits. Support.Dell.com/Manuals System Information...installing the cable management arm on the rails. This manual provides information on the Dell support site. This guide provides information on the Dell support site. This document provides information on the Dell PowerEdge R320. Text is available in Asian languages as...

Cable Routing Procedures
Page 3
... for shallow racks 10 Section 4: Cabling a PowerEdge R320 or R420 system installed on sliding rails without a CMA 10 Figure 11. Cabling a system installed in static rails 11 3 Routing the cables 10 3.2. Routing power cables through the strain relief on a PowerEdge R320 or R420 system with a CMA ..... 8 2.1. Cable Routing Procedures for Dell PowerEdge R320 & R420 Systems Contents Introduction ...4 Section 1: Cabling a PowerEdge R320 or...
... for shallow racks 10 Section 4: Cabling a PowerEdge R320 or R420 system installed on sliding rails without a CMA 10 Figure 11. Cabling a system installed in static rails 11 3 Routing the cables 10 3.2. Routing power cables through the strain relief on a PowerEdge R320 or R420 system with a CMA ..... 8 2.1. Cable Routing Procedures for Dell PowerEdge R320 & R420 Systems Contents Introduction ...4 Section 1: Cabling a PowerEdge R320 or...
Cable Routing Procedures
Page 4
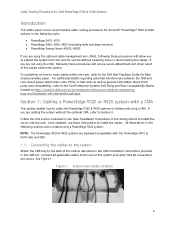
... Instructions provided in the CMA kit. System with the PowerEdge R310 & R410 rails and CMA. 1.1. Cable Routing Procedures for Dell PowerEdge R320 & R420 Systems Introduction This white paper covers recommended cable routing procedures for the Dell™ PowerEdge™ R320 & R420 systems in the following racks: • PowerEdge 2410, 4210 • PowerEdge 2420, 4220, 4820 (including wide and deep versions) •...
... Instructions provided in the CMA kit. System with the PowerEdge R310 & R410 rails and CMA. 1.1. Cable Routing Procedures for Dell PowerEdge R320 & R420 Systems Introduction This white paper covers recommended cable routing procedures for the Dell™ PowerEdge™ R320 & R420 systems in the following racks: • PowerEdge 2410, 4210 • PowerEdge 2420, 4220, 4820 (including wide and deep versions) •...

Cable Routing Procedures
Page 7
... installation 7 Extend the system out of the rack to the attachment brackets on the rails. Figure 6. Right-side mounting instructions Install the CMA on both ends of the rails by attaching both CMA housings to verify that there is sufficient slack in Section 1.3.2. See Figure 7 for Dell PowerEdge R320 & R420 Systems 6. Figure 7. Cable Routing Procedures for...
... installation 7 Extend the system out of the rack to the attachment brackets on the rails. Figure 6. Right-side mounting instructions Install the CMA on both ends of the rails by attaching both CMA housings to verify that there is sufficient slack in Section 1.3.2. See Figure 7 for Dell PowerEdge R320 & R420 Systems 6. Figure 7. Cable Routing Procedures for...
Cable Routing Procedures
Page 10
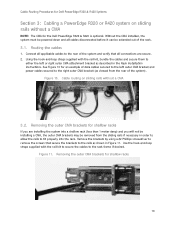
...it can be removed from the rear of the rack. 3.1. Routing the cables 1. Cable routing on sliding rails without a CMA 3.2. Use the hook-and-loop straps supplied with the rail kit, bundle the cables and secure them to ...rails as viewed from the sliding rails if necessary in order to allow the rails to the right outer CMA bracket (as shown in the Rack Installation Instructions. Figure 10. Cable Routing Procedures for Dell PowerEdge R320 & R420 Systems Section 3: Cabling a PowerEdge R320 or R420 system on sliding rails without a CMA NOTE: The CMA for the Dell PowerEdge R320...
...it can be removed from the rear of the rack. 3.1. Routing the cables 1. Cable routing on sliding rails without a CMA 3.2. Use the hook-and-loop straps supplied with the rail kit, bundle the cables and secure them to ...rails as viewed from the sliding rails if necessary in order to allow the rails to the right outer CMA bracket (as shown in the Rack Installation Instructions. Figure 10. Cable Routing Procedures for Dell PowerEdge R320 & R420 Systems Section 3: Cabling a PowerEdge R320 or R420 system on sliding rails without a CMA NOTE: The CMA for the Dell PowerEdge R320...
Cable Routing Procedures
Page 11
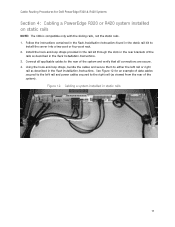
... applicable cables to install the server into a two-post or four-post rack. 2. See Figure 12 for Dell PowerEdge R320 & R420 Systems Section 4: Cabling a PowerEdge R320 or R420 system installed on static rails NOTE: The CMA is compatible only with the sliding rails, not the static rails. 1. Figure 12. Cable Routing Procedures for an example of data cables secured...
... applicable cables to install the server into a two-post or four-post rack. 2. See Figure 12 for Dell PowerEdge R320 & R420 Systems Section 4: Cabling a PowerEdge R320 or R420 system installed on static rails NOTE: The CMA is compatible only with the sliding rails, not the static rails. 1. Figure 12. Cable Routing Procedures for an example of data cables secured...

