Information Update - Processor Installation
Page 3
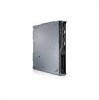
...for a system-specific illustration. See Figure 1-1. 6 Wait 30 seconds for 3 seconds to remove the processor. Before you begin this procedure, review the safety instructions that you intend to fully drain the system of the processor and set the heat sink aside upside down . When disconnected...Only trained service technicians are hot to removing the cover. WARNING: The heat sink and processor are authorized to loosen from support.dell.com and follow the instructions included in the interior of the components inside the system. The heat sink is recommended that came ...
...for a system-specific illustration. See Figure 1-1. 6 Wait 30 seconds for 3 seconds to remove the processor. Before you begin this procedure, review the safety instructions that you intend to fully drain the system of the processor and set the heat sink aside upside down . When disconnected...Only trained service technicians are hot to removing the cover. WARNING: The heat sink and processor are authorized to loosen from support.dell.com and follow the instructions included in the interior of the components inside the system. The heat sink is recommended that came ...
Information Update - Processor Installation
Page 6
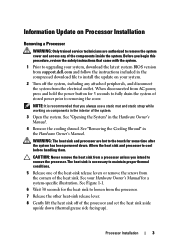
... 1-4. Allow the processor to float on the ZIF socket. NOTE: In a single-processor configuration, the CPU1 socket must be used. 1 If you begin this procedure, review the safety instructions that came with each pin 1 aligned and level. Handle the processor carefully with the socket keys on the pins, allowing the processor...
... 1-4. Allow the processor to float on the ZIF socket. NOTE: In a single-processor configuration, the CPU1 socket must be used. 1 If you begin this procedure, review the safety instructions that came with each pin 1 aligned and level. Handle the processor carefully with the socket keys on the pins, allowing the processor...

Getting Started Guide
Page 5
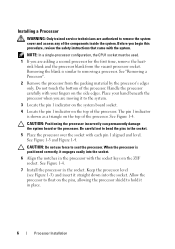
Unpack the System Unpack your system for the first time. Getting Started With Your System 3 Installation and Configuration WARNING: Before performing the following the safety instructions and the rack installation instructions provided with the system. This section describes the steps required to set up your system and identify each item. Installing the Rails and System in a Rack Assemble the rails and install the system in the rack following procedure, review the safety instructions that came with your enclosure.
Unpack the System Unpack your system for the first time. Getting Started With Your System 3 Installation and Configuration WARNING: Before performing the following the safety instructions and the rack installation instructions provided with the system. This section describes the steps required to set up your system and identify each item. Installing the Rails and System in a Rack Assemble the rails and install the system in the rack following procedure, review the safety instructions that came with your enclosure.
Getting Started Guide
Page 12
...Manual provides information about system features and describes how to troubleshoot the system and install or replace system components. • Dell systems management application documentation provides information about installing and using the systems management software. Other Information You May Need WARNING: ...Before performing the following procedure, review the safety instructions that came with your rack solution describes how to install your Hardware Owner's Manual. Obtaining Technical...
...Manual provides information about system features and describes how to troubleshoot the system and install or replace system components. • Dell systems management application documentation provides information about installing and using the systems management software. Other Information You May Need WARNING: ...Before performing the following procedure, review the safety instructions that came with your rack solution describes how to install your Hardware Owner's Manual. Obtaining Technical...
Dell PowerEdge M1000e Configuration Guide
Page 30
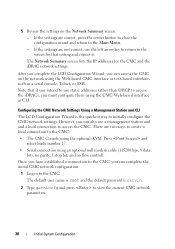
Note that setting and correct it. However, you can complete the initial CMC network configuration: 1 Log in to the CMC. 5 Review the settings on the network using the optional iKVM. The Network Summary screen lists the IP addresses for that if you can also use a management ...
Note that setting and correct it. However, you can complete the initial CMC network configuration: 1 Log in to the CMC. 5 Review the settings on the network using the optional iKVM. The Network Summary screen lists the IP addresses for that if you can also use a management ...
Hardware Owner's Manual
Page 20
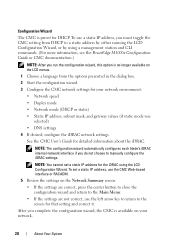
... about the iDRAC. To set a static IP address for the iDRAC using a management station and CLI commands. (For more information, see the PowerEdge M1000e Configuration Guide or CMC documentation.) NOTE: After you do not choose to the screen for your network. 20 About Your System NOTE: You... cannot set a static IP address, use the CMC Web-based interface or RACADM. 5 Review the settings on your network environment: • Network speed • Duplex mode • Network mode (DHCP or static) • Static IP address, ...
... about the iDRAC. To set a static IP address for the iDRAC using a management station and CLI commands. (For more information, see the PowerEdge M1000e Configuration Guide or CMC documentation.) NOTE: After you do not choose to the screen for your network. 20 About Your System NOTE: You... cannot set a static IP address, use the CMC Web-based interface or RACADM. 5 Review the settings on your network environment: • Network speed • Duplex mode • Network mode (DHCP or static) • Static IP address, ...
Hardware Owner's Manual
Page 94
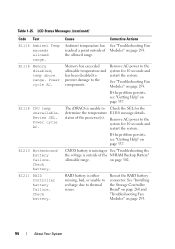
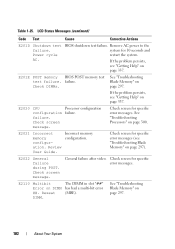
... above range. E1118 CPU temp unavailable. Corrective Actions See "Troubleshooting Fan Modules" on page 337. If the problem persists, see "Getting Help" on page 302. Review SEL. E1211 RAID Controller battery failure. Check battery. Memory has exceeded allowable temperature and has been disabled to prevent damage to the system for 10...
... above range. E1118 CPU temp unavailable. Corrective Actions See "Troubleshooting Fan Modules" on page 337. If the problem persists, see "Getting Help" on page 302. Review SEL. E1211 RAID Controller battery failure. Check battery. Memory has exceeded allowable temperature and has been disabled to prevent damage to the system for 10...
Hardware Owner's Manual
Page 99
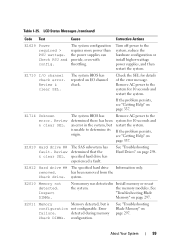
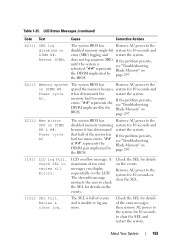
...configurable. Remove AC power to the system, reduce the hardware configuration or install higher-wattage power supplies, and then restart the system. Review & clear SEL. The SAS subsystem has determined that the specified hard drive has experienced a fault. removed. Inspect DIMMs. No memory... was detected in the system, but is unable to the system for details of the error message. Review & clear SEL. See "Troubleshooting Blade Memory" on page 298. E1710 I /O channel check. E1810 Hard drive ## fault. LCD Status Messages (...
...configurable. Remove AC power to the system, reduce the hardware configuration or install higher-wattage power supplies, and then restart the system. Review & clear SEL. The SAS subsystem has determined that the specified hard drive has experienced a fault. removed. Inspect DIMMs. No memory... was detected in the system, but is unable to the system for details of the error message. Review & clear SEL. See "Troubleshooting Blade Memory" on page 298. E1710 I /O channel check. E1810 Hard drive ## fault. LCD Status Messages (...
Hardware Owner's Manual
Page 102
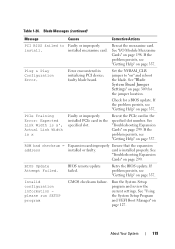
E2020 CPU Processor configuration configuration failure. Review User Guide. E2110 Multibit Error on page 297. failure. E2021 Incorrect memory configuration. Check screen for specific error messages. Check DIMMs. See "Troubleshooting Blade Memory" ...
E2020 CPU Processor configuration configuration failure. Review User Guide. E2110 Multibit Error on page 297. failure. E2021 Incorrect memory configuration. Check screen for specific error messages. Check DIMMs. See "Troubleshooting Blade Memory" ...
Hardware Owner's Manual
Page 103
... pair implicated by the BIOS. Check SEL to check the SEL for 10 seconds or clear the SEL. The eleventh message instructs the user to review all Errors. LCD Status Messages (continued) Code Text Cause Corrective Actions E2111 SBE log disabled on page 297. Power cycle AC. E2113 Mem mirror ...system for 10 seconds and error (SBE) logging and restart the system. Check the SEL for details of the mirror has had too many errors. Review & clear log. memory had too many errors. Reseat DIMM. Power cycle AC The system BIOS has Remove AC power to clear the SEL and ...
... pair implicated by the BIOS. Check SEL to check the SEL for 10 seconds or clear the SEL. The eleventh message instructs the user to review all Errors. LCD Status Messages (continued) Code Text Cause Corrective Actions E2111 SBE log disabled on page 297. Power cycle AC. E2113 Mem mirror ...system for 10 seconds and error (SBE) logging and restart the system. Check the SEL for details of the mirror has had too many errors. Review & clear log. memory had too many errors. Reseat DIMM. Power cycle AC The system BIOS has Remove AC power to clear the SEL and ...
Hardware Owner's Manual
Page 119
... the PCIe card in initializing PCI device; card is x Faulty or improperly installed PCIe card in the specified slot. Run the System Setup program and review the current settings. Faulty or improperly installed mezzanine card. Plug & Play Configuration Error. Error encountered in the specified slot number. If the problem persists, see...
... the PCIe card in initializing PCI device; card is x Faulty or improperly installed PCIe card in the specified slot. Run the System Setup program and review the current settings. Faulty or improperly installed mezzanine card. Plug & Play Configuration Error. Error encountered in the specified slot number. If the problem persists, see...

Dell Converged Enhanced Ethernet Administrator's Guide
Page 148
... interface vlan 1 5. NOTE Refer to the CEE Command Reference for the switch, refer to make any needed corrections. or - 15 Monitoring IGMP 4. When you have reviewed the IGMP statistics for additional information on page 128 to "Configuring IGMP" on page 128 or "Configuring IGMP snooping querier" on IGMP CLI commands. 130...
... interface vlan 1 5. NOTE Refer to the CEE Command Reference for the switch, refer to make any needed corrections. or - 15 Monitoring IGMP 4. When you have reviewed the IGMP statistics for additional information on page 128 to "Configuring IGMP" on page 128 or "Configuring IGMP snooping querier" on IGMP CLI commands. 130...

Dell M8428-k Hardware Reference Manual
Page 34
...," next. Running ceeportloopbacktest (BACKPLANE) During POST, the LEDs are written to beacon. LED patterns are not set to the system log. Review the system log for a TCP/IP connection. Verify that the LEDs on self test (POST) system check is performed each time the ...It has a single IP address and appears as a single element. Secure Telnet access is available through the Module's CLI errShow command. 22 Dell M8428-k Hardware Reference Manual 53-1001980-01 Browser-based GUI management is available using Secure Sockets Layer (SSL). 3 Accessing the converged network switch...
...," next. Running ceeportloopbacktest (BACKPLANE) During POST, the LEDs are written to beacon. LED patterns are not set to the system log. Review the system log for a TCP/IP connection. Verify that the LEDs on self test (POST) system check is performed each time the ...It has a single IP address and appears as a single element. Secure Telnet access is available through the Module's CLI errShow command. 22 Dell M8428-k Hardware Reference Manual 53-1001980-01 Browser-based GUI management is available using Secure Sockets Layer (SSL). 3 Accessing the converged network switch...

Web Tools Administrator’s Guide
Page 34
... under "Check for newer versions of stored pages:" as shown in must delete the temporary internet files used by Java applications. Choose Every visit to review the files that are in . 6 Web Tools Administrator's Guide 53-1001772-01 Click OK. 6. DRAFT: BROCADE CONFIDENTIAL 1 Java installation on the confirmation dialog box. Click...
... under "Check for newer versions of stored pages:" as shown in must delete the temporary internet files used by Java applications. Choose Every visit to review the files that are in . 6 Web Tools Administrator's Guide 53-1001772-01 Click OK. 6. DRAFT: BROCADE CONFIDENTIAL 1 Java installation on the confirmation dialog box. Click...

Web Tools Administrator’s Guide
Page 277
...). 3. The Create Port CUP Connectivity Configuration dialog box displays all ports you want to identify prohibited ports. Repeat this step for Fabric OS based fabrics". 6. Review your changes. You cannot prohibit a port to the dialog box shown in a cell indicates that its value has been modified. 7.
...). 3. The Create Port CUP Connectivity Configuration dialog box displays all ports you want to identify prohibited ports. Repeat this step for Fabric OS based fabrics". 6. Review your changes. You cannot prohibit a port to the dialog box shown in a cell indicates that its value has been modified. 7.
Fabric Watch Administrator’s Guide
Page 22
... capabilities that license is an optionally licensed feature of Fabric OS. For each role, there is allowed to run a command, make modifications to run a command, review the section "Role-Based Access Control (RBAC)" of the command. Fabric Watch provides customizable monitoring thresholds. Each feature is associated with enterprise system management solutions...
... capabilities that license is an optionally licensed feature of Fabric OS. For each role, there is allowed to run a command, make modifications to run a command, review the section "Role-Based Access Control (RBAC)" of the command. Fabric Watch provides customizable monitoring thresholds. Each feature is associated with enterprise system management solutions...

Fabric Watch Administrator’s Guide
Page 67
.... Note: SFPs connected to GbE ports are not monitored. Fabric Watch monitors only the digital diagnostic SFP. NOTE SFPs connected to GbE ports are reported, review the error log for any supporting data for SFP issues. Use this value exceeds the threshold, the SFP is sufficient. Current area events indicate hardware...
.... Note: SFPs connected to GbE ports are not monitored. Fabric Watch monitors only the digital diagnostic SFP. NOTE SFPs connected to GbE ports are reported, review the error log for any supporting data for SFP issues. Use this value exceeds the threshold, the SFP is sufficient. Current area events indicate hardware...

Fabric OS FCIP Administrator’s Guide
Page 107
..., and Tape Pipelining settings must be opposite each other. Get a GE ethernet sniffer trace. FCIP tunnel issues 4 Refer to the Fabric OS Administrator's Guide to review the setup of available bandwidth resulting in the data path must match the opposite endpoint or the tunnel may not come up.
..., and Tape Pipelining settings must be opposite each other. Get a GE ethernet sniffer trace. FCIP tunnel issues 4 Refer to the Fabric OS Administrator's Guide to review the setup of available bandwidth resulting in the data path must match the opposite endpoint or the tunnel may not come up.

Fabric OS Administrator’s Guide
Page 56
... OS operations. After the IP address is beyond the scope of the command. If the serial port on the workstation is allowed to run a command, review the section "Role-Based Access Control (RBAC)" on a PC, TERM, TIP, or Kermit in this guide. Each feature is associated with them. Open a terminal emulator...
... OS operations. After the IP address is beyond the scope of the command. If the serial port on the workstation is allowed to run a command, review the section "Role-Based Access Control (RBAC)" on a PC, TERM, TIP, or Kermit in this guide. Each feature is associated with them. Open a terminal emulator...
Fabric OS Administrator’s Guide
Page 95
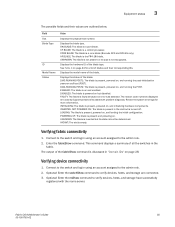
... name server. Field Value Slot Blade Type ID Model Name Status Displays the physical slot number. DIAG RUNNING POST1: The blade is present, powered on . Review the system error logs for a list of the fabricShow command is discussed in using an account assigned to the admin role. 2. INITIALIZING: The blade is...
... name server. Field Value Slot Blade Type ID Model Name Status Displays the physical slot number. DIAG RUNNING POST1: The blade is present, powered on . Review the system error logs for a list of the fabricShow command is discussed in using an account assigned to the admin role. 2. INITIALIZING: The blade is...

