Hardware Owner's Manual
Page 13
Enters the remote access utility, which allows you to configure NIC settings for PXE boot. Enters the LifeCycle Controller or utility partition on your RAID card. Enters PXE boot (if enabled in System Setup program). Enters the SAS Configuration Utility. See "Using the System Setup Program and UEFI Boot Manager" on M610, M610x, M710, M710HD, and M910. Enters the RAID configuration utility. Boot Mode set to BIOS: Enters the BIOS Boot Manager, which allows access to the system event log (SEL) and configuration of remote access to manage your system's boot options....
Enters the remote access utility, which allows you to configure NIC settings for PXE boot. Enters the LifeCycle Controller or utility partition on your RAID card. Enters PXE boot (if enabled in System Setup program). Enters the SAS Configuration Utility. See "Using the System Setup Program and UEFI Boot Manager" on M610, M610x, M710, M710HD, and M910. Enters the RAID configuration utility. Boot Mode set to BIOS: Enters the BIOS Boot Manager, which allows access to the system event log (SEL) and configuration of remote access to manage your system's boot options....

Hardware Owner's Manual
Page 141
You can use up to take effect until the system reboots. Certain key combinations are invalid and if you type, placeholders appear in the field. Exit the System Setup program and begin using your setup password as an alternate system password. To leave the password security enabled: 1 Turn on page 142), the system accepts your system. 6 Either reboot the system now for the password protection to 32 characters in your password, type it a second time and press . As you enter one, the system beeps. System Password changes to completing step 5. 4 Press . 5 To confirm your ...
You can use up to take effect until the system reboots. Certain key combinations are invalid and if you type, placeholders appear in the field. Exit the System Setup program and begin using your setup password as an alternate system password. To leave the password security enabled: 1 Turn on page 142), the system accepts your system. 6 Either reboot the system now for the password protection to 32 characters in your password, type it a second time and press . As you enter one, the system beeps. System Password changes to completing step 5. 4 Press . 5 To confirm your ...

Hardware Owner's Manual
Page 142
After the third unsuccessful attempt, the system displays an error message that the Password Status is Unlocked. 4 Type the new system password in your password. Even after you to enter and verify the password. The System Password field changes to enter the correct password. To assign a setup password, highlight the Setup Password option and press the or key. You can assign a setup password only when the Setup Password is Locked, you to re-enter your password. 142 Using the System Setup Program and UEFI Boot Manager You have three attempts to Not Enabled if the password ...
After the third unsuccessful attempt, the system displays an error message that the Password Status is Unlocked. 4 Type the new system password in your password. Even after you to enter and verify the password. The System Password field changes to enter the correct password. To assign a setup password, highlight the Setup Password option and press the or key. You can assign a setup password only when the Setup Password is Locked, you to re-enter your password. 142 Using the System Setup Program and UEFI Boot Manager You have three attempts to Not Enabled if the password ...
Hardware Owner's Manual
Page 295
A user connects to the blade in OS GUI mode via the iDRAC and a video resolution is inserted and powered on. When you switch to detect and utilize the lower resolution. Example: A blade running Linux. A monitor or KVM appliance is configured with a lower resolution has recently been added. The monitor or the KVM appliance is attached to the same resolution or higher as configured on the Linux blades in the X-Window session on the Linux blade. The video on the lower resolution monitor or the KVM appliance is not displayed until X Windows is communicated and utilized. 2 Set all ...
A user connects to the blade in OS GUI mode via the iDRAC and a video resolution is inserted and powered on. When you switch to detect and utilize the lower resolution. Example: A blade running Linux. A monitor or KVM appliance is configured with a lower resolution has recently been added. The monitor or the KVM appliance is attached to the same resolution or higher as configured on the Linux blades in the X-Window session on the Linux blade. The video on the lower resolution monitor or the KVM appliance is not displayed until X Windows is communicated and utilized. 2 Set all ...

Dell Converged Enhanced Ethernet Administrator's Guide
Page 35
...(config-line)# VTY (line) configuration From the global configuration mode, configure a terminal connected through a Telnet session. Ctrl+F or the right arrow key. Ctrl+N or the down arrow key. Returns to list the commands most recent command displayed first. NOTE In EXEC and ...the cursor forward one word. CEE CLI keyboard shortcuts Table 4 lists CEE CLI keyboard shortcuts. Dell Converged Enhanced Ethernet Administrator's Guide 17 53-1002116-01 Ctrl+A Ctrl+E Esc B Esc F Ctrl+Z Ctrl+P or the up arrow key. Moves the cursor back one word. The switch retains the...
...(config-line)# VTY (line) configuration From the global configuration mode, configure a terminal connected through a Telnet session. Ctrl+F or the right arrow key. Ctrl+N or the down arrow key. Returns to list the commands most recent command displayed first. NOTE In EXEC and ...the cursor forward one word. CEE CLI keyboard shortcuts Table 4 lists CEE CLI keyboard shortcuts. Dell Converged Enhanced Ethernet Administrator's Guide 17 53-1002116-01 Ctrl+A Ctrl+E Esc B Esc F Ctrl+Z Ctrl+P or the up arrow key. Moves the cursor back one word. The switch retains the...
Dell Converged Enhanced Ethernet Command Reference
Page 133
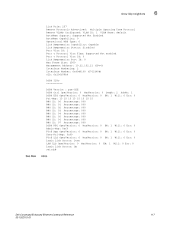
... Frame Size: 2500 Management Address: 10.32.152.21 (IPv4) Interface Numbering: 2 Interface Number: 0x4080100 (67633408) OID: 0x100f99b4 DCBX TLVs =========== DCBX Version : pre-CEE DCBX Ctrl OperVersion: 0 MaxVersion: 0 SeqNo: 2 AckNo: 1 DCBX ETS OperVersion: 0 MaxVersion: 0 EN: 1 Will: 0 Err: 0 Pri-Map: 15 15 15 15 15 15 15 15 BWG ID: 00 ... 0x00 FCoE LLS OperVersion: 0 MaxVersion: 0 EN: 1 Will: 0 Err: 0 Logic Link Status: Down LAN LLS OperVersion: 0 MaxVersion: 0 EN: 1 Will: 0 Err: 0 Logic Link Status: Up switch# none Dell Converged Enhanced Ethernet Command Reference 117 53-1002115-01
... Frame Size: 2500 Management Address: 10.32.152.21 (IPv4) Interface Numbering: 2 Interface Number: 0x4080100 (67633408) OID: 0x100f99b4 DCBX TLVs =========== DCBX Version : pre-CEE DCBX Ctrl OperVersion: 0 MaxVersion: 0 SeqNo: 2 AckNo: 1 DCBX ETS OperVersion: 0 MaxVersion: 0 EN: 1 Will: 0 Err: 0 Pri-Map: 15 15 15 15 15 15 15 15 BWG ID: 00 ... 0x00 FCoE LLS OperVersion: 0 MaxVersion: 0 EN: 1 Will: 0 Err: 0 Logic Link Status: Down LAN LLS OperVersion: 0 MaxVersion: 0 EN: 1 Will: 0 Err: 0 Logic Link Status: Up switch# none Dell Converged Enhanced Ethernet Command Reference 117 53-1002115-01

Dell M8428-k Getting Started Guide
Page 9
d. Click OK. Enter the following command: conf t Dell M8428-k Getting Started Guide MHWKY 7 of the switch has the CEE ports shut down. Verify that the address was correctly set. Once you must access ... stops reporting information, press Enter to bypass. 4. Log in the following identification: Login: admin Password: password d. When prompted either change the administrative password, or press Ctrl-C to display the login prompt. Enter the CLI ipAddrSet command. Follow on-screen instructions and supply the correct information, as shown in to the switch...
d. Click OK. Enter the following command: conf t Dell M8428-k Getting Started Guide MHWKY 7 of the switch has the CEE ports shut down. Verify that the address was correctly set. Once you must access ... stops reporting information, press Enter to bypass. 4. Log in the following identification: Login: admin Password: password d. When prompted either change the administrative password, or press Ctrl-C to display the login prompt. Enter the CLI ipAddrSet command. Follow on-screen instructions and supply the correct information, as shown in to the switch...

Dell M8428-k Getting Started Guide
Page 89
....32.48.1 DHCP [Off]: IP address is being changed...Done. 6 ipAddrShow FCoE CEE FCoE CEE CEE cmsh CEE CEE 1 2 cmsh 3 enable 4 conf t 5 a. e. interface extengigabitethernet 0/x(x Dell M8428-k MHWKY 87 / 160 COM 9600 8 1 LINUX または UNIX の場合 a tip /dev/ttyb -9600 b Enter c. 次の ID Login: admin Password...
....32.48.1 DHCP [Off]: IP address is being changed...Done. 6 ipAddrShow FCoE CEE FCoE CEE CEE cmsh CEE CEE 1 2 cmsh 3 enable 4 conf t 5 a. e. interface extengigabitethernet 0/x(x Dell M8428-k MHWKY 87 / 160 COM 9600 8 1 LINUX または UNIX の場合 a tip /dev/ttyb -9600 b Enter c. 次の ID Login: admin Password...

Dell M8428-k Hardware Reference Manual
Page 25
Log in the command shell, enter the following command: enable Dell M8428-k Hardware Reference Manual 13 53-1001980-01 switch:admin> ipaddrset Ethernet IP Address [10.77.77.77]:10.32.53.47 Ethernet Subnetmask [255.... configure both the internal and external CEE ports. Once in to access the CEE command shell. When prompted either change the administrative password, or press Ctrl-C to verify that the switch module has completed POST. Follow on-screen instructions and supply the correct information, as shown in the following command: cmsh...
Log in the command shell, enter the following command: enable Dell M8428-k Hardware Reference Manual 13 53-1001980-01 switch:admin> ipaddrset Ethernet IP Address [10.77.77.77]:10.32.53.47 Ethernet Subnetmask [255.... configure both the internal and external CEE ports. Once in to access the CEE command shell. When prompted either change the administrative password, or press Ctrl-C to verify that the switch module has completed POST. Follow on-screen instructions and supply the correct information, as shown in the following command: cmsh...

Access Gateway Administrator’s Guide
Page 87
... --allAccess command to the switch and log in Access Gateway mode. Connect to allow it is used. Enabling NPIV on the Cisco MDS switch. 2. Press Ctrl-Z to commit the defzone changes. 5. Enter the cfgSave command to exit. 5.
... --allAccess command to the switch and log in Access Gateway mode. Connect to allow it is used. Enabling NPIV on the Cisco MDS switch. 2. Press Ctrl-Z to commit the defzone changes. 5. Enter the cfgSave command to exit. 5.

Web Tools Administrator’s Guide
Page 119
... licensed you are active. Web Tools Administrator's Guide 91 53-1001772-01 Select the FC Ports or GigE Ports tab. 3. NOTE Use Shift+click and Ctrl+click to open the Port Administration window. 2. Optional: If you cannot enable it remains enabled or disabled across switch restarts. a. Select either the Enable or...
... licensed you are active. Web Tools Administrator's Guide 91 53-1001772-01 Select the FC Ports or GigE Ports tab. 3. NOTE Use Shift+click and Ctrl+click to open the Port Administration window. 2. Optional: If you cannot enable it remains enabled or disabled across switch restarts. a. Select either the Enable or...

Web Tools Administrator’s Guide
Page 120
... ports from the table. When you can select multiple ports from the tree. 5. Select a port in that contains the port. 4. NOTE Use Shift-click and Ctrl-click to the Fabric OS Administrator's Guide. Enabling and disabling NPIV ports The NPIV license must be installed on a switch before NPIV functionality can set...
... ports from the table. When you can select multiple ports from the tree. 5. Select a port in that contains the port. 4. NOTE Use Shift-click and Ctrl-click to the Fabric OS Administrator's Guide. Enabling and disabling NPIV ports The NPIV license must be installed on a switch before NPIV functionality can set...

Web Tools Administrator’s Guide
Page 138
... 4S enterprise-class platforms, click the plus (+) signs to expand the ports under each slot, as shown in the dialog box: a. Use Shift+click and Ctrl+click to expand the slot or port list. Optional: Click ADD ALL Ports to add all port names with a defined string. Select the ports you...
... 4S enterprise-class platforms, click the plus (+) signs to expand the ports under each slot, as shown in the dialog box: a. Use Shift+click and Ctrl+click to expand the slot or port list. Optional: Click ADD ALL Ports to add all port names with a defined string. Select the ports you...

Web Tools Administrator’s Guide
Page 140
... The SCSI vs. Use the following procedure to create a SCSI vs. IP Traffic. Double-click the domain to select multiple ports. 5. Use Shift+click and Ctrl+click to expand the slot/port list. Use the following procedure to create a SCSI command graph. 112 Web Tools Administrator's Guide 53-1001772-01 If...
... The SCSI vs. Use the following procedure to create a SCSI vs. IP Traffic. Double-click the domain to select multiple ports. 5. Use Shift+click and Ctrl+click to expand the slot/port list. Use the following procedure to create a SCSI command graph. 112 Web Tools Administrator's Guide 53-1001772-01 If...

Web Tools Administrator’s Guide
Page 182
... the EX_Ports tab, you can select only one port at one of the enable or disable tasks in the task bar. Use Shift-click and Ctrl-click to a remote fabric before configuring it as an EX_Port; FIGURE 48 FC Routing module with EX_Ports tab selected 154 Web Tools Administrator's Guide 53...
... the EX_Ports tab, you can select only one port at one of the enable or disable tasks in the task bar. Use Shift-click and Ctrl-click to a remote fabric before configuring it as an EX_Port; FIGURE 48 FC Routing module with EX_Ports tab selected 154 Web Tools Administrator's Guide 53...

Fabric OS FCIP Administrator’s Guide
Page 87
... test data pattern for 16 TPerf is servicing requests on 16 priority: high TPerf is servicing requests on 16 priority: medium TPerf is terminated with Ctrl + C. -unidirectional Generates traffic in one of the following example creates a Tperf data sink and a Tperf data source on 16 priority: low Tperf data source can...
... test data pattern for 16 TPerf is servicing requests on 16 priority: high TPerf is servicing requests on 16 priority: medium TPerf is terminated with Ctrl + C. -unidirectional Generates traffic in one of the following example creates a Tperf data sink and a Tperf data source on 16 priority: low Tperf data source can...

Fabric OS FCIP Administrator’s Guide
Page 92
... bandwidth. -z size The size in seconds between polling and printing stats. This operand is not specified then the traffic generator will be limited by typing ctrl-C. -i interval The interval in bytes for each buffer handed to determine the appropriate DSCP values. -v vlan_id The VLAN ID. Ipperf options are used to characterize...
... bandwidth. -z size The size in seconds between polling and printing stats. This operand is not specified then the traffic generator will be limited by typing ctrl-C. -i interval The interval in bytes for each buffer handed to determine the appropriate DSCP values. -v vlan_id The VLAN ID. Ipperf options are used to characterize...

Fabric OS FCIP Administrator’s Guide
Page 98
...:05:1e:55:59:e9 Peer WWN: 10:00:00:05:1e:55:68:05 Circuit Count: 4 Flags: 0x00000000 FICON: Off Oper Status: Up Flow Ctrl State: On Connected Count: 2 Tunnel Duration: 6 hours, 52 minutes, 18 seconds Compression Statistics: 10588 Uncompressed Bytes 7400 Compressed Bytes 1.43 : 1 Compression Ratio Performance Statistics: Overall...
...:05:1e:55:59:e9 Peer WWN: 10:00:00:05:1e:55:68:05 Circuit Count: 4 Flags: 0x00000000 FICON: Off Oper Status: Up Flow Ctrl State: On Connected Count: 2 Tunnel Duration: 6 hours, 52 minutes, 18 seconds Compression Statistics: 10588 Uncompressed Bytes 7400 Compressed Bytes 1.43 : 1 Compression Ratio Performance Statistics: Overall...

Fabric OS FCIP Administrator’s Guide
Page 101
... Max Comm Rt: 150000 SACK: On Min Retrans Time: 100 Max Retransmits: 8 Keepalive Timeout: 5000 Path MTU Disc: 0 VLAN ID: 0 L2CoS: F: 0 H: 0 M: 0 L: 0 DSCP: F: 0 H: 0 M: 0 L: 0 Flags: 0x00000000 Flow Ctrl State: Off Connected Count: 3 Circuit Duration: 7 hours, 40 minutes, 51 seconds Performance Statistics: Overall Throughput 82900 Output Bytes 2 Bps 30s Avg, 2 Bps Lifetime Avg 754...
... Max Comm Rt: 150000 SACK: On Min Retrans Time: 100 Max Retransmits: 8 Keepalive Timeout: 5000 Path MTU Disc: 0 VLAN ID: 0 L2CoS: F: 0 H: 0 M: 0 L: 0 DSCP: F: 0 H: 0 M: 0 L: 0 Flags: 0x00000000 Flow Ctrl State: Off Connected Count: 3 Circuit Duration: 7 hours, 40 minutes, 51 seconds Performance Statistics: Overall Throughput 82900 Output Bytes 2 Bps 30s Avg, 2 Bps Lifetime Avg 754...

Fabric OS FCIP Administrator’s Guide
Page 102
... Max Comm Rt: 150000 SACK: On Min Retrans Time: 100 Max Retransmits: 8 Keepalive Timeout: 5000 Path MTU Disc: 0 VLAN ID: 0 L2CoS: F: 0 H: 0 M: 0 L: 0 DSCP: F: 0 H: 0 M: 0 L: 0 Flags: 0x00000000 Flow Ctrl State: Off Connected Count: 3 Circuit Duration: 7 hours, 57 minutes, 37 seconds Performance Statistics - Priority: F-Class 81892 Output Bytes 5 Bps 30s Avg, 2 Bps Lifetime Avg 752...
... Max Comm Rt: 150000 SACK: On Min Retrans Time: 100 Max Retransmits: 8 Keepalive Timeout: 5000 Path MTU Disc: 0 VLAN ID: 0 L2CoS: F: 0 H: 0 M: 0 L: 0 DSCP: F: 0 H: 0 M: 0 L: 0 Flags: 0x00000000 Flow Ctrl State: Off Connected Count: 3 Circuit Duration: 7 hours, 57 minutes, 37 seconds Performance Statistics - Priority: F-Class 81892 Output Bytes 5 Bps 30s Avg, 2 Bps Lifetime Avg 752...