
Information Update
Page 10
... Power source for information about these utilities. See "Troubleshooting the Microprocessors" in your Installation and Troubleshooting Guide. See "Replacing a Processor" in your has halted operation. acceptable range. 8 Information Update LCD Status Messages (continued) Line 1 Message E0780 E07F0 E07FA ...or the SEL is cleared using either Server Assistant or the BMC Management Utility. www.dell.com | support.dell.com Table 1-2. See "Replacing a Processor" in socket n. See "Troubleshooting Redundant Power Supplies" in socket n. Install a microprocessor in your...
... Power source for information about these utilities. See "Troubleshooting the Microprocessors" in your Installation and Troubleshooting Guide. See "Replacing a Processor" in your has halted operation. acceptable range. 8 Information Update LCD Status Messages (continued) Line 1 Message E0780 E07F0 E07FA ...or the SEL is cleared using either Server Assistant or the BMC Management Utility. www.dell.com | support.dell.com Table 1-2. See "Replacing a Processor" in socket n. See "Troubleshooting Redundant Power Supplies" in socket n. Install a microprocessor in your...
Processor Upgrade Installation Guide
Page 5
...that is installed in your system is still warm. To take advantage of your system. See www.dell.com and support.dell.com for information on processor availability and upgrade options for detailed instructions on the system board, other ZIF sockets might adhere to ...L2 cache. Adding or Replacing a Processor NOTICE: The secondary processor must be the same speed as the primary processor (if applicable). NOTICE: The processor and heat sink can add secondary processors or replace processors in a ZIF socket on the Dell Support website at support.dell.com, and upgrade the BIOS ...
...that is installed in your system is still warm. To take advantage of your system. See www.dell.com and support.dell.com for information on processor availability and upgrade options for detailed instructions on the system board, other ZIF sockets might adhere to ...L2 cache. Adding or Replacing a Processor NOTICE: The secondary processor must be the same speed as the primary processor (if applicable). NOTICE: The processor and heat sink can add secondary processors or replace processors in a ZIF socket on the Dell Support website at support.dell.com, and upgrade the BIOS ...
Processor Upgrade Installation Guide
Page 6
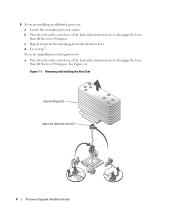
6 If you are installing an additional processor: a Locate the secondary processor socket. See Figure 1-1. If you are upgrading an existing processor: a Press the tab on the end of one of the heat-sink retention levers to step 7. c Repeat step b for the remaining heat-...sink retention lever. Figure 1-1. Removing and Installing the Heat Sink heat sink (typical) heat-sink retention lever (2) 4 Processor Upgrade Installation Guide b Press the tab on the end of one of the heat-sink retention levers to disengage the lever, then lift the lever...
6 If you are installing an additional processor: a Locate the secondary processor socket. See Figure 1-1. If you are upgrading an existing processor: a Press the tab on the end of one of the heat-sink retention levers to step 7. c Repeat step b for the remaining heat-...sink retention lever. Figure 1-1. Removing and Installing the Heat Sink heat sink (typical) heat-sink retention lever (2) 4 Processor Upgrade Installation Guide b Press the tab on the end of one of the heat-sink retention levers to disengage the lever, then lift the lever...
Processor Upgrade Installation Guide
Page 7
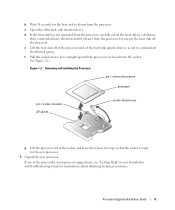
...heat sink to contaminate the thermal grease. Processor Upgrade Installation Guide 5 e Lift the heat sink off the processor. Removing and Installing the Processor pin-1 corner of processor processor pin-1 corner of socket ZIF socket socket-release lever g Lift the processor out of the pins on the microprocessor...that the socket is released from the processor. d If the heat sink has not separated from the processor, carefully rotate the heat sink in your Installation and Troubleshooting Guide for the new processor. 7 Unpack the new processor. If any of the socket and ...
...heat sink to contaminate the thermal grease. Processor Upgrade Installation Guide 5 e Lift the heat sink off the processor. Removing and Installing the Processor pin-1 corner of processor processor pin-1 corner of socket ZIF socket socket-release lever g Lift the processor out of the pins on the microprocessor...that the socket is released from the processor. d If the heat sink has not separated from the processor, carefully rotate the heat sink in your Installation and Troubleshooting Guide for the new processor. 7 Unpack the new processor. If any of the socket and ...
Processor Upgrade Installation Guide
Page 8
...evenly to positioning the processor correctly. See Figure 1-1. 8 Align the pin-1 corner of the processor with minimal pressure. Identify the pin-1 corner of the processor by a corresponding triangle. 9 Install the processor in the same corner of the processor. b With the pin-1 corners of the processor. See Figure 1-1. ...locating the tiny gold triangle on the processor enter the corresponding holes. When placing the processor in the socket, be sure that all pins are upgrading an existing processor, use force, which could bend the pins if the processor is fully seated in the socket....
...evenly to positioning the processor correctly. See Figure 1-1. 8 Align the pin-1 corner of the processor with minimal pressure. Identify the pin-1 corner of the processor by a corresponding triangle. 9 Install the processor in the same corner of the processor. b With the pin-1 corners of the processor. See Figure 1-1. ...locating the tiny gold triangle on the processor enter the corresponding holes. When placing the processor in the socket, be sure that all pins are upgrading an existing processor, use force, which could bend the pins if the processor is fully seated in the socket....
Processor Upgrade Installation Guide
Page 9
...the System Diagnostics" in the System Setup program. 16 Press to enter the System Setup program, and check that the new processor operates correctly. Processor Upgrade Installation Guide 7 11 Reinstall the center fan bracket or replace the memory module shroud (if applicable). 12 If you ...have added an additional processor, install the processor cooling fan(s) for the new processor. 13 Replace the processor cooling fans (if applicable). 14 Close the system. 15 Reconnect your Installation and Troubleshooting Guide for...
...the System Diagnostics" in the System Setup program. 16 Press to enter the System Setup program, and check that the new processor operates correctly. Processor Upgrade Installation Guide 7 11 Reinstall the center fan bracket or replace the memory module shroud (if applicable). 12 If you ...have added an additional processor, install the processor cooling fan(s) for the new processor. 13 Replace the processor cooling fans (if applicable). 14 Close the system. 15 Reconnect your Installation and Troubleshooting Guide for...

Processor Upgrade Installation Guide
Page 10
8 Processor Upgrade Installation Guide
8 Processor Upgrade Installation Guide


