
Rack Installation Guide
Page 10
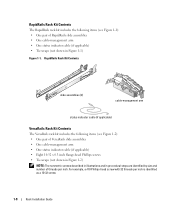
... • One cable-management arm • One status indicator cable (if applicable) • Tie-wraps (not shown in procedural steps are identified by size and number of VersaRails slide assemblies • One cable-management arm • One status indicator cable (if applicable) • Eight 10-32 x 0.5-inch flange-head Phillips screws...
... • One cable-management arm • One status indicator cable (if applicable) • Tie-wraps (not shown in procedural steps are identified by size and number of VersaRails slide assemblies • One cable-management arm • One status indicator cable (if applicable) • Eight 10-32 x 0.5-inch flange-head Phillips screws...
Rack Installation Guide
Page 11
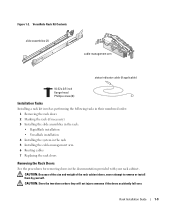
... arm status indicator cable (if applicable) 10-32 x 0.5-inch flange-head Phillips screw (8) Installation Tasks Installing a rack kit involves performing the following tasks in their numbered order: 1 Removing the rack doors 2 Marking the rack (if necessary) 3 Installing the slide assemblies in the rack: • RapidRails installation • VersaRails installation 4 Installing the...
... arm status indicator cable (if applicable) 10-32 x 0.5-inch flange-head Phillips screw (8) Installation Tasks Installing a rack kit involves performing the following tasks in their numbered order: 1 Removing the rack doors 2 Marking the rack (if necessary) 3 Installing the slide assemblies in the rack: • RapidRails installation • VersaRails installation 4 Installing the...
Rack Installation Guide
Page 12
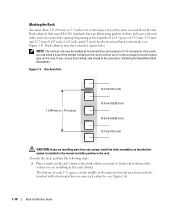
... installed in the lowest available position in the rack. If you install in the rack. If you wish, you can make a note of the number marking on the rack's front vertical rails where you want to locate the bottom of the system you are installing in 1-U increments. It is at... of a 1-U space) of each 1-U space is not necessary to the procedure "Installing the RapidRails Slide Assemblies." Rack cabinets may be marked by horizontal lines and numbers in the rack cabinet. One Rack Unit 1 U (44 mm or 1.75 inches) 12.7 mm (0.5 inch) 15.9 mm (0.625 inch) 15.9 mm (0.625 inch) 12.7 ...
... installed in the lowest available position in the rack. If you install in the rack. If you wish, you can make a note of the number marking on the rack's front vertical rails where you want to locate the bottom of the system you are installing in 1-U increments. It is at... of a 1-U space) of each 1-U space is not necessary to the procedure "Installing the RapidRails Slide Assemblies." Rack cabinets may be marked by horizontal lines and numbers in the rack cabinet. One Rack Unit 1 U (44 mm or 1.75 inches) 12.7 mm (0.5 inch) 15.9 mm (0.625 inch) 15.9 mm (0.625 inch) 12.7 ...
Rack Installation Guide
Page 15
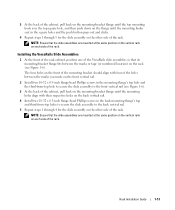
... Guide 1-13 The four holes on the front of the mounting bracket should align with four of the holes between the marks or tape (or numbered location) on the rack (see Figure 1-6). 3 At the back of the cabinet, pull back on the mounting-bracket flange until the mounting hooks seat in...
... Guide 1-13 The four holes on the front of the mounting bracket should align with four of the holes between the marks or tape (or numbered location) on the rack (see Figure 1-6). 3 At the back of the cabinet, pull back on the mounting-bracket flange until the mounting hooks seat in...
Rack Installation Guide
Page 23
... precautionary warnings before attempting this guide for servicing. Two-Post Rack Installation Tasks Installing a two-post rack kit includes performing the following tasks in their numbered order: 1 Marking the rack (if necessary) 2 Installing the slide assemblies in the rack: • Center-mount installation • Flush-mount installation 3 Installing the system in...
... precautionary warnings before attempting this guide for servicing. Two-Post Rack Installation Tasks Installing a two-post rack kit includes performing the following tasks in their numbered order: 1 Marking the rack (if necessary) 2 Installing the slide assemblies in the rack: • Center-mount installation • Flush-mount installation 3 Installing the system in...


