
Configuration Guide
Page 49
... On a server using the Red Hat® Enterprise Linux or SUSE® Linux Enterprise Server operating system, the virtual drives must be mounted before the drives can download a TFTP server from within Windows is similar to be accessed. Type the following command to quickly identify the assigned... firmware as the option to 20 characters. 6 Click Update Firmware. 7 The TFTP download and firmware update process may take several minutes. Before mounting the drive, first connect to the media at a management station, the media is available at the management station. When you connect to the...
... On a server using the Red Hat® Enterprise Linux or SUSE® Linux Enterprise Server operating system, the virtual drives must be mounted before the drives can download a TFTP server from within Windows is similar to be accessed. Type the following command to quickly identify the assigned... firmware as the option to 20 characters. 6 Click Update Firmware. 7 The TFTP download and firmware update process may take several minutes. Before mounting the drive, first connect to the media at a management station, the media is available at the management station. When you connect to the...
Hardware Owner's Manual (PDF)
Page 149
... tag - The BIOS controls the following: • Communications between the processor and peripheral devices • Miscellaneous functions, such as system messages bit - The modules are mounted into a chassis that keeps a copy of a system. BTU - Celsius. A fast storage area that includes power supplies and fans. Software designed to help you start your...
... tag - The BIOS controls the following: • Communications between the processor and peripheral devices • Miscellaneous functions, such as system messages bit - The modules are mounted into a chassis that keeps a copy of a system. BTU - Celsius. A fast storage area that includes power supplies and fans. Software designed to help you start your...

Rack Installation Guide
Page 5
... Rack 12 Routing Cables 13 Replacing the Rack Doors 14 Index 15 Figures Figure 1-1. Figure 1-4. Figure 1-6. Figure 1-3. Figure 1-2. Figure 1-7. Figure 1-8. Contents Safety Instructions 5 SAFETY: Rack Mounting of Systems 5 Installation Instructions 6 Before You Begin 6 Installation Tasks 7 Recommended Tools and Supplies 7 RapidRails Rack Kit Contents 7 VersaRails Rack Kit Contents 8 Removing the Rack Doors...
... Rack 12 Routing Cables 13 Replacing the Rack Doors 14 Index 15 Figures Figure 1-1. Figure 1-4. Figure 1-6. Figure 1-3. Figure 1-2. Figure 1-7. Figure 1-8. Contents Safety Instructions 5 SAFETY: Rack Mounting of Systems 5 Installation Instructions 6 Before You Begin 6 Installation Tasks 7 Recommended Tools and Supplies 7 RapidRails Rack Kit Contents 7 VersaRails Rack Kit Contents 8 Removing the Rack Doors...
Rack Installation Guide
Page 7
... racks or the front stabilizer on racks joined to be sure that the rack meets the specifications. • Before working on the floor. SAFETY: Rack Mounting of the rack rests on the rack. • Always load the rack from the rack. • Do not overload the AC power supply branch circuit...
... racks or the front stabilizer on racks joined to be sure that the rack meets the specifications. • Before working on the floor. SAFETY: Rack Mounting of the rack rests on the rack. • Always load the rack from the rack. • Do not overload the AC power supply branch circuit...
Rack Installation Guide
Page 9
... a rack, never pull more than one system out of the rack on installing and anchoring the stabilizer feet. CAUTION: After installing systems in marking the mounting holes to tip over when a system or other component is pulled out of RapidRails assemblies • Four reusable tie wraps Rack Installation Guide 7
... a rack, never pull more than one system out of the rack on installing and anchoring the stabilizer feet. CAUTION: After installing systems in marking the mounting holes to tip over when a system or other component is pulled out of RapidRails assemblies • Four reusable tie wraps Rack Installation Guide 7

Rack Installation Guide
Page 12
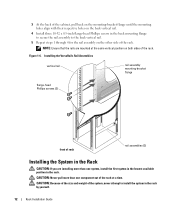
...should enter the third hole up 21 holes in a rack that meets EIA-310 standards). (If you placed on the mountingbracket flange until the top mounting hook enters the square hole just below the upper marks or tape you counted holes, place a mark just above the original mark you made (...or count up from the bottom mark on the vertical rails. 2 Push the rail assembly forward until the mounting hooks seat in the appropriate location on the rack (see Figure 1-5). Next, push down on the vertical rail. Figure 1-4. Marking the Vertical Rails tape ...
...should enter the third hole up 21 holes in a rack that meets EIA-310 standards). (If you placed on the mountingbracket flange until the top mounting hook enters the square hole just below the upper marks or tape you counted holes, place a mark just above the original mark you made (...or count up from the bottom mark on the vertical rails. 2 Push the rail assembly forward until the mounting hooks seat in the appropriate location on the rack (see Figure 1-5). Next, push down on the vertical rail. Figure 1-4. Marking the Vertical Rails tape ...

Rack Installation Guide
Page 13
...of the rack cabinet, place a VersaRails assembly so that the rails are in the appropriate holes, and then push down on the flange until the mounting hooks seat in the square holes and the push button pops out and clicks. 4 Repeat steps 1 through 3 for the rail assembly on the ...rack (see Figure 1-6). 3 At the back of the cabinet, pull back on the mounting-bracket flange until the mounting hooks are mounted at the same vertical position on the front vertical rail. 2 Install three 10-32 x 0.5-inch flange-head Phillips screws to secure the...
...of the rack cabinet, place a VersaRails assembly so that the rails are in the appropriate holes, and then push down on the flange until the mounting hooks seat in the square holes and the push button pops out and clicks. 4 Repeat steps 1 through 3 for the rail assembly on the ...rack (see Figure 1-6). 3 At the back of the cabinet, pull back on the mounting-bracket flange until the mounting hooks are mounted at the same vertical position on the front vertical rail. 2 Install three 10-32 x 0.5-inch flange-head Phillips screws to secure the...
Rack Installation Guide
Page 14
...rail assembly to install the system in the rack by yourself. 12 Rack Installation Guide Installing the VersaRails Rail Assemblies vertical rail rail assembly mounting-bracket flange flange-head Phillips screws (3) front of the rack. NOTE: Ensure that the rails are installing more than one system, ...install the first system in the lowest available position in the Rack CAUTION: If you are mounted at a time. Figure 1-6. CAUTION: Never pull more than one component out of the rack. CAUTION: Because of the size and weight ...
...rail assembly to install the system in the rack by yourself. 12 Rack Installation Guide Installing the VersaRails Rail Assemblies vertical rail rail assembly mounting-bracket flange flange-head Phillips screws (3) front of the rack. NOTE: Ensure that the rails are installing more than one system, ...install the first system in the lowest available position in the Rack CAUTION: If you are mounted at a time. Figure 1-6. CAUTION: Never pull more than one component out of the rack. CAUTION: Because of the size and weight ...

Rack Installation Guide
Page 17
Index C cable routing, 13 D doors removing, 9 replacing, 14 I installing system in the rack, 12 K kit contents RapidRails, 7 VersaRails, 8 M marking the rack, 9 R rack marking, 9 rack mount precautions, 6 rack stabilizer feet, 6 RapidRails kit contents, 7 routing cables, 13 S safety instructions, 5 T tools and supplies four-post kits, 7 V VersaRails kit contents, 8 Index 15
Index C cable routing, 13 D doors removing, 9 replacing, 14 I installing system in the rack, 12 K kit contents RapidRails, 7 VersaRails, 8 M marking the rack, 9 R rack marking, 9 rack mount precautions, 6 rack stabilizer feet, 6 RapidRails kit contents, 7 routing cables, 13 S safety instructions, 5 T tools and supplies four-post kits, 7 V VersaRails kit contents, 8 Index 15


