Rack Installation Guide
Page 30
... Begin Before you install the kit in any component when servicing other rack, be sure that the rack meets the specifications of a Dell rack. This precaution becomes increasingly important when systems are important to prevent injury to yourself and to protect yourself as well as the ... in the rack first. • Make sure that provides power to others . Recommended Tools and Supplies • #2 Phillips screwdriver • 3/8-inch wrench or nut driver (if changing bracket to flush-mount configuration) • Masking tape or felt-tip pen to install the next system. Due to the...
... Begin Before you install the kit in any component when servicing other rack, be sure that the rack meets the specifications of a Dell rack. This precaution becomes increasingly important when systems are important to prevent injury to yourself and to protect yourself as well as the ... in the rack first. • Make sure that provides power to others . Recommended Tools and Supplies • #2 Phillips screwdriver • 3/8-inch wrench or nut driver (if changing bracket to flush-mount configuration) • Masking tape or felt-tip pen to install the next system. Due to the...
Rack Installation Guide
Page 35
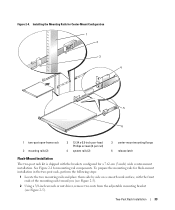
... latch Flush-Mount Installation The two-post rack kit is shipped with the front ends of the mounting rails toward you (see Figure 2-5). 2 Using a 3/8-inch wrench or nut driver, remove two nuts from the adjustable mounting bracket (see Figure 2-5).
... latch Flush-Mount Installation The two-post rack kit is shipped with the front ends of the mounting rails toward you (see Figure 2-5). 2 Using a 3/8-inch wrench or nut driver, remove two nuts from the adjustable mounting bracket (see Figure 2-5).

Rack Installation Guide
Page 37
... two 12-24 x 0.5-inch pan-head Phillips screws (see Figure 2-6). 8 Repeat step 6 and step 7 to install the right mounting rail in the rack. 9 Using a 3/8-inch wrench or nut driver, tighten the nuts on the adjustable mounting brackets on both mounting rails.
... two 12-24 x 0.5-inch pan-head Phillips screws (see Figure 2-6). 8 Repeat step 6 and step 7 to install the right mounting rail in the rack. 9 Using a 3/8-inch wrench or nut driver, tighten the nuts on the adjustable mounting brackets on both mounting rails.