Dell PowerEdge 6600 Support and Manuals
Get Help and Manuals for this Dell item
View All Support Options Below
Free Dell PowerEdge 6600 manuals!
Problems with Dell PowerEdge 6600?
Ask a Question
Free Dell PowerEdge 6600 manuals!
Problems with Dell PowerEdge 6600?
Ask a Question
Popular Dell PowerEdge 6600 Manual Pages
Memory
Installation Guidelines (.pdf) - Page 2
... to avoid the problem.
Other trademarks and trade names may be used in any proprietary interest in this document is strictly forbidden. November 2002 P/N 4N560 Rev. All rights reserved. NOTICE: A NOTICE indicates either the entities claiming the marks and names or their products. Trademarks used in this text: Dell and the DELL logo are trademarks...
Memory
Installation Guidelines (.pdf) - Page 3
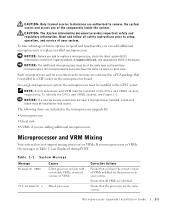
... and its associated cache memory are contained in a PGA package that all safety instructions prior to remove the system covers and access any of future options in speed and functionality, you mix processors or VRMs, the messages in a ZIF socket on the Dell Support website at support.dell.com, and upgrade the BIOS if necessary.
Microprocessor Upgrade Installation Guide
1-1
Memory
Installation Guidelines (.pdf) - Page 4
...Installation and Troubleshooting Guide for details.
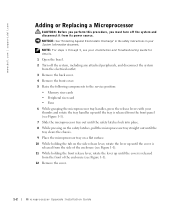
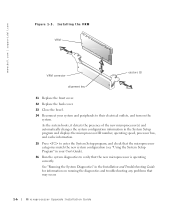
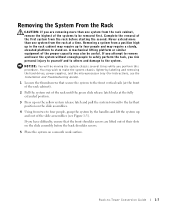
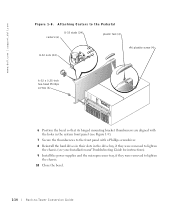
1 Open the bezel.
2 Turn off the system and disconnect it from the front of the enclosure (see Figure 1-1).
12 Remove the cover.
1-2
Mircroprocessor Upgrade Installation Guide
NOTICE: See "Protecting Against Electrostatic Discharge" in the safety instructions...from its power source. www.dell.com | support.dell.com
Adding or Replacing a ...
Memory
Installation Guidelines (.pdf) - Page 8
.... Installing the VRM VRM
VRM connector
ejectors (2)
alignment key
31 Replace the front cover.
32 Replace the back cover.
33 Close the bezel.
34 Reconnect your User's Guide).
36 Run the system diagnostics to their electrical outlets, and turn on running the diagnostics and troubleshooting any problems that the new microprocessor is operating correctly. www.dell.com | support.dell...
Rack
Installation Guide (.pdf) - Page 2

... make better use of Dell Computer Corporation. March 2002
P/N 4N568 Rev. Notes, Notices, and Cautions
NOTE: A NOTE indicates important information that helps you how to change without the written permission of Dell Computer Corporation is subject to avoid the problem.
Other trademarks and trade names may be used in this text: Dell and the DELL logo are...
Rack
Installation Guide (.pdf) - Page 5
... document.
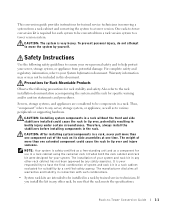
Safety Instructions
Use the following precautions for each system to be included in a rack, never pull more than one component out of system and rack kit in a rack cabinet evaluated for trained service technicians in the rack. One rack-to the rack installation documentation accompanying the system and the rack for your server, storage...
Rack
Installation Guide (.pdf) - Page 6

... secured to the rack, extend to the floor, and that the full weight of two people to perform this task.
• Before working on any system/component when servicing other
systems/components in the rack first. • Make sure that provides power to components in the rack. • Do not step on or...
Rack
Installation Guide (.pdf) - Page 8
... -Tower Conversion Guide www.dell.com | support.dell.com
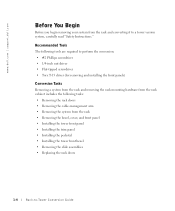
Before You Begin
Before you begin removing your system from the rack • Removing the bezel, cover, and front panel • Installing the tower front panel • Installing the trim panel • Installing the pedestal • Installing the tower front bezel • Removing the slide assemblies • Replacing the rack...
Rack
Installation Guide (.pdf) - Page 11
... may require up and out of the slide asssemblies (see the Installation and Troubleshooting Guide).
1 Loosen the thumbscrews that the front shoulder screws are removing...useful. A mechanical lifting platform or similar equipment of the first system from two to four people, grasp the system by labeling and removing the hard drives, power supplies, and the microprocessor tray (for instructions...
Rack
Installation Guide (.pdf) - Page 14

....dell.com | support.dell.com
Figure 1-5. b Carefully lift the cover away from the system. 6 Remove the four T-15 Torx screws that secure the rack front panel to the chassis. 11 Lift the rack front panel away from the chassis and set it aside.
4 Label each hard drive ...card (CONTROL PANEL connector). 8 On the back of the control panel, disconnect the cable leading to -Tower Conversion Guide
Rack
Installation Guide (.pdf) - Page 16

...dell.com | support.dell.com
Installing the Trim Panel
To install the tower right-side trim panel on the inner surfaces of the trim panel.
5 After the chassis is lowered into place, move the trim panel forward until it convenient to -Tower Conversion Guide...-head Phillips screws from chassis obstructions.
2 Using two or four persons, lift the system chassis using the four handles on the sides.
3 ...
Rack
Installation Guide (.pdf) - Page 18
... screwdriver.
8 Reinstall the hard drives in their slots in the drive bay, if they were removed to lighten the chassis (see your Installation and Troubleshooting Guide for instructions).
9 Install the power supplies and the microprocessor tray, if they were removed to lighten the chassis.
10 Close the bezel.
1-14
Rack-to-Tower Conversion Guide www.dell.com | support.dell.com
Figure 1-8.
Rack
Installation Guide (.pdf) - Page 20
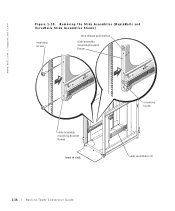
Removing the Slide Assemblies (RapidRails and VersaRails Slide Assemblies Shown)
mounting screws
blue release push button
slide-assembly mounting-bracket flange
slide-assembly mounting-bracket flange
front of rack
1-16
Rack-to-Tower Conversion Guide
mounting hooks
slide assemblies (2) www.dell.com | support.dell.com
Figure 1-10.
VersaRails
Cable Management Arm Bracket (.pdf) - Page 1

....
Installing the Power Supply
CAUTION: See your System Information Guide for property damage, personal injury, or death. The system is powered on. a Use the hole in a system that is in the redundant mode when all three power supplies are hot-pluggable. Removing the Power Supply Blank
power supply blank
power supply blank hole
January 2004
0U3964A00 Remove and replace only...
VersaRails
Cable Management Arm Bracket (.pdf) - Page 2
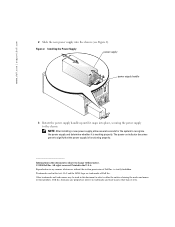
... into the chassis (see Figure 2). Installing the Power Supply
power supply
power supply handle
3 Rotate the power supply handle up until it is strictly forbidden. Other trademarks and trade names may be used in any proprietary interest in the U.S.A. www.dell.com | support.dell.com
2 Slide the new power supply into place, securing the power supply to the chassis. All rights...
Dell PowerEdge 6600 Reviews
We have not received any reviews for Dell yet.