

User Manual
Page 3
... Authorization Table • User Authentication Mode - NOTE: The graphics in this section may differ slightly from the graphics on your switch. Addendum to the 3024, 3048, and 5012 User's Guides 3 RADIUS Server IP Address, RADIUS Shared Secret, IP Filtering, and Allowed IP Addresses • Layer 3 Priority - DiffServ • Configuration File Management... • Enhanced Security Administration • More Statistics/Utilization Summary NOTE: The features described in this section apply to both the Web interface and the console interface for your computer.
... Authorization Table • User Authentication Mode - NOTE: The graphics in this section may differ slightly from the graphics on your switch. Addendum to the 3024, 3048, and 5012 User's Guides 3 RADIUS Server IP Address, RADIUS Shared Secret, IP Filtering, and Allowed IP Addresses • Layer 3 Priority - DiffServ • Configuration File Management... • Enhanced Security Administration • More Statistics/Utilization Summary NOTE: The features described in this section apply to both the Web interface and the console interface for your computer.
User Manual
Page 6
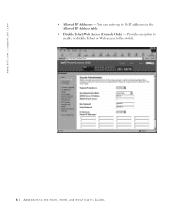
Provides an option to enable or disable Telnet or Web access to the switch. 6 Addendum to 16 IP addresses in the Allowed IP Address table. • Disable Telnet/Web Access (Console Only) - www.dell.com | support.dell.com • Allowed IP Addresses - You can enter up to the 3024, 3048, and 5012 User's Guides
Provides an option to enable or disable Telnet or Web access to the switch. 6 Addendum to 16 IP addresses in the Allowed IP Address table. • Disable Telnet/Web Access (Console Only) - www.dell.com | support.dell.com • Allowed IP Addresses - You can enter up to the 3024, 3048, and 5012 User's Guides
System Information Guide
Page 5
... Guide 9 Finding Information and Assistance 10 Getting Started/Setup 10 Package Contents 10 Before You Connect to the Network: Mounting Kit Instructions 11 Connecting the Console Port 12 Password Protection 13 IP Address Assignment 14 Connecting Devices to the Switch 15 Regulatory Information 15 CE Notice (European Union 17 EN 55022...
... Guide 9 Finding Information and Assistance 10 Getting Started/Setup 10 Package Contents 10 Before You Connect to the Network: Mounting Kit Instructions 11 Connecting the Console Port 12 Password Protection 13 IP Address Assignment 14 Connecting Devices to the Switch 15 Regulatory Information 15 CE Notice (European Union 17 EN 55022...

System Information Guide
Page 14
...Emulation mode. NOTICE: When using HyperTerminal with Microsoft® Windows® 2000, ensure that the setting is for Terminal keys (not Windows keys). www.dell.com | support.dell.com 3 Insert and tighten two screws appropriate for m a t io n G u id e d Set flow control to 9600 baud. With .... 2 Connect the other end of a desktop system running terminal emulation software. To use the console port, you have Windows 2000 Service Pack 2 or later installed. Connecting the Console Port The switch provides an RS-232 serial port that enables a connection to a desktop system ...
...Emulation mode. NOTICE: When using HyperTerminal with Microsoft® Windows® 2000, ensure that the setting is for Terminal keys (not Windows keys). www.dell.com | support.dell.com 3 Insert and tighten two screws appropriate for m a t io n G u id e d Set flow control to 9600 baud. With .... 2 Connect the other end of a desktop system running terminal emulation software. To use the console port, you have Windows 2000 Service Pack 2 or later installed. Connecting the Console Port The switch provides an RS-232 serial port that enables a connection to a desktop system ...
System Information Guide
Page 15
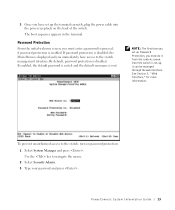
... switch, turn on the back of the switch. By default, password protection is displayed and you immediately have set up , it from the console screen. See Section 3, "Web Interface," for more information. 3 Once you have access to the switch management interface. The boot sequence appears in... the terminal. Use the key to proceed, if password protection is enabled. PowerConnect System Infor mation Guide 13 NOTE: The first time you must enter a password to navigate the menu. 2 Select Security Admin. 3 Type...
... switch, turn on the back of the switch. By default, password protection is displayed and you immediately have set up , it from the console screen. See Section 3, "Web Interface," for more information. 3 Once you have access to the switch management interface. The boot sequence appears in... the terminal. Use the key to proceed, if password protection is enabled. PowerConnect System Infor mation Guide 13 NOTE: The first time you must enter a password to navigate the menu. 2 Select Security Admin. 3 Type...


