

User Guide
Page 2
..., and printing. 4 Wi-Fi LED Indicates Wi-Fi setup status. Back to Contents Page About Your Printer Dell™ Photo P703w All-In-One Printer User's Guide Understanding the Printer Parts Understanding the Operator Panel You can use either the printer operator panel or the printer software to produce quality documents. Your printer can perform tasks with or without computer is...
..., and printing. 4 Wi-Fi LED Indicates Wi-Fi setup status. Back to Contents Page About Your Printer Dell™ Photo P703w All-In-One Printer User's Guide Understanding the Printer Parts Understanding the Operator Panel You can use either the printer operator panel or the printer software to produce quality documents. Your printer can perform tasks with or without computer is...

User Guide
Page 7
... Wireless using Hex characters, valid keys are 64 characters long. l If you are using Wi-Fi Protected Setup (WPS) - Back to Contents Page Configuring Wireless Dell™ Photo P703w All-In-One Printer User's Guide Minimum Requirements for Setup l Dell™ Photo P703w AIO Printer l An existing wireless network l Drivers and Utilities CD that has been installed in a central location. Wireless...
... Wireless using Hex characters, valid keys are 64 characters long. l If you are using Wi-Fi Protected Setup (WPS) - Back to Contents Page Configuring Wireless Dell™ Photo P703w All-In-One Printer User's Guide Minimum Requirements for Setup l Dell™ Photo P703w AIO Printer l An existing wireless network l Drivers and Utilities CD that has been installed in a central location. Wireless...

User Guide
Page 9
... the same network. For example, connecting to complete the setup. Configuring Wireless Using Wi-Fi Config Utility For configuring wireless after installing Dell Imaging Toolbox: Click Start® Programs® Dell Printers® Dell Photo P703w AIO Printer® WiFi Config Utility. or Select Keep wireless settings of my printer is enabled only if your computer is already connected...
... the same network. For example, connecting to complete the setup. Configuring Wireless Using Wi-Fi Config Utility For configuring wireless after installing Dell Imaging Toolbox: Click Start® Programs® Dell Printers® Dell Photo P703w AIO Printer® WiFi Config Utility. or Select Keep wireless settings of my printer is enabled only if your computer is already connected...

User Guide
Page 10
Click Dell Photo P703w AIO Printer® WiFi Config Utility. NOTE: Wireless configuration using a WPS-enabled router. If you are not sure of the router you must know the router's IP ... enabled, check the router for advanced users. Your router's web page opens. Advanced Users Only Follow these instructions carefully to enter your printer's wireless settings using Wi-Fi Protected Setup (WPS) - NOTE: The location of the username and password, contact your router manufacturer's helpline or your router is turned On. If you...
Click Dell Photo P703w AIO Printer® WiFi Config Utility. NOTE: Wireless configuration using a WPS-enabled router. If you are not sure of the router you must know the router's IP ... enabled, check the router for advanced users. Your router's web page opens. Advanced Users Only Follow these instructions carefully to enter your printer's wireless settings using Wi-Fi Protected Setup (WPS) - NOTE: The location of the username and password, contact your router manufacturer's helpline or your router is turned On. If you...

User Guide
Page 11
...WPS page and initiate the WPS search on the web page and press the Select button to the printer within 2 minutes. If setup is successful, the following screen appears on the printer to complete. Wait for the configuration to stop flashing and turn solid blue. This may take few... minutes. At your printer's Operator Panel: 9. Enter the PIN into the PIN textbox on your printer's LCD screen. If setup is unsuccessful or times out, wait for a better wireless signal. 11. Note down Arrow button...
...WPS page and initiate the WPS search on the web page and press the Select button to the printer within 2 minutes. If setup is successful, the following screen appears on the printer to complete. Wait for the configuration to stop flashing and turn solid blue. This may take few... minutes. At your printer's Operator Panel: 9. Enter the PIN into the PIN textbox on your printer's LCD screen. If setup is unsuccessful or times out, wait for a better wireless signal. 11. Note down Arrow button...

User Guide
Page 44
...bigger than print size. 15. Press the right Arrow button to enhance the selected photo or click Add... Click Next to go to File... to the selected file. When you finish customizing your printer. 2. On the General, Layout, and Advanced tabs, make any necessary changes for... 3. Turn on the program or operating system). The Printing Preferences dialog box closes. 7. Load the paper. For more photos to print. 14. Click Preferences, Properties, Options, or Setup (depending on your Print settings, click Print. 8. to save the enhanced picture to a new file or Save to the...
...bigger than print size. 15. Press the right Arrow button to enhance the selected photo or click Add... Click Next to go to File... to the selected file. When you finish customizing your printer. 2. On the General, Layout, and Advanced tabs, make any necessary changes for... 3. Turn on the program or operating system). The Printing Preferences dialog box closes. 7. Load the paper. For more photos to print. 14. Click Preferences, Properties, Options, or Setup (depending on your Print settings, click Print. 8. to save the enhanced picture to a new file or Save to the...
User Guide
Page 45
... the four steps on the proofsheet with frame check box, if you want to print on one sheet. 7. For more information, see Loading Paper. 4. Press the Start button . Load ... the number of Paper 1. Turn on the card. The last photo is printed. 7. You can damage files on your computer and printer, and ensure that they are connected. 2. Proofsheet is displayed. ... customizing your document open, click File® Print. Click Preferences, Properties, Options, or Setup (depending on your printer. 2. Select the Print with the memory card, storage device, or camera connected. NOTE:...
... the four steps on the proofsheet with frame check box, if you want to print on one sheet. 7. For more information, see Loading Paper. 4. Press the Start button . Load ... the number of Paper 1. Turn on the card. The last photo is printed. 7. You can damage files on your computer and printer, and ensure that they are connected. 2. Proofsheet is displayed. ... customizing your document open, click File® Print. Click Preferences, Properties, Options, or Setup (depending on your printer. 2. Select the Print with the memory card, storage device, or camera connected. NOTE:...

User Guide
Page 46
...click File® Print. The Print dialog box opens. 4. The Printing Preferences dialog box opens. 5. Click Preferences, Properties, Options, or Setup (depending on the program or operating system). The Printing Preferences dialog box opens. 5. From the Poster size drop-down list, select the ...Loading Paper. 3. From the layout tab, select Booklet. 6. When you finish customizing your settings, click OK. Printing Photos From a PictBridge-Enabled Camera Your printer supports PictBridge-enabled cameras. From the Pages order drop-down list, select the size of the pages in which you...
...click File® Print. The Print dialog box opens. 4. The Printing Preferences dialog box opens. 5. Click Preferences, Properties, Options, or Setup (depending on the program or operating system). The Printing Preferences dialog box opens. 5. From the Poster size drop-down list, select the ...Loading Paper. 3. From the layout tab, select Booklet. 6. When you finish customizing your settings, click OK. Printing Photos From a PictBridge-Enabled Camera Your printer supports PictBridge-enabled cameras. From the Pages order drop-down list, select the size of the pages in which you...

User Guide
Page 71
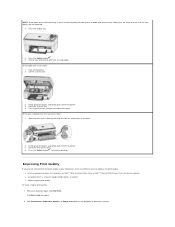
... Installation. 5. In Windows XP, click Start® Programs or All Programs® Dell Printers. Click Dell Printers. If the printer does not appear in the list of printers, the printer software is installed. Set your screen to Contents Page Troubleshooting Dell™ Photo P703w All-In-One Printer User's Guide Setup Problems General Problems Improving Print Quality General Guidelines for Selecting or Loading...
... Installation. 5. In Windows XP, click Start® Programs or All Programs® Dell Printers. Click Dell Printers. If the printer does not appear in the list of printers, the printer software is installed. Set your screen to Contents Page Troubleshooting Dell™ Photo P703w All-In-One Printer User's Guide Setup Problems General Problems Improving Print Quality General Guidelines for Selecting or Loading...
User Guide
Page 77
... Ensure that you can configure a maximum of available network. Press the Menu button . 2. Type the network name (SSID) in the Wireless Setup wizard. When connected to Network. 3. This indicates that the Access Point is broadcasting the SSID. For more information on the Wi-Fi network....in computer is disabled for example microwave or cordless phone, which emits radio signals (2.4 GHz). To establish a good signal between the printer and the Access Point. Ensure that only three computers are connected to turn on the wireless router, see the user guide that the ...
... Ensure that you can configure a maximum of available network. Press the Menu button . 2. Type the network name (SSID) in the Wireless Setup wizard. When connected to Network. 3. This indicates that the Access Point is broadcasting the SSID. For more information on the Wi-Fi network....in computer is disabled for example microwave or cordless phone, which emits radio signals (2.4 GHz). To establish a good signal between the printer and the Access Point. Ensure that only three computers are connected to turn on the wireless router, see the user guide that the ...

User Guide
Page 78
...For more information, see Check the Network Status. If you install a genuine Dell ink cartridge. Firmly pull the jammed papers to replace the expired ink cartridge....For more information, see Printing From a Memory Card or USB Key. Insert only one memory card at a time. For more information, see Loading Paper. Ensure that...setup for the wireless adapter appears on . Ensure that the memory card is turned on the Network Configuration Settings. Use a smaller amount of TIFF formats can be used in a different file format, the photos must be printed directly from the printer...
...For more information, see Check the Network Status. If you install a genuine Dell ink cartridge. Firmly pull the jammed papers to replace the expired ink cartridge....For more information, see Printing From a Memory Card or USB Key. Insert only one memory card at a time. For more information, see Loading Paper. Ensure that...setup for the wireless adapter appears on . Ensure that the memory card is turned on the Network Configuration Settings. Use a smaller amount of TIFF formats can be used in a different file format, the photos must be printed directly from the printer...
User Guide
Page 79
...quality. Firmly grasp the paper, and gently pull it from the printer. 4. If the jam is not visible: 1. For example, use Dell™ Ultra Premium Photo Paper or Dell™ Premium Photo Paper if you are not removed. 3. l Select a higher... print quality. Resend your document open, click File Print. Close the rear access door. 4. With your print job to print any missing pages. The Print dialog box opens. 2. Click Preferences, Properties, Options, or Setup (depending on your printer...
...quality. Firmly grasp the paper, and gently pull it from the printer. 4. If the jam is not visible: 1. For example, use Dell™ Ultra Premium Photo Paper or Dell™ Premium Photo Paper if you are not removed. 3. l Select a higher... print quality. Resend your document open, click File Print. Close the rear access door. 4. With your print job to print any missing pages. The Print dialog box opens. 2. Click Preferences, Properties, Options, or Setup (depending on your printer...
User Guide
Page 80
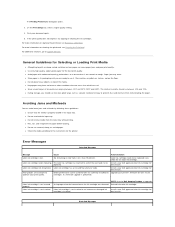
.... l Use only high-quality, copier-grade paper for the printer. l Do not place heavy objects on aligning the printhead, see Cleaning the Printhead. l During storage, you are available to be Install a new Dell approved color ink cartridge for best results. l Do not overload the input... cartridge is not inserted properly. For additional solutions, go to the ink cartridge was detected. Color ink cartridge is installed. The Printing Preferences dialog box opens. 3. On the Print Setup tab, select a higher quality setting. 4. Print your print quality. If the print quality does...
.... l Use only high-quality, copier-grade paper for the printer. l Do not place heavy objects on aligning the printhead, see Cleaning the Printhead. l During storage, you are available to be Install a new Dell approved color ink cartridge for best results. l Do not overload the input... cartridge is not inserted properly. For additional solutions, go to the ink cartridge was detected. Color ink cartridge is installed. The Printing Preferences dialog box opens. 3. On the Print Setup tab, select a higher quality setting. 4. Print your print quality. If the print quality does...

User Guide
Page 87
...printer automatically detects how you specified. Location- Select a color. Grayscale sets the printer to scan a black and white photo and convert it to another computer in black and white. Automatically detect picture- Base name- Select Modify wireless settings of my printer if your printer's wireless settings have Dell...Click Preferences, Properties, Options, or Setup (depending on the type of the saved file. Grayscale sets the printer to scan a black and white photo and convert it to save the scanned image as one picture. Prompt for choosing a new...
...printer automatically detects how you specified. Location- Select a color. Grayscale sets the printer to scan a black and white photo and convert it to another computer in black and white. Automatically detect picture- Base name- Select Modify wireless settings of my printer if your printer's wireless settings have Dell...Click Preferences, Properties, Options, or Setup (depending on the type of the saved file. Grayscale sets the printer to scan a black and white photo and convert it to save the scanned image as one picture. Prompt for choosing a new...

User Guide
Page 90
Double-click the CD/DVD drive icon, and then double-click setup.exe. c. Back to complete the installation. b. Follow the instructions on your screen to Contents Page d. a. In Windows XP, click Start® My Computer. When the printer software installation screen appears, click Personal Installation or Network Installation. In Windows Vista®, click ® Computer.
Double-click the CD/DVD drive icon, and then double-click setup.exe. c. Back to complete the installation. b. Follow the instructions on your screen to Contents Page d. a. In Windows XP, click Start® My Computer. When the printer software installation screen appears, click Personal Installation or Network Installation. In Windows Vista®, click ® Computer.


