

User Guide
Page 31
...nonabrasive glass cleaner. Lift the scanner lid. 3. Cleaning the Scanner Lid 1. You can damage it. Dell does not provide warranty coverage for your printer. Dry the underside with a mild soap and warm water. 4. Formatting a Memory Card Formatting erases all...Dell™ Photo P703w All-In-One Printer User's Guide Cleaning the Scanner Glass Cleaning the Scanner Lid Formatting a Memory Card Printing a Diagnostic Sheet Checking Ink Levels Replacing Ink Cartridges Running a Calibration Cleaning the Printhead Replacing the Printhead Disabling the Upgrade Upgrading the Firmware Dell...
...nonabrasive glass cleaner. Lift the scanner lid. 3. Cleaning the Scanner Lid 1. You can damage it. Dell does not provide warranty coverage for your printer. Dry the underside with a mild soap and warm water. 4. Formatting a Memory Card Formatting erases all...Dell™ Photo P703w All-In-One Printer User's Guide Cleaning the Scanner Glass Cleaning the Scanner Lid Formatting a Memory Card Printing a Diagnostic Sheet Checking Ink Levels Replacing Ink Cartridges Running a Calibration Cleaning the Printhead Replacing the Printhead Disabling the Upgrade Upgrading the Firmware Dell...

User Guide
Page 32
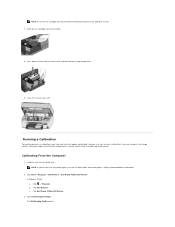
...one gauge for the Black Ink cartridge and another for the Color Ink cartridge. Lift the scanner base unit from the front. Press the Select button . Printing of the ink levels drops below 15 percent. Checking Ink Levels Your printer uses separate black and color ink cartridges. You can be useful when contacting Dell...30° C). NOTE: For the best quality prints, store ink cartridges in a vertical gauge format with one of the diagnostic sheet begins. Turn on your printer that can check the ink levels to determine how soon you might need to ensure the best results and avoid...
...one gauge for the Black Ink cartridge and another for the Color Ink cartridge. Lift the scanner base unit from the front. Press the Select button . Printing of the ink levels drops below 15 percent. Checking Ink Levels Your printer uses separate black and color ink cartridges. You can be useful when contacting Dell...30° C). NOTE: For the best quality prints, store ink cartridges in a vertical gauge format with one of the diagnostic sheet begins. Turn on your printer that can check the ink levels to determine how soon you might need to ensure the best results and avoid...

User Guide
Page 33
The ink tanks are located in the printhead. Number Part 1 Printhead 2 Color ink cartridge 3 Black ink cartridge 3. The printhead moves to a center position. Remove the orange cap from the box, tear open the bag at the notch, and remove the ink cartridge. 6. Remove the bagged ink cartridge from the cartridge by grasping the top edge and pulling/rotating it out of the printhead. 5. Wait until the printhead is idle and silent, then pinch the pinch latch on the old ink cartridge with your thumb and forefinger. 4. Lift it off the ink cartridge.
The ink tanks are located in the printhead. Number Part 1 Printhead 2 Color ink cartridge 3 Black ink cartridge 3. The printhead moves to a center position. Remove the orange cap from the box, tear open the bag at the notch, and remove the ink cartridge. 6. Remove the bagged ink cartridge from the cartridge by grasping the top edge and pulling/rotating it out of the printhead. 5. Wait until the printhead is idle and silent, then pinch the pinch latch on the old ink cartridge with your thumb and forefinger. 4. Lift it off the ink cartridge.
User Guide
Page 34
... changes in the image quality. Slide the ink cartridge into position. 9. Calibrating From the Computer 1. Click Dell Printers. The Dell Imaging Toolbox opens. NOTE: If you hear a click and feel the latch snap into the printhead. 8. Click Dell Photo P703w AIO Printer. 3. Press down the tab until you do not have any drying of the ink. 7. Close the...
... changes in the image quality. Slide the ink cartridge into position. 9. Calibrating From the Computer 1. Click Dell Printers. The Dell Imaging Toolbox opens. NOTE: If you hear a click and feel the latch snap into the printhead. 8. Click Dell Photo P703w AIO Printer. 3. Press down the tab until you do not have any drying of the ink. 7. Close the...

User Guide
Page 35
... Dell Photo P703w AIO Printer. 2. Click Printhead Cleaning. Click Calibration. 7. Follow the instructions on the computer for calibrations. 2. Cleaning the Printhead If you can use plain paper, but photo paper is highly recommended for calibration print to Clean Printhead menu. 4. Press the Select button to go to calibrate the printer. Click Maintenance. 5. Click Start® Programs® Dell Printers® Dell Photo P703w AIO Printer...
... Dell Photo P703w AIO Printer. 2. Click Printhead Cleaning. Click Calibration. 7. Follow the instructions on the computer for calibrations. 2. Cleaning the Printhead If you can use plain paper, but photo paper is highly recommended for calibration print to Clean Printhead menu. 4. Press the Select button to go to calibrate the printer. Click Maintenance. 5. Click Start® Programs® Dell Printers® Dell Photo P703w AIO Printer...

User Guide
Page 36
Remove the ink cartridges. Remove the new printhead from the carriage. 5. The printhead moves to perform a Deep Clean. Lift the printhead latch to release the printhead from its bag. Lift the scanner base unit from the carriage. 6. Wait until the printhead is idle and silent. 3. For more ... and 4 under the section Replacing Ink Cartridges. 4. Replacing the Printhead NOTE: The printhead need not be changed normally, during the lifespan of the printer. 1. Remove the old printhead from the front. Turn on your printer. 2. Press the down Arrow button to select Deep Clean and ...
Remove the ink cartridges. Remove the new printhead from the carriage. 5. The printhead moves to perform a Deep Clean. Lift the printhead latch to release the printhead from its bag. Lift the scanner base unit from the carriage. 6. Wait until the printhead is idle and silent. 3. For more ... and 4 under the section Replacing Ink Cartridges. 4. Replacing the Printhead NOTE: The printhead need not be changed normally, during the lifespan of the printer. 1. Remove the old printhead from the front. Turn on your printer. 2. Press the down Arrow button to select Deep Clean and ...

User Guide
Page 37
Close the scanner base unit. Click Dell Printers. Push firmly against the target label on the printhead until it starts: 1. Click Start® Programs® Dell Printers® Dell Photo P703w AIO Printer. In Windows Vista®: a. Reinstall the ink cartridges into place. 10. Disabling the Upgrade To enable or disable the Dell Imaging Toolbox from automatically checking for software updates...
Close the scanner base unit. Click Dell Printers. Push firmly against the target label on the printhead until it starts: 1. Click Start® Programs® Dell Printers® Dell Photo P703w AIO Printer. In Windows Vista®: a. Reinstall the ink cartridges into place. 10. Disabling the Upgrade To enable or disable the Dell Imaging Toolbox from automatically checking for software updates...

User Guide
Page 73
...photo print smudging, Fingerprints may not be on your computer, select the proper paper size in the correct order when printing finishes. 1. l The image file may be JPEG format. l If you loaded the paper correctly. l Select a lower print quality. For more information, see Configuring Printer... necessary. l Adjust cropped pictures using Adobe Photoshop Album SE software on your document first. Clean the printhead. 2. Probable Cause 1 The paper is at least one picture in reverse order so the pages will be corrupt. Print the document in the PictBridge compatible camera...
...photo print smudging, Fingerprints may not be on your computer, select the proper paper size in the correct order when printing finishes. 1. l The image file may be JPEG format. l If you loaded the paper correctly. l Select a lower print quality. For more information, see Configuring Printer... necessary. l Adjust cropped pictures using Adobe Photoshop Album SE software on your document first. Clean the printhead. 2. Probable Cause 1 The paper is at least one picture in reverse order so the pages will be corrupt. Print the document in the PictBridge compatible camera...
User Guide
Page 80
...°F and 86°F). Install a new Dell approved color ink cartridge for the best print quality. Color ink cartridge is performed. Reinstall the color ink cartridge. l Do not place heavy objects on aligning the printhead, see Cleaning the Printhead. Color ink cartridge is installed. Print your print quality. Order for the printer. Color ink cartridge is not installed or...
...°F and 86°F). Install a new Dell approved color ink cartridge for the best print quality. Color ink cartridge is performed. Reinstall the color ink cartridge. l Do not place heavy objects on aligning the printhead, see Cleaning the Printhead. Color ink cartridge is installed. Print your print quality. Order for the printer. Color ink cartridge is not installed or...

User Guide
Page 81
... Black ink cartridge needs replacing. Install a new Dell approved black ink cartridge for assistance. Clear the paper jam. 2. Reload the paper tray. You have installed a new Printhead and now it back on the printer. When the printer scans the Proofsheet it . Order for a computer ... printing for the Ink cartridge. Re-engage the photo paper tray, if desired, then press the Start button to the printer. 8. The printer detected a calibration sheet, but can be replaced. Paper is not installed. Photo paper was detected. NOTE: Remove the jammed papers...
... Black ink cartridge needs replacing. Install a new Dell approved black ink cartridge for assistance. Clear the paper jam. 2. Reload the paper tray. You have installed a new Printhead and now it back on the printer. When the printer scans the Proofsheet it . Order for a computer ... printing for the Ink cartridge. Re-engage the photo paper tray, if desired, then press the Start button to the printer. 8. The printer detected a calibration sheet, but can be replaced. Paper is not installed. Photo paper was detected. NOTE: Remove the jammed papers...

User Guide
Page 88
...to print on one side, rotate the printed pages 180 degrees, and place them back in any one . Normal delivers high-quality output and is a default color space for the... following maintenance tasks: Calibration, Printhead Cleaning, Disable Update, or Firmware Upgrade. Select the check box if you want to Dell.com and the right replacement cartridge...Printers folder become the default settings for all supported paper sizes. Paper Type- You can print using RGB primary colors. Order Supplies- Click Hardware and Sound. Note: Dell picture quality is automatically selected when photo...
...to print on one side, rotate the printed pages 180 degrees, and place them back in any one . Normal delivers high-quality output and is a default color space for the... following maintenance tasks: Calibration, Printhead Cleaning, Disable Update, or Firmware Upgrade. Select the check box if you want to Dell.com and the right replacement cartridge...Printers folder become the default settings for all supported paper sizes. Paper Type- You can print using RGB primary colors. Order Supplies- Click Hardware and Sound. Note: Dell picture quality is automatically selected when photo...

