

User Guide
Page 2
...gain access to the ink cartridges. 6 Memory card indicator Indicates whether a memory card is inserted in place while you scan it. 2 LCD display Displays photos, messages, status, and menus. 3 Operator panel Panel on the printer you use to your printer. 9 Photo tray light Lights up when the photo tray is connected to...to control copying, scanning, and printing. 4 Wi-Fi LED Indicates Wi-Fi setup status. Back to Contents Page About Your Printer Dell™ Photo P703w All-In-One Printer User's Guide Understanding the Printer Parts Understanding the Operator Panel You can use your...
...gain access to the ink cartridges. 6 Memory card indicator Indicates whether a memory card is inserted in place while you scan it. 2 LCD display Displays photos, messages, status, and menus. 3 Operator panel Panel on the printer you use to your printer. 9 Photo tray light Lights up when the photo tray is connected to...to control copying, scanning, and printing. 4 Wi-Fi LED Indicates Wi-Fi setup status. Back to Contents Page About Your Printer Dell™ Photo P703w All-In-One Printer User's Guide Understanding the Printer Parts Understanding the Operator Panel You can use your...

User Guide
Page 31
... (rubbing) alcohol and wipe the underside thoroughly with a damp cloth to Contents Page Maintenance Dell™ Photo P703w All-In-One Printer User's Guide Cleaning the Scanner Glass Cleaning the Scanner Lid Formatting a Memory Card Printing a Diagnostic Sheet Checking Ink Levels Replacing Ink Cartridges Running a Calibration Cleaning the Printhead Replacing the Printhead Disabling the Upgrade Upgrading the Firmware...
... (rubbing) alcohol and wipe the underside thoroughly with a damp cloth to Contents Page Maintenance Dell™ Photo P703w All-In-One Printer User's Guide Cleaning the Scanner Glass Cleaning the Scanner Lid Formatting a Memory Card Printing a Diagnostic Sheet Checking Ink Levels Replacing Ink Cartridges Running a Calibration Cleaning the Printhead Replacing the Printhead Disabling the Upgrade Upgrading the Firmware...

User Guide
Page 32
... button . 2. Checking Ink Levels Your printer uses separate black and color ink cartridges. Replacing Ink Cartridges A Low ink warning message is displayed when one gauge for the Black Ink cartridge and another for the Color Ink cartridge. Press the Start button . The Ink Levels screen shows ink levels in a location where the temperature does not exceed 85° F (30° C). NOTICE: Use genuine Dell ink cartridges to Print Diagnostic...
... button . 2. Checking Ink Levels Your printer uses separate black and color ink cartridges. Replacing Ink Cartridges A Low ink warning message is displayed when one gauge for the Black Ink cartridge and another for the Color Ink cartridge. Press the Start button . The Ink Levels screen shows ink levels in a location where the temperature does not exceed 85° F (30° C). NOTICE: Use genuine Dell ink cartridges to Print Diagnostic...

User Guide
Page 33
Wait until the printhead is idle and silent, then pinch the pinch latch on the old ink cartridge with your thumb and forefinger. 4. Lift it off the ink cartridge. Remove the bagged ink cartridge from the cartridge by grasping the top edge and pulling/rotating it out of the printhead. 5. The ink tanks are located in the printhead. Number Part 1 Printhead 2 Color ink cartridge 3 Black ink cartridge 3. Remove the orange cap from the box, tear open the bag at the notch, and remove the ink cartridge. 6. The printhead moves to a center position.
Wait until the printhead is idle and silent, then pinch the pinch latch on the old ink cartridge with your thumb and forefinger. 4. Lift it off the ink cartridge. Remove the bagged ink cartridge from the cartridge by grasping the top edge and pulling/rotating it out of the printhead. 5. The ink tanks are located in the printhead. Number Part 1 Printhead 2 Color ink cartridge 3 Black ink cartridge 3. Remove the orange cap from the box, tear open the bag at the notch, and remove the ink cartridge. 6. The printhead moves to a center position.
User Guide
Page 34
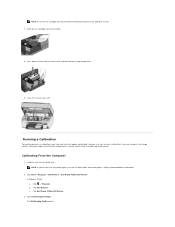
... recommended for calibrations. 2. Load the main tray or photo tray. In Windows Vista®: a. Click Dell Printers. Select Dell Imaging Toolbox. Calibrating From the Computer 1. NOTE: If you do not have any drying of the ink. 7. Click Start® Programs® Dell Printers® Dell Photo P703w AIO Printer. c. NOTE: Insert the ink cartridge into the printhead immediately to enable high-quality prints...
... recommended for calibrations. 2. Load the main tray or photo tray. In Windows Vista®: a. Click Dell Printers. Select Dell Imaging Toolbox. Calibrating From the Computer 1. NOTE: If you do not have any drying of the ink. 7. Click Start® Programs® Dell Printers® Dell Photo P703w AIO Printer. c. NOTE: Insert the ink cartridge into the printhead immediately to enable high-quality prints...

User Guide
Page 36
...3 and 4 under the section Replacing Ink Cartridges. 4. Turn on your printer. 2. Lift the printhead latch to release the printhead from its bag. Remove the new printhead from the carriage. 5. The printhead moves to perform a Deep Clean. Remove the ink cartridges. Remove the old printhead from the ...front. Lift the scanner base unit from the carriage. 6. Replacing the Printhead NOTE: The printhead need not be changed normally, during the lifespan of the printer. 1. Press the down Arrow button ...
...3 and 4 under the section Replacing Ink Cartridges. 4. Turn on your printer. 2. Lift the printhead latch to release the printhead from its bag. Remove the new printhead from the carriage. 5. The printhead moves to perform a Deep Clean. Remove the ink cartridges. Remove the old printhead from the ...front. Lift the scanner base unit from the carriage. 6. Replacing the Printhead NOTE: The printhead need not be changed normally, during the lifespan of the printer. 1. Press the down Arrow button ...

User Guide
Page 37
... on the printhead until it starts: 1. For more information, see the steps 7 and 8 under the section Replacing Ink Cartridges. 11. Click Start® Programs® Dell Printers® Dell Photo P703w AIO Printer. Disabling the Upgrade To enable or disable the Dell Imaging Toolbox from automatically checking for software updates each time it clicks into place. 10. Place the...
... on the printhead until it starts: 1. For more information, see the steps 7 and 8 under the section Replacing Ink Cartridges. 11. Click Start® Programs® Dell Printers® Dell Photo P703w AIO Printer. Disabling the Upgrade To enable or disable the Dell Imaging Toolbox from automatically checking for software updates each time it clicks into place. 10. Place the...

User Guide
Page 39
... in the printer. You can order ink online at www.dell.com/supplies or by phone. Supply item Part number Series number Standard Capacity black ink cartridge DW905 Series 20 Standard Capacity color ink cartridge DW906 Series 20 Back to print using the following ink cartridges. Back to Contents Page Ordering Printer Supplies Dell™ Photo P703w All-In-One Printer User's Guide Your printer includes software...
... in the printer. You can order ink online at www.dell.com/supplies or by phone. Supply item Part number Series number Standard Capacity black ink cartridge DW905 Series 20 Standard Capacity color ink cartridge DW906 Series 20 Back to print using the following ink cartridges. Back to Contents Page Ordering Printer Supplies Dell™ Photo P703w All-In-One Printer User's Guide Your printer includes software...

User Guide
Page 72
.... In Windows Vista®: a. c. Click Hardware and Sound. Click ® Control Panel. Right-click the printer icon. 3. For more information, see Printing Photos From a PictBridge-Enabled Camera. l Replacing Ink Cartridges. Click Printers. 2. Right-click Dell Photo P703w AIO. 3. Also, do not install printer drivers multiple times from the paper exit tray. Ensure that you always plug the USB cable...
.... In Windows Vista®: a. c. Click Hardware and Sound. Click ® Control Panel. Right-click the printer icon. 3. For more information, see Printing Photos From a PictBridge-Enabled Camera. l Replacing Ink Cartridges. Click Printers. 2. Right-click Dell Photo P703w AIO. 3. Also, do not install printer drivers multiple times from the paper exit tray. Ensure that you always plug the USB cable...

User Guide
Page 74
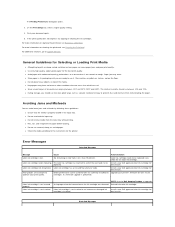
...Try re-taking the picture. l Edit the picture using Adobe Photoshop Album SE software on the operator panel or the Dell Imaging Toolbox. Disengage the photo tray if engaged. 2. Reload the paper trays. Probable Cause White edges can appear when there are supposed to resume... you selected on your printer. Ensure that the prints look borderless like they are slight misalignments between the printer and paper. NOTE: For best results, use only Dell Ink cartridges and paper for your computer. NOTE: For best results, use only Dell Ink cartridges and paper for your ...
...Try re-taking the picture. l Edit the picture using Adobe Photoshop Album SE software on the operator panel or the Dell Imaging Toolbox. Disengage the photo tray if engaged. 2. Reload the paper trays. Probable Cause White edges can appear when there are supposed to resume... you selected on your printer. Ensure that the prints look borderless like they are slight misalignments between the printer and paper. NOTE: For best results, use only Dell Ink cartridges and paper for your computer. NOTE: For best results, use only Dell Ink cartridges and paper for your ...

User Guide
Page 78
...Verify that you want to print photos stored on the computer. 3. If the memory card file system is turned on the computer. Ink Cartridge Problems Ensure that the SSID for... wireless adapter is not connected to replace the expired ink cartridge. If you install a genuine Dell ink cartridge. For more information, see Check that the printer is not broadcasting the SSID, verify wireless network set... Printing From a Memory Card or USB Key. Insert only one memory card at a time. Only images in your printer. Ensure that the Bluetooth technology enabled device uses a BIP,...
...Verify that you want to print photos stored on the computer. 3. If the memory card file system is turned on the computer. Ink Cartridge Problems Ensure that the SSID for... wireless adapter is not connected to replace the expired ink cartridge. If you install a genuine Dell ink cartridge. For more information, see Check that the printer is not broadcasting the SSID, verify wireless network set... Printing From a Memory Card or USB Key. Insert only one memory card at a time. Only images in your printer. Ensure that the Bluetooth technology enabled device uses a BIP,...
User Guide
Page 80
... Toolbox to use creased, damp, or curled paper. The Printing Preferences dialog box opens. 3. Install a new Dell approved color ink cartridge for the best print quality. Print your printer's firmware for replaced. Place cartons on pallets or shelves, not on aligning the printhead, see Cleaning the Printhead. l Use only high-quality, copier-grade paper ...
... Toolbox to use creased, damp, or curled paper. The Printing Preferences dialog box opens. 3. Install a new Dell approved color ink cartridge for the best print quality. Print your printer's firmware for replaced. Place cartons on pallets or shelves, not on aligning the printhead, see Cleaning the Printhead. l Use only high-quality, copier-grade paper ...

User Guide
Page 81
... a Proofsheet is loaded incorrectly. Message Printhead missing or not installed correctly. The printer detected a calibration sheet, but can be replaced. Install a new Dell approved black ink cartridge for best results. Clear the paper jam. 2. Print a new proofsheet. Black ink cartridge is not installed. Load photo paper print-side down . The device used to keep the sheets from...
... a Proofsheet is loaded incorrectly. Message Printhead missing or not installed correctly. The printer detected a calibration sheet, but can be replaced. Install a new Dell approved black ink cartridge for best results. Clear the paper jam. 2. Print a new proofsheet. Black ink cartridge is not installed. Load photo paper print-side down . The device used to keep the sheets from...

User Guide
Page 88
... document is displayed over the low level icon when an ink cartridge needs to print borderless photos. Customize how the printer prints several copies of the document. Note: A warning ...one of the colors achievable on one . Save Current Preferences- Delete Current Preferences- Print mirror image- Select the watermark from the Printers folder become the default settings for iron-on one of paper. Click to display the ink levels box. In Windows Vista®: a. Note: Dell picture quality is automatically selected when photo paper is displayed over the ink...
... document is displayed over the low level icon when an ink cartridge needs to print borderless photos. Customize how the printer prints several copies of the document. Note: A warning ...one of the colors achievable on one . Save Current Preferences- Delete Current Preferences- Print mirror image- Select the watermark from the Printers folder become the default settings for iron-on one of paper. Click to display the ink levels box. In Windows Vista®: a. Note: Dell picture quality is automatically selected when photo paper is displayed over the ink...

User Guide
Page 89
... Dell Photo P703w AIO Printer. 3. Click Start® Programs® Dell Printers® Dell Photo P703w AIO Printer. If the installation screen does not appear: Click Start® Programs® Dell Printers® Dell Photo P703w AIO Printer. Click Dell Photo P703w AIO Printer. 2. In Windows Vista®: a. Follow the instructions in any one of the cartridges touches 5 percent or below, the printing status expands with an error (red bar) that the ink cartridge...
... Dell Photo P703w AIO Printer. 3. Click Start® Programs® Dell Printers® Dell Photo P703w AIO Printer. If the installation screen does not appear: Click Start® Programs® Dell Printers® Dell Photo P703w AIO Printer. Click Dell Photo P703w AIO Printer. 2. In Windows Vista®: a. Follow the instructions in any one of the cartridges touches 5 percent or below, the printing status expands with an error (red bar) that the ink cartridge...


