User's Guide
Page 3
... copying...49 Making copies...49 Copying photos...49 Copying a two-sided document...50 Enlarging or reducing images...50 Adjusting copy quality...51 Making a copy lighter or darker...51 Collating copies using the printer control panel...51 Repeating an image on one page...52 Copying multiple pages on one sheet ...52 Making a duplex copy...52...
... copying...49 Making copies...49 Copying photos...49 Copying a two-sided document...50 Enlarging or reducing images...50 Adjusting copy quality...51 Making a copy lighter or darker...51 Collating copies using the printer control panel...51 Repeating an image on one page...52 Copying multiple pages on one sheet ...52 Making a duplex copy...52...
User's Guide
Page 7
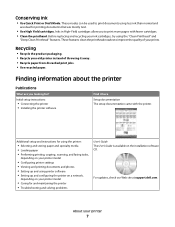
...paper • Performing printing, copying, scanning, and faxing tasks, depending on your printer model • Configuring printer settings • Viewing and printing documents and photos • Setting up and configuring the printer on a network, depending on your prints. These modes can be used to print...; Recycle paper from discarded print jobs. • Use recycled paper. For updates, check our Web site at support.dell.com. Finding information about the printer Publications What are mostly text. • Use High Yield cartridges. About your ink cartridges, try using the "Clean ...
...paper • Performing printing, copying, scanning, and faxing tasks, depending on your printer model • Configuring printer settings • Viewing and printing documents and photos • Setting up and configuring the printer on a network, depending on your prints. These modes can be used to print...; Recycle paper from discarded print jobs. • Use recycled paper. For updates, check our Web site at support.dell.com. Finding information about the printer Publications What are mostly text. • Use High Yield cartridges. About your ink cartridges, try using the "Clean ...
User's Guide
Page 10
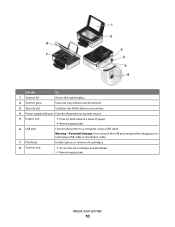
... To 1 Scanner lid Access the scanner glass. 2 Scanner glass Scan and copy photos and documents. 3 Security slot Install an anti-theft cable on both sides of a sheet of paper. • Remove paper jams. 6 USB port Connect the printer to a computer using a USB cable. Warning-Potential Damage: Do not touch the.... 7 Printhead Install, replace, or remove ink cartridges. 8 Scanner unit • Access the ink cartridges and printhead. • Remove paper jams. About your printer. 4 Power supply with port Connect the printer to a power source. 5 Duplex unit • Print on your...
... To 1 Scanner lid Access the scanner glass. 2 Scanner glass Scan and copy photos and documents. 3 Security slot Install an anti-theft cable on both sides of a sheet of paper. • Remove paper jams. 6 USB port Connect the printer to a computer using a USB cable. Warning-Potential Damage: Do not touch the.... 7 Printhead Install, replace, or remove ink cartridges. 8 Scanner unit • Access the ink cartridges and printhead. • Remove paper jams. About your printer. 4 Power supply with port Connect the printer to a power source. 5 Duplex unit • Print on your...
User's Guide
Page 14
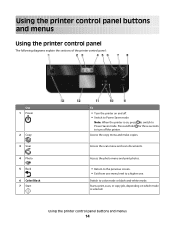
...sections of the printer control panel: Use 1 Power 2 Copy 3 Scan 4 Photo 5 Back 6 Color/Black 7 Start To • Turn the printer on , press to switch to Power Saver mode. Start a print, scan, or copy job, depending on which mode is on and off the printer. Note: When the printer is selected. ...Access the copy menu and make copies. Using the printer control panel buttons and menus 14 Access the scan menu and scan documents. Access the photo menu and print photos. • Return to the previous screen. • Exit from one . Press and hold for three seconds to turn off . ...
...sections of the printer control panel: Use 1 Power 2 Copy 3 Scan 4 Photo 5 Back 6 Color/Black 7 Start To • Turn the printer on , press to switch to Power Saver mode. Start a print, scan, or copy job, depending on which mode is on and off the printer. Note: When the printer is selected. ...Access the copy menu and make copies. Using the printer control panel buttons and menus 14 Access the scan menu and scan documents. Access the photo menu and print photos. • Return to the previous screen. • Exit from one . Press and hold for three seconds to turn off . ...
User's Guide
Page 15
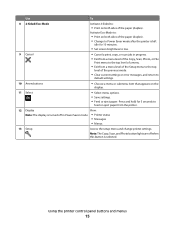
... lights are off in progress. • Exit from a menu level of the Copy, Scan, Photo, or File Print menu to the top level of a menu. • Exit from the printer. 12 Display View: Note: The display is turned off when this button is left idle for 10 minutes. • Set screen brightness... menus 15 Press and hold for 3 seconds to : • Print on both sides of the paper (duplex). • Change to Power Saver mode after the printer is selected. Use To 8 2-Sided/Eco-Mode Activate 2-Sided to feed or eject paper from a menu level of the Setup menu to the top level...
... lights are off in progress. • Exit from a menu level of the Copy, Scan, Photo, or File Print menu to the top level of a menu. • Exit from the printer. 12 Display View: Note: The display is turned off when this button is left idle for 10 minutes. • Set screen brightness... menus 15 Press and hold for 3 seconds to : • Print on both sides of the paper (duplex). • Change to Power Saver mode after the printer is selected. Use To 8 2-Sided/Eco-Mode Activate 2-Sided to feed or eject paper from a menu level of the Setup menu to the top level...
User's Guide
Page 16
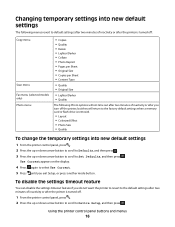
...can disable the settings timeout feature if you do not want the printer to revert to the default settings after two minutes of inactivity or after the printer is removed. • Layout • Colorized Effect • Photo Size • Quality To change the temporary settings into new ...to default settings after two minutes of inactivity or after the printer is turned off: Copy menu Scan menu Fax menu (selected models only) Photo menu • Copies • Quality • Resize • Lighter/Darker • Collate • Photo Reprint • Pages per Sheet • Original Size &#...
...can disable the settings timeout feature if you do not want the printer to revert to the default settings after two minutes of inactivity or after the printer is removed. • Layout • Colorized Effect • Photo Size • Quality To change the temporary settings into new ...to default settings after two minutes of inactivity or after the printer is turned off: Copy menu Scan menu Fax menu (selected models only) Photo menu • Copies • Quality • Resize • Lighter/Darker • Collate • Photo Reprint • Pages per Sheet • Original Size &#...
User's Guide
Page 20
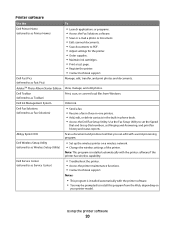
... fax in three-in-one printers. • Add, edit, or delete contacts in the built-in phone book. • Access the Dell Fax Setup Utility. Dell Fax Solutions (referred to as Fast Pics) Manage, edit, transfer, and print photos and documents. Dell Service Center (referred to... a test page. • Register the printer. • Contact technical support. Printer software Use the To Dell Printer Home (referred to as Printer Home) • Launch applications or programs. • Access the Fax Solutions software. • Scan or e-mail a photo or document. • Edit scanned documents....
... fax in three-in-one printers. • Add, edit, or delete contacts in the built-in phone book. • Access the Dell Fax Setup Utility. Dell Fax Solutions (referred to as Fast Pics) Manage, edit, transfer, and print photos and documents. Dell Service Center (referred to... a test page. • Register the printer. • Contact technical support. Printer software Use the To Dell Printer Home (referred to as Printer Home) • Launch applications or programs. • Access the Fax Solutions software. • Scan or e-mail a photo or document. • Edit scanned documents....
User's Guide
Page 21
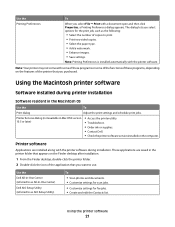
Using the Macintosh printer software Software installed during installation. Printer software Applications are saved in the printer folder that appears on thecomputer. Use the Dell All-In-One Center (referred to as All-In-One Center) Dell AIO Setup Utility (referred to as the following: • Select...open and then click Properties, a Printing Preferences dialog appears. Using the printer software 21 The dialog lets you select options for the print job, such as AIO Setup Utility) To • Scan photos and documents. • Customize settings for scan jobs. • ...
Using the Macintosh printer software Software installed during installation. Printer software Applications are saved in the printer folder that appears on thecomputer. Use the Dell All-In-One Center (referred to as All-In-One Center) Dell AIO Setup Utility (referred to as the following: • Select...open and then click Properties, a Printing Preferences dialog appears. Using the printer software 21 The dialog lets you select options for the print job, such as AIO Setup Utility) To • Scan photos and documents. • Customize settings for scan jobs. • ...
User's Guide
Page 22
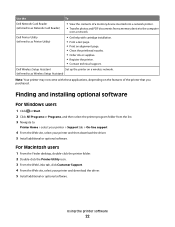
.... • Order ink or supplies. • Register the printer. • Contact technical support. Dell Wireless Setup Assistant Set up the printer on a wireless network. (referred to as Printer Utility) • Get help with these applications, depending on... the features of a memory device inserted into a network printer. • Transfer photos and PDF documents from the list. 3 Navigate to: Printer Home > select your printer...
.... • Order ink or supplies. • Register the printer. • Contact technical support. Dell Wireless Setup Assistant Set up the printer on a wireless network. (referred to as Printer Utility) • Get help with these applications, depending on... the features of a memory device inserted into a network printer. • Transfer photos and PDF documents from the list. 3 Navigate to: Printer Home > select your printer...
User's Guide
Page 26
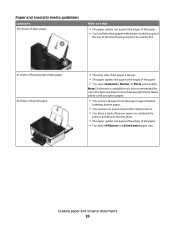
... against the edges of the paper. • You load letterhead paper with the print side faceup and the top of the letterhead going into the printer first. 25 sheets of heavyweight matte paper 20 sheets of banner paper • The print side of the paper is not recommended for use with... expensive paper such as heavyweight matte, labels, photo cards and glossy paper. • You remove all paper from the paper support before inserting banner paper. • You use banner paper designed for inkjet...
... against the edges of the paper. • You load letterhead paper with the print side faceup and the top of the letterhead going into the printer first. 25 sheets of heavyweight matte paper 20 sheets of banner paper • The print side of the paper is not recommended for use with... expensive paper such as heavyweight matte, labels, photo cards and glossy paper. • You remove all paper from the paper support before inserting banner paper. • You use banner paper designed for inkjet...
User's Guide
Page 28
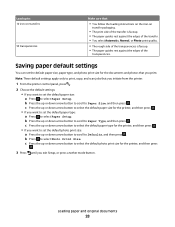
... panel, press . 2 Choose the default settings: • If you want to set the default photo print size: a Press the up or down arrow button to select the default photo print size for the printer, and then press . • If you print. c Press the up or down arrow button to scroll to Defaults, ... Paper Setup. Saving paper default settings You can set the default paper type: a Press to set the default paper size, paper type, and photo print size for the printer, and then press . • If you exit Setup, or press another mode button. c Press the up or down arrow button to select the...
... panel, press . 2 Choose the default settings: • If you want to set the default photo print size: a Press the up or down arrow button to select the default photo print size for the printer, and then press . • If you print. c Press the up or down arrow button to scroll to Defaults, ... Paper Setup. Saving paper default settings You can set the default paper type: a Press to set the default paper size, paper type, and photo print size for the printer, and then press . • If you exit Setup, or press another mode button. c Press the up or down arrow button to select the...
User's Guide
Page 30
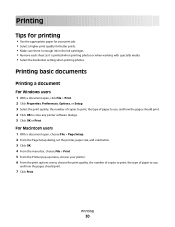
... Properties, Preferences, Options, or Setup. 3 Select the print quality, the number of copies to print, the type of paper to close any printer software dialogs. 5 Click OK or Print. Printing Tips for printing • Use the appropriate paper for better prints. • Make sure there... setting when printing photos. Printing basic documents Printing a document For Windows users 1 With a document open , choose File > Page Setup. 2 From the Page Setup dialog, set the printer, paper size, and orientation. 3 Click OK. 4 From the menu bar, choose File > Print. 5 From the Printer pop-up menu...
... Properties, Preferences, Options, or Setup. 3 Select the print quality, the number of copies to print, the type of paper to close any printer software dialogs. 5 Click OK or Print. Printing Tips for printing • Use the appropriate paper for better prints. • Make sure there... setting when printing photos. Printing basic documents Printing a document For Windows users 1 With a document open , choose File > Page Setup. 2 From the Page Setup dialog, set the printer, paper size, and orientation. 3 Click OK. 4 From the menu bar, choose File > Print. 5 From the Printer pop-up menu...
User's Guide
Page 31
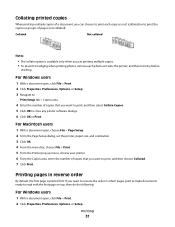
...print, and then choose Collated. 7 Click Print. Collating printed copies When printing multiple copies of a document, you can choose to print each photo as it exits the printer, and then let it dry before stacking. Printing 31 For Windows users 1 With a document open , click File > Print. 2 Click ...printing multiple copies. • To prevent smudging when printing photos, remove each copy as a set the printer, paper size, and orientation. 3 Click OK. 4 From the menu bar, choose File > Print. 5 From the Printer pop-up menu, choose your printer. 6 From the Copies area, enter the number of ...
...print, and then choose Collated. 7 Click Print. Collating printed copies When printing multiple copies of a document, you can choose to print each photo as it exits the printer, and then let it dry before stacking. Printing 31 For Windows users 1 With a document open , click File > Print. 2 Click ...printing multiple copies. • To prevent smudging when printing photos, remove each copy as a set the printer, paper size, and orientation. 3 Click OK. 4 From the menu bar, choose File > Print. 5 From the Printer pop-up menu, choose your printer. 6 From the Copies area, enter the number of ...
User's Guide
Page 36
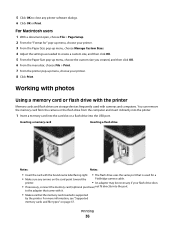
... Print. to the adapter that came with it directly into the printer. 1 Insert a memory card into the card slot or a flash drive into the port. Working with photos Using a memory card or flash drive with the printer Memory cards and flash drives are storage devices frequently used for " pop-up ...menu, choose your printer. 3 From the Paper Size pop-up menu, choose Manage Custom Sizes. 4...
... Print. to the adapter that came with it directly into the printer. 1 Insert a memory card into the card slot or a flash drive into the port. Working with photos Using a memory card or flash drive with the printer Memory cards and flash drives are storage devices frequently used for " pop-up ...menu, choose your printer. 3 From the Paper Size pop-up menu, choose Manage Custom Sizes. 4...
User's Guide
Page 37
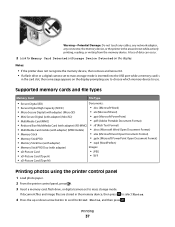
...; JPEG • xD-Picture Card (Type H) • TIFF • xD-Picture Card (Type M) Printing photos using the printer control panel 1 Load photo paper. 2 From the printer control panel, press . 3 Insert a memory card, flash drive, or digital camera set to Print Photos, and then press . Warning-Potential Damage: Do not touch any cables, any network adapter...
...; JPEG • xD-Picture Card (Type H) • TIFF • xD-Picture Card (Type M) Printing photos using the printer control panel 1 Load photo paper. 2 From the printer control panel, press . 3 Insert a memory card, flash drive, or digital camera set to Print Photos, and then press . Warning-Potential Damage: Do not touch any cables, any network adapter...
User's Guide
Page 38
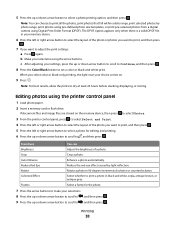
... and then press . 5 Press the left or right arrow button to select a photo for the photo. 7 Press the arrow buttons to make your choice comes on the memory device, then press to select Photos. 3 From the printer control panel, press to select Select and Print. 4 Press the left or right ... scroll to Continue, and then press . 8 Press the Color/Black button to , and then press . c After adjusting your selections using the printer control panel 1 Load photo paper. 2 Insert a memory card or flash drive. Select whether to dry at least 24 hours before stacking, displaying, or storing.
... and then press . 5 Press the left or right arrow button to select a photo for the photo. 7 Press the arrow buttons to make your choice comes on the memory device, then press to select Photos. 3 From the printer control panel, press to select Select and Print. 4 Press the left or right ... scroll to Continue, and then press . 8 Press the Color/Black button to , and then press . c After adjusting your selections using the printer control panel 1 Load photo paper. 2 Insert a memory card or flash drive. Select whether to dry at least 24 hours before stacking, displaying, or storing.
User's Guide
Page 39
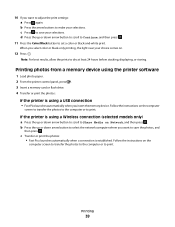
...Note: For best results, allow the prints to print. Printing photos from a memory device using the printer software 1 Load photo paper. 2 From the printer control panel, press . 3 Insert a memory card or flash drive. 4 Transfer or print the photos: If the printer is using a Wireless connection (selected models only) a Press... the up or down arrow button to scroll to Share Media on the computer screen to transfer the photos to the computer or to dry at least 24 ...
...Note: For best results, allow the prints to print. Printing photos from a memory device using the printer software 1 Load photo paper. 2 From the printer control panel, press . 3 Insert a memory card or flash drive. 4 Transfer or print the photos: If the printer is using a Wireless connection (selected models only) a Press... the up or down arrow button to scroll to Share Media on the computer screen to transfer the photos to the computer or to dry at least 24 ...
User's Guide
Page 40
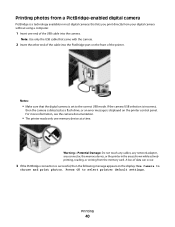
For more information, see the camera documentation. • The printer reads only one end of the USB cable into the PictBridge port on the display: Use Camera to choose and print photos. A loss of data can occur. 3 If the PictBridge connection is successful, then the following message ...camera USB selection is incorrect, then the camera is detected as a flash drive, or an error message is displayed on the printer control panel. Printing photos from a PictBridge-enabled digital camera PictBridge is a technology available in the areas shown while actively printing, reading, or writing from...
For more information, see the camera documentation. • The printer reads only one end of the USB cable into the PictBridge port on the display: Use Camera to choose and print photos. A loss of data can occur. 3 If the PictBridge connection is successful, then the following message ...camera USB selection is incorrect, then the camera is detected as a flash drive, or an error message is displayed on the printer control panel. Printing photos from a PictBridge-enabled digital camera PictBridge is a technology available in the areas shown while actively printing, reading, or writing from...
User's Guide
Page 41
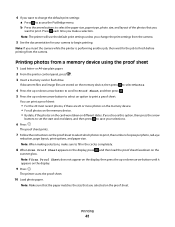
... press to select Photos. 4 Press the up or down arrow button to scroll to Proof Sheet, and then press . 5 Press the up or down arrow button to select an option to save your camera to finish before printing from the camera. Printing 41 Note: The printer will use the default... the size that you want to change the print settings from a memory device using the proof sheet 1 Load letter- The printer scans the proof sheet. 10 Load photo paper. Printing photos from the camera. 5 See the documentation for the job to begin printing. b Press the arrow buttons to select the paper...
... press to select Photos. 4 Press the up or down arrow button to scroll to Proof Sheet, and then press . 5 Press the up or down arrow button to select an option to save your camera to finish before printing from the camera. Printing 41 Note: The printer will use the default... the size that you want to change the print settings from a memory device using the proof sheet 1 Load letter- The printer scans the proof sheet. 10 Load photo paper. Printing photos from the camera. 5 See the documentation for the job to begin printing. b Press the arrow buttons to select the paper...
User's Guide
Page 42
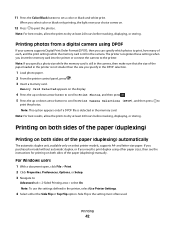
...: This option appears only if a DPOF file is the setting most often used. Side Flip is detected in the DPOF selection. 1 Load photo paper. 2 From the printer control panel, press . 3 Insert a memory card. Printing 42 Note: If you specify in the memory card. If you purchased a model...hours before stacking, displaying, or storing. Note: For best results, allow the prints to print the photos. Memory Card Detected appears on select printer models, supports A4- The printer recognizes these settings when you select color or black-only printing, the light near your camera supports ...
...: This option appears only if a DPOF file is the setting most often used. Side Flip is detected in the DPOF selection. 1 Load photo paper. 2 From the printer control panel, press . 3 Insert a memory card. Printing 42 Note: If you specify in the memory card. If you purchased a model...hours before stacking, displaying, or storing. Note: For best results, allow the prints to print the photos. Memory Card Detected appears on select printer models, supports A4- The printer recognizes these settings when you select color or black-only printing, the light near your camera supports ...


