
Monitor Users Guide
Page 3
... Parts and Controls 8 Front View 8 Back View 9 Bottom View 10 Monitor Specifications 11 Resolution Specifications 12 Preset Display Modes 13 Electrical Specifications 14 Physical Characteristics 15 Environmental Characteristics 16 Pin Assignments 17 Plug-and-Play 23 LCD Monitor Quality and Pixel Policy 23 Handling and Moving Your Display 23 Maintenance Guidelines 25 Cleaning Your Monitor 25 Setting Up the Monitor 26 Connecting the Stand 26 Using the Tilt, Swivel, and Vertical Extension 29 Tilt, Swivel and Vertical Extension...
... Parts and Controls 8 Front View 8 Back View 9 Bottom View 10 Monitor Specifications 11 Resolution Specifications 12 Preset Display Modes 13 Electrical Specifications 14 Physical Characteristics 15 Environmental Characteristics 16 Pin Assignments 17 Plug-and-Play 23 LCD Monitor Quality and Pixel Policy 23 Handling and Moving Your Display 23 Maintenance Guidelines 25 Cleaning Your Monitor 25 Setting Up the Monitor 26 Connecting the Stand 26 Using the Tilt, Swivel, and Vertical Extension 29 Tilt, Swivel and Vertical Extension...
Monitor Users Guide
Page 4
... Information . . 77 Contacting Dell 77 EU Product Database for USB-C 41 Securing Your Monitor Using Kensington Lock (Optional) . . . 43 Removing the Monitor Stand 44 Wall Mounting (Optional 45 Operating the Monitor 46 Turning On the Monitor 46 Using the Joystick Control 46 Using the Menu Launcher 47 Front‑Panel Button 49 Using the Main Menu 50 Using the OSD Lock Function 61 Initial Setup 64 OSD Warning Messages 65 Setting the Maximum Resolution 68 Troubleshooting 69 Self-Test...
... Information . . 77 Contacting Dell 77 EU Product Database for USB-C 41 Securing Your Monitor Using Kensington Lock (Optional) . . . 43 Removing the Monitor Stand 44 Wall Mounting (Optional 45 Operating the Monitor 46 Turning On the Monitor 46 Using the Joystick Control 46 Using the Menu Launcher 47 Front‑Panel Button 49 Using the Main Menu 50 Using the OSD Lock Function 61 Initial Setup 64 OSD Warning Messages 65 Setting the Maximum Resolution 68 Troubleshooting 69 Self-Test...
Monitor Users Guide
Page 7
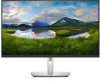
... viewing experience. • Extensive digital connectivity with DP and HDMI helps future-proof your monitor. • Plug and play capability if supported by your system. • On-Screen Display (OSD) adjustments for ease of set-up and screen optimization. • Power and OSD buttons lock. • Security lock slot. • ≤ 0.3 W in Standby Mode. • Optimize eye comfort with TUV Rheinland (Hardware Solution) at factory reset/default setting mode (Preset mode: Standard). • Decreases the level of hazard blue light...
... viewing experience. • Extensive digital connectivity with DP and HDMI helps future-proof your monitor. • Plug and play capability if supported by your system. • On-Screen Display (OSD) adjustments for ease of set-up and screen optimization. • Power and OSD buttons lock. • Security lock slot. • ≤ 0.3 W in Standby Mode. • Optimize eye comfort with TUV Rheinland (Hardware Solution) at factory reset/default setting mode (Preset mode: Standard). • Decreases the level of hazard blue light...

Monitor Users Guide
Page 30
... Dell computer, you may experience performance degradation in graphic-intensive applications (3D Gaming and so on). NOTE: When in the Portrait View Mode, you require an updated graphics driver that is not working correctly, go the graphics driver website or your computer manufacturer website for your graphics card. 30 | Setting Up the Monitor To download the graphics driver, go to adjust the Rotation Display Settings...
... Dell computer, you may experience performance degradation in graphic-intensive applications (3D Gaming and so on). NOTE: When in the Portrait View Mode, you require an updated graphics driver that is not working correctly, go the graphics driver website or your computer manufacturer website for your graphics card. 30 | Setting Up the Monitor To download the graphics driver, go to adjust the Rotation Display Settings...

Monitor Users Guide
Page 35
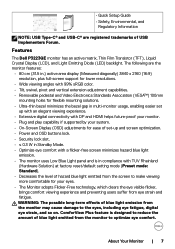
This feature is only supported with Dell platform which has built-in the Control Panel first. USB-C USB-C To make sure the DPBS function works for the first time, perform the following steps on the DPBS supported platform in DPBS function, and is designed with Dell Power Button Sync (DPBS) feature to allow you to Control Panel. Go to control PC system power state from the monitor power button. Setting Up the Monitor | 35 NOTE: DPBS only supports the USB-C upstream port. 1. Dell Power Button Sync (DPBS) Your monitor is only supported over USB-C interface.
This feature is only supported with Dell platform which has built-in the Control Panel first. USB-C USB-C To make sure the DPBS function works for the first time, perform the following steps on the DPBS supported platform in DPBS function, and is designed with Dell Power Button Sync (DPBS) feature to allow you to Control Panel. Go to control PC system power state from the monitor power button. Setting Up the Monitor | 35 NOTE: DPBS only supports the USB-C upstream port. 1. Dell Power Button Sync (DPBS) Your monitor is only supported over USB-C interface.
Monitor Users Guide
Page 52
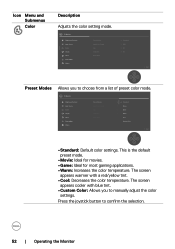
... Monitor Brightness/Contrast Input Source Color Display Menu Personalize Others Preset Modes Input Color Format Hue Saturation Reset Color Standard RGB 50 50 Exit Preset Modes Allows you to manually adjust the color settings. This is the default preset mode. • Movie: Ideal for movies. • Game: Ideal for most gaming applications. • Warm: Increases the color temperature. The screen appears cooler with a red/yellow tint. • Cool: Decreases the color temperature. Press the joystick button...
... Monitor Brightness/Contrast Input Source Color Display Menu Personalize Others Preset Modes Input Color Format Hue Saturation Reset Color Standard RGB 50 50 Exit Preset Modes Allows you to manually adjust the color settings. This is the default preset mode. • Movie: Ideal for movies. • Game: Ideal for most gaming applications. • Warm: Increases the color temperature. The screen appears cooler with a red/yellow tint. • Cool: Decreases the color temperature. Press the joystick button...

Monitor Users Guide
Page 58
... so on. 32 Monitor Brightness/Contrast Input Source Color Display Menu Personalize Others Display Info DDC/CI LCD Conditioning Firmware Service Tag Self-Diagnostic Reset Others Factory Reset Select On O 13T101 CN073K0 Select ENERGY STAR® Exit Display Info Displays the monitor's current settings. Icon Menu and Submenus Others Description Select this function. 32 Monitor Input Source: Resolution: Input Capability: USB: Stream Info: DP 3840 x 2160, 30Hz 24-bit DP 1.4 (5.4Gbps) HDMI 2.0 5.4Gbps Model: Firmware: Service Tag: P3223QE 13T111 CN073K0 58...
... so on. 32 Monitor Brightness/Contrast Input Source Color Display Menu Personalize Others Display Info DDC/CI LCD Conditioning Firmware Service Tag Self-Diagnostic Reset Others Factory Reset Select On O 13T101 CN073K0 Select ENERGY STAR® Exit Display Info Displays the monitor's current settings. Icon Menu and Submenus Others Description Select this function. 32 Monitor Input Source: Resolution: Input Capability: USB: Stream Info: DP 3840 x 2160, 30Hz 24-bit DP 1.4 (5.4Gbps) HDMI 2.0 5.4Gbps Model: Firmware: Service Tag: P3223QE 13T111 CN073K0 58...

Monitor Users Guide
Page 61
... lock the front-panel control buttons to prevent access to the User's Guide. To unlock the Button, refer to the OSD menu and/ or power button. Select one of the following message appears. The following options. 32 Monitor Brightness/Contrast Input Source Color Display Menu Personalize Others Language Rotation Transparency Timer Lock Reset Menu 2. Select Yes to lock the Menu Buttons? Yes No 3. Operating the Monitor | 61 Menu Buttons Power Button Menu + Power Buttons Disable Exit Are you sure you want to lock buttons. Once locked, pressing any control button...
... lock the front-panel control buttons to prevent access to the User's Guide. To unlock the Button, refer to the OSD menu and/ or power button. Select one of the following message appears. The following options. 32 Monitor Brightness/Contrast Input Source Color Display Menu Personalize Others Language Rotation Transparency Timer Lock Reset Menu 2. Select Yes to lock the Menu Buttons? Yes No 3. Operating the Monitor | 61 Menu Buttons Power Button Menu + Power Buttons Disable Exit Are you sure you want to lock buttons. Once locked, pressing any control button...
Monitor Users Guide
Page 68
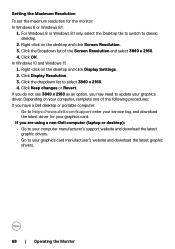
... driver. Click Keep changes or Revert. Right-click on the desktop and click Display Settings. 2. Click OK. Click the dropdown list to classic desktop. 2. If you may need to your graphics card manufacturer's website and download the latest graphic drivers. 68 | Operating the Monitor Right-click on the desktop and click Screen Resolution. 3. Setting the Maximum Resolution To set the maximum resolution for your graphics card. In Windows...
... driver. Click Keep changes or Revert. Right-click on the desktop and click Display Settings. 2. Click OK. Click the dropdown list to classic desktop. 2. If you may need to your graphics card manufacturer's website and download the latest graphic drivers. 68 | Operating the Monitor Right-click on the desktop and click Screen Resolution. 3. Setting the Maximum Resolution To set the maximum resolution for your graphics card. In Windows...
Monitor Users Guide
Page 69
To ensure proper Self-Test operation, remove all digital and the analog cables from the back of computer. 3. While in 4 minutes. www.dell.com/P3223QE Troubleshooting | 69 Turn on -screen (against a black background), if the monitor cannot sense a video signal and is functioning properly. No HDMI Cable The display will go into Standby mode in this section, follow the Safety Instructions. Unplug the video cable from the back of the computer...
To ensure proper Self-Test operation, remove all digital and the analog cables from the back of computer. 3. While in 4 minutes. www.dell.com/P3223QE Troubleshooting | 69 Turn on -screen (against a black background), if the monitor cannot sense a video signal and is functioning properly. No HDMI Cable The display will go into Standby mode in this section, follow the Safety Instructions. Unplug the video cable from the back of the computer...

Monitor Users Guide
Page 70
... Monitor Brightness/Contrast Input Source Color Display Menu Personalize Others Display Info DDC/CI LCD Conditioning Firmware Service Tag Self-Diagnostic Reset Others Factory Reset Select On O 13T101 CN073K0 Select ENERGY STAR® Exit To Run the Built-in diagnostics only when the video cable is unplugged and the monitor is functioning properly. Repeat steps 5 and 6 until a red screen is complete when the text screen appears. To exit, toggle the joystick control...
... Monitor Brightness/Contrast Input Source Color Display Menu Personalize Others Display Info DDC/CI LCD Conditioning Firmware Service Tag Self-Diagnostic Reset Others Factory Reset Select On O 13T101 CN073K0 Select ENERGY STAR® Exit To Run the Built-in diagnostics only when the video cable is unplugged and the monitor is functioning properly. Repeat steps 5 and 6 until a red screen is complete when the text screen appears. To exit, toggle the joystick control...

Monitor Users Guide
Page 72
These can be adjusted in diagnostics. Wrong Color Picture color not good • Try different Preset Modes in Color settings OSD. • Adjust R/G/B value under Custom Color in Color menu OSD. • Change the Input Color Format to RGB or YCbCr in the Color settings OSD. • Run the built-in image left on image displayed Windows Power Options or Mac Energy Saver the monitor for appears on monitor to the computer is connected properly & off after a few minutes from...
These can be adjusted in diagnostics. Wrong Color Picture color not good • Try different Preset Modes in Color settings OSD. • Adjust R/G/B value under Custom Color in Color menu OSD. • Change the Input Color Format to RGB or YCbCr in the Color settings OSD. • Run the built-in image left on image displayed Windows Power Options or Mac Energy Saver the monitor for appears on monitor to the computer is connected properly & off after a few minutes from...

Monitor Users Guide
Page 73
... the power saving mode by moving the mouse or pressing any key on the keyboard. • Check whether the signal cable is white The picture does not fill the entire screen The picture cannot fill the height or width of device cannot support DP alternate mode. • Set Windows to factory settings. • Turn off the monitor, unplug the monitor power cable, plug it back, and then turn on the monitor. • Check the signal source. Troubleshooting | 73 Product Specific Problems Problem...
... the power saving mode by moving the mouse or pressing any key on the keyboard. • Check whether the signal cable is white The picture does not fill the entire screen The picture cannot fill the height or width of device cannot support DP alternate mode. • Set Windows to factory settings. • Turn off the monitor, unplug the monitor power cable, plug it back, and then turn on the monitor. • Check the signal source. Troubleshooting | 73 Product Specific Problems Problem...
Monitor Users Guide
Page 75
... LED is connected securely on the computer, plug in the Windows Device Manager. • If your BIOS Setup has a LAN/GBE Enabled/ Disabled option, make sure it is set to Enabled. • Ensure that the Ethernet cable is not lit. • First power off the Computer and unplug the Type-C cable and power cord of the monitor. Problem What you experience The LAN port is OS setting...
... LED is connected securely on the computer, plug in the Windows Device Manager. • If your BIOS Setup has a LAN/GBE Enabled/ Disabled option, make sure it is set to Enabled. • Ensure that the Ethernet cable is not lit. • First power off the Computer and unplug the Type-C cable and power cord of the monitor. Problem What you experience The LAN port is OS setting...
Display Manager Users Guide
Page 4
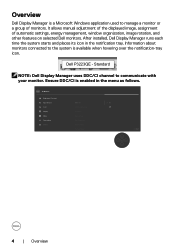
... installed, Dell Display Manager runs each time the system starts and places its icon in the menu as follows. 32 Monitor Brightness/Contrast Display Info Input Source DDC/CI On Color LCD Conditioning O Display Firmware Menu Service Tag Personalize Self-Diagnostic Others Reset Others Factory Reset Exit 4 | Overview Overview Dell Display Manager is a Microsoft Windows application used to the system is enabled in the notification tray. Dell P3223QE - It allows manual adjustment of the displayed image, assignment of monitors. Information about monitors connected...
... installed, Dell Display Manager runs each time the system starts and places its icon in the menu as follows. 32 Monitor Brightness/Contrast Display Info Input Source DDC/CI On Color LCD Conditioning O Display Firmware Menu Service Tag Personalize Self-Diagnostic Others Reset Others Factory Reset Exit 4 | Overview Overview Dell Display Manager is a Microsoft Windows application used to the system is enabled in the notification tray. Dell P3223QE - It allows manual adjustment of the displayed image, assignment of monitors. Information about monitors connected...

Monitor Simplified Service Manual
Page 14
... to check whether your monitor and computer are properly connected but the monitor screen remains dark, run the monitor self-test by performing the following steps: 1. www.dell.com/P3223QE or No DP Cable The display will continuously scroll through the screen. then turn on -screen (against a black background), if the monitor cannot sense a video signal and is functioning properly. While in this section, follow the Safety Instructions. Turn...
... to check whether your monitor and computer are properly connected but the monitor screen remains dark, run the monitor self-test by performing the following steps: 1. www.dell.com/P3223QE or No DP Cable The display will continuously scroll through the screen. then turn on -screen (against a black background), if the monitor cannot sense a video signal and is functioning properly. While in this section, follow the Safety Instructions. Turn...

Monitor Simplified Service Manual
Page 15
... the screen displays green, blue, black, and white colors. Select OSD items of the screen). 2. Check the video card and computer. Ensure that helps you determine if the screen abnormality you do not detect any defects or abnormalities. 5. To exit, toggle the joystick control again. Observe if the screen has any screen abnormalities upon using the built-in diagnostic tool, the monitor is in self-test mode. 32 Monitor Brightness/Contrast Input Source Color Display Menu Personalize Others Display...
... the screen displays green, blue, black, and white colors. Select OSD items of the screen). 2. Check the video card and computer. Ensure that helps you determine if the screen abnormality you do not detect any defects or abnormalities. 5. To exit, toggle the joystick control again. Observe if the screen has any screen abnormalities upon using the built-in diagnostic tool, the monitor is in self-test mode. 32 Monitor Brightness/Contrast Input Source Color Display Menu Personalize Others Display...

Monitor Simplified Service Manual
Page 17
..., use a dynamically changing time screensaver. a long period of screen idle time. Image retention Faint shadow • Set the screen to turn off and is secure. • Reset the monitor to factory settings. • Perform monitor self-test feature check to the computer is secure. • Check for appears on image displayed Windows Power Options or Mac Energy Saver the monitor for bent or broken pins in self-test mode. Missing Color Picture missing color...
..., use a dynamically changing time screensaver. a long period of screen idle time. Image retention Faint shadow • Set the screen to turn off and is secure. • Reset the monitor to factory settings. • Perform monitor self-test feature check to the computer is secure. • Check for appears on image displayed Windows Power Options or Mac Energy Saver the monitor for bent or broken pins in self-test mode. Missing Color Picture missing color...
Monitor Simplified Service Manual
Page 18
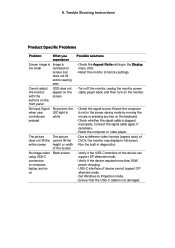
... image when Black screen using USB-C connection to computer, laptop, and so on Possible solutions • Check the Aspect Ratio setting in the Display menu OSD. • Reset the monitor to Projection mode. • Ensure that the USB-C cable is plugged in the power saving mode by moving the mouse or pressing any key on the monitor. • Check the signal source. Ensure the computer is not in properly. Trouble Shooting Instructions Product Specific Problems Problem What you experience Screen image...
... image when Black screen using USB-C connection to computer, laptop, and so on Possible solutions • Check the Aspect Ratio setting in the Display menu OSD. • Reset the monitor to Projection mode. • Ensure that the USB-C cable is plugged in the power saving mode by moving the mouse or pressing any key on the monitor. • Check the signal source. Ensure the computer is not in properly. Trouble Shooting Instructions Product Specific Problems Problem What you experience Screen image...
Monitor Simplified Service Manual
Page 19
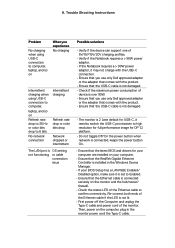
...; Check the status LED of the monitor. Re-connect both ends of the Ethernet cable if the LED is connected securely on the computer, plug in the monitor power cord the Type-C cable. Trouble Shooting Instructions Problem No charging when using USB-C connection to computer, laptop, and so on What you experience No charging Intermittent charging when using USB-C connection to computer, laptop, and so on Refresh rate drop to 30 Hz or color...
...; Check the status LED of the monitor. Re-connect both ends of the Ethernet cable if the LED is connected securely on the computer, plug in the monitor power cord the Type-C cable. Trouble Shooting Instructions Problem No charging when using USB-C connection to computer, laptop, and so on What you experience No charging Intermittent charging when using USB-C connection to computer, laptop, and so on Refresh rate drop to 30 Hz or color...


