
Professional Projector Users Guide
Page 3
Contents 1 About Your Dell Projector 4 Projector Box Contents 4 Projector Top and Bottom View 5 Projector Connections 6 Using Remote Control 8 2 Adjusting Projector Image 12 Adjusting Projected Zoom 12 Adjusting Projector Focus 13 Adjusting Image Size 14 3 Troubleshooting 17 Troubleshooting Tips 17 Guiding Signals 21 4 Maintenance 22 Changing the Lamp 22 Replacing Remote Control Batteries 24 5 Specifications 25 6 Additional Information 28 7 Contacting Dell 29 Contents | 3
Contents 1 About Your Dell Projector 4 Projector Box Contents 4 Projector Top and Bottom View 5 Projector Connections 6 Using Remote Control 8 2 Adjusting Projector Image 12 Adjusting Projected Zoom 12 Adjusting Projector Focus 13 Adjusting Image Size 14 3 Troubleshooting 17 Troubleshooting Tips 17 Guiding Signals 21 4 Maintenance 22 Changing the Lamp 22 Replacing Remote Control Batteries 24 5 Specifications 25 6 Additional Information 28 7 Contacting Dell 29 Contents | 3

Professional Projector Users Guide
Page 4
Ensure that you have all the items shown below. FREEZE BLANK ZOOM ZOOM INFO VGA VIDEO HDMI AAA Batteries (2) AAAAAA Documentation (User's Guide on line) Informacion Importante 4 About Your Dell Projector Projector Box Contents Package Contents Power cable VGA cable (VGA to VGA) Remote control POWER MENU ASPECT SOURCE VOL VIDEO MODE MUTE KEYSTONE VOL PAGE AUTO ADJ. 1 About Your Dell Projector Your projector comes with all the items, and contact Dell if anything is missing.
Ensure that you have all the items shown below. FREEZE BLANK ZOOM ZOOM INFO VGA VIDEO HDMI AAA Batteries (2) AAAAAA Documentation (User's Guide on line) Informacion Importante 4 About Your Dell Projector Projector Box Contents Package Contents Power cable VGA cable (VGA to VGA) Remote control POWER MENU ASPECT SOURCE VOL VIDEO MODE MUTE KEYSTONE VOL PAGE AUTO ADJ. 1 About Your Dell Projector Your projector comes with all the items, and contact Dell if anything is missing.

Professional Projector Users Guide
Page 6
Projector Connections 12 3 4 9 8 76 5 1 + 5V/1A DC out connector 6 HDMI connector 2 VGA output (monitor loop through) connector 7 Audio input connector 3 VGA input (D-sub) connector 8 Composite Video connector 4 Power cord connector 9 Audio output connector 5 Mini USB (mini type B) connector for remote mouse and firmware upgrade CAUTION: Before you begin any of the procedures in this section, follow the Safety Instructions as described on page 7. 6 About Your Dell Projector
Projector Connections 12 3 4 9 8 76 5 1 + 5V/1A DC out connector 6 HDMI connector 2 VGA output (monitor loop through) connector 7 Audio input connector 3 VGA input (D-sub) connector 8 Composite Video connector 4 Power cord connector 9 Audio output connector 5 Mini USB (mini type B) connector for remote mouse and firmware upgrade CAUTION: Before you begin any of the procedures in this section, follow the Safety Instructions as described on page 7. 6 About Your Dell Projector

Professional Projector Users Guide
Page 8
Using Remote Control POWER 1 14 2 15 3 MENU 4 ASPECT 16 5 17 SOURCE VOL VIDEO MODE 6 18 MUTE 7 19 KEYSTONE PAGE 20 VOL 8 21 9 AUTO ADJ. Press to navigate through the On-Screen Display (OSD) Menu items. Press to navigate through the On-Screen Display (OSD) Menu items. Press to confirm the selection. Press to change the aspect ratio of a displayed image. 8 About Your Dell Projector FREEZE BLANK 10 22 11 ZOOM ZOOM INFO 23 12 24 VGA VIDEO HDMI 25 13 26 1 Power 2 Enter 3 Right 4 Down 5 Aspect Ratio Turns the projector on or off.
Using Remote Control POWER 1 14 2 15 3 MENU 4 ASPECT 16 5 17 SOURCE VOL VIDEO MODE 6 18 MUTE 7 19 KEYSTONE PAGE 20 VOL 8 21 9 AUTO ADJ. Press to navigate through the On-Screen Display (OSD) Menu items. Press to navigate through the On-Screen Display (OSD) Menu items. Press to confirm the selection. Press to change the aspect ratio of a displayed image. 8 About Your Dell Projector FREEZE BLANK 10 22 11 ZOOM ZOOM INFO 23 12 24 VGA VIDEO HDMI 25 13 26 1 Power 2 Enter 3 Right 4 Down 5 Aspect Ratio Turns the projector on or off.

Professional Projector Users Guide
Page 11
About Your Dell Projector 11 Weak batteries will also prevent the remote control from the diagram. VGA VIDEO HDMI ZOOM ZOOM INFO AUTO ADJ. FREEZE BLANK KEYSTONE VOL PAGE VOL VIDEO MODE MUTE Remote Control Operating Range Operating range Angle ±30° Distance 7 m/22.97 feet Angle SOURCE MENU ASPECT POWER Distance NOTE: Actual operating range may slightly differ from properly operating the projector.
About Your Dell Projector 11 Weak batteries will also prevent the remote control from the diagram. VGA VIDEO HDMI ZOOM ZOOM INFO AUTO ADJ. FREEZE BLANK KEYSTONE VOL PAGE VOL VIDEO MODE MUTE Remote Control Operating Range Operating range Angle ±30° Distance 7 m/22.97 feet Angle SOURCE MENU ASPECT POWER Distance NOTE: Actual operating range may slightly differ from properly operating the projector.
Professional Projector Users Guide
Page 18
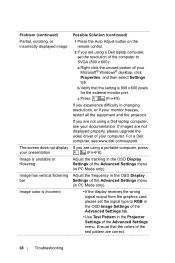
...c Press (Fn+F8). Ensure that the setting is incorrect Possible Solution (continued) 1 Press the Auto Adjust button on the remote control. 2 If you are using a Dell laptop computer, set the signal type to RGB in the OSD Image Settings of the Advanced Settings tab. •Use Test... that the colors of the Advanced Settings menu (in changing resolutions, or if your monitor freezes, restart all the equipment and the projector. If images are correct. 18 Troubleshooting Adjust the tracking in the OSD Display Settings of the test pattern are not displayed properly, please...
...c Press (Fn+F8). Ensure that the setting is incorrect Possible Solution (continued) 1 Press the Auto Adjust button on the remote control. 2 If you are using a Dell laptop computer, set the signal type to RGB in the OSD Image Settings of the Advanced Settings tab. •Use Test... that the colors of the Advanced Settings menu (in changing resolutions, or if your monitor freezes, restart all the equipment and the projector. If images are correct. 18 Troubleshooting Adjust the tracking in the OSD Display Settings of the test pattern are not displayed properly, please...

Professional Projector Users Guide
Page 20
... the Power button for 10 seconds. If the problem persists, contact Dell. If the projector fan fails, the projector will automatically shut down . If the problem persists, contact Dell. Try to power up again. The battery may be low. The... display automatically shuts down. If so, replace with two new AAA batteries. 20 Troubleshooting Problem (continued) TEMP light is solid amber TEMP light is blinking amber The remote...
... the Power button for 10 seconds. If the problem persists, contact Dell. If the projector fan fails, the projector will automatically shut down . If the problem persists, contact Dell. Try to power up again. The battery may be low. The... display automatically shuts down. If so, replace with two new AAA batteries. 20 Troubleshooting Problem (continued) TEMP light is solid amber TEMP light is blinking amber The remote...
Professional Projector Users Guide
Page 27
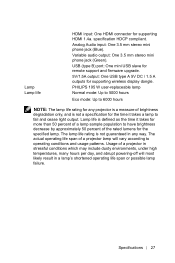
... a lamp's shortened operating life span or possible lamp failure. specification HDCP compliant. Specifications 27 USB (type B) port: One mini USB slave for remote support and firmware upgrade. 5V/1.5A output: One USB type A 5V DC / 1.5 A outputs for supporting HDMI 1.4a. Analog Audio input: ...the rated lumens for more than 50 percent of a lamp sample population to have brightness decrease by approximately 50 percent of a projector in stressful conditions which may include dusty environments, under high temperatures, many hours per day, and abrupt powering-off will vary according...
... a lamp's shortened operating life span or possible lamp failure. specification HDCP compliant. Specifications 27 USB (type B) port: One mini USB slave for remote support and firmware upgrade. 5V/1.5A output: One USB type A 5V DC / 1.5 A outputs for supporting HDMI 1.4a. Analog Audio input: ...the rated lumens for more than 50 percent of a lamp sample population to have brightness decrease by approximately 50 percent of a projector in stressful conditions which may include dusty environments, under high temperatures, many hours per day, and abrupt powering-off will vary according...
Professional Projector Users Guide
Page 30
... 13 Adjusting the Projected Image Adjusting the Projector Height 12 lower the projector Front tilt adjustment wheel 12 Rubber foot 12 Adjusting the Projector Zoom and Focus Focus ring 13 Zoom tab 13 C Changing the Lamp 22 Connection Ports + 5V/1A DC out...Audio output connector 6 Composite Video connector 6 HDMI connector 6 Mini USB (mini type B) connector for remote mouse and firmware upgrade 6 Power cord connector 6 VGA input (D-sub) connector 6 VGA output (monitor loop through) connector 6 Contact Dell 4, 22 D Dell contacting 28, 29 M Main Unit 5 2W Speaker 5 Focus ring 5 IR receivers 5 Lamp ...
... 13 Adjusting the Projected Image Adjusting the Projector Height 12 lower the projector Front tilt adjustment wheel 12 Rubber foot 12 Adjusting the Projector Zoom and Focus Focus ring 13 Zoom tab 13 C Changing the Lamp 22 Connection Ports + 5V/1A DC out...Audio output connector 6 Composite Video connector 6 HDMI connector 6 Mini USB (mini type B) connector for remote mouse and firmware upgrade 6 Power cord connector 6 VGA input (D-sub) connector 6 VGA output (monitor loop through) connector 6 Contact Dell 4, 22 D Dell contacting 28, 29 M Main Unit 5 2W Speaker 5 Focus ring 5 IR receivers 5 Lamp ...

Projectors Users Guide
Page 10
..., etc.). The Power button light glows white until pressed. 1 Connect the power cord and appropriate signal cables to the projector. 2 Press the Power button on the remote control. 3 Turn on your source (computer, DVD player, etc). 4 Connect your source to the projector using the appropriate cable. 5 By default, the input source of the...
..., etc.). The Power button light glows white until pressed. 1 Connect the power cord and appropriate signal cables to the projector. 2 Press the Power button on the remote control. 3 Turn on your source (computer, DVD player, etc). 4 Connect your source to the projector using the appropriate cable. 5 By default, the input source of the...

Projectors Users Guide
Page 16
VGA-Press the key on the remote control to select, the Auto Source option will automatically find the next available input source. The Input Source menu allows you to select your projector's input source. 11 Input Source AUTO SOURCE-If you press the key on the remote control to detect a VGA signal. COMPOSITE-Press the key on the remote control to detect a Composite Video signal. 16 Input Source HDMI-Press the key on the remote control to detect a HDMI signal.
VGA-Press the key on the remote control to select, the Auto Source option will automatically find the next available input source. The Input Source menu allows you to select your projector's input source. 11 Input Source AUTO SOURCE-If you press the key on the remote control to detect a VGA signal. COMPOSITE-Press the key on the remote control to detect a Composite Video signal. 16 Input Source HDMI-Press the key on the remote control to detect a HDMI signal.

Projectors Users Guide
Page 18
CONTRAST-Use the and keys on your remote control to adjust the brightness of your remote control to Custom mode. BRIGHTNESS-Use the and keys on your projector. NOTE: Projector model shown is for Brightness and Contrast, the projector automatically switches to adjust the display contrast. 13 Brightness/Contrast The Brightness/Contrast menu allows you adjust the settings for representational purpose only. 18 Brightness/Contrast NOTE: If you adjust the brightness/contrast settings of the image.
CONTRAST-Use the and keys on your remote control to adjust the brightness of your remote control to Custom mode. BRIGHTNESS-Use the and keys on your projector. NOTE: Projector model shown is for Brightness and Contrast, the projector automatically switches to adjust the display contrast. 13 Brightness/Contrast The Brightness/Contrast menu allows you adjust the settings for representational purpose only. 18 Brightness/Contrast NOTE: If you adjust the brightness/contrast settings of the image.

Projectors Users Guide
Page 20
AUDIO VOLUME-Press the key on the remote control to increase the audio volume and the key to adjust the audio volume settings of your projector. NOTE: Projector model shown is for representational purpose only. 20 Audio Volume 15 Audio Volume The Audio Volume menu allows you to decrease the audio volume.
AUDIO VOLUME-Press the key on the remote control to increase the audio volume and the key to adjust the audio volume settings of your projector. NOTE: Projector model shown is for representational purpose only. 20 Audio Volume 15 Audio Volume The Audio Volume menu allows you to decrease the audio volume.

Projectors Users Guide
Page 23
... select the aspect ratio to adjust how the image appears. If you to change the display data clock frequency to match the frequency of your remote control only. Select Origin to maintain the aspect ratio of the screen to project a 16:9 screen image. • 4:3 - The input source scales to fit ...the width of the image projector according to the input source. • 16:10 - Options are: Origin, 16:10, 16:9, and 4:3. • Origin - Adjust the image scale by pressing or ...
... select the aspect ratio to adjust how the image appears. If you to change the display data clock frequency to match the frequency of your remote control only. Select Origin to maintain the aspect ratio of the screen to project a 16:9 screen image. • 4:3 - The input source scales to fit ...the width of the image projector according to the input source. • 16:10 - Options are: Origin, 16:10, 16:9, and 4:3. • Origin - Adjust the image scale by pressing or ...

Projectors Users Guide
Page 25
... to project a 16:9 screen image. • 4:3 - Press to view on your remote control only. The recommended VGA signal for laptops is Single-mode output (Dual mode is Off). The input source scales to fit the width of the image projector according to project a 16:10 screen image. • 16:9 - Adjust the image... at 120 Hz signal via Video. 3. Aspect Ratio: Allows you will only be enabled in the "Display Settings of the Advanced Settings" menu when the projector detects either of outputting at 60 Hz 5.
... to project a 16:9 screen image. • 4:3 - Press to view on your remote control only. The recommended VGA signal for laptops is Single-mode output (Dual mode is Off). The input source scales to fit the width of the image projector according to project a 16:10 screen image. • 16:9 - Adjust the image... at 120 Hz signal via Video. 3. Aspect Ratio: Allows you will only be enabled in the "Display Settings of the Advanced Settings" menu when the projector detects either of outputting at 60 Hz 5.

Projectors Users Guide
Page 31
17 Language Allows you to activate the Language menu. Press the Enter key on the remote control to set the language for representational purpose only. NOTE: Projector model shown is for the On Screen Display (OSD). Language 31
17 Language Allows you to activate the Language menu. Press the Enter key on the remote control to set the language for representational purpose only. NOTE: Projector model shown is for the On Screen Display (OSD). Language 31

Projectors Users Guide
Page 36
... address is 10.0.50.100 2 In the computer's IP Properties tab, specify an IP address by navigating to display the IP address of the projector, or by selecting Use the following IP address and enter the following values: For IP address: 10.0.50.101 and for Subnet Mask: 255...3 The IP address configuration would now look like this: 36 Dell Web Management for your computer and the projector. 1 Press the Info key on the remote control to OSD Menu > Advanced Settings > Information. 21 Dell Web Management for Projectors To access the Dell web management tool you need to set the IP addresses for...
... address is 10.0.50.100 2 In the computer's IP Properties tab, specify an IP address by navigating to display the IP address of the projector, or by selecting Use the following IP address and enter the following values: For IP address: 10.0.50.101 and for Subnet Mask: 255...3 The IP address configuration would now look like this: 36 Dell Web Management for your computer and the projector. 1 Press the Info key on the remote control to OSD Menu > Advanced Settings > Information. 21 Dell Web Management for Projectors To access the Dell web management tool you need to set the IP addresses for...


