
Dell Users Guide
Page 12
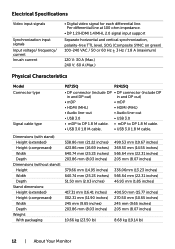
...07 inches) 8.68 kg (19.14 lb) 12 | About Your Monitor Per differential line at 100 ohm impedance. • DP 1.2/HDMI 1.4/MHL 2.0 signal input support Separate horizontal and vertical synchronization, polarity-free TTL level, SOG (Composite SYNC on green) 100-240 VAC / 50 or 60 Hz ± 3 Hz .../ 1.8 A (maximum) 120 V: 30 A (Max.) 240 V: 60 A (Max.) Physical Characteristics Model Connector type Signal cable type P2715Q P2415Q • DP connector (include DP • DP connector (include DP in and DP out) in and DP out) • mDP • mDP • HDMI...
...07 inches) 8.68 kg (19.14 lb) 12 | About Your Monitor Per differential line at 100 ohm impedance. • DP 1.2/HDMI 1.4/MHL 2.0 signal input support Separate horizontal and vertical synchronization, polarity-free TTL level, SOG (Composite SYNC on green) 100-240 VAC / 50 or 60 Hz ± 3 Hz .../ 1.8 A (maximum) 120 V: 30 A (Max.) 240 V: 60 A (Max.) Physical Characteristics Model Connector type Signal cable type P2715Q P2415Q • DP connector (include DP • DP connector (include DP in and DP out) in and DP out) • mDP • mDP • HDMI...

Dell Users Guide
Page 14
... only be achieved by disconnecting the power adapter from the keyboard, mouse, or other input devices, the monitor automatically resumes functioning. If the computer detects input from the monitor. **Maximum power consumption with maximum luminance. Inactive Off - - P2715Q VESA Modes Normal operation Active-off mode Switch off Horizontal Vertical Video Power Indicator Sync...
... only be achieved by disconnecting the power adapter from the keyboard, mouse, or other input devices, the monitor automatically resumes functioning. If the computer detects input from the monitor. **Maximum power consumption with maximum luminance. Inactive Off - - P2715Q VESA Modes Normal operation Active-off mode Switch off Horizontal Vertical Video Power Indicator Sync...

Dell Users Guide
Page 25
3 Turn on the monitor and the MHL source device. 4 Select input source on monitor to HDMI (MHL) by using OSD menu (see Using the On-Screen Display (OSD) Menu for details). 5 If the monitor does not display an image, see Mobile High-Definition Link (MHL) Specific Problems. Organizing Your Cables After attaching all necessary cables to your monitor and computer, (see Connecting Your Monitor for cable attachment) organize all cables as shown above. Setting Up the Monitor | 25
3 Turn on the monitor and the MHL source device. 4 Select input source on monitor to HDMI (MHL) by using OSD menu (see Using the On-Screen Display (OSD) Menu for details). 5 If the monitor does not display an image, see Mobile High-Definition Link (MHL) Specific Problems. Organizing Your Cables After attaching all necessary cables to your monitor and computer, (see Connecting Your Monitor for cable attachment) organize all cables as shown above. Setting Up the Monitor | 25

Dell Users Guide
Page 29
.... 2 Use the OK button to confirm your selection. Shortcut key: Preset Modes 2 Use this button to choose from a list of preset color modes. Shortcut key: Input Source 3 Use this button to go back to the previous menu. Menu See Accessing the Menu System. 4 Use this menu button to launch the on... select the OSD menu. The following table describes the front panel buttons: Front‑Panel Button 1 Description Use this button to choose from a list of Input Source.
.... 2 Use the OK button to confirm your selection. Shortcut key: Preset Modes 2 Use this button to choose from a list of preset color modes. Shortcut key: Input Source 3 Use this button to go back to the previous menu. Menu See Accessing the Menu System. 4 Use this menu button to launch the on... select the OSD menu. The following table describes the front panel buttons: Front‑Panel Button 1 Description Use this button to choose from a list of Input Source.

Dell Users Guide
Page 31
.... Use to select the DP input source. NOTE: Manual adjustment of the backlight (minimum 0; Contrast adjusts the difference between 0 and 100). Use to select the mDP input source. Press the button to increase brightness. DP mDP Select DP input when you are be connected to... select between different video inputs that are using the DP (DisplayPort) connector. Brightness Contrast Input Source Brightness adjusts the luminance of Brightness...
.... Use to select the DP input source. NOTE: Manual adjustment of the backlight (minimum 0; Contrast adjusts the difference between 0 and 100). Use to select the mDP input source. Press the button to increase brightness. DP mDP Select DP input when you are be connected to... select between different video inputs that are using the DP (DisplayPort) connector. Brightness Contrast Input Source Brightness adjusts the luminance of Brightness...

Dell Users Guide
Page 32
Use to adjust the color setting mode. Use the Color menu to select the HDMI (MHL) input source. YPbPr: Select this option if your DVD player supports only YPbPr output. 32 | Operating the Monitor Input Color Format Allows you are using the MHL cable. Icon Menu and Submenus HDMI (MHL) Color Description Select the HDMI (MHL) input when you to set the video input mode to: RGB: Select this option if your monitor is connected to a computer (or DVD player) using the HDMI, mDP-DP cable or MHL devices using the HDMI connector.
Use to adjust the color setting mode. Use the Color menu to select the HDMI (MHL) input source. YPbPr: Select this option if your DVD player supports only YPbPr output. 32 | Operating the Monitor Input Color Format Allows you are using the MHL cable. Icon Menu and Submenus HDMI (MHL) Color Description Select the HDMI (MHL) input when you to set the video input mode to: RGB: Select this option if your monitor is connected to a computer (or DVD player) using the HDMI, mDP-DP cable or MHL devices using the HDMI connector.
Dell Users Guide
Page 33
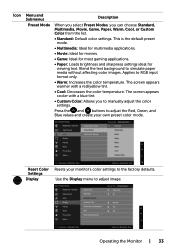
... the color temperature. Applies to manually adjust the color settings. Icon Menu and Submenus Preset Mode Description When you select Preset Modes, you to RGB input format only. • Warm: Increases the color temperature. Blend the text background to adjust image. Use the Display menu to simulate paper media without affecting...
... the color temperature. Applies to manually adjust the color settings. Icon Menu and Submenus Preset Mode Description When you select Preset Modes, you to RGB input format only. • Warm: Increases the color temperature. Blend the text background to adjust image. Use the Display menu to simulate paper media without affecting...

Dell Users Guide
Page 36
... function - Icon Menu and Submenus Lock Reset Menu Settings Personalize Description Controls user access to factory defaults. Select from Preset Modes, Brightness/Contrast, Auto Adjust, Input Source, Aspect Ratio, or Rotation and set as shortcut key. All buttons are allowed. Either soft lock (through OSD menu) or hard lock (Press and...
... function - Icon Menu and Submenus Lock Reset Menu Settings Personalize Description Controls user access to factory defaults. Select from Preset Modes, Brightness/Contrast, Auto Adjust, Input Source, Aspect Ratio, or Rotation and set as shortcut key. All buttons are allowed. Either soft lock (through OSD menu) or hard lock (Press and...

Dell Users Guide
Page 39
You will appear depending on the selected input: Operating the Monitor | 39 This means that the monitor cannot synchronize with the signal that it is disabled: When the monitor enters the Power Save ...
You will appear depending on the selected input: Operating the Monitor | 39 This means that the monitor cannot synchronize with the signal that it is disabled: When the monitor enters the Power Save ...

Dell Users Guide
Page 40
If either DP, mDP or HDMI (MHL) input is selected and the corresponding cable is not connected, a floating dialog box as shown below appears. or or See Troubleshooting for more information. 40 | Operating the Monitor
If either DP, mDP or HDMI (MHL) input is selected and the corresponding cable is not connected, a floating dialog box as shown below appears. or or See Troubleshooting for more information. 40 | Operating the Monitor

Dell Users Guide
Page 43
... all digital and the analog cables from the back of the dialogs shown below will continuously scroll through the screen. Also, depending upon the selected input, one of the computer. The floating dialog box should appear on the monitor. or Troubleshooting | 43 While in this section, follow the Safety Instructions. If...
... all digital and the analog cables from the back of the dialogs shown below will continuously scroll through the screen. Also, depending upon the selected input, one of the computer. The floating dialog box should appear on the monitor. or Troubleshooting | 43 While in this section, follow the Safety Instructions. If...
Dell Users Guide
Page 45
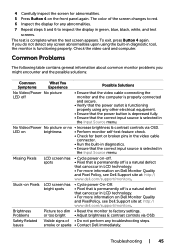
... Quality and PixelPolicy, see Dell Support site at : http:// www.dell.com/support/monitors. To exit, press Button 4 again. Brightness Problems Picture too dim • Reset the monitor to inspect the display in the Input Source menu. 4 Carefully inspect the screen for abnormalities. 5 Press Button 4 on ...you do not detect any other electrical equipment. • Ensure that the power button is depressed fully. • Ensure that the correct input source is selected in LCD technology. • For more information on -off. • Pixel that is permanently off • Ensure that...
... Quality and PixelPolicy, see Dell Support site at : http:// www.dell.com/support/monitors. To exit, press Button 4 again. Brightness Problems Picture too dim • Reset the monitor to inspect the display in the Input Source menu. 4 Carefully inspect the screen for abnormalities. 5 Press Button 4 on ...you do not detect any other electrical equipment. • Ensure that the power button is depressed fully. • Ensure that the correct input source is selected in LCD technology. • For more information on -off. • Pixel that is permanently off • Ensure that...

Dell Users Guide
Page 46
... the • Alternatively, use (for bent or broken pins in use a dynamically changing screen screensaver. 46 | Troubleshooting Color in Color menu OSD. • Change the Input Color Format to determine if the intermittent problem occurs in self-test mode. Common Symptoms Intermittent Problems Missing Color Wrong Color Image retention from the...
... the • Alternatively, use (for bent or broken pins in use a dynamically changing screen screensaver. 46 | Troubleshooting Color in Color menu OSD. • Change the Input Color Format to determine if the intermittent problem occurs in self-test mode. Common Symptoms Intermittent Problems Missing Color Wrong Color Image retention from the...
Dell Users Guide
Page 47
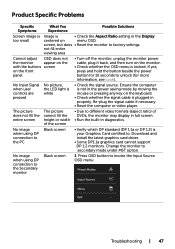
If yes, press and hold the button beside the power button for 10 seconds to secondary mode under MST option. No Input Signal when user controls are pressed No picture, the LED light is locked. Download and install the latest graphics card driver. • Some DP1...DP connection to the PC Black screen • Verify which DP standard (DP 1.1a or DP 1.2) is your Graphics Card certified to invoke the Input Source OSD menu Troubleshooting | 47 Product Specific Problems Specific Symptoms What You Experience Possible Solutions Screen image is too small Image is • Check the...
If yes, press and hold the button beside the power button for 10 seconds to secondary mode under MST option. No Input Signal when user controls are pressed No picture, the LED light is locked. Download and install the latest graphics card driver. • Some DP1...DP connection to the PC Black screen • Verify which DP standard (DP 1.1a or DP 1.2) is your Graphics Card certified to invoke the Input Source OSD menu Troubleshooting | 47 Product Specific Problems Specific Symptoms What You Experience Possible Solutions Screen image is too small Image is • Check the...

Dell Users Guide
Page 48
... your MHL device is turned on. • Check your MHL device is not in standby mode. • Check physical MHL cable connection is corresponding to input source selected on OSD Menu: HDMI (MHL). • Wait for the purpose of the computer may vary. Specific Symptoms What You Experience 2 Use the "mDP...
... your MHL device is turned on. • Check your MHL device is not in standby mode. • Check physical MHL cable connection is corresponding to input source selected on OSD Menu: HDMI (MHL). • Wait for the purpose of the computer may vary. Specific Symptoms What You Experience 2 Use the "mDP...


