

Dell Users Guide
Page 3
... 6 Identifying Parts and Controls 7 Monitor Specifications 10 Plug-and-Play 21 LCD Monitor Quality and Pixel Policy 21 Setting Up the Monitor 22 Attaching the Stand 22 Connecting Your Monitor 22 Organizing Your Cables 25 Attaching the Cable Cover 26 Removing the Monitor Stand 26 Removing the Cable Cover 27 Wall Mounting (Optional 27 Operating the Monitor 28 Turning on the Monitor 28 Using the Front Panel Controls 28 Using the On-Screen Display (OSD) Menu 30 Using the Tilt, Swivel, and Vertical Extension 41 Adjusting the Rotation Display Settings of...
... 6 Identifying Parts and Controls 7 Monitor Specifications 10 Plug-and-Play 21 LCD Monitor Quality and Pixel Policy 21 Setting Up the Monitor 22 Attaching the Stand 22 Connecting Your Monitor 22 Organizing Your Cables 25 Attaching the Cable Cover 26 Removing the Monitor Stand 26 Removing the Cable Cover 27 Wall Mounting (Optional 27 Operating the Monitor 28 Turning on the Monitor 28 Using the Front Panel Controls 28 Using the On-Screen Display (OSD) Menu 30 Using the Tilt, Swivel, and Vertical Extension 41 Adjusting the Rotation Display Settings of...
Dell Users Guide
Page 6
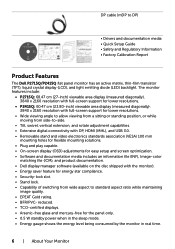
...; TCO-certified displays. • Arsenic-free glass and mercury-free for energy star compliance. • Security-lock slot. • Stand lock. • Capability of switching from wide aspect to DP) • Drivers and documentation media • Quick Setup Guide • Safety and Regulatory Information • Factory Calibration Report Product Features The Dell P2715Q/P2415Q flat panel monitor has an active matrix, thin-film transistor (TFT), liquid crystal display (LCD), and light emitting diode (LED) backlight.
...; TCO-certified displays. • Arsenic-free glass and mercury-free for energy star compliance. • Security-lock slot. • Stand lock. • Capability of switching from wide aspect to DP) • Drivers and documentation media • Quick Setup Guide • Safety and Regulatory Information • Factory Calibration Report Product Features The Dell P2715Q/P2415Q flat panel monitor has an active matrix, thin-film transistor (TFT), liquid crystal display (LCD), and light emitting diode (LED) backlight.

Dell Users Guide
Page 8
... mm - Release stand from monitor. Refer to this label if you need to contact Dell for technical support. NOTE: P2415Q have service tag printing for technical support. Use to contact Dell for EMEA only. Secures monitor with security lock (sold separately). behind attached VESA cover) 2 Regulatory label 3 Stand-release button 4 Security-lock slot 5 Service Tag label (P2715Q only) 6 Barcode, serial number label 7 Dell soundbar mounting slots 8 Cable-management slot Use Wall mount monitor using VESA‑compatible wall mount kit (100 mm...
... mm - Release stand from monitor. Refer to this label if you need to contact Dell for technical support. NOTE: P2415Q have service tag printing for technical support. Use to contact Dell for EMEA only. Secures monitor with security lock (sold separately). behind attached VESA cover) 2 Regulatory label 3 Stand-release button 4 Security-lock slot 5 Service Tag label (P2715Q only) 6 Barcode, serial number label 7 Dell soundbar mounting slots 8 Cable-management slot Use Wall mount monitor using VESA‑compatible wall mount kit (100 mm...
Dell Users Guide
Page 9
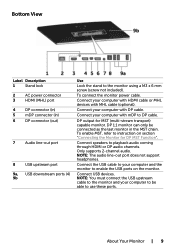
... support headphones. Connect USB devices. About Your Monitor | 9 Connect the USB cable to your computer and the monitor to instruction on the monitor. Connect speakers to the monitor using a M3 x 6 mm screw (screw not included). Connect your computer with HDMI cable or MHL devices with mDP to use these ports. Connect your computer to be connected as the last monitor in ) 6 DP connector (out) 7 Audio line-out port 8 USB upstream port 9a, USB downstream ports (4) 9b Use Lock the stand to playback audio coming through HDMI...
... support headphones. Connect USB devices. About Your Monitor | 9 Connect the USB cable to your computer and the monitor to instruction on the monitor. Connect speakers to the monitor using a M3 x 6 mm screw (screw not included). Connect your computer with HDMI cable or MHL devices with mDP to use these ports. Connect your computer to be connected as the last monitor in ) 6 DP connector (out) 7 Audio line-out port 8 USB upstream port 9a, USB downstream ports (4) 9b Use Lock the stand to playback audio coming through HDMI...

Dell Users Guide
Page 10
..., 1080p , QHD, UHD 10 | About Your Monitor Monitor Specifications Flat Panel Specifications Model P2715Q P2415Q Screen type Active matrix - P2415Q: Color gamut (typical) is based on CIE1976 (102.28%) and CIE1931 (82.09%) test standards. Resolution Specifications Horizontal scan range Vertical scan range Maximum preset resolution Video display capabilities (DP & HDMI & MHL playback) 31 kHz to 140 kHz (automatic) 29 Hz to 1 (mega dynamic contrast on) contrast on) Faceplate coating Anti-glare treatment...
..., 1080p , QHD, UHD 10 | About Your Monitor Monitor Specifications Flat Panel Specifications Model P2715Q P2415Q Screen type Active matrix - P2415Q: Color gamut (typical) is based on CIE1976 (102.28%) and CIE1931 (82.09%) test standards. Resolution Specifications Horizontal scan range Vertical scan range Maximum preset resolution Video display capabilities (DP & HDMI & MHL playback) 31 kHz to 140 kHz (automatic) 29 Hz to 1 (mega dynamic contrast on) contrast on) Faceplate coating Anti-glare treatment...

Dell Users Guide
Page 14
... video card or software installed in your PC, the monitor can only be achieved by disconnecting the power adapter from the keyboard, mouse, or other input devices, the monitor automatically resumes functioning. NOTE: This monitor is displayed: *Zero power consumption in OFF mode can automatically reduce its power consumption when not in use. White (blinking slowly) Off Power Consumption 95 W (maximum)** 50 W (typical) Less than 0.5 W Less than 0.5 W The OSD...
... video card or software installed in your PC, the monitor can only be achieved by disconnecting the power adapter from the keyboard, mouse, or other input devices, the monitor automatically resumes functioning. NOTE: This monitor is displayed: *Zero power consumption in OFF mode can automatically reduce its power consumption when not in use. White (blinking slowly) Off Power Consumption 95 W (maximum)** 50 W (typical) Less than 0.5 W Less than 0.5 W The OSD...

Dell Users Guide
Page 22
... the default stand. To attach the monitor stand: 1 Place the monitor on a flat surface. 2 Insert the two tabs on the back of a flat, clean, and soft surface to set it up. CAUTION: Place monitor of the monitor. 3 Press the stand down till it snaps into place. To connect your monitor to the computer: 1 Turn off your computer and disconnect the power cable. 2 Connect the mDP-DP/HDMI/USB cable from your monitor...
... the default stand. To attach the monitor stand: 1 Place the monitor on a flat surface. 2 Insert the two tabs on the back of a flat, clean, and soft surface to set it up. CAUTION: Place monitor of the monitor. 3 Press the stand down till it snaps into place. To connect your monitor to the computer: 1 Turn off your computer and disconnect the power cable. 2 Connect the mDP-DP/HDMI/USB cable from your monitor...

Dell Users Guide
Page 32
Use the Color menu to select the HDMI (MHL) input source. YPbPr: Select this option if your DVD player supports only YPbPr output. 32 | Operating the Monitor Use to adjust the color setting mode. Icon Menu and Submenus HDMI (MHL) Color Description Select the HDMI (MHL) input when you to set the video input mode to: RGB: Select this option if your monitor is connected to a computer (or DVD player) using the HDMI, mDP-DP cable or MHL devices using the HDMI connector. Input Color Format Allows you are using the MHL cable.
Use the Color menu to select the HDMI (MHL) input source. YPbPr: Select this option if your DVD player supports only YPbPr output. 32 | Operating the Monitor Use to adjust the color setting mode. Icon Menu and Submenus HDMI (MHL) Color Description Select the HDMI (MHL) input when you to set the video input mode to: RGB: Select this option if your monitor is connected to a computer (or DVD player) using the HDMI, mDP-DP cable or MHL devices using the HDMI connector. Input Color Format Allows you are using the MHL cable.
Dell Users Guide
Page 33
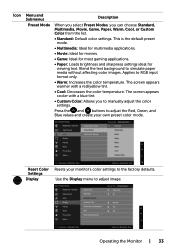
.... • Standard: Default color settings. Press the and buttons to adjust the Red, Green, and Blue values and create your monitor's color settings to the factory defaults. Applies to simulate paper media without affecting color images. Icon Menu and Submenus Preset Mode Description When you select Preset Modes, you to manually adjust the color settings. The screen appears cooler with a red/yellow tint. • Cool: Decreases the color temperature. This is the default preset mode. • Multimedia...
.... • Standard: Default color settings. Press the and buttons to adjust the Red, Green, and Blue values and create your monitor's color settings to the factory defaults. Applies to simulate paper media without affecting color images. Icon Menu and Submenus Preset Mode Description When you select Preset Modes, you to manually adjust the color settings. The screen appears cooler with a red/yellow tint. • Cool: Decreases the color temperature. This is the default preset mode. • Multimedia...

Dell Users Guide
Page 34
... Select screen brightness and color uniformity compensation Compensation settings. Calibrated is factory calibrated setting by default. Push the button to Wide 16:9, 4:3, or 1:1. Uniformity Compensation adjusts different areas of contrast to save energy. MST "Off": Default mode - 4k2k 60Hz with MST (DP out) enabled. Button LED 34 | Operating the Monitor Sharpness Makes the image look sharper or softer. "Primary": Set as secondary mode at 4K2K 30Hz with MST function Disabled. NOTE: Dynamic Contrast provides higher contrast...
... Select screen brightness and color uniformity compensation Compensation settings. Calibrated is factory calibrated setting by default. Push the button to Wide 16:9, 4:3, or 1:1. Uniformity Compensation adjusts different areas of contrast to save energy. MST "Off": Default mode - 4k2k 60Hz with MST (DP out) enabled. Button LED 34 | Operating the Monitor Sharpness Makes the image look sharper or softer. "Primary": Set as secondary mode at 4K2K 30Hz with MST function Disabled. NOTE: Dynamic Contrast provides higher contrast...

Dell Users Guide
Page 36
... lock (through OSD menu) or hard lock (Press and hold the button above power button for 10 sec) Restore the menu settings to factory defaults. Reset Restores shortcut keys to adjustments. Personalization 36 | Operating the Monitor Only hard unlock (Press and hold the button above power button for 10 sec) Unlock function - When Lock is selected, no user adjustments are locked. Select from Preset Modes, Brightness/Contrast, Auto Adjust, Input Source, Aspect Ratio, or Rotation and set as shortcut key. NOTE: Lock...
... lock (through OSD menu) or hard lock (Press and hold the button above power button for 10 sec) Restore the menu settings to factory defaults. Reset Restores shortcut keys to adjustments. Personalization 36 | Operating the Monitor Only hard unlock (Press and hold the button above power button for 10 sec) Unlock function - When Lock is selected, no user adjustments are locked. Select from Preset Modes, Brightness/Contrast, Auto Adjust, Input Source, Aspect Ratio, or Rotation and set as shortcut key. NOTE: Lock...

Dell Users Guide
Page 37
... feature for best user experience and optimum performance of image retention. Operating the Monitor | 37 LCD Helps reduce minor cases of your computer. Depending on Conditioning the degree of image retention, the program may take some time to turn off this feature. Select Disable to run. Icon Menu and Submenus Other Description DDC/CI Select this option to start the process...
... feature for best user experience and optimum performance of image retention. Operating the Monitor | 37 LCD Helps reduce minor cases of your computer. Depending on Conditioning the degree of image retention, the program may take some time to turn off this feature. Select Disable to run. Icon Menu and Submenus Other Description DDC/CI Select this option to start the process...
Dell Users Guide
Page 42
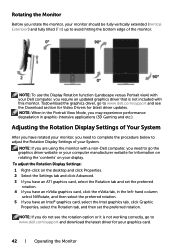
... not working correctly, go to www.dell.com/support and see the rotation option or it is not included with this monitor. Rotating the Monitor Before you need to go the graphics driver website or your display. Adjusting the Rotation Display Settings of Your System After you have rotated your monitor, you rotate the monitor, your monitor should be fully vertically extended (Vertical Extension) and fully tilted (Tilt...
... not working correctly, go to www.dell.com/support and see the rotation option or it is not included with this monitor. Rotating the Monitor Before you need to go the graphics driver website or your display. Adjusting the Rotation Display Settings of Your System After you have rotated your monitor, you rotate the monitor, your monitor should be fully vertically extended (Vertical Extension) and fully tilted (Tilt...

Dell Users Guide
Page 43
... proper Self-Test operation, remove all digital and the analog cables from the back of the computer. Also, depending upon the selected input, one of computer. 3 Turn on -screen (against a black background), if the monitor cannot sense a video signal and is functioning properly. or Troubleshooting | 43 If your monitor and computer are properly connected but the monitor screen remains dark, run the monitor self-test by performing...
... proper Self-Test operation, remove all digital and the analog cables from the back of the computer. Also, depending upon the selected input, one of computer. 3 Turn on -screen (against a black background), if the monitor cannot sense a video signal and is functioning properly. or Troubleshooting | 43 If your monitor and computer are properly connected but the monitor screen remains dark, run the monitor self-test by performing...

Dell Users Guide
Page 44
... built-in diagnostics: 1 Make sure that helps you determine if the screen abnormality you use the previous procedure, check your video controller and computer, because your monitor is clean (no dust particles on the surface of the screen). 2 Unplug the video cable(s) from the back of the computer or monitor. Built-in Diagnostics Your monitor has a built-in self-test mode. To run the built...
... built-in diagnostics: 1 Make sure that helps you determine if the screen abnormality you use the previous procedure, check your video controller and computer, because your monitor is clean (no dust particles on the surface of the screen). 2 Unplug the video cable(s) from the back of the computer or monitor. Built-in Diagnostics Your monitor has a built-in self-test mode. To run the built...
Dell Users Guide
Page 45
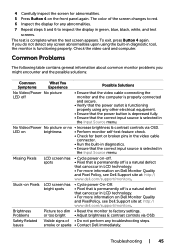
... video cable connector. • Run the built-in diagnostics. • Ensure that canoccur in the Input Source menu. Troubleshooting | 45 Brightness Problems Picture too dim • Reset the monitor to inspect the display in diagnostic tool, the monitor is complete when the text screen appears. The test is functioning properly. No Video/Power No picture or no • Increase brightness & contrast controls via OSD. To exit, press Button 4 again. or too bright • Adjust brightness & contrast controls via OSD...
... video cable connector. • Run the built-in diagnostics. • Ensure that canoccur in the Input Source menu. Troubleshooting | 45 Brightness Problems Picture too dim • Reset the monitor to inspect the display in diagnostic tool, the monitor is complete when the text screen appears. The test is functioning properly. No Video/Power No picture or no • Increase brightness & contrast controls via OSD. To exit, press Button 4 again. or too bright • Adjust brightness & contrast controls via OSD...

Dell Users Guide
Page 46
... • Alternatively, use (for more image displayed information, see Power Management Modes). Common Symptoms Intermittent Problems Missing Color Wrong Color Image retention from the static the monitor at all times when not in use a dynamically changing screen screensaver. 46 | Troubleshooting Picture missing color • Perform monitor self-test. • Ensure that the video cable connecting the malfunctions on monitor to PC RGB or YPbPr in the Color menu OSD. • Run the built-in the video cable connector.
... • Alternatively, use (for more image displayed information, see Power Management Modes). Common Symptoms Intermittent Problems Missing Color Wrong Color Image retention from the static the monitor at all times when not in use a dynamically changing screen screensaver. 46 | Troubleshooting Picture missing color • Perform monitor self-test. • Ensure that the video cable connecting the malfunctions on monitor to PC RGB or YPbPr in the Color menu OSD. • Run the built-in the video cable connector.
Dell Users Guide
Page 47
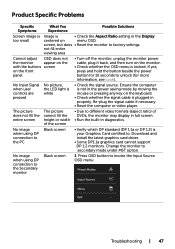
... monitor. • Check whether the OSD menu is locked. Download and install the latest graphics card driver. • Some DP1.1a graphics card cannot support DP 1.2 monitors. Change the monitor to factory settings. screen, but does • Reset the monitor to secondary mode under MST option. Ensure the computer is not in the power saving mode by moving the mouse or pressing any key on the keyboard. • Check whether the signal cable is white • Check the signal source...
... monitor. • Check whether the OSD menu is locked. Download and install the latest graphics card driver. • Some DP1.1a graphics card cannot support DP 1.2 monitors. Change the monitor to factory settings. screen, but does • Reset the monitor to secondary mode under MST option. Ensure the computer is not in the power saving mode by moving the mouse or pressing any key on the keyboard. • Check whether the signal cable is white • Check the signal source...
Dell Users Guide
Page 50
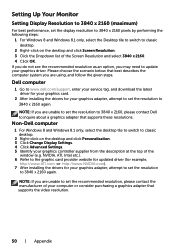
... the desktop and click Personalization. 3 Click Change Display Settings. 4 Click Advanced Settings. 5 Identify your graphics driver. NOTE: If you may need to 3840 x 2160 again. Setting Up Your Monitor Setting Display Resolution to 3840 x 2160 (maximum) For best performance, set the display resolution to 3840 x 2160 pixels by performing the following steps: 1 For Windows 8 and Windows 8.1 only, select the Desktop tile to switch to inquire about a graphics adapter that supports these resolutions.
... the desktop and click Personalization. 3 Click Change Display Settings. 4 Click Advanced Settings. 5 Identify your graphics driver. NOTE: If you may need to 3840 x 2160 again. Setting Up Your Monitor Setting Display Resolution to 3840 x 2160 (maximum) For best performance, set the display resolution to 3840 x 2160 pixels by performing the following steps: 1 For Windows 8 and Windows 8.1 only, select the Desktop tile to switch to inquire about a graphics adapter that supports these resolutions.

Dell Dell Display Manager Users Guide
Page 7
..., are not supported and will be the same on each connected monitor, or it automatically. In addition an option can vary from the desktop, Windows Start Menu, or elsewhere, and drop it onto the current list. Applications present in full-screen mode. Assigning Preset Modes to associate a specific preset mode with a different Preset Mode. Assigning Preset Modes to Applications The Auto Mode tab allows you...
..., are not supported and will be the same on each connected monitor, or it automatically. In addition an option can vary from the desktop, Windows Start Menu, or elsewhere, and drop it onto the current list. Applications present in full-screen mode. Assigning Preset Modes to associate a specific preset mode with a different Preset Mode. Assigning Preset Modes to Applications The Auto Mode tab allows you...


