P2314T/P2714T Monitor Users Guide
Page 3
Contents About Your Monitor 5 Package Contents 5 Features 6 Parts and Controls 7 Specifications 9 Plug-and-Play 17 LCD Monitor Quality and Pixel Policy 17 Maintenance Guidelines 17 Setting Up the Monitor 18 Preparing the Stand 18 Connecting Your Monitor 18 Organizing Cables 20 Wall Mounting (Optional 20 Operating the Monitor 21 Side‑Panel Controls 21 Front‑Panel Button 22 Using the On-Screen Display (OSD) Menu 23 Setting the Maximum Resolution 34 Tilt 34 3
Contents About Your Monitor 5 Package Contents 5 Features 6 Parts and Controls 7 Specifications 9 Plug-and-Play 17 LCD Monitor Quality and Pixel Policy 17 Maintenance Guidelines 17 Setting Up the Monitor 18 Preparing the Stand 18 Connecting Your Monitor 18 Organizing Cables 20 Wall Mounting (Optional 20 Operating the Monitor 21 Side‑Panel Controls 21 Front‑Panel Button 22 Using the On-Screen Display (OSD) Menu 23 Setting the Maximum Resolution 34 Tilt 34 3

P2314T/P2714T Monitor Users Guide
Page 5
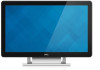
Some features or media may not ship with the components shown below. NOTE: Some items may be optional and may not be available in certain countries. About Your Monitor Package Contents Your monitor ships with your monitor. Monitor with any other stand, see the documentation for the stand. Make sure that you have received all the components and contact Dell if something is missing. NOTE: To set up with stand Power cable (varies by country) Power adapter HDMI cable USB 3.0 upstream cable (enables touch screen function on the monitor) About Your Monitor 5
Some features or media may not ship with the components shown below. NOTE: Some items may be optional and may not be available in certain countries. About Your Monitor Package Contents Your monitor ships with your monitor. Monitor with any other stand, see the documentation for the stand. Make sure that you have received all the components and contact Dell if something is missing. NOTE: To set up with stand Power cable (varies by country) Power adapter HDMI cable USB 3.0 upstream cable (enables touch screen function on the monitor) About Your Monitor 5
P2314T/P2714T Monitor Users Guide
Page 6
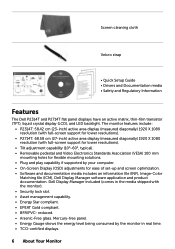
...; Safety and Regulatory Information Features The Dell P2314T and P2714T flat panel displays have an active matrix, thin-film transistor (TFT), liquid crystal display (LCD), and LED backlight. reduced. • Arsenic-Free glass. Dell Display Manager included (comes in real time. • TCO-certified displays. 6 About Your Monitor Mercury-free panel. • Energy Gauge...
...; Safety and Regulatory Information Features The Dell P2314T and P2714T flat panel displays have an active matrix, thin-film transistor (TFT), liquid crystal display (LCD), and LED backlight. reduced. • Arsenic-Free glass. Dell Display Manager included (comes in real time. • TCO-certified displays. 6 About Your Monitor Mercury-free panel. • Energy Gauge...
P2314T/P2714T Monitor Users Guide
Page 7
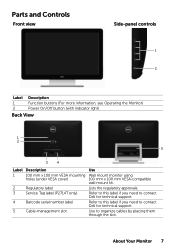
... Function buttons (For more information, see Operating the Monitor) Power On/Off button (with indicator light) Back View 1 2 5 34 Label 1 2 3 4 5 Description 100 mm x 100 mm VESA mounting holes (under VESA cover) Regulatory label Service Tag label (P2714T only) Barcode serial number label Cable-management slot Use... Wall mount monitor using 100 mm x 100 mm VESA‑compatible wall‑mount kit. Use to contact Dell for technical support. Refer to this label if...
... Function buttons (For more information, see Operating the Monitor) Power On/Off button (with indicator light) Back View 1 2 5 34 Label 1 2 3 4 5 Description 100 mm x 100 mm VESA mounting holes (under VESA cover) Regulatory label Service Tag label (P2714T only) Barcode serial number label Cable-management slot Use... Wall mount monitor using 100 mm x 100 mm VESA‑compatible wall‑mount kit. Use to contact Dell for technical support. Refer to this label if...

P2314T/P2714T Monitor Users Guide
Page 8
... or portable device with MHL cable (optional). Connect the DisplayPort cable. To connect your computer to the USB upstream port on the monitor. NOTE: The audio line-out port does not support headphones. You can only use this port after you connect the USB cable ... your USB device. Connect speakers to prevent unauthorized movement of your computer to the USB upstream port on the monitor. 8 About Your Monitor Only supports 2-channel audio. Use a security cable to playback audio coming through HDMI or DisplayPort audio channels. Bottom View 10 1 24 3 5 67 8 9 ...
... or portable device with MHL cable (optional). Connect the DisplayPort cable. To connect your computer to the USB upstream port on the monitor. NOTE: The audio line-out port does not support headphones. You can only use this port after you connect the USB cable ... your USB device. Connect speakers to prevent unauthorized movement of your computer to the USB upstream port on the monitor. 8 About Your Monitor Only supports 2-channel audio. Use a security cable to playback audio coming through HDMI or DisplayPort audio channels. Bottom View 10 1 24 3 5 67 8 9 ...

P2314T/P2714T Monitor Users Guide
Page 9
...;edge design, consider the placement of the display as the reflection of surrounding light and bright surfaces from the glass may cause disturbances. About Your Monitor 9 Specifications Panel Screen type Panel type Viewable image: Diagonal Horizontal (active area) Vertical (active area) Area Pixel pitch Viewing angle: Horizontal Vertical Luminance: Panel...
...;edge design, consider the placement of the display as the reflection of surrounding light and bright surfaces from the glass may cause disturbances. About Your Monitor 9 Specifications Panel Screen type Panel type Viewable image: Diagonal Horizontal (active area) Vertical (active area) Area Pixel pitch Viewing angle: Horizontal Vertical Luminance: Panel...
P2314T/P2714T Monitor Users Guide
Page 10
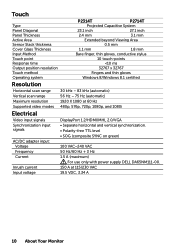
Touch Type Panel Diagonal Panel Thickness Active Area Sensor Stack thickness Cover Glass Thickness Input Method Touch point Response time Output position resolution Touch method Operating system P2314T P2714T Projected Capacitive System 23.1 inch 27.1 inch 2.4 mm 3.1 mm Extended beyond Viewing Area 0.5 mm 1.1 mm 1.8 mm Bare finger, thin gloves, conductive stylus 10 touch-points
Touch Type Panel Diagonal Panel Thickness Active Area Sensor Stack thickness Cover Glass Thickness Input Method Touch point Response time Output position resolution Touch method Operating system P2314T P2714T Projected Capacitive System 23.1 inch 27.1 inch 2.4 mm 3.1 mm Extended beyond Viewing Area 0.5 mm 1.1 mm 1.8 mm Bare finger, thin gloves, conductive stylus 10 touch-points

P2314T/P2714T Monitor Users Guide
Page 11
Environmental Characteristics Temperature: Operating Non-operating Humidity: Operating Non-operating Altitude Operating Non-operating Thermal dissipation: P2314T P2714T 0°C to 40°C (32°F to 104°F) -20°C to 60°C (-4°F to 140°F) 10% to 80% (non-condensing) 5% to 90% (....0 60.0 75.0 60.0 60.0 Pixel Clock (MHz) 28.3 25.2 31.5 40.0 49.5 65.0 78.8 108.0 108.0 135.0 108.0 148.5 Sync Polarity (Horizontal/ Vertical About Your Monitor 11
Environmental Characteristics Temperature: Operating Non-operating Humidity: Operating Non-operating Altitude Operating Non-operating Thermal dissipation: P2314T P2714T 0°C to 40°C (32°F to 104°F) -20°C to 60°C (-4°F to 140°F) 10% to 80% (non-condensing) 5% to 90% (....0 60.0 75.0 60.0 60.0 Pixel Clock (MHz) 28.3 25.2 31.5 40.0 49.5 65.0 78.8 108.0 108.0 135.0 108.0 148.5 Sync Polarity (Horizontal/ Vertical About Your Monitor 11

P2314T/P2714T Monitor Users Guide
Page 12
P2714T Display Mode 720 x 400 640 x 480 640 x 480 800 x 600 800 x 600 1024 x 768 1024 x 768 1152 x 864 1280 x 1024 1280 x 1024 1600 x 900 1920 X ... (3.19 inches) Dimensions (without stand) Height 348.10 mm (13.70 inches) Width 569.90 mm (22.44 inches) Depth 42.20 mm (1.66 inches) P2714T D-Sub DisplayPort HDMI(MHL) USB D-Sub HDMI MHL DisplayPort USB 3.0 246.50 mm (9.70 inches) 475.50 mm (18.72 inches) 665 mm (26.18... inches) 79.70 mm (3.14 inches) 410.70 mm (16.17 inches) 665 mm (26.18 inches) 44.30 mm (1.74 inches) 12 About Your Monitor
P2714T Display Mode 720 x 400 640 x 480 640 x 480 800 x 600 800 x 600 1024 x 768 1024 x 768 1152 x 864 1280 x 1024 1280 x 1024 1600 x 900 1920 X ... (3.19 inches) Dimensions (without stand) Height 348.10 mm (13.70 inches) Width 569.90 mm (22.44 inches) Depth 42.20 mm (1.66 inches) P2714T D-Sub DisplayPort HDMI(MHL) USB D-Sub HDMI MHL DisplayPort USB 3.0 246.50 mm (9.70 inches) 475.50 mm (18.72 inches) 665 mm (26.18... inches) 79.70 mm (3.14 inches) 410.70 mm (16.17 inches) 665 mm (26.18 inches) 44.30 mm (1.74 inches) 12 About Your Monitor

P2314T/P2714T Monitor Users Guide
Page 13
... lb) Power Management Modes If you have VESA's DPM compliant display card or software installed in your computer, the monitor can automatically reduce its power consumption when not in use. The monitor automatically resumes functioning when it computer detects input from keyboard, mouse, or other input devices. This is referred to as...
... lb) Power Management Modes If you have VESA's DPM compliant display card or software installed in your computer, the monitor can automatically reduce its power consumption when not in use. The monitor automatically resumes functioning when it computer detects input from keyboard, mouse, or other input devices. This is referred to as...

P2314T/P2714T Monitor Users Guide
Page 14
If you press any button in the normal operation mode. The OSD only function in Active‑off mode, the following message is displayed: Pin Assignments VGA Pin number 1 2 3 4 5 6 7 8 15-pin side of the cable Video-Red Video-Green Video-Blue GND Self-test GND-R GND-G GND-B Pin number 9 10 11 12 13 14 15 15-pin side of the cable Computer 5 V/3.3 V GND-sync GND DDC data H-sync V-sync DDC clock 14 About Your Monitor
If you press any button in the normal operation mode. The OSD only function in Active‑off mode, the following message is displayed: Pin Assignments VGA Pin number 1 2 3 4 5 6 7 8 15-pin side of the cable Video-Red Video-Green Video-Blue GND Self-test GND-R GND-G GND-B Pin number 9 10 11 12 13 14 15 15-pin side of the cable Computer 5 V/3.3 V GND-sync GND DDC data H-sync V-sync DDC clock 14 About Your Monitor

P2314T/P2714T Monitor Users Guide
Page 15
... the port 11 GND 12 ML3(n) 13 GND 14 GND 15 AUX(p) 16 GND 17 AUX(n) 18 HPD 19 DP_PWR Return 20 +3.3 V DP_PWR About Your Monitor 15
... the port 11 GND 12 ML3(n) 13 GND 14 GND 15 AUX(p) 16 GND 17 AUX(n) 18 HPD 19 DP_PWR Return 20 +3.3 V DP_PWR About Your Monitor 15

P2314T/P2714T Monitor Users Guide
Page 16
... 1 VBUS 2 D- 3 D+ 4 GND 5 StdA_SSRX- 6 StdA_SSRX+ 7 GND_DRAIN 8 StdA_SSTX- 9 StdA_SSTX+ Shell Shield Pin number 1 2 3 4 Signal name VCC DMD DPD GND 16 About Your Monitor If you information about the USB ports available on your monitor. left side NOTE: USB 3.0 functionality requires a USB 3.0 compatible computer. Your computer has the following USB ports: • One USB 3.0 upstream...
... 1 VBUS 2 D- 3 D+ 4 GND 5 StdA_SSRX- 6 StdA_SSRX+ 7 GND_DRAIN 8 StdA_SSTX- 9 StdA_SSTX+ Shell Shield Pin number 1 2 3 4 Signal name VCC DMD DPD GND 16 About Your Monitor If you information about the USB ports available on your monitor. left side NOTE: USB 3.0 functionality requires a USB 3.0 compatible computer. Your computer has the following USB ports: • One USB 3.0 upstream...

P2314T/P2714T Monitor Users Guide
Page 17
... any kind as some detergents leave a milky film on Dell Monitor Quality and Pixel Policy, see dell.com/support/monitors. For more information about changing the monitor settings, see and do not affect the display quality or usability. LCD Monitor Quality and Pixel Policy During the LCD Monitor manufacturing process, it off with a soft and clean cloth...
... any kind as some detergents leave a milky film on Dell Monitor Quality and Pixel Policy, see dell.com/support/monitors. For more information about changing the monitor settings, see and do not affect the display quality or usability. LCD Monitor Quality and Pixel Policy During the LCD Monitor manufacturing process, it off with a soft and clean cloth...

P2314T/P2714T Monitor Users Guide
Page 18
.... Connect the USB cable and only one of the following display cables to your monitor to the same computer. 18 Setting Up the Monitor To connect your computer: • VGA cable • DisplayPort cable • HDMI cable NOTE: Do not connect multiple display cables to the...disconnect the power cable from the factory. 1. Setting Up the Monitor Preparing the Stand NOTE: The stand is attached when the monitor is shipped from the wall outlet. 2. Place the monitor on a soft cloth or cushion. 2. Connecting Your Monitor WARNING: Follow the safety instructions before you perform any of ...
.... Connect the USB cable and only one of the following display cables to your monitor to the same computer. 18 Setting Up the Monitor To connect your computer: • VGA cable • DisplayPort cable • HDMI cable NOTE: Do not connect multiple display cables to the...disconnect the power cable from the factory. 1. Setting Up the Monitor Preparing the Stand NOTE: The stand is attached when the monitor is shipped from the wall outlet. 2. Place the monitor on a soft cloth or cushion. 2. Connecting Your Monitor WARNING: Follow the safety instructions before you perform any of ...

P2314T/P2714T Monitor Users Guide
Page 19
Appearance of the computer may vary. Setting Up the Monitor 19 Connecting the VGA cable (cable sold separately) Connecting the DisplayPort (or miniDP) cable (cable sold separately) Connecting the HDMI cable Connecting the USB cable NOTE: The graphics used are for illustration purpose only.
Appearance of the computer may vary. Setting Up the Monitor 19 Connecting the VGA cable (cable sold separately) Connecting the DisplayPort (or miniDP) cable (cable sold separately) Connecting the HDMI cable Connecting the USB cable NOTE: The graphics used are for illustration purpose only.

P2314T/P2714T Monitor Users Guide
Page 20
...;mounting kit. 1. Use a screwdriver to remove the four screws that came with minimum weight/load bearing capacity of 7.11 kg. 20 Setting Up the Monitor NOTE: For use the cablemanagement slot to organize the cables. Remove the stand. 3. Wall Mounting (Optional) NOTE: Use M4 x 10 mm screws to... mount your monitor and computer, use only with UL-listed wall‑mount bracket with the wall mounting kit. Attach the mounting bracket from the wall‑mounting ...
...;mounting kit. 1. Use a screwdriver to remove the four screws that came with minimum weight/load bearing capacity of 7.11 kg. 20 Setting Up the Monitor NOTE: For use the cablemanagement slot to organize the cables. Remove the stand. 3. Wall Mounting (Optional) NOTE: Use M4 x 10 mm screws to... mount your monitor and computer, use only with UL-listed wall‑mount bracket with the wall mounting kit. Attach the mounting bracket from the wall‑mounting ...

P2314T/P2714T Monitor Users Guide
Page 21
... image settings. Shortcut key: Preset Modes 2 Use this button to directly access the "Brightness/ Contrast" menu. Operating the Monitor Side‑Panel Controls Use the control buttons on the front of the settings that you can change. 1 2 3 4 5 The following table describes the front panel ...
... image settings. Shortcut key: Preset Modes 2 Use this button to directly access the "Brightness/ Contrast" menu. Operating the Monitor Side‑Panel Controls Use the control buttons on the front of the settings that you can change. 1 2 3 4 5 The following table describes the front panel ...

P2314T/P2714T Monitor Users Guide
Page 22
Power A blinking/breathing white light indicates DPMS (with power light indicator) power save mode. Back 22 Operating the Monitor OK 3 Use the Back key to go back to adjust the image settings. Button Description 1 Up Down Use the Up (increase) and Down (...to the previous menu. Front‑Panel Button 1 2 3 Use the buttons on and fully functional. Exit Use this button to turn the monitor turn-on or turnoff the monitor. 5 A solid white light on this button to go back to confirm your selection. Front‑panel button Description 4 Use this button ...
Power A blinking/breathing white light indicates DPMS (with power light indicator) power save mode. Back 22 Operating the Monitor OK 3 Use the Back key to go back to adjust the image settings. Button Description 1 Up Down Use the Up (increase) and Down (...to the previous menu. Front‑Panel Button 1 2 3 Use the buttons on and fully functional. Exit Use this button to turn the monitor turn-on or turnoff the monitor. 5 A solid white light on this button to go back to confirm your selection. Front‑panel button Description 4 Use this button ...

P2314T/P2714T Monitor Users Guide
Page 23
... menu. As you use the indicators on the menu, to make using the OSD menu are automatically saved if you move to disappear. 1. Operating the Monitor 23 Press the button to activate the highlighted option. 4. Press the button once to return to the main menu to select another option or press...
... menu. As you use the indicators on the menu, to make using the OSD menu are automatically saved if you move to disappear. 1. Operating the Monitor 23 Press the button to activate the highlighted option. 4. Press the button once to return to the main menu to select another option or press...


