
Users Guide
Page 3
... 8 Identifying parts and controls 9 Front view 9 Back view 10 Side view 11 Bottom view 12 Monitor specifications 13 Resolution specifications 14 Supported video modes 15 Preset display modes 15 MST Multi-Stream Transport (MST) Modes 16 Electrical specifications 16 Physical characteristics 17 Environmental characteristics 18 Power management modes 19 Plug and play capability 25 LCD monitor quality and pixel policy 25 Maintenance guidelines 25 Cleaning your monitor 25 Setting up the monitor 26 Attaching the stand 26 │...
... 8 Identifying parts and controls 9 Front view 9 Back view 10 Side view 11 Bottom view 12 Monitor specifications 13 Resolution specifications 14 Supported video modes 15 Preset display modes 15 MST Multi-Stream Transport (MST) Modes 16 Electrical specifications 16 Physical characteristics 17 Environmental characteristics 18 Power management modes 19 Plug and play capability 25 LCD monitor quality and pixel policy 25 Maintenance guidelines 25 Cleaning your monitor 25 Setting up the monitor 26 Attaching the stand 26 │...
Users Guide
Page 8
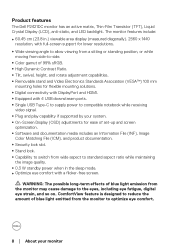
...;∞Stand lock. ∞∞Capability to switch from wide aspect to standard aspect ratio while maintaining the image quality. ∞∞0.3 W standby power when in .) viewable area display (measured diagonally). 2560 x 1440 resolution, with full-screen support for flexible mounting solutions. ∞∞Digital connectivity with DisplayPort and HDMI. ∞∞Equipped with 4 USB downstream ports. ∞∞Single USB Type-C to supply power to compatible notebook while receiving video signal...
...;∞Stand lock. ∞∞Capability to switch from wide aspect to standard aspect ratio while maintaining the image quality. ∞∞0.3 W standby power when in .) viewable area display (measured diagonally). 2560 x 1440 resolution, with full-screen support for flexible mounting solutions. ∞∞Digital connectivity with DisplayPort and HDMI. ∞∞Equipped with 4 USB downstream ports. ∞∞Single USB Type-C to supply power to compatible notebook while receiving video signal...
Users Guide
Page 10
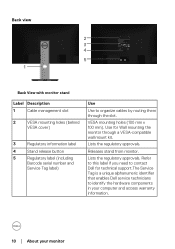
... Service Code: 123 456 789 0 S/N: CN-012345TV100-96N-001V -A00 Q40G024N-700-XXA Back View with monitor stand Label Description 1 Cable management slot 2 VESA mounting holes (behind VESA cover) 3 Regulatory information label 4 Stand release button 5 Regulatory label (including Barcode serial number and Service Tag label) Use Use to an earthed mains socket-outlet. Releases stand from monitor. Refer to this device must be connected to organize cables by routing them through a VESA-compatible wall mount...
... Service Code: 123 456 789 0 S/N: CN-012345TV100-96N-001V -A00 Q40G024N-700-XXA Back View with monitor stand Label Description 1 Cable management slot 2 VESA mounting holes (behind VESA cover) 3 Regulatory information label 4 Stand release button 5 Regulatory label (including Barcode serial number and Service Tag label) Use Use to an earthed mains socket-outlet. Releases stand from monitor. Refer to this device must be connected to organize cables by routing them through a VESA-compatible wall mount...

Users Guide
Page 12
... with HDMI cable. 5 DisplayPort (in the MST chain. DP 1.1 monitor can attach the monitor to instruction on section "Connecting the monitor for MST (multi-stream transport) capable monitor. To enable MST, refer to PC using a M3 x 6 mm screw (screw not included). 4 HDMI port Connect your computer with your monitor Power delivery of your monitor. 3 Stand lock feature To lock the stand to USB 3.1. Display resolution up to 2560 x 1440@60 Hz on versions of Windows...
... with HDMI cable. 5 DisplayPort (in the MST chain. DP 1.1 monitor can attach the monitor to instruction on section "Connecting the monitor for MST (multi-stream transport) capable monitor. To enable MST, refer to PC using a M3 x 6 mm screw (screw not included). 4 HDMI port Connect your computer with your monitor Power delivery of your monitor. 3 Stand lock feature To lock the stand to USB 3.1. Display resolution up to 2560 x 1440@60 Hz on versions of Windows...

Users Guide
Page 29
... supply power delivery of this feature, your PC Graphics Card must be used as USB Type-C or DisplayPort 1.2, alternatively. ∞∞Supports USB Power Delivery (PD), with PowerDelivery) 45 W Maximum charging power 45 W 65 W 65 W 90 W Not supported 130 W Not supported Setting up the monitor │ 29 NOTE: Supports the DP MST feature. NOTE: Remove the rubber plug when using DP out port. Connecting the USB Type-C cable USB Type-c USB Type-c The USB...
... supply power delivery of this feature, your PC Graphics Card must be used as USB Type-C or DisplayPort 1.2, alternatively. ∞∞Supports USB Power Delivery (PD), with PowerDelivery) 45 W Maximum charging power 45 W 65 W 65 W 90 W Not supported 130 W Not supported Setting up the monitor │ 29 NOTE: Supports the DP MST feature. NOTE: Remove the rubber plug when using DP out port. Connecting the USB Type-C cable USB Type-c USB Type-c The USB...

Users Guide
Page 39
... HDMI input source. Push to restore default Input Source. Select auto select to scan for Multiple Inputs USB Type-C Select the USB Type-C input when you to set Auto Select for USB-C to: USB-C ∞∞Prompt for Multiple Inputs: always show Switch to USB-C Video Input message for user to choose whether to switch or not. ∞∞Yes: The monitor always switch to USB-C video without asking while USB-C connected. Dell 24 Monitor Brightness / Contrast Input Source Color Display Menu Personalize Others Preset Modes Input Color Format Reset Color Standard RGB...
... HDMI input source. Push to restore default Input Source. Select auto select to scan for Multiple Inputs USB Type-C Select the USB Type-C input when you to set Auto Select for USB-C to: USB-C ∞∞Prompt for Multiple Inputs: always show Switch to USB-C Video Input message for user to choose whether to switch or not. ∞∞Yes: The monitor always switch to USB-C video without asking while USB-C connected. Dell 24 Monitor Brightness / Contrast Input Source Color Display Menu Personalize Others Preset Modes Input Color Format Reset Color Standard RGB...
Users Guide
Page 40
The screen appears warmer with a blue tint. ∞∞Custom Color: Allows you to manually adjust the color settings. 40 │ Operating your eyes. NOTE: To reduce the risk of eye strain and neck/ arm/back/shoulders pain from using the monitor for long periods of blue light emitted from the list. ∞∞Standard: Loads the monitor's default color settings. The screen appears cooler with a red/yellow...
The screen appears warmer with a blue tint. ∞∞Custom Color: Allows you to manually adjust the color settings. 40 │ Operating your eyes. NOTE: To reduce the risk of eye strain and neck/ arm/back/shoulders pain from using the monitor for long periods of blue light emitted from the list. ∞∞Standard: Loads the monitor's default color settings. The screen appears cooler with a red/yellow...

Users Guide
Page 41
.... Dell 24 Monitor Brightness / Contrast Input Source Color Display Menu Personalize Others Preset Modes Input Color Format Reset Color RGB YPbPr Hue This feature can shift the color of the video image to 100. NOTE: Hue adjustment is used to adjust the desired flesh tone color. Operating your DVD player supports only YPbPr output. Press the and buttons to increase the purple shade of the video image. Press to adjust the three colors (R, G, B) values and create your monitor is connected...
.... Dell 24 Monitor Brightness / Contrast Input Source Color Display Menu Personalize Others Preset Modes Input Color Format Reset Color RGB YPbPr Hue This feature can shift the color of the video image to 100. NOTE: Hue adjustment is used to adjust the desired flesh tone color. Operating your DVD player supports only YPbPr output. Press the and buttons to increase the purple shade of the video image. Press to adjust the three colors (R, G, B) values and create your monitor is connected...

Users Guide
Page 42
... Game mode. Dell 24 Monitor Brightness / Contrast Input Source Color Display Menu Personalize Others Aspect Ratio Sharpness Response Time MST USB-C Prioritization Reset Display Wide 16:9 50 Normal O 42 │ Operating your monitor color settings to the factory settings. Use the display to increase the monochrome appearance of the video image. Use or to adjust the saturation from 0 to increase the colorful appearance of the video image. Allows your monitor Press to 100. Saturation Reset Color Display This feature can adjust the color saturation...
... Game mode. Dell 24 Monitor Brightness / Contrast Input Source Color Display Menu Personalize Others Aspect Ratio Sharpness Response Time MST USB-C Prioritization Reset Display Wide 16:9 50 Normal O 42 │ Operating your monitor color settings to the factory settings. Use the display to increase the monochrome appearance of the video image. Use or to adjust the saturation from 0 to increase the colorful appearance of the video image. Allows your monitor Press to 100. Saturation Reset Color Display This feature can adjust the color saturation...

Users Guide
Page 44
.... 44 │ Operating your display rotation. Dell 24 Monitor Brightness / Contrast Input Source Color Display Menu Personalize Others Language Rotation Transparency Timer Lock Reset Menu English 20 20 s Disable Language Rotation Language options set the OSD display to your monitor You can select one of the following: Menu Buttons, Power Button, Menu + Power Buttons, Disable. (For more information, see Menu and Power button lock). Menu Select this option to change the menu transparency by 90 degrees counter-clockwise. User can adjust the menu according to one of the...
.... 44 │ Operating your display rotation. Dell 24 Monitor Brightness / Contrast Input Source Color Display Menu Personalize Others Language Rotation Transparency Timer Lock Reset Menu English 20 20 s Disable Language Rotation Language options set the OSD display to your monitor You can select one of the following: Menu Buttons, Power Button, Menu + Power Buttons, Disable. (For more information, see Menu and Power button lock). Menu Select this option to change the menu transparency by 90 degrees counter-clockwise. User can adjust the menu according to one of the...
Users Guide
Page 47
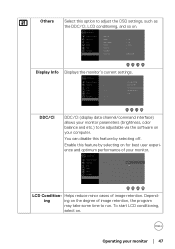
... start LCD conditioning, select on for best user experience and optimum performance of image retention. Dell 24 Monitor Brightness / Contrast Display Info Input Source DDC/CI On Color LCD Conditioning O Display Firmware Menu Service Tag Personalize Reset Others Others Factory Reset LCD Condition- Helps reduce minor cases of your monitor. Others Select this option to run. Dell 24 Monitor Brightness / Contrast Input Source Color Display Menu Personalize Others Display Info DDC/CI LCD Conditioning Firmware Service Tag Reset Others Factory Reset Model: Dell P2421DC...
... start LCD conditioning, select on for best user experience and optimum performance of image retention. Dell 24 Monitor Brightness / Contrast Display Info Input Source DDC/CI On Color LCD Conditioning O Display Firmware Menu Service Tag Personalize Reset Others Others Factory Reset LCD Condition- Helps reduce minor cases of your monitor. Others Select this option to run. Dell 24 Monitor Brightness / Contrast Input Source Color Display Menu Personalize Others Display Info DDC/CI LCD Conditioning Firmware Service Tag Reset Others Factory Reset Model: Dell P2421DC...

Users Guide
Page 49
Operating your monitor │ 49 Menu and Power button lock Controls user access to display the lock menu (when Menu and Power buttons unlocked), A lock menu appears and is shown on the bottom right corner of display screen. The default setting of Menu and Power buttons lock is Disable. 1 234 5 To enter the lock menu: Hold the Exit key (button 4) for 4 seconds to display the lock menu (when Menu and Power buttons locked), A unlock menu appears and is shown on the bottom right corner of display screen. Dell 24 Monitor Select Option...
Operating your monitor │ 49 Menu and Power button lock Controls user access to display the lock menu (when Menu and Power buttons unlocked), A lock menu appears and is shown on the bottom right corner of display screen. The default setting of Menu and Power buttons lock is Disable. 1 234 5 To enter the lock menu: Hold the Exit key (button 4) for 4 seconds to display the lock menu (when Menu and Power buttons locked), A unlock menu appears and is shown on the bottom right corner of display screen. Dell 24 Monitor Select Option...

Users Guide
Page 51
... the unlock icon buttons lock. Before the DDC/CI function is disabled, the following message is displayed: Dell 24 Monitor The current input timing is receiving from the computer. Yes No P2421DC When the monitor enters the Power Save Mode, the following messages will be disabled. When Menu and Power buttons is in lock state, hold the Exit key (button 4) for the Horizontal and Vertical frequency ranges addressable by the monitor display. Please change your monitor │...
... the unlock icon buttons lock. Before the DDC/CI function is disabled, the following message is displayed: Dell 24 Monitor The current input timing is receiving from the computer. Yes No P2421DC When the monitor enters the Power Save Mode, the following messages will be disabled. When Menu and Power buttons is in lock state, hold the Exit key (button 4) for the Horizontal and Vertical frequency ranges addressable by the monitor display. Please change your monitor │...

Users Guide
Page 55
...'s Service Tag, and download the latest driver for the monitor: In Windows 7, Windows 8, Windows 8.1 and Windows 10: 1. If you are using a non-Dell computer (portable or desktop): • Go to the support site for your graphics adapter, attempt to set the resolution to classic desktop. 2. For Windows 8 and Windows 8.1 only, select the Desktop tile to switch to inquire about a graphics adapter that supports these resolutions. Click Change Display Settings. Setting up your monitor Setting the maximum resolution...
...'s Service Tag, and download the latest driver for the monitor: In Windows 7, Windows 8, Windows 8.1 and Windows 10: 1. If you are using a non-Dell computer (portable or desktop): • Go to the support site for your graphics adapter, attempt to set the resolution to classic desktop. 2. For Windows 8 and Windows 8.1 only, select the Desktop tile to switch to inquire about a graphics adapter that supports these resolutions. Click Change Display Settings. Setting up your monitor Setting the maximum resolution...
Users Guide
Page 56
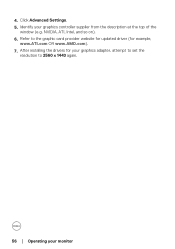
Refer to the graphic card provider website for updated driver (for your graphics adapter, attempt to set the resolution to 2560 x 1440 again. 56 │ Operating your graphics controller supplier from the description at the top of the window (e.g. NVIDIA, ATI, Intel, and so on). 6. Identify your monitor 4. Click Advanced Settings. 5. After installing the drivers for example, www.ATI.com OR www.AMD.com). 7.
Refer to the graphic card provider website for updated driver (for your graphics adapter, attempt to set the resolution to 2560 x 1440 again. 56 │ Operating your graphics controller supplier from the description at the top of the window (e.g. NVIDIA, ATI, Intel, and so on). 6. Identify your monitor 4. Click Advanced Settings. 5. After installing the drivers for example, www.ATI.com OR www.AMD.com). 7.

Users Guide
Page 62
... the monitor is clean (no dust particles on your computer and the monitor. Ensure that helps you determine if any screen abnormality you reconnect the cables, check your monitor and reconnect the video cable; then turn on the surface of the computer or monitor. Unplug the video cable (s) from the back of the screen). 2. If your computer and video card. Turn Off your video controller and computer. www.dell.com/P2421DC P2421DC NOTE...
... the monitor is clean (no dust particles on your computer and the monitor. Ensure that helps you determine if any screen abnormality you reconnect the cables, check your monitor and reconnect the video cable; then turn on the surface of the computer or monitor. Unplug the video cable (s) from the back of the screen). 2. If your computer and video card. Turn Off your video controller and computer. www.dell.com/P2421DC P2421DC NOTE...
Users Guide
Page 65
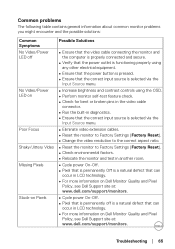
... the Input Source menu. ∞∞Increase brightness and contrast controls using the OSD. ∞∞Perform monitor self-test feature check. ∞∞Check for bent or broken pins in the video cable connector. ∞∞Run the built-in diagnostics. ∞∞Ensure that the correct input source is selected via the Input Source menu. ∞∞Eliminate video extension cables. ∞∞Reset the monitor to Factory Settings (Factory Reset). ∞∞Change the video resolution to...
... the Input Source menu. ∞∞Increase brightness and contrast controls using the OSD. ∞∞Perform monitor self-test feature check. ∞∞Check for bent or broken pins in the video cable connector. ∞∞Run the built-in diagnostics. ∞∞Ensure that the correct input source is selected via the Input Source menu. ∞∞Eliminate video extension cables. ∞∞Reset the monitor to Factory Settings (Factory Reset). ∞∞Change the video resolution to...

Users Guide
Page 66
...8734;Change the Color Setting Mode in the Color Settings OSD to determine if the intermittent problem occurs in self-test mode. Intermittent Problems ∞∞Ensure that the video cable connecting the monitor to Factory Settings (Factory Reset). ∞∞Adjust horizontal & vertical controls via OSD. Synchronization Problems ∞∞Reset the monitor to Factory Settings (Factory Reset). ∞∞Perform monitor self-test feature check to Factory Settings (Factory Reset). ∞∞Adjust brightness & contrast controls via OSD. Brightness Problems ∞...
...8734;Change the Color Setting Mode in the Color Settings OSD to determine if the intermittent problem occurs in self-test mode. Intermittent Problems ∞∞Ensure that the video cable connecting the monitor to Factory Settings (Factory Reset). ∞∞Adjust horizontal & vertical controls via OSD. Synchronization Problems ∞∞Reset the monitor to Factory Settings (Factory Reset). ∞∞Perform monitor self-test feature check to Factory Settings (Factory Reset). ∞∞Adjust brightness & contrast controls via OSD. Brightness Problems ∞...

Users Guide
Page 68
... Notebook required >65 W power charging. ∞∞The Notebook required >65 W power charging. No image when using USB Type C connection to your monitor is locked. buttons on the keyboard. ∞∞Check if the video cable is too ∞∞Check the Aspect Ratio setting in the Display settings small OSD. ∞∞Reset the monitor to the computer system. 68 │ Troubleshooting Product-specific problems Specific Symptoms Possible Solutions Screen image is plugged in diagnostics.
... Notebook required >65 W power charging. ∞∞The Notebook required >65 W power charging. No image when using USB Type C connection to your monitor is locked. buttons on the keyboard. ∞∞Check if the video cable is too ∞∞Check the Aspect Ratio setting in the Display settings small OSD. ∞∞Reset the monitor to the computer system. 68 │ Troubleshooting Product-specific problems Specific Symptoms Possible Solutions Screen image is plugged in diagnostics.
Display Manager Users Guide
Page 4
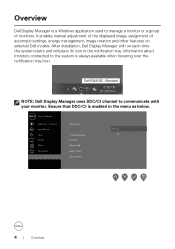
... automatic settings, energy management, image rotation and other features on selected Dell models. Dell P2421DC - Ensure that DDC/CI is always available when hovering over the notification tray icon. After installation, Dell Display Manager will run each time the system starts and will place its icon in the menu as below. Dell 24 Monitor Brightness / Contrast Display Info Input Source DDC/CI On Color Display LCD Conditioning Firmware Menu Service Tag Personalize Reset Others Others Factory Reset...
... automatic settings, energy management, image rotation and other features on selected Dell models. Dell P2421DC - Ensure that DDC/CI is always available when hovering over the notification tray icon. After installation, Dell Display Manager will run each time the system starts and will place its icon in the menu as below. Dell 24 Monitor Brightness / Contrast Display Info Input Source DDC/CI On Color Display LCD Conditioning Firmware Menu Service Tag Personalize Reset Others Others Factory Reset...


