

Dell Monitor Outline Dimensions
Page 1
P2715Q Outline Dimension Swivel 45.0 Swivel 45.0 122.0 [5] Nominal Dimensions Unit: mm(inch) M4x10(4X) 51.50 [2.0] 100.0 2X [4] [1] 13.0 [0.8] 21.03 640.74 [25.2] 598.69 [23.6] Pivot 90.0 684(.2676)4 Back View of Monitor wihtout stand 7.52 [0.3] Tilt 5.0 21.0 201.89 [7.9] [13.3] 337.61 [14.9] 379.66 669.39 [26.4] 538.86 [21.2] 551.47 [21.7] 384.65 [15.1] 417.31 [16.4] 423.86 [16.7] 15.51 [0.6] 9.02 [0.4] [4.5] 115.01 Lift 28.65 [1.1] [6.3] 159.20 245.0 [10] 1.50 [0.1] 59.11 [2.3] 69.38 [2.7] 4.72 [0.2] 58.74 [2.3] 203.86 [8.0]
P2715Q Outline Dimension Swivel 45.0 Swivel 45.0 122.0 [5] Nominal Dimensions Unit: mm(inch) M4x10(4X) 51.50 [2.0] 100.0 2X [4] [1] 13.0 [0.8] 21.03 640.74 [25.2] 598.69 [23.6] Pivot 90.0 684(.2676)4 Back View of Monitor wihtout stand 7.52 [0.3] Tilt 5.0 21.0 201.89 [7.9] [13.3] 337.61 [14.9] 379.66 669.39 [26.4] 538.86 [21.2] 551.47 [21.7] 384.65 [15.1] 417.31 [16.4] 423.86 [16.7] 15.51 [0.6] 9.02 [0.4] [4.5] 115.01 Lift 28.65 [1.1] [6.3] 159.20 245.0 [10] 1.50 [0.1] 59.11 [2.3] 69.38 [2.7] 4.72 [0.2] 58.74 [2.3] 203.86 [8.0]

Dell Users Guide
Page 3
... Contents 5 Product Features 6 Identifying Parts and Controls 7 Monitor Specifications 10 Plug-and-Play 21 LCD Monitor Quality and Pixel Policy 21 Setting Up the Monitor 22 Attaching the Stand 22 Connecting Your Monitor 22 Organizing Your Cables 25 Attaching the Cable Cover 26 Removing the Monitor Stand 26 Removing the Cable Cover 27 Wall Mounting...
... Contents 5 Product Features 6 Identifying Parts and Controls 7 Monitor Specifications 10 Plug-and-Play 21 LCD Monitor Quality and Pixel Policy 21 Setting Up the Monitor 22 Attaching the Stand 22 Connecting Your Monitor 22 Organizing Your Cables 25 Attaching the Cable Cover 26 Removing the Monitor Stand 26 Removing the Cable Cover 27 Wall Mounting...

Dell Users Guide
Page 4
only) and Other Regulatory Information 49 Contacting Dell 49 Setting Up Your Monitor 50 Maintenance Guidelines 51 4 | Contents Troubleshooting 43 Self-Test 43 Built-in Diagnostics 44 Common Problems 45 Product Specific Problems 47 Mobile High-Definition Link (MHL) Specific Problems 48 Appendix 49 Safety Instructions 49 FCC Notices (U.S.
only) and Other Regulatory Information 49 Contacting Dell 49 Setting Up Your Monitor 50 Maintenance Guidelines 51 4 | Contents Troubleshooting 43 Self-Test 43 Built-in Diagnostics 44 Common Problems 45 Product Specific Problems 47 Mobile High-Definition Link (MHL) Specific Problems 48 Appendix 49 Safety Instructions 49 FCC Notices (U.S.

Dell Users Guide
Page 5
Monitor Stand Cable cover Power cable (varies by country) USB 3.0 upstream cable (enables the USB ports on the monitor) About Your Monitor | 5 NOTE: Some items may not ship with the components shown below. Make sure that you have received all the components and contact Dell if something is missing. About Your Monitor Package Contents Your monitor ships with your monitor. Some features or media may not be optional and may be available in certain countries.
Monitor Stand Cable cover Power cable (varies by country) USB 3.0 upstream cable (enables the USB ports on the monitor) About Your Monitor | 5 NOTE: Some items may not ship with the components shown below. Make sure that you have received all the components and contact Dell if something is missing. About Your Monitor Package Contents Your monitor ships with your monitor. Some features or media may not be optional and may be available in certain countries.

Dell Users Guide
Page 6
... and documentation media • Quick Setup Guide • Safety and Regulatory Information • Factory Calibration Report Product Features The Dell P2715Q/P2415Q flat panel monitor has an active matrix, thin-film transistor (TFT), liquid crystal display (LCD), and light emitting diode (LED) backlight.... media includes an information file (INF), Image‑color matching file (ICM), and product documentation. • Dell display manager software (available on the disc shipped with the monitor). • Energy saver feature for the panel only. • 0.5 W standby power when in the sleep...
... and documentation media • Quick Setup Guide • Safety and Regulatory Information • Factory Calibration Report Product Features The Dell P2715Q/P2415Q flat panel monitor has an active matrix, thin-film transistor (TFT), liquid crystal display (LCD), and light emitting diode (LED) backlight.... media includes an information file (INF), Image‑color matching file (ICM), and product documentation. • Dell display manager software (available on the disc shipped with the monitor). • Energy saver feature for the panel only. • 0.5 W standby power when in the sleep...

Dell Users Guide
Page 7
Identifying Parts and Controls Front view Label 1 2 Description Function buttons (For more information, see Operating the Monitor) Power on/off button (with LED indicator) About Your Monitor | 7
Identifying Parts and Controls Front view Label 1 2 Description Function buttons (For more information, see Operating the Monitor) Power on/off button (with LED indicator) About Your Monitor | 7
Dell Users Guide
Page 8
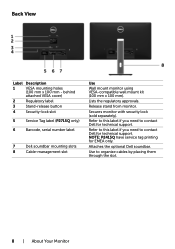
... to organize cables by placing them through the slot. 8 | About Your Monitor Lists the regulatory approvals. NOTE: P2415Q have service tag printing for technical support. Use to contact Dell for EMEA only. Refer to this label if you need to contact Dell for technical support. Back View Label Description 1 VESA mounting holes (100 mm...
... to organize cables by placing them through the slot. 8 | About Your Monitor Lists the regulatory approvals. NOTE: P2415Q have service tag printing for technical support. Use to contact Dell for EMEA only. Refer to this label if you need to contact Dell for technical support. Back View Label Description 1 VESA mounting holes (100 mm...
Dell Users Guide
Page 9
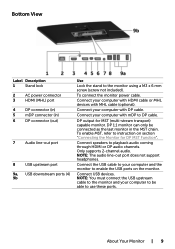
Connect speakers to DP cable. Only supports 2-channel audio. NOTE: You must connect the USB upstream cable to the monitor and your computer to be connected as the last monitor in ) 6 DP connector (out) 7 Audio line-out port 8 USB upstream port 9a, USB downstream ports (4) 9b Use ...DP output for DP MST Function". NOTE: The audio line-out port does not support headphones. Connect your computer and the monitor to instruction on the monitor. Connect the USB cable to your computer with MHL cable (optional). Connect your computer with mDP to playback audio coming through...
Connect speakers to DP cable. Only supports 2-channel audio. NOTE: You must connect the USB upstream cable to the monitor and your computer to be connected as the last monitor in ) 6 DP connector (out) 7 Audio line-out port 8 USB upstream port 9a, USB downstream ports (4) 9b Use ...DP output for DP MST Function". NOTE: The audio line-out port does not support headphones. Connect your computer and the monitor to instruction on the monitor. Connect the USB cable to your computer with MHL cable (optional). Connect your computer with mDP to playback audio coming through...

Dell Users Guide
Page 10
... 1 (mega dynamic 2,000,000 to 76 Hz (automatic) 3840 x 2160 at 60 Hz 480i, 480p, 576i, 576p, 720p, 1080i, 1080p , QHD, UHD 10 | About Your Monitor Monitor Specifications Flat Panel Specifications Model P2715Q P2415Q Screen type Active matrix - P2415Q: Color gamut (typical) is based on CIE1976 (102.28%) and CIE1931 (82.09%) test standards.
... 1 (mega dynamic 2,000,000 to 76 Hz (automatic) 3840 x 2160 at 60 Hz 480i, 480p, 576i, 576p, 720p, 1080i, 1080p , QHD, UHD 10 | About Your Monitor Monitor Specifications Flat Panel Specifications Model P2715Q P2415Q Screen type Active matrix - P2415Q: Color gamut (typical) is based on CIE1976 (102.28%) and CIE1931 (82.09%) test standards.

Dell Users Guide
Page 12
...or 60 Hz ± 3 Hz / 1.8 A (maximum) 120 V: 30 A (Max.) 240 V: 60 A (Max.) Physical Characteristics Model Connector type Signal cable type P2715Q P2415Q • DP connector (include DP • DP connector (include DP in and DP out) in and DP out) • mDP • mDP • HDMI (MHL... mm (10.65 inches) 245 mm (9.65 inches) 205 mm (8.07 inches) 8.68 kg (19.14 lb) 12 | About Your Monitor Electrical Specifications Video input signals Synchronization input signals Input voltage/ frequency/ current Inrush current • Digital video signal for each differential line.
...or 60 Hz ± 3 Hz / 1.8 A (maximum) 120 V: 30 A (Max.) 240 V: 60 A (Max.) Physical Characteristics Model Connector type Signal cable type P2715Q P2415Q • DP connector (include DP • DP connector (include DP in and DP out) in and DP out) • mDP • mDP • HDMI (MHL... mm (10.65 inches) 245 mm (9.65 inches) 205 mm (8.07 inches) 8.68 kg (19.14 lb) 12 | About Your Monitor Electrical Specifications Video input signals Synchronization input signals Input voltage/ frequency/ current Inrush current • Digital video signal for each differential line.

Dell Users Guide
Page 13
... (7.36 lb) 2.06 kg (4.54 lb) 5% (maximum) Environmental Characteristics Model Temperature: Operating Non-operating Humidity: Operating Non-operating Altitude: Operating Non-operating Thermal dissipation P2715Q P2415Q 0°C to 35°C (32°F to 95°F) 0°C to 35°C (32°F to 95°F) -20°C to 60°C (-4°F to...,000 ft) (maximum) 324.15 BTU/hour (maximum) 170.61 BTU/hour (typical) 307.09 BTU/hour (maximum) 153.55 BTU/hour (typical) About Your Monitor | 13
... (7.36 lb) 2.06 kg (4.54 lb) 5% (maximum) Environmental Characteristics Model Temperature: Operating Non-operating Humidity: Operating Non-operating Altitude: Operating Non-operating Thermal dissipation P2715Q P2415Q 0°C to 35°C (32°F to 95°F) 0°C to 35°C (32°F to 95°F) -20°C to 60°C (-4°F to...,000 ft) (maximum) 324.15 BTU/hour (maximum) 170.61 BTU/hour (typical) 307.09 BTU/hour (maximum) 153.55 BTU/hour (typical) About Your Monitor | 13

Dell Users Guide
Page 14
...Modes Normal operation Active-off mode Switch off Horizontal Vertical Video Power Indicator Sync Sync Active Active Active White Inactive - NOTE: This monitor is referred to the OSD. P2715Q VESA Modes Normal operation Active-off mode Switch off mode, one of this automatic power saving ...- Power Management Modes If you press any button in the active-off P2415Q Horizontal Vertical Video Power Indicator Sync Sync Active Active Active White Inactive - Activate the computer and the monitor to gain access to as power save mode*. If the computer detects input...
...Modes Normal operation Active-off mode Switch off Horizontal Vertical Video Power Indicator Sync Sync Active Active Active White Inactive - NOTE: This monitor is referred to the OSD. P2715Q VESA Modes Normal operation Active-off mode Switch off mode, one of this automatic power saving ...- Power Management Modes If you press any button in the active-off P2415Q Horizontal Vertical Video Power Indicator Sync Sync Active Active Active White Inactive - Activate the computer and the monitor to gain access to as power save mode*. If the computer detects input...

Dell Users Guide
Page 15
Pin Assignments DP connector (in) Pin number 20-pin side of the connected signal cable 1 ML3(n) 2 GND 3 ML3(p) 4 ML2(n) 5 GND 6 ML2(p) 7 ML1(u) 8 GND 9 ML1(p) 10 ML0(n) 11 GND 12 ML0(p) 13 CONFIG1 14 CONFIG2 15 AUX CH (p) 16 GND 17 AUX CH (n) 18 Hot Plug Detect 19 Return 20 DP_PWR About Your Monitor | 15
Pin Assignments DP connector (in) Pin number 20-pin side of the connected signal cable 1 ML3(n) 2 GND 3 ML3(p) 4 ML2(n) 5 GND 6 ML2(p) 7 ML1(u) 8 GND 9 ML1(p) 10 ML0(n) 11 GND 12 ML0(p) 13 CONFIG1 14 CONFIG2 15 AUX CH (p) 16 GND 17 AUX CH (n) 18 Hot Plug Detect 19 Return 20 DP_PWR About Your Monitor | 15

Dell Users Guide
Page 16
DP connector (out) Pin number 20-pin side of the connected signal cable 1 ML0(p) 2 GND 3 ML0(n) 4 ML1(p) 5 GND 6 ML1(n) 7 ML2(p) 8 GND 9 ML2(n) 10 ML3(p) 11 GND 12 ML3(n) 13 CONFIG1 14 CONFIG1 15 AUX CH(p) 16 GND 17 AUX CH(n) 18 Hot Plug Detect 19 Return 20 DP_PWR 16 | About Your Monitor
DP connector (out) Pin number 20-pin side of the connected signal cable 1 ML0(p) 2 GND 3 ML0(n) 4 ML1(p) 5 GND 6 ML1(n) 7 ML2(p) 8 GND 9 ML2(n) 10 ML3(p) 11 GND 12 ML3(n) 13 CONFIG1 14 CONFIG1 15 AUX CH(p) 16 GND 17 AUX CH(n) 18 Hot Plug Detect 19 Return 20 DP_PWR 16 | About Your Monitor

Dell Users Guide
Page 17
mDP connector Pin number 20-pin side of the connected signal cable 1 GND 2 Hot Plug Detect 3 ML3 (n) 4 GND 5 ML3 (n) 6 GND 7 GND 8 GND 9 ML2 (n) 10 ML0 (p) 11 ML2 (p) 12 ML0 (p) 13 GND 14 GND 15 ML1 (n) 16 AUX (p) 17 ML1 (p) 18 AUX (n) 19 GND 20 +3.3 V DP_PWR About Your Monitor | 17
mDP connector Pin number 20-pin side of the connected signal cable 1 GND 2 Hot Plug Detect 3 ML3 (n) 4 GND 5 ML3 (n) 6 GND 7 GND 8 GND 9 ML2 (n) 10 ML0 (p) 11 ML2 (p) 12 ML0 (p) 13 GND 14 GND 15 ML1 (n) 16 AUX (p) 17 ML1 (p) 18 AUX (n) 19 GND 20 +3.3 V DP_PWR About Your Monitor | 17

Dell Users Guide
Page 18
HDMI connector Pin number 1 2 3 4 5 6 7 8 9 10 11 12 13 14 15 16 17 18 19 19-pin side of the connected signal cable TMDS DATA 2+ TMDS DATA 2 SHIELD TMDS DATA 2TMDS DATA 1+ TMDS DATA 1 SHIELD TMDS DATA 1TMDS DATA 0+ TMDS DATA 0 SHIELD TMDS DATA 0TMDS CLOCK+ TMDS CLOCK SHIELD TMDS CLOCKCEC Reserved (N.C. on device) DDC CLOCK (SCL) DDC DATA (SDA) DDC/CEC Ground +5 V POWER HOT PLUG DETECT 18 | About Your Monitor
HDMI connector Pin number 1 2 3 4 5 6 7 8 9 10 11 12 13 14 15 16 17 18 19 19-pin side of the connected signal cable TMDS DATA 2+ TMDS DATA 2 SHIELD TMDS DATA 2TMDS DATA 1+ TMDS DATA 1 SHIELD TMDS DATA 1TMDS DATA 0+ TMDS DATA 0 SHIELD TMDS DATA 0TMDS CLOCK+ TMDS CLOCK SHIELD TMDS CLOCKCEC Reserved (N.C. on device) DDC CLOCK (SCL) DDC DATA (SDA) DDC/CEC Ground +5 V POWER HOT PLUG DETECT 18 | About Your Monitor

Dell Users Guide
Page 19
MHL connector Pin number 19-pin side of the connected signal cable 1 N/C 2 CD_SENSE 3 N/C 4 N/C 5 TMDS_GND 6 N/C 7 MHL+ 8 MHL_Shield 9 MHL- 10 N/C 11 TMDS_GND 12 N/C 13 N/C 14 N/C 15 CD_PULLUP 16 N/C 17 VBUS_CBUS_GND 18 VBUS 19 CBUS 2Shell Shield About Your Monitor | 19
MHL connector Pin number 19-pin side of the connected signal cable 1 N/C 2 CD_SENSE 3 N/C 4 N/C 5 TMDS_GND 6 N/C 7 MHL+ 8 MHL_Shield 9 MHL- 10 N/C 11 TMDS_GND 12 N/C 13 N/C 14 N/C 15 CD_PULLUP 16 N/C 17 VBUS_CBUS_GND 18 VBUS 19 CBUS 2Shell Shield About Your Monitor | 19

Dell Users Guide
Page 20
.... Your computer has the following USB ports: • One USB 3.0 upstream port • Four USB 3.0 downstream ports NOTE: The monitor's USB ports work only when the monitor is on your monitor. If you information about the USB ports available on or in the power save mode. Transfer speed SuperSpeed Hi-Speed Full... 1 VBUS 2 D- 3 D+ 4 GND 5 StdB_SSTX- 6 StdB_SSTX+ 7 GND_DRAIN 8 StdB_SSRX- 9 StdB_SSRX+ Shell Shield Pin number 1 2 3 4 5 6 7 8 9 Shell Signal name VBUS DD+ GND StdA_SSRXStdA_SSRX+ GND_DRAIN StdA_SSTXStdA_SSTX+ Shield 20 | About Your Monitor
.... Your computer has the following USB ports: • One USB 3.0 upstream port • Four USB 3.0 downstream ports NOTE: The monitor's USB ports work only when the monitor is on your monitor. If you information about the USB ports available on or in the power save mode. Transfer speed SuperSpeed Hi-Speed Full... 1 VBUS 2 D- 3 D+ 4 GND 5 StdB_SSTX- 6 StdB_SSTX+ 7 GND_DRAIN 8 StdB_SSRX- 9 StdB_SSRX+ Shell Shield Pin number 1 2 3 4 5 6 7 8 9 Shell Signal name VBUS DD+ GND StdA_SSRXStdA_SSRX+ GND_DRAIN StdA_SSTXStdA_SSTX+ Shield 20 | About Your Monitor

Dell Users Guide
Page 21
... identification data (EDID) using display data channel (DDC) protocols so the computer can install the monitor in an unchanging state which are automatic; Most monitor installations are hard to see Dell support site at: http://www.dell.com/support/monitors. For more pixels to become fixed in any Plug-and-Play-compatible system. Plug-and...
... identification data (EDID) using display data channel (DDC) protocols so the computer can install the monitor in an unchanging state which are automatic; Most monitor installations are hard to see Dell support site at: http://www.dell.com/support/monitors. For more pixels to become fixed in any Plug-and-Play-compatible system. Plug-and...
Dell Users Guide
Page 22
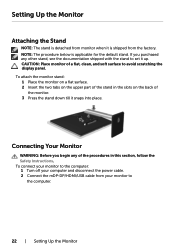
...to avoid scratching the display panel. NOTE: The procedure below is shipped from the factory. CAUTION: Place monitor of the monitor. 3 Press the stand down till it snaps into place. To connect your monitor to the computer: 1 Turn off your computer and disconnect the power cable. 2 Connect the mDP-DP...the slots on the upper part of the stand in this section, follow the Safety Instructions. Setting Up the Monitor Attaching the Stand NOTE: The stand is detached from monitor when it is applicable for the default stand. If you begin any other stand, see the documentation shipped with...
...to avoid scratching the display panel. NOTE: The procedure below is shipped from the factory. CAUTION: Place monitor of the monitor. 3 Press the stand down till it snaps into place. To connect your monitor to the computer: 1 Turn off your computer and disconnect the power cable. 2 Connect the mDP-DP...the slots on the upper part of the stand in this section, follow the Safety Instructions. Setting Up the Monitor Attaching the Stand NOTE: The stand is detached from monitor when it is applicable for the default stand. If you begin any other stand, see the documentation shipped with...


