Dell Display Manager Users Guide
Page 1
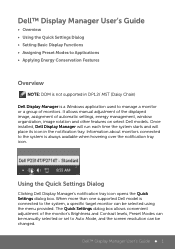
... Dell models. Using the Quick Settings Dialog Clicking Dell Display Manager's notification tray icon opens the Quick Settings dialog box. Dell™ Display Manager User's Guide 1 Information about monitors connected to the system is connected to the system, a specific target monitor can be selected using the menu provided. It allows manual adjustment of the displayed image, assignment of the monitor's Brightness and Contrast levels, Preset Modes can be manually selected or set to Auto Mode, and the screen resolution can be changed. Dell™ Display Manager User's Guide...
... Dell models. Using the Quick Settings Dialog Clicking Dell Display Manager's notification tray icon opens the Quick Settings dialog box. Dell™ Display Manager User's Guide 1 Information about monitors connected to the system is connected to the system, a specific target monitor can be selected using the menu provided. It allows manual adjustment of the displayed image, assignment of the monitor's Brightness and Contrast levels, Preset Modes can be manually selected or set to Auto Mode, and the screen resolution can be changed. Dell™ Display Manager User's Guide...
Dell Display Manager Users Guide
Page 3
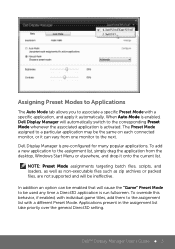
... used any time a Direct3D application is activated. In addition an option can vary from the desktop, Windows Start Menu or elsewhere, and drop it automatically. Applications present in the assignment list take priority over the general Direct3D setting. Assigning Preset Modes to Applications The Auto Mode tab allows you to associate a specific Preset Mode with a different Preset Mode. Dell™ Display Manager User's Guide 3 Dell Display...
... used any time a Direct3D application is activated. In addition an option can vary from the desktop, Windows Start Menu or elsewhere, and drop it automatically. Applications present in the assignment list take priority over the general Direct3D setting. Assigning Preset Modes to Applications The Auto Mode tab allows you to associate a specific Preset Mode with a different Preset Mode. Dell™ Display Manager User's Guide 3 Dell Display...
Users Guide
Page 3
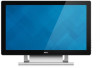
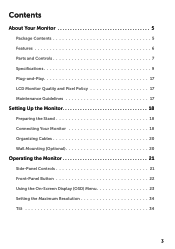
Contents About Your Monitor 5 Package Contents 5 Features 6 Parts and Controls 7 Specifications 9 Plug-and-Play 17 LCD Monitor Quality and Pixel Policy 17 Maintenance Guidelines 17 Setting Up the Monitor 18 Preparing the Stand 18 Connecting Your Monitor 18 Organizing Cables 20 Wall Mounting (Optional 20 Operating the Monitor 21 Side‑Panel Controls 21 Front‑Panel Button 22 Using the On-Screen Display (OSD) Menu 23 Setting the Maximum Resolution 34 Tilt 34 3
Contents About Your Monitor 5 Package Contents 5 Features 6 Parts and Controls 7 Specifications 9 Plug-and-Play 17 LCD Monitor Quality and Pixel Policy 17 Maintenance Guidelines 17 Setting Up the Monitor 18 Preparing the Stand 18 Connecting Your Monitor 18 Organizing Cables 20 Wall Mounting (Optional 20 Operating the Monitor 21 Side‑Panel Controls 21 Front‑Panel Button 22 Using the On-Screen Display (OSD) Menu 23 Setting the Maximum Resolution 34 Tilt 34 3
Users Guide
Page 4
only) and Other Regulatory Information 41 Contacting Dell 41 Setting Display Resolution to 1920 X 1080 (maximum 42 Downloading Latest Video Drivers 42 Setting up Dual Monitors 43 Display Styles For Multiple Monitors 48 4 Troubleshooting 35 Self-Test 35 Built-in Diagnostics 36 Common Problems 37 Touchscreen Problems 39 Product Specific Problems 40 Appendix 41 Safety Instructions 41 FCC Notices (U.S.
only) and Other Regulatory Information 41 Contacting Dell 41 Setting Display Resolution to 1920 X 1080 (maximum 42 Downloading Latest Video Drivers 42 Setting up Dual Monitors 43 Display Styles For Multiple Monitors 48 4 Troubleshooting 35 Self-Test 35 Built-in Diagnostics 36 Common Problems 37 Touchscreen Problems 39 Product Specific Problems 40 Appendix 41 Safety Instructions 41 FCC Notices (U.S.
Users Guide
Page 6
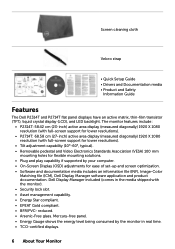
...-Screen Display (OSD) adjustments for ease of set-up and screen optimization. • Software and documentation media includes an information file (INF), Image‑Color Matching file (ICM), Dell Display Manager software application and product documentation. Screen cleaning cloth Velcro strap • Quick Setup Guide • Drivers and Documentation media • Product and Safety Information Guide Features The Dell P2314T and P2714T flat panel displays have an active matrix, thin-film transistor (TFT), liquid crystal display (LCD), and LED backlight...
...-Screen Display (OSD) adjustments for ease of set-up and screen optimization. • Software and documentation media includes an information file (INF), Image‑Color Matching file (ICM), Dell Display Manager software application and product documentation. Screen cleaning cloth Velcro strap • Quick Setup Guide • Drivers and Documentation media • Product and Safety Information Guide Features The Dell P2314T and P2714T flat panel displays have an active matrix, thin-film transistor (TFT), liquid crystal display (LCD), and LED backlight...

Users Guide
Page 8
... with MHL cable (optional). Connect your computer to the monitor using a VGA cable (optional). Only supports 2-channel audio. Bottom View 10 1 24 3 5 67 8 9 Label 1 2 3 Description Power-cable connector DisplayPort connector HDMI (MHL) 1 port 4 HDMI (MHL) 2 port 5 VGA port 6 Audio line-out port 7 USB upstream port 8 USB 2.0 downstream ports 9 Security-cable slot 10 USB 3.0 downstream ports Use Connect the power cable. To connect your monitor. You can only use this port after you to use this port after you connect the USB cable from the monitor to...
... with MHL cable (optional). Connect your computer to the monitor using a VGA cable (optional). Only supports 2-channel audio. Bottom View 10 1 24 3 5 67 8 9 Label 1 2 3 Description Power-cable connector DisplayPort connector HDMI (MHL) 1 port 4 HDMI (MHL) 2 port 5 VGA port 6 Audio line-out port 7 USB upstream port 8 USB 2.0 downstream ports 9 Security-cable slot 10 USB 3.0 downstream ports Use Connect the power cable. To connect your monitor. You can only use this port after you to use this port after you connect the USB cable from the monitor to...

Users Guide
Page 10
Touch Type Panel Diagonal Panel Thickness Active Area Sensor Stack thickness Cover Glass Thickness Input Method Touch point Response time Output position resolution Touch method Operating system P2314T P2714T Projected Capacitive System 23.1 inch 27.1 inch 2.4 mm 3.1 mm Extended beyond Viewing Area 0.5 mm 1.1 mm 1.8 mm Bare finger, thin gloves, conductive stylus 10 touch-points with palm accommodation
Touch Type Panel Diagonal Panel Thickness Active Area Sensor Stack thickness Cover Glass Thickness Input Method Touch point Response time Output position resolution Touch method Operating system P2314T P2714T Projected Capacitive System 23.1 inch 27.1 inch 2.4 mm 3.1 mm Extended beyond Viewing Area 0.5 mm 1.1 mm 1.8 mm Bare finger, thin gloves, conductive stylus 10 touch-points with palm accommodation

Users Guide
Page 13
... Weight with stand assembly and cables Weight without stand without cables (For wall mount or VESA mount) Weight of Power Save Mode: P2314T VESA Modes Normal operation Active-off mode Horizontal Vertical Sync Sync Active Active Video Active Inactive Inactive Blank Power Indicator White Glowing white Power Consumption 17 W (typical) 26 W (maximum) The monitor automatically resumes functioning when it computer detects input from keyboard, mouse, or other input devices. The following table shows the power consumption and signaling of stand assembly 298...
... Weight with stand assembly and cables Weight without stand without cables (For wall mount or VESA mount) Weight of Power Save Mode: P2314T VESA Modes Normal operation Active-off mode Horizontal Vertical Sync Sync Active Active Video Active Inactive Inactive Blank Power Indicator White Glowing white Power Consumption 17 W (typical) 26 W (maximum) The monitor automatically resumes functioning when it computer detects input from keyboard, mouse, or other input devices. The following table shows the power consumption and signaling of stand assembly 298...

Users Guide
Page 17
... best image quality on your monitor, use a dynamically changing screen saver and turn off your screen, use a soft, clean cloth lightly dampened with water. WARNING: Before cleaning the monitor, unplug the monitor power cable from the electrical outlet. You can configure itself and optimize the monitor settings. CAUTION: Do not use special screen-cleaning tissue or solution suitable for one or more pixels to become fixed in an unchanging state. Avoid using detergent of any Plug...
... best image quality on your monitor, use a dynamically changing screen saver and turn off your screen, use a soft, clean cloth lightly dampened with water. WARNING: Before cleaning the monitor, unplug the monitor power cable from the electrical outlet. You can configure itself and optimize the monitor settings. CAUTION: Do not use special screen-cleaning tissue or solution suitable for one or more pixels to become fixed in an unchanging state. Avoid using detergent of any Plug...

Users Guide
Page 27
... boost color contrast to increase the green shade. Press to enhance image clarity. Game: Ideal for multimedia applications. Use or to adjust the hue from 0 to adjust the Red, Green, and Blue values and create your own preset color mode. NOTE: Hue adjustment is the default preset mode. The screen appears cooler with a red/yellow tint. Press the and buttons to 100. Operating the Monitor 27 Press to manually adjust the color settings...
... boost color contrast to increase the green shade. Press to enhance image clarity. Game: Ideal for multimedia applications. Use or to adjust the hue from 0 to adjust the Red, Green, and Blue values and create your own preset color mode. NOTE: Hue adjustment is the default preset mode. The screen appears cooler with a red/yellow tint. Press the and buttons to 100. Operating the Monitor 27 Press to manually adjust the color settings...

Users Guide
Page 28
...". Adjusts the vertical position of the image. Use or to factory defaults. 28 Operating the Monitor Adjusts the horizontal position of the image. Makes the image look sharper or softer. Restores the display settings to adjust the sharpness. Menu and Submenus Saturation Reset Color Settings Description This feature adjusts the color saturation of the video image. Use the and buttons to change the image position. Use the and buttons to 8,000,000 : 1. Dynamic Contrast adjusts the contrast ratio to adjust for video input. Resets your monitor is available only for best...
...". Adjusts the vertical position of the image. Use or to factory defaults. 28 Operating the Monitor Adjusts the horizontal position of the image. Makes the image look sharper or softer. Restores the display settings to adjust the sharpness. Menu and Submenus Saturation Reset Color Settings Description This feature adjusts the color saturation of the video image. Use the and buttons to change the image position. Use the and buttons to 8,000,000 : 1. Dynamic Contrast adjusts the contrast ratio to adjust for video input. Resets your monitor is available only for best...

Users Guide
Page 31
... Enable to factory defaults. LCD Conditioning Reset Other Settings Helps reduce minor cases of image retention, the program may take some time to run. Operating the Monitor 31 Restores other settings, such as such as the DDC/CI, LCD Conditioning, and so on the degree of image retention. Depending on . Menu and Submenus Description Other Settings Select this option to adjust the OSD settings, such as...
... Enable to factory defaults. LCD Conditioning Reset Other Settings Helps reduce minor cases of image retention, the program may take some time to run. Operating the Monitor 31 Restores other settings, such as such as the DDC/CI, LCD Conditioning, and so on the degree of image retention. Depending on . Menu and Submenus Description Other Settings Select this option to adjust the OSD settings, such as...

Users Guide
Page 32
... the computer. See Specifications for the frequency ranges addressable by this monitor. Recommended mode is disabled. 32 Operating the Monitor The following message appears: This means that the monitor cannot synchronize with the signal that it is receiving from Preset Modes, Brightness/Contrast, Auto Adjust, Input Source, Aspect Ratio and set as shortcut key. Restores shortcut keys to the factory defaults. OSD Warning Messages When the monitor does not support a display resolution, the following...
... the computer. See Specifications for the frequency ranges addressable by this monitor. Recommended mode is disabled. 32 Operating the Monitor The following message appears: This means that the monitor cannot synchronize with the signal that it is receiving from Preset Modes, Brightness/Contrast, Auto Adjust, Input Source, Aspect Ratio and set as shortcut key. Restores shortcut keys to the factory defaults. OSD Warning Messages When the monitor does not support a display resolution, the following...

Users Guide
Page 35
... shows monitor has a problem. Self-Test Your monitor features a self-test feature that allows you use the self test, check your monitor and computer are properly connected but cannot sense an incoming video signal, one of computer, if connected. 3. To ensure proper self-test operation, remove both the digital (white connector) and the analog (blue connector) cables from the back of the procedures in self-test mode. The power light remains blue...
... shows monitor has a problem. Self-Test Your monitor features a self-test feature that allows you use the self test, check your monitor and computer are properly connected but cannot sense an incoming video signal, one of computer, if connected. 3. To ensure proper self-test operation, remove both the digital (white connector) and the analog (blue connector) cables from the back of the procedures in self-test mode. The power light remains blue...
Users Guide
Page 37
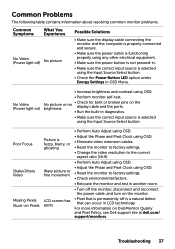
... using any other electrical equipment. • Make sure the power button is not pressed-in. • Make sure the correct input source is selected using the Input Source Select button. • Check the Power Button LED option under Energy Settings in OSD Menu. Troubleshooting 37 Poor Focus Shaky/Jittery Video Missing Pixels Stuck-on Pixels Picture is selected using the Input Source Select button. No Video (Power light on Dell Monitor Quality and Pixel Policy, see Dell support site at dell.com/ support/monitors. No picture or no brightness • Check...
... using any other electrical equipment. • Make sure the power button is not pressed-in. • Make sure the correct input source is selected using the Input Source Select button. • Check the Power Button LED option under Energy Settings in OSD Menu. Troubleshooting 37 Poor Focus Shaky/Jittery Video Missing Pixels Stuck-on Pixels Picture is selected using the Input Source Select button. No Video (Power light on Dell Monitor Quality and Pixel Policy, see Dell support site at dell.com/ support/monitors. No picture or no brightness • Check...

Users Guide
Page 38
... the self-test mode. • Check for bent or broken pins on and off Reset the monitor to factory settings. Perform monitor self-test to factory settings. • Perform Auto Adjust using OSD. Intermittent Problems Make sure the display cable connecting the monitor to factory settings. • Perform Auto Adjust using OSD. Geometric Distortion Screen not centered correctly • Reset the monitor to factory settings. • Auto Adjust using OSD. • Adjust horizontal and vertical positions using OSD. • Perform monitor self-test check to the computer...
... the self-test mode. • Check for bent or broken pins on and off Reset the monitor to factory settings. Perform monitor self-test to factory settings. • Perform Auto Adjust using OSD. Intermittent Problems Make sure the display cable connecting the monitor to factory settings. • Perform Auto Adjust using OSD. Geometric Distortion Screen not centered correctly • Reset the monitor to factory settings. • Auto Adjust using OSD. • Adjust horizontal and vertical positions using OSD. • Perform monitor self-test check to the computer...
Users Guide
Page 39
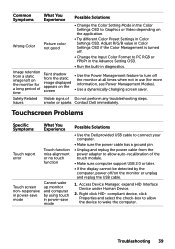
... turned off. • Change the Input Color Format to PC RGB or YPbPr in the Advance Setting OSD. • Run the built-in diagnostics. • Use the Power Management feature to turn off /on the monitor or unplug and replug the USB cable. 1. Contact Dell immediately. compliant device, click Properties and select the check-box to allow auto‑recalibration of the touch module. • Make sure computer support USB...
... turned off. • Change the Input Color Format to PC RGB or YPbPr in the Advance Setting OSD. • Run the built-in diagnostics. • Use the Power Management feature to turn off /on the monitor or unplug and replug the USB cable. 1. Contact Dell immediately. compliant device, click Properties and select the check-box to allow auto‑recalibration of the touch module. • Make sure computer support USB...

Users Guide
Page 40
... OSD does not appear on the screen Turn off the monitor, disconnect and reconnect the power cable, and turn on the front panel No input signal when controls are pressed The picture does not fill the entire screen. Open Control Panel, open Hardware and Sound, and then open Tablet PC Settings. 2. Follow the instructions to the computer is connected properly and is powered on • Check the aspect ratio in diagnostics. 40 Troubleshooting Specific Symptoms Windows 7 and Windows 8/ Windows 8.1 Calibration...
... OSD does not appear on the screen Turn off the monitor, disconnect and reconnect the power cable, and turn on the front panel No input signal when controls are pressed The picture does not fill the entire screen. Open Control Panel, open Hardware and Sound, and then open Tablet PC Settings. 2. Follow the instructions to the computer is connected properly and is powered on • Check the aspect ratio in diagnostics. 40 Troubleshooting Specific Symptoms Windows 7 and Windows 8/ Windows 8.1 Calibration...
Users Guide
Page 42
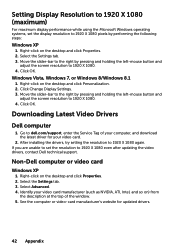
... left -mouse button and adjust the screen resolution to dell.com/support, enter the Service Tag of the window. 5. Setting Display Resolution to 1920 X 1080 (maximum) For maximum display performance while using the Microsoft Windows operating systems, set the resolution to 1920 X 1080 again. Click OK. Select Advanced. 4. Right-click on ) from the description at the top of your computer, and download the latest driver for updated drivers. 42 Appendix...
... left -mouse button and adjust the screen resolution to dell.com/support, enter the Service Tag of the window. 5. Setting Display Resolution to 1920 X 1080 (maximum) For maximum display performance while using the Microsoft Windows operating systems, set the resolution to 1920 X 1080 again. Click OK. Select Advanced. 4. Right-click on ) from the description at the top of your computer, and download the latest driver for updated drivers. 42 Appendix...
Users Guide
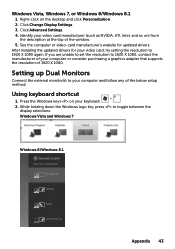
Page 43
... Change Display Settings. 3. If you are unable to set the resolution to 1920 X 1080 again. After installing the updated drivers for updated drivers. Identify your computer and follow any of the below setup method. Setting up Dual Monitors Connect the external monitor(s) to toggle between the display selections. Press the Windows key+ on the desktop and click Personalization. 2. See the computer or video‑card manufacturer's website for your video card...
... Change Display Settings. 3. If you are unable to set the resolution to 1920 X 1080 again. After installing the updated drivers for updated drivers. Identify your computer and follow any of the below setup method. Setting up Dual Monitors Connect the external monitor(s) to toggle between the display selections. Press the Windows key+ on the desktop and click Personalization. 2. See the computer or video‑card manufacturer's website for your video card...


