Users Guide
Page 4
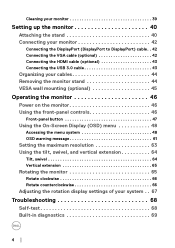
... (optional 42 Connecting the HDMI cable (optional 43 Connecting the USB 3.0 cable 43 Organizing your cables 44 Removing the monitor stand 44 VESA wall mounting (optional 45 Operating the monitor 46 Power on the monitor 46 Using the front-panel controls 46 Front-panel button 47 Using the On-Screen Display (OSD) menu 48...
... (optional 42 Connecting the HDMI cable (optional 43 Connecting the USB 3.0 cable 43 Organizing your cables 44 Removing the monitor stand 44 VESA wall mounting (optional 45 Operating the monitor 46 Power on the monitor 46 Using the front-panel controls 46 Front-panel button 47 Using the On-Screen Display (OSD) menu 48...
Users Guide
Page 6
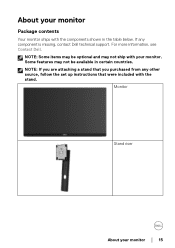
If any other source, follow the set up instructions that you purchased from any component is missing, contact Dell technical support. Some features may not ship with your monitor Package contents Your monitor ships with the stand. NOTE: If you are attaching a stand that were included with the components shown in certain countries. NOTE: Some items may be optional and may not be available in the table below. For more information, see Contact Dell. About your monitor. Monitor Stand riser About your monitor │ 15
If any other source, follow the set up instructions that you purchased from any component is missing, contact Dell technical support. Some features may not ship with your monitor Package contents Your monitor ships with the stand. NOTE: If you are attaching a stand that were included with the components shown in certain countries. NOTE: Some items may be optional and may not be available in the table below. For more information, see Contact Dell. About your monitor. Monitor Stand riser About your monitor │ 15
Users Guide
Page 7
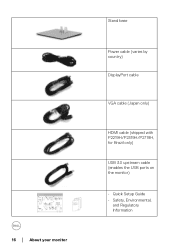
16 │ About your monitor Stand base Power cable (varies by country) DisplayPort cable VGA cable (Japan only) HDMI cable (shipped with P2219H/P2319H/P2719H, for Brazil only) USB 3.0 upstream cable (enables the USB ports on the monitor) • Quick Setup Guide • Safety, Environmental, and Regulatory Information
16 │ About your monitor Stand base Power cable (varies by country) DisplayPort cable VGA cable (Japan only) HDMI cable (shipped with P2219H/P2319H/P2719H, for Brazil only) USB 3.0 upstream cable (enables the USB ports on the monitor) • Quick Setup Guide • Safety, Environmental, and Regulatory Information
Users Guide
Page 8
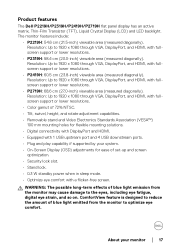
...Dell P2219H/P2319H/P2419H/P2719H flat panel display has an active matrix, Thin-Film Transistor (TFT), Liquid Crystal Display (LCD) and LED backlight. Resolution: Up to 1920 x 1080 through VGA, DisplayPort, and HDMI, with fullscreen support or lower resolutions. • P2719H: 68.6 cm (27.0-inch) viewable area (measured diagonally). The monitor...). WARNING: The possible long-term effects of set-up and screen optimization. • Security lock slot. • Stand lock. • 0.3 W standby power when in sleep mode. • Optimize eye comfort with fullscreen support or lower...
...Dell P2219H/P2319H/P2419H/P2719H flat panel display has an active matrix, Thin-Film Transistor (TFT), Liquid Crystal Display (LCD) and LED backlight. Resolution: Up to 1920 x 1080 through VGA, DisplayPort, and HDMI, with fullscreen support or lower resolutions. • P2719H: 68.6 cm (27.0-inch) viewable area (measured diagonally). The monitor...). WARNING: The possible long-term effects of set-up and screen optimization. • Security lock slot. • Stand lock. • 0.3 W standby power when in sleep mode. • Optimize eye comfort with fullscreen support or lower...
Users Guide
Page 10
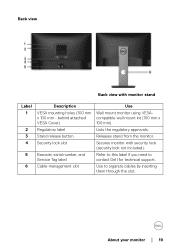
... through the slot. Use to contact Dell for technical support. Back view Back view with security lock (security lock not included). behind attached VESA Cover) Regulatory label Stand release button Security lock slot Barcode, serial number, and Service Tag label Cable-management slot Use Wall mount monitor using VESAcompatible wall mount kit (100...
... through the slot. Use to contact Dell for technical support. Back view Back view with security lock (security lock not included). behind attached VESA Cover) Regulatory label Stand release button Security lock slot Barcode, serial number, and Service Tag label Cable-management slot Use Wall mount monitor using VESAcompatible wall mount kit (100...
Users Guide
Page 12
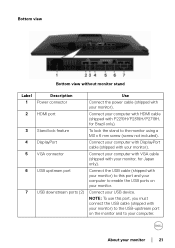
...). About your USB device. Connect your monitor │ 21 Bottom view Bottom view without monitor stand Label 1 2 3 4 5 6 7 Description Power connector HDMI port Stand lock feature DisplayPort VGA connector USB upstream port USB downstream ports (2) Use Connect the power cable (shipped with your computer with HDMI cable (shipped with P2219H/P2319H/P2719H, for Japan onl y). Connect...
...). About your USB device. Connect your monitor │ 21 Bottom view Bottom view without monitor stand Label 1 2 3 4 5 6 7 Description Power connector HDMI port Stand lock feature DisplayPort VGA connector USB upstream port USB downstream ports (2) Use Connect the power cable (shipped with your computer with HDMI cable (shipped with P2219H/P2319H/P2719H, for Japan onl y). Connect...
Users Guide
Page 14
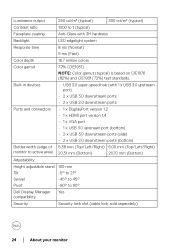
... 2.0 downstream ports (bottom) Border width (edge of 5.62 mm (Top/Left/Right) 5.40 mm (Top/Left/Right) monitor to active area) 19.99 mm (Bottom) 19.86 mm (Bottom) Adjustability Height adjustable stand 130 mm Til t -5° to 21° Swivel -45° to 45° Pivot -90° to 90...° Dell Display Manager Yes compatibility Security Security lock slot (cable lock sold separately) Model Screen type...
... 2.0 downstream ports (bottom) Border width (edge of 5.62 mm (Top/Left/Right) 5.40 mm (Top/Left/Right) monitor to active area) 19.99 mm (Bottom) 19.86 mm (Bottom) Adjustability Height adjustable stand 130 mm Til t -5° to 21° Swivel -45° to 45° Pivot -90° to 90...° Dell Display Manager Yes compatibility Security Security lock slot (cable lock sold separately) Model Screen type...
Users Guide
Page 15
...; 2 x USB 2.0 downstream ports (bottom) Border width (edge of 5.38 mm (Top/Left/Right) 6.00 mm (Top/Left/Right) monitor to active area) 20.31 mm (Bottom) 20.70 mm (Bottom) Adjustability Height adjustable stand 130 mm Til t -5° to 21° Swivel -45° to 45° Pivot -90° to 90...
...; 2 x USB 2.0 downstream ports (bottom) Border width (edge of 5.38 mm (Top/Left/Right) 6.00 mm (Top/Left/Right) monitor to active area) 20.31 mm (Bottom) 20.70 mm (Bottom) Adjustability Height adjustable stand 130 mm Til t -5° to 21° Swivel -45° to 45° Pivot -90° to 90...
Users Guide
Page 17
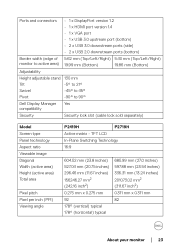
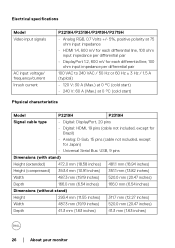
.../ frequency/current Inrush current P2219H/P2319H/P2419H/P2719H •... (cold start) • 240 V: 60 A (Max.) at 0 °C (cold start) Physical characteristics Model P2219H P2319H Signal cable type • Digital: DisplayPort, 20 pins • Digital: HDMI, 19 pins (cable not included...included, except for Japan) • Universal Serial Bus: USB, 9 pins Dimensions (with stand) Height (extended) 472.0 mm (18.58 inches) 481.1 mm (18.94 inches...Depth 166.0 mm (6.54 inches) 166.0 mm (6.54 inches) Dimensions (without stand) Height 293.4 mm (11.55 inches) 311.7 mm (12.27 inches) ...
.../ frequency/current Inrush current P2219H/P2319H/P2419H/P2719H •... (cold start) • 240 V: 60 A (Max.) at 0 °C (cold start) Physical characteristics Model P2219H P2319H Signal cable type • Digital: DisplayPort, 20 pins • Digital: HDMI, 19 pins (cable not included...included, except for Japan) • Universal Serial Bus: USB, 9 pins Dimensions (with stand) Height (extended) 472.0 mm (18.58 inches) 481.1 mm (18.94 inches...Depth 166.0 mm (6.54 inches) 166.0 mm (6.54 inches) Dimensions (without stand) Height 293.4 mm (11.55 inches) 311.7 mm (12.27 inches) ...
Users Guide
Page 18
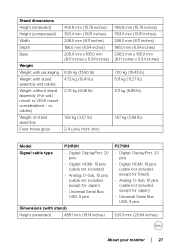
... except for Japan) • Universal Serial Bus: USB, 9 pins 524.3 mm (20.64 inches) About your monitor │ 27 Stand dimensions Height (extended) Height (compressed) Width Depth Base Weight Weight with packaging Weight with stand) Height (extended) 486.1 mm (19.14 inches) P2719H • Digital: DisplayPort, 20 pins • Digital: ... except for Brazil) • Analog: D-Sub, 15 pins (cable not included, except for Japan) • Universal Serial Bus: USB, 9 pins Dimensions (with stand assembly and cables Weight without stand assembly (For wall mount or VESA mount considerations -
... except for Japan) • Universal Serial Bus: USB, 9 pins 524.3 mm (20.64 inches) About your monitor │ 27 Stand dimensions Height (extended) Height (compressed) Width Depth Base Weight Weight with packaging Weight with stand) Height (extended) 486.1 mm (19.14 inches) P2719H • Digital: DisplayPort, 20 pins • Digital: ... except for Brazil) • Analog: D-Sub, 15 pins (cable not included, except for Japan) • Universal Serial Bus: USB, 9 pins Dimensions (with stand assembly and cables Weight without stand assembly (For wall mount or VESA mount considerations -
Users Guide
Page 19
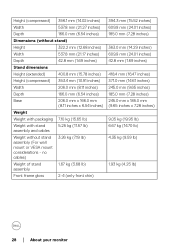
...70 lb) 4.35 kg (9.59 lb) 1.93 kg (4.25 lb) 28 │ About your monitor Height (compressed) 356.1 mm (14.02 inches) Width 537.8 mm (21.27 inches) Depth 166.0 mm (6.54 inches) Dimensions (without stand) Height 322.2 mm (12.68 inches) Width 537.8 mm (21.17 inches) Depth 42.8 mm... (1.69 inches) Stand dimensions Height (extended) 400.8 mm (15.78 inches) Height (compressed) 353.4 mm (13.91 inches) ...
...70 lb) 4.35 kg (9.59 lb) 1.93 kg (4.25 lb) 28 │ About your monitor Height (compressed) 356.1 mm (14.02 inches) Width 537.8 mm (21.27 inches) Depth 166.0 mm (6.54 inches) Dimensions (without stand) Height 322.2 mm (12.68 inches) Width 537.8 mm (21.17 inches) Depth 42.8 mm... (1.69 inches) Stand dimensions Height (extended) 400.8 mm (15.78 inches) Height (compressed) 353.4 mm (13.91 inches) ...
Users Guide
Page 31
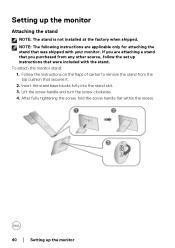
... are applicable only for attaching the stand that was shipped with the stand. Insert the stand base blocks fully into the stand slot. 3. Follow the instructions on the flaps of carton to remove the stand from any other source, follow the set up instructions that secures it. 2. To attach the monitor stand: 1. NOTE: The following instructions are...
... are applicable only for attaching the stand that was shipped with the stand. Insert the stand base blocks fully into the stand slot. 3. Follow the instructions on the flaps of carton to remove the stand from any other source, follow the set up instructions that secures it. 2. To attach the monitor stand: 1. NOTE: The following instructions are...
Users Guide
Page 32
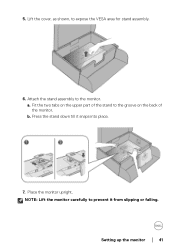
Attach the stand assembly to the groove on the back of the stand to the monitor. Fit the two tabs on the upper part of the monitor. NOTE: Lift the monitor carefully to expose the VESA area for stand assembly. 6. Setting up the monitor │ 41 Place the monitor upright. 5. Press the stand down till it from slipping or falling. b. Lift the cover, as shown, to prevent it snaps into place. 7. a.
Attach the stand assembly to the groove on the back of the stand to the monitor. Fit the two tabs on the upper part of the monitor. NOTE: Lift the monitor carefully to expose the VESA area for stand assembly. 6. Setting up the monitor │ 41 Place the monitor upright. 5. Press the stand down till it from slipping or falling. b. Lift the cover, as shown, to prevent it snaps into place. 7. a.
Users Guide
Page 34
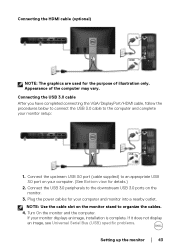
... below to connect the USB 3.0 cable to the computer and complete your monitor displays an image, installation is complete. Connect the USB 3.0 peripherals to the downstream USB 3.0 ports on the monitor stand to an appropriate USB 3.0 port on your computer. (See Bottom view for... your computer and monitor into a nearby outlet. Connect the upstream USB 3.0 port (cable supplied) to organize the cables. 4. If your monitor setup: 1. Plug the power cables for...
... below to connect the USB 3.0 cable to the computer and complete your monitor displays an image, installation is complete. Connect the USB 3.0 peripherals to the downstream USB 3.0 ports on the monitor stand to an appropriate USB 3.0 port on your computer. (See Bottom view for... your computer and monitor into a nearby outlet. Connect the upstream USB 3.0 port (cable supplied) to organize the cables. 4. If your monitor setup: 1. Plug the power cables for...
Users Guide
Page 35
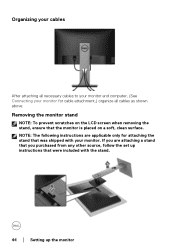
...monitor stand NOTE: To prevent scratches on a soft, clean surface. NOTE: The following instructions are attaching a stand that you are applicable only for cable attachment,) organize all necessary cables to your monitor and computer, (See Connecting your monitor. If you purchased from any other source, follow the set up instructions that were included with your monitor... for attaching the stand that the monitor is placed on the LCD screen when removing the stand, ensure that was shipped with the stand. 44 │ Setting up the monitor Organizing your ...
...monitor stand NOTE: To prevent scratches on a soft, clean surface. NOTE: The following instructions are attaching a stand that you are applicable only for cable attachment,) organize all necessary cables to your monitor and computer, (See Connecting your monitor. If you purchased from any other source, follow the set up instructions that were included with your monitor... for attaching the stand that the monitor is placed on the LCD screen when removing the stand, ensure that was shipped with the stand. 44 │ Setting up the monitor Organizing your ...
Users Guide
Page 36
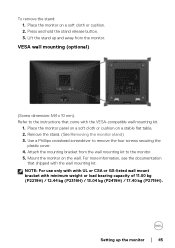
... 11.00 kg (P2219H) / 12.44 kg (P2319H) / 13.04 kg (P2419H) / 17.40 kg (P2719H). Place the monitor panel on a soft cloth or cushion on the wall. Use a Phillips crosshead screwdriver to the monitor. 5. Lift the stand up the monitor │ 45 Remove the stand. (See Removing the monitor stand) 3. Press and hold the stand release button. 3. Setting...
... 11.00 kg (P2219H) / 12.44 kg (P2319H) / 13.04 kg (P2419H) / 17.40 kg (P2719H). Place the monitor panel on a soft cloth or cushion on the wall. Use a Phillips crosshead screwdriver to the monitor. 5. Lift the stand up the monitor │ 45 Remove the stand. (See Removing the monitor stand) 3. Press and hold the stand release button. 3. Setting...
Users Guide
Page 55
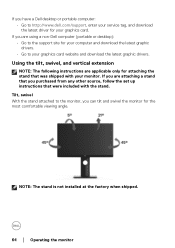
... latest graphic drivers. Tilt, swivel With the stand attached to http://www.dell.com/support, enter your service tag, and download the latest driver for your computer and download the latest graphic drivers. • Go to your monitor. NOTE: The stand is not installed at the factory when shipped.... 64 │ Operating the monitor If you purchased from any other source, follow the set up instructions that was shipped with the stand. If you are attaching a stand that you are using a non-Dell computer (portable or desktop): • Go to the support...
... latest graphic drivers. Tilt, swivel With the stand attached to http://www.dell.com/support, enter your service tag, and download the latest driver for your computer and download the latest graphic drivers. • Go to your monitor. NOTE: The stand is not installed at the factory when shipped.... 64 │ Operating the monitor If you purchased from any other source, follow the set up instructions that was shipped with the stand. If you are attaching a stand that you are using a non-Dell computer (portable or desktop): • Go to the support...
Users Guide
Page 56
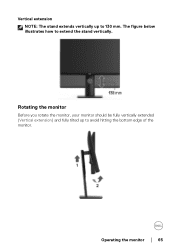
Rotating the monitor Before you rotate the monitor, your monitor should be fully vertically extended (Vertical extension) and fully tilted up to 130 mm. Vertical extension NOTE: The stand extends vertically up to avoid hitting the bottom edge of the monitor. Operating the monitor │ 65 The figure below illustrates how to extend the stand vertically.
Rotating the monitor Before you rotate the monitor, your monitor should be fully vertically extended (Vertical extension) and fully tilted up to 130 mm. Vertical extension NOTE: The stand extends vertically up to avoid hitting the bottom edge of the monitor. Operating the monitor │ 65 The figure below illustrates how to extend the stand vertically.


