Users Guide
Page 3
... 17 Identifying parts and controls 18 Front view 18 Back view 19 Side view 20 Bottom view 21 Monitor specifications 22 Resolution specifications 25 Supported video modes 25 Preset display modes 25 Electrical specifications 26 Physical characteristics 26 Environmental characteristics 29 Power management modes 30 Pin assignments 33 Plug and play capability 36 Universal Serial Bus (USB) interface 36 USB 3.0 36 USB 2.0 36 USB 3.0 upstream connector 37 USB 3.0 downstream connector 37 USB 2.0 downstream connector 38 USB ports 38 LCD monitor quality and pixel policy...
... 17 Identifying parts and controls 18 Front view 18 Back view 19 Side view 20 Bottom view 21 Monitor specifications 22 Resolution specifications 25 Supported video modes 25 Preset display modes 25 Electrical specifications 26 Physical characteristics 26 Environmental characteristics 29 Power management modes 30 Pin assignments 33 Plug and play capability 36 Universal Serial Bus (USB) interface 36 USB 3.0 36 USB 2.0 36 USB 3.0 upstream connector 37 USB 3.0 downstream connector 37 USB 2.0 downstream connector 38 USB ports 38 LCD monitor quality and pixel policy...
Users Guide
Page 4
... Connecting your monitor 42 Connecting the DisplayPort (DisplayPort to DisplayPort) cable. . 42 Connecting the VGA cable (optional 42 Connecting the HDMI cable (optional 43 Connecting the USB 3.0 cable 43 Organizing your cables 44 Removing the monitor stand 44 VESA wall mounting (optional 45 Operating the monitor 46 Power on the monitor 46 Using the front-panel controls 46 Front-panel button 47 Using the On-Screen Display (OSD) menu 48 Accessing the menu system 48 OSD warning message 61 Setting the maximum resolution 63 Using the tilt, swivel, and vertical...
... Connecting your monitor 42 Connecting the DisplayPort (DisplayPort to DisplayPort) cable. . 42 Connecting the VGA cable (optional 42 Connecting the HDMI cable (optional 43 Connecting the USB 3.0 cable 43 Organizing your cables 44 Removing the monitor stand 44 VESA wall mounting (optional 45 Operating the monitor 46 Power on the monitor 46 Using the front-panel controls 46 Front-panel button 47 Using the On-Screen Display (OSD) menu 48 Accessing the menu system 48 OSD warning message 61 Setting the maximum resolution 63 Using the tilt, swivel, and vertical...
Users Guide
Page 8
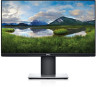
... resolutions. • Color gamut of 72% NTSC. • Tilt, swivel, height, and rotate adjustment capabilities. • Removable stand and Video Electronics Standards Association (VESA™) 100 mm mounting holes for flexible mounting solutions. • Digital connectivity with DisplayPort and HDMI. • Equipped with 1 USB upstream port and 4 USB downstream ports. • Plug and play capability if supported by your monitor │ 17 Resolution: Up to optimize eye comfort. About your system. • On-Screen Display (OSD) adjustments...
... resolutions. • Color gamut of 72% NTSC. • Tilt, swivel, height, and rotate adjustment capabilities. • Removable stand and Video Electronics Standards Association (VESA™) 100 mm mounting holes for flexible mounting solutions. • Digital connectivity with DisplayPort and HDMI. • Equipped with 1 USB upstream port and 4 USB downstream ports. • Plug and play capability if supported by your monitor │ 17 Resolution: Up to optimize eye comfort. About your system. • On-Screen Display (OSD) adjustments...
Users Guide
Page 12
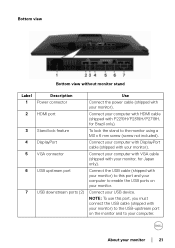
...port, you must connect the USB cable (shipped with your monitor) to the USB-upstream port on your computer. Connect your computer with DisplayPort cable (shipped with your monitor). Connect your monitor │ 21 Connect your computer with HDMI cable (shipped with your monitor, for Brazil only). To lock the stand to your monitor. Bottom view Bottom view without monitor stand Label 1 2 3 4 5 6 7 Description Power connector HDMI port Stand lock feature DisplayPort VGA connector USB upstream port USB downstream ports (2) Use Connect the power cable (shipped with P2219H...
...port, you must connect the USB cable (shipped with your monitor) to the USB-upstream port on your computer. Connect your computer with DisplayPort cable (shipped with your monitor). Connect your monitor │ 21 Connect your computer with HDMI cable (shipped with your monitor, for Brazil only). To lock the stand to your monitor. Bottom view Bottom view without monitor stand Label 1 2 3 4 5 6 7 Description Power connector HDMI port Stand lock feature DisplayPort VGA connector USB upstream port USB downstream ports (2) Use Connect the power cable (shipped with P2219H...
Users Guide
Page 14
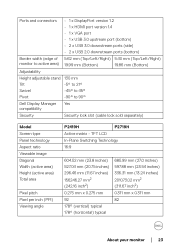
...) Adjustability Height adjustable stand 130 mm Til t -5° to 21° Swivel -45° to 45° Pivot -90° to 90° Dell Display Manager Yes compatibility Security Security lock slot (cable lock sold separately) Model Screen type Panel technology Aspect ratio Viewable image Diagonal Width (active area) Height (active area) Total area Pixel pitch Pixel per inch (PPI) Viewing angle P2419H P2719H Active matrix - TFT LCD In-Plane Switching Technology...
...) Adjustability Height adjustable stand 130 mm Til t -5° to 21° Swivel -45° to 45° Pivot -90° to 90° Dell Display Manager Yes compatibility Security Security lock slot (cable lock sold separately) Model Screen type Panel technology Aspect ratio Viewable image Diagonal Width (active area) Height (active area) Total area Pixel pitch Pixel per inch (PPI) Viewing angle P2419H P2719H Active matrix - TFT LCD In-Plane Switching Technology...
Users Guide
Page 15
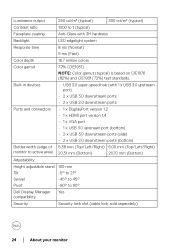
...178; (typical) Contrast ratio 1000 to 90° Dell Display Manager Yes compatibility Security Security lock slot (cable lock sold separately) 24 │ About your monitor Built-in devices • USB 3.0 super-speed hub (with 1 x USB 3.0 upstream port) • 2 x USB 3.0 downstream ports • 2 x USB 2.0 downstream ports Ports and connectors • 1 x DisplayPort version 1.2 • 1 x HDMI port version 1.4 • 1 x VGA port • 1 x USB 3.0 upstream port (bottom) • 2 x USB 3.0 downstream ports (side) • 2 x USB 2.0 downstream ports (bottom) Border...
...178; (typical) Contrast ratio 1000 to 90° Dell Display Manager Yes compatibility Security Security lock slot (cable lock sold separately) 24 │ About your monitor Built-in devices • USB 3.0 super-speed hub (with 1 x USB 3.0 upstream port) • 2 x USB 3.0 downstream ports • 2 x USB 2.0 downstream ports Ports and connectors • 1 x DisplayPort version 1.2 • 1 x HDMI port version 1.4 • 1 x VGA port • 1 x USB 3.0 upstream port (bottom) • 2 x USB 3.0 downstream ports (side) • 2 x USB 2.0 downstream ports (bottom) Border...
Users Guide
Page 31
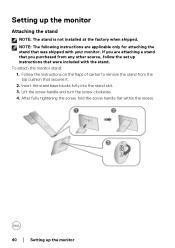
... monitor Insert the stand base blocks fully into the stand slot. 3. Follow the instructions on the flaps of carton to remove the stand from any other source, follow the set up instructions that secures it. 2. To attach the monitor stand: 1. After fully tightening the screw, fold the screw handle flat within the recess. 40 │ Setting up the monitor Attaching the stand NOTE: The stand is not installed at the factory...
... monitor Insert the stand base blocks fully into the stand slot. 3. Follow the instructions on the flaps of carton to remove the stand from any other source, follow the set up instructions that secures it. 2. To attach the monitor stand: 1. After fully tightening the screw, fold the screw handle flat within the recess. 40 │ Setting up the monitor Attaching the stand NOTE: The stand is not installed at the factory...
Users Guide
Page 34
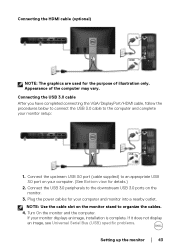
... USB 3.0 cable to the downstream USB 3.0 ports on your computer. (See Bottom view for your monitor displays an image, installation is complete. Connect the upstream USB 3.0 port (cable supplied) to organize the cables. 4. Connecting the HDMI cable (optional) NOTE: The graphics are used for the purpose of the computer may vary. Plug the power cables for details.) 2. Turn On the monitor and the computer. NOTE: Use the cable slot on the monitor stand to an appropriate USB 3.0 port on the monitor...
... USB 3.0 cable to the downstream USB 3.0 ports on your computer. (See Bottom view for your monitor displays an image, installation is complete. Connect the upstream USB 3.0 port (cable supplied) to organize the cables. 4. Connecting the HDMI cable (optional) NOTE: The graphics are used for the purpose of the computer may vary. Plug the power cables for details.) 2. Turn On the monitor and the computer. NOTE: Use the cable slot on the monitor stand to an appropriate USB 3.0 port on the monitor...
Users Guide
Page 42
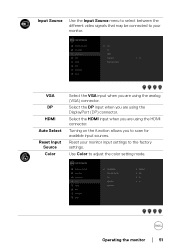
VGA DP HDMI Auto Select Reset Input Source Color Select the VGA input when you are using the HDMI connector. Select the HDMI input when you are using the analog (VGA) connector. Operating the monitor │ 51 Use Color to adjust the color setting mode. Turning on the function allows you are using the DisplayPort (DP) connector. Reset your monitor. Select the DP input when you to scan for available input sources. Input Source Use the Input Source menu to select between the different video signals that may be connected to your monitor input settings to...
VGA DP HDMI Auto Select Reset Input Source Color Select the VGA input when you are using the HDMI connector. Select the HDMI input when you are using the analog (VGA) connector. Operating the monitor │ 51 Use Color to adjust the color setting mode. Turning on the function allows you are using the DisplayPort (DP) connector. Reset your monitor. Select the DP input when you to scan for available input sources. Input Source Use the Input Source menu to select between the different video signals that may be connected to your monitor input settings to...
Users Guide
Page 44
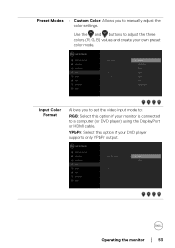
Preset Modes • Custom Color: Allows you to set the video input mode to: RGB: Select this option if your DVD player supports only YPbPr output. Use the and buttons to manually adjust the color settings. Operating the monitor │ 53 YPbPr: Select this option if your own preset color mode. Input Color Format Allows you to adjust the three colors (R, G, B) values and create your monitor is connected to a computer (or DVD player) using the DisplayPort or HDMI cable.
Preset Modes • Custom Color: Allows you to set the video input mode to: RGB: Select this option if your DVD player supports only YPbPr output. Use the and buttons to manually adjust the color settings. Operating the monitor │ 53 YPbPr: Select this option if your own preset color mode. Input Color Format Allows you to adjust the three colors (R, G, B) values and create your monitor is connected to a computer (or DVD player) using the DisplayPort or HDMI cable.
Users Guide
Page 46
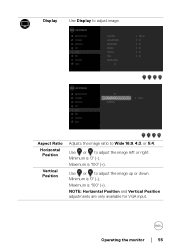
NOTE: Horizontal Position and Vertical Position adjustments are only available for VGA input. Use or to Wide 16:9, 4:3, or 5:4. Minimum is '100' (+). Maximum is '0' (-). Operating the monitor │ 55 Minimum is '100' (+). Maximum is '0' (-). Aspect Ratio Horizontal Position Vertical Position Adjusts the image ratio to adjust the image left or right. Display Use Display to adjust the image up or down. Use or to adjust image.
NOTE: Horizontal Position and Vertical Position adjustments are only available for VGA input. Use or to Wide 16:9, 4:3, or 5:4. Minimum is '100' (+). Maximum is '0' (-). Operating the monitor │ 55 Minimum is '100' (+). Maximum is '0' (-). Aspect Ratio Horizontal Position Vertical Position Adjusts the image ratio to adjust the image left or right. Display Use Display to adjust the image up or down. Use or to adjust image.
Users Guide
Page 47
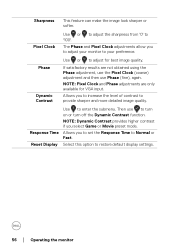
... best image quality. Use to adjust for VGA input. Reset Display Select this option to '100'. NOTE: Pixel Clock and Phase adjustments are not obtained using the Phase adjustment, use the Pixel Clock (coarse) adjustment and then use to your preference. Pixel Clock Use or to adjust the sharpness from '0' to restore default display settings. 56 │ Operating the monitor Response Time Allows you select Game or Movie preset mode. NOTE: Dynamic Contrast provides higher contrast...
... best image quality. Use to adjust for VGA input. Reset Display Select this option to '100'. NOTE: Pixel Clock and Phase adjustments are not obtained using the Phase adjustment, use the Pixel Clock (coarse) adjustment and then use to your preference. Pixel Clock Use or to adjust the sharpness from '0' to restore default display settings. 56 │ Operating the monitor Response Time Allows you select Game or Movie preset mode. NOTE: Dynamic Contrast provides higher contrast...
Users Guide
Page 51
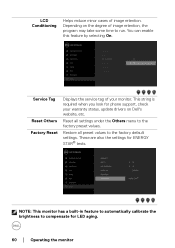
... a built-in feature to automatically calibrate the brightness to the factory default settings. Service Tag Reset Others Factory Reset Displays the service tag of image retention. These are also the settings for LED aging. 60 │ Operating the monitor LCD Conditioning Helps reduce minor cases of your warranty status, update drivers on the degree of image retention, the program may take some time to the factory preset values. This string is...
... a built-in feature to automatically calibrate the brightness to the factory default settings. Service Tag Reset Others Factory Reset Displays the service tag of image retention. These are also the settings for LED aging. 60 │ Operating the monitor LCD Conditioning Helps reduce minor cases of your warranty status, update drivers on the degree of image retention, the program may take some time to the factory preset values. This string is...
Users Guide
Page 59
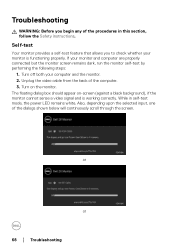
or or 68 │ Troubleshooting Turn off both your monitor and computer are properly connected but the monitor screen remains dark, run the monitor self-test by performing the following steps: 1. Unplug the video cable from the back of the procedures in self-test mode, the power LED remains white. While in this section, follow the Safety instructions. The floating dialog box should appear on...
or or 68 │ Troubleshooting Turn off both your monitor and computer are properly connected but the monitor screen remains dark, run the monitor self-test by performing the following steps: 1. Unplug the video cable from the back of the procedures in self-test mode, the power LED remains white. While in this section, follow the Safety instructions. The floating dialog box should appear on...
Users Guide
Page 60
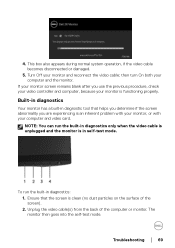
... diagnostic tool that the screen is in diagnostics: 1. Ensure that helps you determine if the screen abnormality you use the previous procedure, check your video controller and computer, because your monitor is an inherent problem with your monitor, or with your monitor screen remains blank after you are experiencing is functioning properly. 4. If your computer and video card. Troubleshooting │ 69 Turn Off your computer and...
... diagnostic tool that the screen is in diagnostics: 1. Ensure that helps you determine if the screen abnormality you use the previous procedure, check your video controller and computer, because your monitor is an inherent problem with your monitor, or with your monitor screen remains blank after you are experiencing is functioning properly. 4. If your computer and video card. Troubleshooting │ 69 Turn Off your computer and...
Users Guide
Page 61
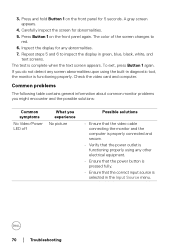
... common monitor problems you might encounter and the possible solutions: Common symptoms No Video/Power LED off What you do not detect any screen abnormalities upon using any abnormalities. 7. The color of the screen changes to inspect the display in the Input Source menu. 70 │ Troubleshooting Repeat steps 5 and 6 to red. 6. Inspect the display for 5 seconds. The test is selected in green, blue, black, white, and text screens. Press and hold Button...
... common monitor problems you might encounter and the possible solutions: Common symptoms No Video/Power LED off What you do not detect any screen abnormalities upon using any abnormalities. 7. The color of the screen changes to inspect the display in the Input Source menu. 70 │ Troubleshooting Repeat steps 5 and 6 to red. 6. Inspect the display for 5 seconds. The test is selected in green, blue, black, white, and text screens. Press and hold Button...
Users Guide
Page 63
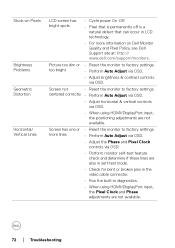
...; Troubleshooting more information on Pixels Brightness Problems Geometric Distortion Horizontal/ Vertical Lines LCD screen has bright spots • Cycle power On-Off. • Pixel that is permanently off is a natural defect that can occur in diagnostics. • When using HDMI/DisplayPort input, the positioning adjustments are not available. Stuck-on Dell Monitor Quality and Pixel Policy, see Dell Support site at: http:// www.de l l.com/support/monitors. Screen has one or • Reset the monitor to factory settings. Picture...
...; Troubleshooting more information on Pixels Brightness Problems Geometric Distortion Horizontal/ Vertical Lines LCD screen has bright spots • Cycle power On-Off. • Pixel that is permanently off is a natural defect that can occur in diagnostics. • When using HDMI/DisplayPort input, the positioning adjustments are not available. Stuck-on Dell Monitor Quality and Pixel Policy, see Dell Support site at: http:// www.de l l.com/support/monitors. Screen has one or • Reset the monitor to factory settings. Picture...
Users Guide
Page 64
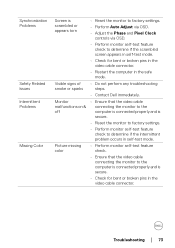
... mode. Synchronization Problems Safety Related Issues Intermittent Problems Missing Color Screen is scrambled or appears torn • Reset the monitor to factory settings. • Perform Auto Adjust via OSD. • Adjust the Phase and Pixel Clock controls via OSD. • Perform monitor self-test feature check to determine if the scrambled screen appears in self-test mode. • Check for bent or broken pins in the video cable connector. Monitor • Ensure that the video cable connecting the monitor...
... mode. Synchronization Problems Safety Related Issues Intermittent Problems Missing Color Screen is scrambled or appears torn • Reset the monitor to factory settings. • Perform Auto Adjust via OSD. • Adjust the Phase and Pixel Clock controls via OSD. • Perform monitor self-test feature check to determine if the scrambled screen appears in self-test mode. • Check for bent or broken pins in the video cable connector. Monitor • Ensure that the video cable connecting the monitor...
Users Guide
Page 65
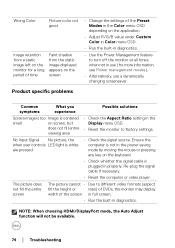
... Input Signal No picture, the when user controls LED light is centered smal l on screen, but does not fill entire viewing area • Check the Aspect Ratio setting in the Display menu OSD. • Reset the monitor to factory settings. Re-plug the signal cable if necessary. • Reset the computer or video player. NOTE: When choosing HDMI/DisplayPort mode, the Auto Adjust function will not be available. 74 │ Troubleshooting The picture does not fill the entire screen The picture...
... Input Signal No picture, the when user controls LED light is centered smal l on screen, but does not fill entire viewing area • Check the Aspect Ratio setting in the Display menu OSD. • Reset the monitor to factory settings. Re-plug the signal cable if necessary. • Reset the computer or video player. NOTE: When choosing HDMI/DisplayPort mode, the Auto Adjust function will not be available. 74 │ Troubleshooting The picture does not fill the entire screen The picture...
Display Manager Users Guide
Page 1
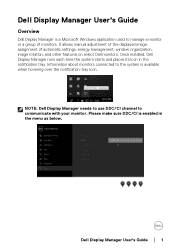
... on select Dell monitors. Please make sure DDC/CI is enabled in the notification tray. Dell Display Manager User's Guide │ 1 Information about monitors connected to the system is a Microsoft Windows application used to communicate with your monitor. Once installed, Dell Display Manager runs each time the system starts and places its icon in the menu as below. It allows manual adjustment of the displayed image, assignment of monitors. Dell Display Manager User's Guide Overview Dell Display Manager...
... on select Dell monitors. Please make sure DDC/CI is enabled in the notification tray. Dell Display Manager User's Guide │ 1 Information about monitors connected to the system is a Microsoft Windows application used to communicate with your monitor. Once installed, Dell Display Manager runs each time the system starts and places its icon in the menu as below. It allows manual adjustment of the displayed image, assignment of monitors. Dell Display Manager User's Guide Overview Dell Display Manager...


