
Users Guide
Page 3
Contents About your monitor 5 Package contents 5 Product features 7 Identifying parts and controls 8 Monitor specifications 12 Universal serial bus (USB) interface 26 Plug and play capability 29 LCD monitor quality and pixel policy 29 Maintenance guidelines 29 Setting up the monitor 30 Attaching the stand 30 Connecting your monitor 32 Organizing cables 34 Disconnecting the monitor stand 35 Wall mounting (optional 36 Operating your monitor 37 Power on the monitor 37 Using the front panel controls 37 Contents | 3
Contents About your monitor 5 Package contents 5 Product features 7 Identifying parts and controls 8 Monitor specifications 12 Universal serial bus (USB) interface 26 Plug and play capability 29 LCD monitor quality and pixel policy 29 Maintenance guidelines 29 Setting up the monitor 30 Attaching the stand 30 Connecting your monitor 32 Organizing cables 34 Disconnecting the monitor stand 35 Wall mounting (optional 36 Operating your monitor 37 Power on the monitor 37 Using the front panel controls 37 Contents | 3
Users Guide
Page 7
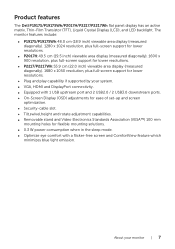
... flexible mounting solutions. ∞ 0.3 W power consumption when in the sleep mode. ∞ Optimize eye comfort with a flicker-free screen and ComfortView feature which minimizes blue light emission. Product features The Dell P1917S/P1917SWh/P2017H/P2217/P2217Wh flat panel display has an active matrix, Thin-Film Transistor (TFT), Liquid Crystal Display (LCD), and LED backlight. About your system. ∞ VGA, HDMI and DisplayPort connectivity. ∞ Equipped with 1 USB upstream port and 2 USB2.0 / 2 USB3.0 downstream ports. ∞ On-Screen Display (OSD) adjustments...
... flexible mounting solutions. ∞ 0.3 W power consumption when in the sleep mode. ∞ Optimize eye comfort with a flicker-free screen and ComfortView feature which minimizes blue light emission. Product features The Dell P1917S/P1917SWh/P2017H/P2217/P2217Wh flat panel display has an active matrix, Thin-Film Transistor (TFT), Liquid Crystal Display (LCD), and LED backlight. About your system. ∞ VGA, HDMI and DisplayPort connectivity. ∞ Equipped with 1 USB upstream port and 2 USB2.0 / 2 USB3.0 downstream ports. ∞ On-Screen Display (OSD) adjustments...
Users Guide
Page 9
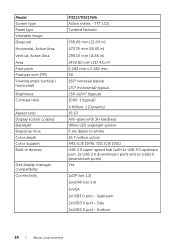
.... 3 Stand release button Release stand from monitor. 4 Security lock slot Secures monitor with monitor stand Label Description Use 1 VESA mounting holes (100 mm x 100 Wall mount monitor using VESAmm - Use to an earthed mains socket-outlet. CAN ICES-3 (B)/NMB-3(B Fabriqué en Chine xxxxx デ x xxxxxx-xx xxxxxxx-xxxxx MSIP-REM-TPF-P1917Sc TPV Electronics (Fujian) Co., Ltd. 080-200-3800 Q40G019N-700-52A DELL P1917S Flat Panel Monitor MODEL NO...
.... 3 Stand release button Release stand from monitor. 4 Security lock slot Secures monitor with monitor stand Label Description Use 1 VESA mounting holes (100 mm x 100 Wall mount monitor using VESAmm - Use to an earthed mains socket-outlet. CAN ICES-3 (B)/NMB-3(B Fabriqué en Chine xxxxx デ x xxxxxx-xx xxxxxxx-xxxxx MSIP-REM-TPF-P1917Sc TPV Electronics (Fujian) Co., Ltd. 080-200-3800 Q40G019N-700-52A DELL P1917S Flat Panel Monitor MODEL NO...

Users Guide
Page 11
... computer to the computer. Connect your computer with VGA cable. Once the cable is connected, you can use the USB connectors on the rear side and bottom side of the monitor. To lock the stand to the monitor using a DP cable. CAN ICES-3 (B)/NMB-3(B) XXXXXXX-XXXXX MSIP-REM-TPV-SE2416Hc Bottom View 61 234 5 Bottom view without monitor stand Label Description 1 Power port 2 HDMI port 3 DP port 4 VGA port 5 USB connector (x2 downstream, x1 upstream) 6 Stand lock feature Use Connect the power cable.
... computer to the computer. Connect your computer with VGA cable. Once the cable is connected, you can use the USB connectors on the rear side and bottom side of the monitor. To lock the stand to the monitor using a DP cable. CAN ICES-3 (B)/NMB-3(B) XXXXXXX-XXXXX MSIP-REM-TPV-SE2416Hc Bottom View 61 234 5 Bottom view without monitor stand Label Description 1 Power port 2 HDMI port 3 DP port 4 VGA port 5 USB connector (x2 downstream, x1 upstream) 6 Stand lock feature Use Connect the power cable.
Users Guide
Page 14
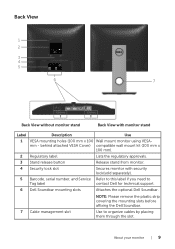
Model Screen type Panel type Viewable image Diagonal Horizontal, Active Area Vertical, Active Area Area Pixel pitch Pixel per inch (PPI) Viewing angle (vertical / horizontal) Brightness Contrast ratio Aspect ratio Display screen coating Backlight Response time Color depth Color Support Built-in ) 1402.80 cm2 (217.43 in2) 0.282 mm x 0.282 mm 90 160° (vertical) typical 170° (horizontal) typical 250 cd/m² (typical) 1000: 1 (typical) 4 Million: 1 (Dynamic) 16:10 Anti-glare...
Model Screen type Panel type Viewable image Diagonal Horizontal, Active Area Vertical, Active Area Area Pixel pitch Pixel per inch (PPI) Viewing angle (vertical / horizontal) Brightness Contrast ratio Aspect ratio Display screen coating Backlight Response time Color depth Color Support Built-in ) 1402.80 cm2 (217.43 in2) 0.282 mm x 0.282 mm 90 160° (vertical) typical 170° (horizontal) typical 250 cd/m² (typical) 1000: 1 (typical) 4 Million: 1 (Dynamic) 16:10 Anti-glare...
Users Guide
Page 29
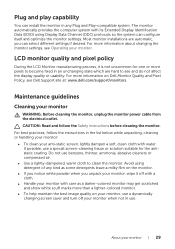
.... Most monitor installations are hard to clean the monitor. For more information on the monitor. ∞ If you notice white powder when you can configure itself and optimize the monitor settings. Maintenance guidelines Cleaning your monitor | 29 For more information about changing the monitor settings, see Dell Support site at: www.dell.com/support/monitors. CAUTION: Read and follow the instructions in use a dynamically changing screen saver and turn off with water. Avoid using Display Data...
.... Most monitor installations are hard to clean the monitor. For more information on the monitor. ∞ If you notice white powder when you can configure itself and optimize the monitor settings. Maintenance guidelines Cleaning your monitor | 29 For more information about changing the monitor settings, see Dell Support site at: www.dell.com/support/monitors. CAUTION: Read and follow the instructions in use a dynamically changing screen saver and turn off with water. Avoid using Display Data...

Users Guide
Page 30
... carton to expose the VESA area for the set up the monitor Attaching the stand NOTE: The stand is detached when the monitor is applicable for a monitor with a stand. Insert the stand base blocks fully into the stand slot. 3. Lift the screw handle and turn the screw clockwise. 4. To attach the monitor stand. 1. Lift the cover, as shown, to remove the stand from the factory. Setting up instructions. NOTE: This is shipped...
... carton to expose the VESA area for the set up the monitor Attaching the stand NOTE: The stand is detached when the monitor is applicable for a monitor with a stand. Insert the stand base blocks fully into the stand slot. 3. Lift the screw handle and turn the screw clockwise. 4. To attach the monitor stand. 1. Lift the cover, as shown, to remove the stand from the factory. Setting up instructions. NOTE: This is shipped...

Users Guide
Page 33
.... 4. Connect the USB 3.0 peripherals to the downstream USB 3.0 ports on the monitor stand to an appropriate USB 3.0 port on the monitor and the computer. Plug the power cables for details.) 2. Use the cable slot on the monitor. 3. Turn on your monitor displays an image, installation is complete. Connect the upstream USB 3.0 port (cable supplied) to organize the cables. If your computer. (See Bottom View for your monitor setup: 1. Setting up the monitor | 33 If it does not display an image, see Universal serial bus (USB) specific problems. 5.
.... 4. Connect the USB 3.0 peripherals to the downstream USB 3.0 ports on the monitor stand to an appropriate USB 3.0 port on the monitor and the computer. Plug the power cables for details.) 2. Use the cable slot on the monitor. 3. Turn on your monitor displays an image, installation is complete. Connect the upstream USB 3.0 port (cable supplied) to organize the cables. If your computer. (See Bottom View for your monitor setup: 1. Setting up the monitor | 33 If it does not display an image, see Universal serial bus (USB) specific problems. 5.

Users Guide
Page 38
... up in a menu. Power On/Off button (with Solid white light indicates the monitor is in a menu. save mode. Down 3 Use the OK button to confirm your monitor 5 Use the power button to turn the monitor on . Blinking white light indicates it is turned LED indicator) on and off. Back 38 | Operating your selection in power- OSD controls Use the buttons on the front of the monitor to adjust the image settings. 12 34 Front Panel Button Description 1 Use the up button to increase values...
... up in a menu. Power On/Off button (with Solid white light indicates the monitor is in a menu. save mode. Down 3 Use the OK button to confirm your monitor 5 Use the power button to turn the monitor on . Blinking white light indicates it is turned LED indicator) on and off. Back 38 | Operating your selection in power- OSD controls Use the buttons on the front of the monitor to adjust the image settings. 12 34 Front Panel Button Description 1 Use the up button to increase values...

Users Guide
Page 40
... Brightness / Contrast Auto Adjust Input Source Color Display Energy Menu Personalize Others Resolution: 1280x1024, 60Hz Energy Use 75% 75% Dell P2017H Brightness / Contrast Auto Adjust Input Source Color Display Energy Menu Personalize Others Resolution: 1600x900, 60Hz Energy Use 75% 75% Dell P2217/P2217Wh Brightness / Contrast Auto Adjust Input Source Color Display Energy Menu Personalize Others Resolution: 1680x1050, 60Hz Energy Use 75% 75% Brightness Contrast Brightness adjusts the luminance of brightness is disabled when dynamic contrast is necessary. Press the button...
... Brightness / Contrast Auto Adjust Input Source Color Display Energy Menu Personalize Others Resolution: 1280x1024, 60Hz Energy Use 75% 75% Dell P2017H Brightness / Contrast Auto Adjust Input Source Color Display Energy Menu Personalize Others Resolution: 1600x900, 60Hz Energy Use 75% 75% Dell P2217/P2217Wh Brightness / Contrast Auto Adjust Input Source Color Display Energy Menu Personalize Others Resolution: 1680x1050, 60Hz Energy Use 75% 75% Brightness Contrast Brightness adjusts the luminance of brightness is disabled when dynamic contrast is necessary. Press the button...
Users Guide
Page 41
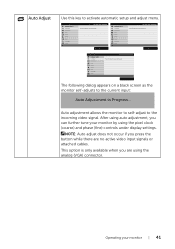
...no active video input signals or attached cables. Auto adjustment allows the monitor to self-adjust to adjust the screen automatically. The following dialog appears on a black screen as the monitor self-adjusts to adjust the screen automatically. NOTE: Auto adjust does not occur if you can further tune your monitor | 41 Operating your monitor by using the analog (VGA) connector. Dell P2217/P2217Wh Brightness / Contrast Auto Adjust Input Source Color Display Energy Menu Personalize Others Resolution: 1680x1050, 60Hz Energy Use Press to the current input: Auto Adjustment in...
...no active video input signals or attached cables. Auto adjustment allows the monitor to self-adjust to adjust the screen automatically. The following dialog appears on a black screen as the monitor self-adjusts to adjust the screen automatically. NOTE: Auto adjust does not occur if you can further tune your monitor | 41 Operating your monitor by using the analog (VGA) connector. Dell P2217/P2217Wh Brightness / Contrast Auto Adjust Input Source Color Display Energy Menu Personalize Others Resolution: 1680x1050, 60Hz Energy Use Press to the current input: Auto Adjustment in...

Users Guide
Page 42
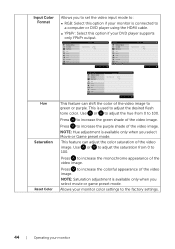
...Dell P2217/P2217Wh Brightness / Contrast Auto Adjust Input Source Color Display Energy Menu Personalize Others Resolution: 1680x1050, 60Hz Energy Use Preset Modes Input Color Format Reset Color Standard RGB 42 | Operating your monitor. Select DP input when you are using the analog (VGA) connector. Push to select the VGA input source. Push to restore default Input Source. Reset Input Source Select this option to select the DP input source. Select HDMI input when you are using the HDMI connector. Color Use color to scan for available input signals. Select auto...
...Dell P2217/P2217Wh Brightness / Contrast Auto Adjust Input Source Color Display Energy Menu Personalize Others Resolution: 1680x1050, 60Hz Energy Use Preset Modes Input Color Format Reset Color Standard RGB 42 | Operating your monitor. Select DP input when you are using the analog (VGA) connector. Push to select the VGA input source. Push to restore default Input Source. Reset Input Source Select this option to select the DP input source. Select HDMI input when you are using the HDMI connector. Color Use color to scan for available input signals. Select auto...
Users Guide
Page 43
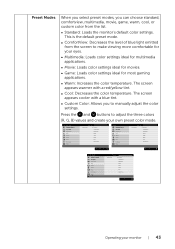
The screen appears cooler with a red/yellow tint. ∞ Cool: Decreases the color temperature. Preset Modes When you select preset modes, you to manually adjust the color settings. This is the default preset mode. ∞ ComfortView: Decreases the level of blue light emitted from the list. ∞ Standard: Loads the monitor's default color settings. Dell P1917S/P1917SWh Brightness / Contrast Auto Adjust Input Source Color Display Energy Menu Personalize Others Resolution: 1280x1024, 60Hz Energy Use Preset Modes Standard ComfortView Multimedia Movie Game...
The screen appears cooler with a red/yellow tint. ∞ Cool: Decreases the color temperature. Preset Modes When you select preset modes, you to manually adjust the color settings. This is the default preset mode. ∞ ComfortView: Decreases the level of blue light emitted from the list. ∞ Standard: Loads the monitor's default color settings. Dell P1917S/P1917SWh Brightness / Contrast Auto Adjust Input Source Color Display Energy Menu Personalize Others Resolution: 1280x1024, 60Hz Energy Use Preset Modes Standard ComfortView Multimedia Movie Game...
Users Guide
Page 44
...the video image to 100. Dell P1917S/P1917SWh Brightness / Contrast Auto Adjust Input Source Color Display Energy Menu Personalize Others Resolution: 1280x1024, 60Hz Energy Use Input Color Format RGB YPbPr Dell P2017H Brightness / Contrast Auto Adjust Input Source Color Display Energy Menu Personalize Others Resolution: 1600x900, 60Hz Energy Use Input Color Format RGB YPbPr Dell P2217/P2217Wh Brightness / Contrast Auto Adjust Input Source Color Display Energy Menu Personalize Others Resolution: 1680x1050, 60Hz Energy Use Input Color Format RGB YPbPr Hue Saturation Reset Color This...
...the video image to 100. Dell P1917S/P1917SWh Brightness / Contrast Auto Adjust Input Source Color Display Energy Menu Personalize Others Resolution: 1280x1024, 60Hz Energy Use Input Color Format RGB YPbPr Dell P2017H Brightness / Contrast Auto Adjust Input Source Color Display Energy Menu Personalize Others Resolution: 1600x900, 60Hz Energy Use Input Color Format RGB YPbPr Dell P2217/P2217Wh Brightness / Contrast Auto Adjust Input Source Color Display Energy Menu Personalize Others Resolution: 1680x1050, 60Hz Energy Use Input Color Format RGB YPbPr Hue Saturation Reset Color This...

Users Guide
Page 45
... Dynamic Contrast Response Time Normal Reset Display Dell P2217/P2217Wh Brightness / Contrast Auto Adjust Input Source Color Display Energy Menu Personalize Others Resolution: 1680x1050, 60Hz Energy Use Aspect Ratio Wide 16:10 Horizontal Position 50 Vertical Position 50 Sharpness 50 Pixel Clock 50 Phase 12 Dynamic Contrast Reset Display Aspect Ratio Adjusts the image ratio to wide 16:10, 4:3 or 5:4(for P2017H). Sharpness This feature can select between fast or normal. (for best image quality. Response Time User can make the image look...
... Dynamic Contrast Response Time Normal Reset Display Dell P2217/P2217Wh Brightness / Contrast Auto Adjust Input Source Color Display Energy Menu Personalize Others Resolution: 1680x1050, 60Hz Energy Use Aspect Ratio Wide 16:10 Horizontal Position 50 Vertical Position 50 Sharpness 50 Pixel Clock 50 Phase 12 Dynamic Contrast Reset Display Aspect Ratio Adjusts the image ratio to wide 16:10, 4:3 or 5:4(for P2017H). Sharpness This feature can select between fast or normal. (for best image quality. Response Time User can make the image look...

Users Guide
Page 47
... Auto Adjust Input Source Color Display Energy Menu Personalize Others Resolution: 1600x900, 60Hz Energy Use Language Rotation Transparency Timer English 20 20 s Lock Reset Menu Unlock Dell P2217/P2217Wh Brightness / Contrast Auto Adjust Input Source Color Display Energy Menu Personalize Others Resolution: 1680x1050, 60Hz Energy Use Language Rotation Transparency Timer English 20 20 s Lock Reset Menu Unlock Language Rotation Transparency Timer Lock Reset Menu Language options set the OSD display to 100. All buttons are allowed. NOTE: When the OSD is selected, no user...
... Auto Adjust Input Source Color Display Energy Menu Personalize Others Resolution: 1600x900, 60Hz Energy Use Language Rotation Transparency Timer English 20 20 s Lock Reset Menu Unlock Dell P2217/P2217Wh Brightness / Contrast Auto Adjust Input Source Color Display Energy Menu Personalize Others Resolution: 1680x1050, 60Hz Energy Use Language Rotation Transparency Timer English 20 20 s Lock Reset Menu Unlock Language Rotation Transparency Timer Lock Reset Menu Language options set the OSD display to 100. All buttons are allowed. NOTE: When the OSD is selected, no user...

Users Guide
Page 56
... to your graphics card website and download the latest graphic drivers. 56 | Operating your monitor Setting the maximum resolution To set the maximum resolution for your graphics driver. In Windows® 10: 1. Click Apply. If you may need to classic desktop. 2. Click OK. Click Advanced display settings. 3. Depending on the desktop and click Screen resolution. 3. Setting up your monitor Click the dropdown list of Resolution and select 1280...
... to your graphics card website and download the latest graphic drivers. 56 | Operating your monitor Setting the maximum resolution To set the maximum resolution for your graphics driver. In Windows® 10: 1. Click Apply. If you may need to classic desktop. 2. Click OK. Click Advanced display settings. 3. Depending on the desktop and click Screen resolution. 3. Setting up your monitor Click the dropdown list of Resolution and select 1280...
Users Guide
Page 63
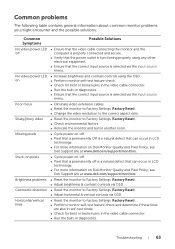
... ∞ Increase brightness and contrast controls using the OSD. ∞ Perform monitor self-test feature check. ∞ Check for bent or broken pins in the video cable connector. ∞ Run the built-in diagnostics. No video/power LED on Dell Monitor Quality and Pixel Policy, see Dell Support site at www.dell.com/support/monitors. Missing pixels ∞ Cycle power on-off. ∞ Pixel that is permanently Off is selected via the Input source menu. Common problems The following...
... ∞ Increase brightness and contrast controls using the OSD. ∞ Perform monitor self-test feature check. ∞ Check for bent or broken pins in the video cable connector. ∞ Run the built-in diagnostics. No video/power LED on Dell Monitor Quality and Pixel Policy, see Dell Support site at www.dell.com/support/monitors. Missing pixels ∞ Cycle power on-off. ∞ Pixel that is permanently Off is selected via the Input source menu. Common problems The following...

Users Guide
Page 64
... feature check to RGB or YPbPr in the Color settings OSD. ∞ Run the built-in diagnostics. Safety related issues Intermittent problems ∞ Do not perform any troubleshooting steps. ∞ Contact Dell immediately. ∞ Ensure that the video cable connecting the monitor to the computer is connected properly and is secure. ∞ Reset the monitor to Factory Settings (Factory Reset). ∞ Perform monitor self-test feature check to turn off the monitor at...
... feature check to RGB or YPbPr in the Color settings OSD. ∞ Run the built-in diagnostics. Safety related issues Intermittent problems ∞ Do not perform any troubleshooting steps. ∞ Contact Dell immediately. ∞ Ensure that the video cable connecting the monitor to the computer is connected properly and is secure. ∞ Reset the monitor to Factory Settings (Factory Reset). ∞ Perform monitor self-test feature check to turn off the monitor at...

Users Guide
Page 65
.... Troubleshooting | 65 No input signal when user controls are pressed ∞ Check the signal source. The picture does not ∞ Due to unlock. (For more information, see Lock). small ∞ Reset the monitor to Factory Settings (Factory Reset) . Disconnect and reconnect the video cable if necessary. ∞ Reset the computer or video player. Product-specific problems Specific Symptoms Possible Solutions Screen image is plugged in properly. Ensure the computer is not in the Display settings OSD. Cannot adjust the monitor with the buttons...
.... Troubleshooting | 65 No input signal when user controls are pressed ∞ Check the signal source. The picture does not ∞ Due to unlock. (For more information, see Lock). small ∞ Reset the monitor to Factory Settings (Factory Reset) . Disconnect and reconnect the video cable if necessary. ∞ Reset the computer or video player. Product-specific problems Specific Symptoms Possible Solutions Screen image is plugged in properly. Ensure the computer is not in the Display settings OSD. Cannot adjust the monitor with the buttons...


