User Guide
Page 1
...you make better use of your computer. Other trademarks and trade names may be used in this text: Dell and the DELL logo are either the entities claiming the marks and names or their products. Model P170Sb/P190Sb/P170St/P190St...other countries; disclaims any manner whatsoever without notice. © 2010 Dell Inc. Environmental Protection Agency. Dell P170S/P190S Flat Panel Monitor User's Guide Dell™ P170S/P190S Flat Panel Monitor User's Guide About Your Monitor Setting Up the Monitor Operating the Monitor Solving Problems Appendix Notes, Cautions, and Warnings NOTE: A NOTE ...
...you make better use of your computer. Other trademarks and trade names may be used in this text: Dell and the DELL logo are either the entities claiming the marks and names or their products. Model P170Sb/P190Sb/P170St/P190St...other countries; disclaims any manner whatsoever without notice. © 2010 Dell Inc. Environmental Protection Agency. Dell P170S/P190S Flat Panel Monitor User's Guide Dell™ P170S/P190S Flat Panel Monitor User's Guide About Your Monitor Setting Up the Monitor Operating the Monitor Solving Problems Appendix Notes, Cautions, and Warnings NOTE: A NOTE ...
User Guide
Page 4
... set both VGA and DVI cables are connected to one PC, this monitor will display an image automatically just as long as they change. Operating the Monitor:Dell P170S/P190S Flat Panel Monitor User's Guide Back to Contents Page Operating the Monitor Dell™ P170S/P190S Flat Panel Monitor User's Guide Using the Front Panel Controls Using the On-Screen Display (OSD) Menu...
... set both VGA and DVI cables are connected to one PC, this monitor will display an image automatically just as long as they change. Operating the Monitor:Dell P170S/P190S Flat Panel Monitor User's Guide Back to Contents Page Operating the Monitor Dell™ P170S/P190S Flat Panel Monitor User's Guide Using the Front Panel Controls Using the On-Screen Display (OSD) Menu...
User Guide
Page 5
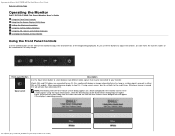
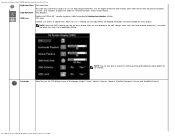
...menu. See Using the OSD Menu. Brightness/Contrast Use this button to launch Brightness/Contrast Menu. The green light indicates the monitor is used to activate automatic setup and adjustment. Power Button and Indicator Using the On-Screen Display (OSD) Menu file:///S|/SSA_Proposal/...The following dialog appears on and off. Operating the Monitor:Dell P170S/P190S Flat Panel Monitor User's Guide or The Menu button is on and fully functional. Use the power button to turn the monitor on a black screen as the monitor self-adjusts to the current input: Auto Adjust Auto ...
...menu. See Using the OSD Menu. Brightness/Contrast Use this button to launch Brightness/Contrast Menu. The green light indicates the monitor is used to activate automatic setup and adjustment. Power Button and Indicator Using the On-Screen Display (OSD) Menu file:///S|/SSA_Proposal/...The following dialog appears on and off. Operating the Monitor:Dell P170S/P190S Flat Panel Monitor User's Guide or The Menu button is on and fully functional. Use the power button to turn the monitor on a black screen as the monitor self-adjusts to the current input: Auto Adjust Auto ...
User Guide
Page 6
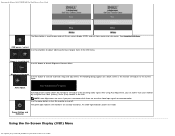
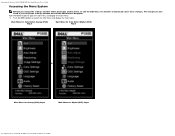
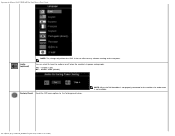
... saves those changes. Push the MENU button to open the OSD menu and display the main menu. 1. Operating the Monitor:Dell P170S/P190S Flat Panel Monitor User's Guide Accessing the Menu System NOTE:If you change the settings and then either proceed to disappear. The changes are also saved if you change the ...
... saves those changes. Push the MENU button to open the OSD menu and display the main menu. 1. Operating the Monitor:Dell P170S/P190S Flat Panel Monitor User's Guide Accessing the Menu System NOTE:If you change the settings and then either proceed to disappear. The changes are also saved if you change the ...
User Guide
Page 7
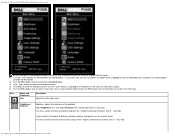
... name is necessary. Contrast adjusts the degree of difference between the setting options. As you are using the analog (VGA) connector. 2. Operating the Monitor:Dell P170S/P190S Flat Panel Monitor User's Guide or NOTE: Auto Adjust, Positioning and Image Settings are only available when you move between darkness and lightness on the menu, to increase the...
... name is necessary. Contrast adjusts the degree of difference between the setting options. As you are using the analog (VGA) connector. 2. Operating the Monitor:Dell P170S/P190S Flat Panel Monitor User's Guide or NOTE: Auto Adjust, Positioning and Image Settings are only available when you move between darkness and lightness on the menu, to increase the...
User Guide
Page 8
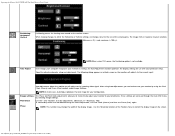
... produces the best image for use Phase (fine), again. Phase NOTE: This function may change the width of the viewing area. Operating the Monitor:Dell P170S/P190S Flat Panel Monitor User's Guide Positioning: Horizontal Vertical Positioning moves the viewing area around on the screen. Image settings: The Phase and Pixel Clock adjustments allow you can further...
... produces the best image for use Phase (fine), again. Phase NOTE: This function may change the width of the viewing area. Operating the Monitor:Dell P170S/P190S Flat Panel Monitor User's Guide Positioning: Horizontal Vertical Positioning moves the viewing area around on the screen. Image settings: The Phase and Pixel Clock adjustments allow you can further...
User Guide
Page 9
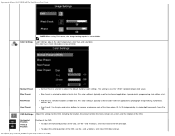
Operating the Monitor:Dell P170S/P190S Flat Panel Monitor User's Guide NOTE:When using DVI source, the Image Settings option is also the "sRGB" standard default color space. Color Settings Color Settings adjusts the color temperature, ... obtain the default (factory) color settings. This color setting is selected to the left and right. and + buttons, and move OSD to obtain a redder tint. User Preset: Use the plus and minus buttons to obtain a bluish tint. Normal Preset Blue Preset Normal Preset is selected to increase or decrease each of...
Operating the Monitor:Dell P170S/P190S Flat Panel Monitor User's Guide NOTE:When using DVI source, the Image Settings option is also the "sRGB" standard default color space. Color Settings Color Settings adjusts the color temperature, ... obtain the default (factory) color settings. This color setting is selected to the left and right. and + buttons, and move OSD to obtain a redder tint. User Preset: Use the plus and minus buttons to obtain a bluish tint. Normal Preset Blue Preset Normal Preset is selected to increase or decrease each of...
User Guide
Page 10
.... Use the - and + buttons to 60 seconds. NOTE: You can also lock or unlock the OSD by 90 ° counter-clockwise. Operating the Monitor:Dell P170S/P190S Flat Panel Monitor User's Guide OSD Hold Time OSD Hold Time: OSD Rotation The OSD stays active for 15 seconds. Adjusting the hold time, sets the length of 8 languages...
.... Use the - and + buttons to 60 seconds. NOTE: You can also lock or unlock the OSD by 90 ° counter-clockwise. Operating the Monitor:Dell P170S/P190S Flat Panel Monitor User's Guide OSD Hold Time OSD Hold Time: OSD Rotation The OSD stays active for 15 seconds. Adjusting the hold time, sets the length of 8 languages...
User Guide
Page 11
enables audio No - NOTE: When the Dell Soundbar is not properly connected to the monitor, the audio menu is in power saving mode. Yes - disables audio (default) Factory Reset: Reset the OSD menu options to have the audio on the computer. file:///S|/SSA_Proposal/P170S_P190S/UG/operate.htm[7/8/2011 4:48:31 PM] You can select to the factory preset values. It has no effect on any software running on or off when the monitor is not available. Operating the Monitor:Dell P170S/P190S Flat Panel Monitor User's Guide Audio (optional) NOTE: The change only affects the OSD.
enables audio No - NOTE: When the Dell Soundbar is not properly connected to the monitor, the audio menu is in power saving mode. Yes - disables audio (default) Factory Reset: Reset the OSD menu options to have the audio on the computer. file:///S|/SSA_Proposal/P170S_P190S/UG/operate.htm[7/8/2011 4:48:31 PM] You can select to the factory preset values. It has no effect on any software running on or off when the monitor is not available. Operating the Monitor:Dell P170S/P190S Flat Panel Monitor User's Guide Audio (optional) NOTE: The change only affects the OSD.
User Guide
Page 12
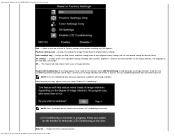
... retention. Enable the DDC/CI control function. Change the Red, Green, and Blue settings back to original factory settings. Change all the user-adjustable settings including color, position, brightness, contrast and OSD hold time to terminate LCD Conditioning at any OSD options. IR - Position settings only - Operating the Monitor:Dell P170S/P190S Flat Panel Monitor User's Guide Exit -
... retention. Enable the DDC/CI control function. Change the Red, Green, and Blue settings back to original factory settings. Change all the user-adjustable settings including color, position, brightness, contrast and OSD hold time to terminate LCD Conditioning at any OSD options. IR - Position settings only - Operating the Monitor:Dell P170S/P190S Flat Panel Monitor User's Guide Exit -
User Guide
Page 13
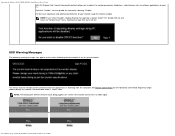
... PC. This means that the monitor cannot synchronize with the signal that the monitor is receiving from the computer. NOTE: The floating Dell Self-test Feature Check dialog appears on your monitor, keep this monitor. Warning message time-out in 20 sec. Recommended mode is "Enable". Operating the Monitor:Dell P170S/P190S Flat Panel Monitor User's Guide DDC/CI (Display Data...
... PC. This means that the monitor cannot synchronize with the signal that the monitor is receiving from the computer. NOTE: The floating Dell Self-test Feature Check dialog appears on your monitor, keep this monitor. Warning message time-out in 20 sec. Recommended mode is "Enable". Operating the Monitor:Dell P170S/P190S Flat Panel Monitor User's Guide DDC/CI (Display Data...

User Guide
Page 14
... tab. 3. If you do not see 1280 X 1024 as an option, you are using a non-Dell computer (portable or desktop): Go to the support site for the monitor: 1. See Solving Problems Setting the Maximum Resolution To set the maximum resolution for your service tag, and ...[7/8/2011 4:48:31 PM] The Soundbar has a rotary volume and on/off control to mount on Dell flat panel displays. Depending on the desktop and select Properties. 2. Click OK. Operating the Monitor:Dell P170S/P190S Flat Panel Monitor User's Guide or Occasionally, no warning message appears, but the screen is blank.
... tab. 3. If you do not see 1280 X 1024 as an option, you are using a non-Dell computer (portable or desktop): Go to the support site for the monitor: 1. See Solving Problems Setting the Maximum Resolution To set the maximum resolution for your service tag, and ...[7/8/2011 4:48:31 PM] The Soundbar has a rotary volume and on/off control to mount on Dell flat panel displays. Depending on the desktop and select Properties. 2. Click OK. Operating the Monitor:Dell P170S/P190S Flat Panel Monitor User's Guide or Occasionally, no warning message appears, but the screen is blank.
User Guide
Page 15
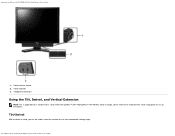
Power indicator 3. Headphone connectors Using the Tilt, Swivel, and Vertical Extension NOTE: This is bought, please refer to the respective AIO stand setup guide for set up instructions. Tilt/Swivel With the built-in stand, you can tilt and/or swivel the monitor for a monitor with a stand. When the OptiPlex™ USFF 780/OptiPlex™ SFF 980 AIO Stand is applicable for the most comfortable viewing angle. Power/volume control 2. file:///S|/SSA_Proposal/P170S_P190S/UG/operate.htm[7/8/2011 4:48:31 PM] Operating the Monitor:Dell P170S/P190S Flat Panel Monitor User's Guide 1.
Power indicator 3. Headphone connectors Using the Tilt, Swivel, and Vertical Extension NOTE: This is bought, please refer to the respective AIO stand setup guide for set up instructions. Tilt/Swivel With the built-in stand, you can tilt and/or swivel the monitor for a monitor with a stand. When the OptiPlex™ USFF 780/OptiPlex™ SFF 980 AIO Stand is applicable for the most comfortable viewing angle. Power/volume control 2. file:///S|/SSA_Proposal/P170S_P190S/UG/operate.htm[7/8/2011 4:48:31 PM] Operating the Monitor:Dell P170S/P190S Flat Panel Monitor User's Guide 1.
User Guide
Page 16
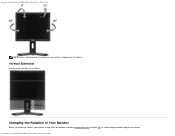
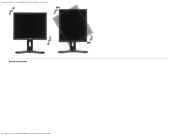
file:///S|/SSA_Proposal/P170S_P190S/UG/operate.htm[7/8/2011 4:48:31 PM] Changing the Rotation of the monitor. Operating the Monitor:Dell P170S/P190S Flat Panel Monitor User's Guide NOTE:Stand is detached and extended when the monitor is shipped from the factory. Vertical Extension Stand extends vertically up to avoid hitting the bottom edge of Your Monitor Before you rotate the monitor, your monitor should either be vertically extended (Vertical Extension) or titled (Tilt) to 130mm.
file:///S|/SSA_Proposal/P170S_P190S/UG/operate.htm[7/8/2011 4:48:31 PM] Changing the Rotation of the monitor. Operating the Monitor:Dell P170S/P190S Flat Panel Monitor User's Guide NOTE:Stand is detached and extended when the monitor is shipped from the factory. Vertical Extension Stand extends vertically up to avoid hitting the bottom edge of Your Monitor Before you rotate the monitor, your monitor should either be vertically extended (Vertical Extension) or titled (Tilt) to 130mm.
User Guide
Page 17
Operating the Monitor:Dell P170S/P190S Flat Panel Monitor User's Guide Back to Contents Page file:///S|/SSA_Proposal/P170S_P190S/UG/operate.htm[7/8/2011 4:48:31 PM]
Operating the Monitor:Dell P170S/P190S Flat Panel Monitor User's Guide Back to Contents Page file:///S|/SSA_Proposal/P170S_P190S/UG/operate.htm[7/8/2011 4:48:31 PM]
User Guide
Page 19
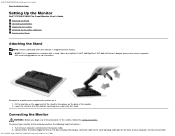
...: Before you begin any of your computer. Turn off your monitor to the computer perform the following steps/instructions: 1. Dell P170S/P190S Flat Panel Monitor User's Guide Back to Contents Page Setting Up the Monitor Dell™ P170S/P190S Flat Panel Monitor User's Guide Attaching the Stand Connecting the Monitor Organizing Your Cables Attaching the Soundbar (Optional) Removing the Stand Attaching the Stand...
...: Before you begin any of your computer. Turn off your monitor to the computer perform the following steps/instructions: 1. Dell P170S/P190S Flat Panel Monitor User's Guide Back to Contents Page Setting Up the Monitor Dell™ P170S/P190S Flat Panel Monitor User's Guide Attaching the Stand Connecting the Monitor Organizing Your Cables Attaching the Soundbar (Optional) Removing the Stand Attaching the Stand...
User Guide
Page 20
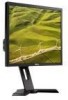
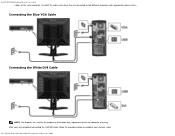
After you have completed connecting the VGA/DVI cable, follow the procedure below to two different computers with appropriate video systems. Connecting the Blue VGA Cable Connecting the White DVI Cable NOTE: The Graphics are connected to complete your monitor setup: file:///S|/SSA_Proposal/P170S_P190S/UG/setup.htm[7/8/2011 4:49:17 PM] Appearance of illustration only. Dell P170S/P190S Flat Panel Monitor User's Guide cables on the same computer. Use both the cables only when they are used for the purpose of the the computer may vary.
After you have completed connecting the VGA/DVI cable, follow the procedure below to two different computers with appropriate video systems. Connecting the Blue VGA Cable Connecting the White DVI Cable NOTE: The Graphics are connected to complete your monitor setup: file:///S|/SSA_Proposal/P170S_P190S/UG/setup.htm[7/8/2011 4:49:17 PM] Appearance of illustration only. Dell P170S/P190S Flat Panel Monitor User's Guide cables on the same computer. Use both the cables only when they are used for the purpose of the the computer may vary.
User Guide
Page 21
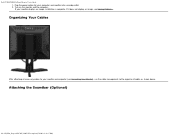
Plug the power cables for your monitor displays an image, installation is complete. If your computer and monitor into a nearby outlet. 2. Turn on the monitor and the computer. If it does not display an image, see Solving Problems. Organizing Your Cables After attaching all necessary cables to your monitor and computer (see Connecting Your Monitor), use the cable management slot to organize all cables as shown above. Dell P170S/P190S Flat Panel Monitor User's Guide 1. Attaching the Soundbar (Optional) file:///S|/SSA_Proposal/P170S_P190S/UG/setup.htm[7/8/2011 4:49:17 PM]
Plug the power cables for your monitor displays an image, installation is complete. If your computer and monitor into a nearby outlet. 2. Turn on the monitor and the computer. If it does not display an image, see Solving Problems. Organizing Your Cables After attaching all necessary cables to your monitor and computer (see Connecting Your Monitor), use the cable management slot to organize all cables as shown above. Dell P170S/P190S Flat Panel Monitor User's Guide 1. Attaching the Soundbar (Optional) file:///S|/SSA_Proposal/P170S_P190S/UG/setup.htm[7/8/2011 4:49:17 PM]
User Guide
Page 22
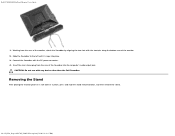
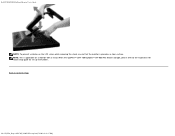
Insert the mini stereo plug from the rear of the monitor, attach the Soundbar by aligning the two slots with the two tabs along the bottom rear of the Soundbar into place. 3. CAUTION: Do not use ... the Soundbar with any device other than the Dell Soundbar Removing the Stand After placing the monitor panel on a soft cloth or cushion, press and hold the stand removal button, and then remove the stand. Working from the rear of the monitor. 2. Dell P170S/P190S Flat Panel Monitor User's Guide 1. Slide the Soundbar to the left until it...
Insert the mini stereo plug from the rear of the monitor, attach the Soundbar by aligning the two slots with the two tabs along the bottom rear of the Soundbar into place. 3. CAUTION: Do not use ... the Soundbar with any device other than the Dell Soundbar Removing the Stand After placing the monitor panel on a soft cloth or cushion, press and hold the stand removal button, and then remove the stand. Working from the rear of the monitor. 2. Dell P170S/P190S Flat Panel Monitor User's Guide 1. Slide the Soundbar to the left until it...
User Guide
Page 23
When the OptiPlex™ USFF 780/Optiplex™ SFF 980 AIO Stand is bought, please refer to Contents Page file:///S|/SSA_Proposal/P170S_P190S/UG/setup.htm[7/8/2011 4:49:17 PM] NOTE: This is placed on a clean surface. Back to the respective AIO stand setup guide for a monitor with a stand. Dell P170S/P190S Flat Panel Monitor User's Guide NOTE: To prevent scratches on the LCD screen while removing the stand, ensure that the monitor is applicable for set up instructions.
When the OptiPlex™ USFF 780/Optiplex™ SFF 980 AIO Stand is bought, please refer to Contents Page file:///S|/SSA_Proposal/P170S_P190S/UG/setup.htm[7/8/2011 4:49:17 PM] NOTE: This is placed on a clean surface. Back to the respective AIO stand setup guide for a monitor with a stand. Dell P170S/P190S Flat Panel Monitor User's Guide NOTE: To prevent scratches on the LCD screen while removing the stand, ensure that the monitor is applicable for set up instructions.

