User Guide
Page 1
Dell P170S/P190S Flat Panel Monitor User's Guide Dell™ P170S/P190S Flat Panel Monitor User's Guide About Your Monitor Setting Up the Monitor Operating the Monitor Solving Problems Appendix Notes, Cautions, and Warnings NOTE: A NOTE indicates important information that this text: Dell and the DELL logo are not followed. Trademarks used in this document is subject to change without the written permission of Dell Inc; disclaims any proprietary interest in any manner...
Dell P170S/P190S Flat Panel Monitor User's Guide Dell™ P170S/P190S Flat Panel Monitor User's Guide About Your Monitor Setting Up the Monitor Operating the Monitor Solving Problems Appendix Notes, Cautions, and Warnings NOTE: A NOTE indicates important information that this text: Dell and the DELL logo are not followed. Trademarks used in this document is subject to change without the written permission of Dell Inc; disclaims any proprietary interest in any manner...
User Guide
Page 4
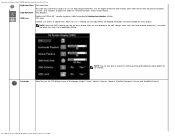
... VGA or DVI outputs. Input select NOTE:The floating 'Dell Self-test Feature Check' dialog appears on the front of the monitor to adjust the characteristics of the image being displayed. Operating the Monitor:Dell P170S/P190S Flat Panel Monitor User's Guide Back to Contents Page Operating the Monitor Dell™ P170S/P190S Flat Panel Monitor User's Guide Using the Front Panel Controls Using the On-Screen Display (OSD) Menu Setting...
... VGA or DVI outputs. Input select NOTE:The floating 'Dell Self-test Feature Check' dialog appears on the front of the monitor to adjust the characteristics of the image being displayed. Operating the Monitor:Dell P170S/P190S Flat Panel Monitor User's Guide Back to Contents Page Operating the Monitor Dell™ P170S/P190S Flat Panel Monitor User's Guide Using the Front Panel Controls Using the On-Screen Display (OSD) Menu Setting...
User Guide
Page 5
... Up (+) Use this button to launch Brightness/Contrast Menu. NOTE: Auto Adjust does not occur if you can further tune your monitor by using Auto Adjustment, you press the button while there are no active video input signals or attached cables. An amber light ...The following dialog appears on and off. The green light indicates the monitor is used to the incoming video signal. Brightness/Contrast Use this button to activate automatic setup and adjustment. Operating the Monitor:Dell P170S/P190S Flat Panel Monitor User's Guide or The Menu button is on -screen display (OSD), and exit...
... Up (+) Use this button to launch Brightness/Contrast Menu. NOTE: Auto Adjust does not occur if you can further tune your monitor by using Auto Adjustment, you press the button while there are no active video input signals or attached cables. An amber light ...The following dialog appears on and off. The green light indicates the monitor is used to the incoming video signal. Brightness/Contrast Use this button to activate automatic setup and adjustment. Operating the Monitor:Dell P170S/P190S Flat Panel Monitor User's Guide or The Menu button is on -screen display (OSD), and exit...
User Guide
Page 6
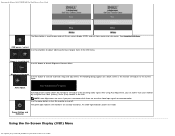
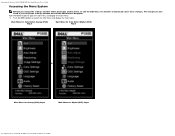
... Main Menu for Auto Detect Digital (DVI) Input or Main Menu for Analog (VGA) Input Main Menu for the OSD menu to disappear. Operating the Monitor:Dell P170S/P190S Flat Panel Monitor User's Guide Accessing the Menu System NOTE:If you change the settings and then either proceed to another menu, or exit the OSD menu, the...
... Main Menu for Auto Detect Digital (DVI) Input or Main Menu for Analog (VGA) Input Main Menu for the OSD menu to disappear. Operating the Monitor:Dell P170S/P190S Flat Panel Monitor User's Guide Accessing the Menu System NOTE:If you change the settings and then either proceed to another menu, or exit the OSD menu, the...
User Guide
Page 7
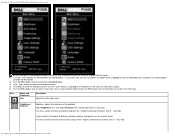
...from the OSD menu. and + button to decrease luminance (min 0 ~ max 100). and + buttons, according to the indicators on the monitor screen. As you are using the analog (VGA) connector. 2. button to select the desired parameter. 5. Contrast adjusts the degree of difference ...min 0 ~ max 100). See the table below for the monitor. 3. Push MENU to activate the highlighted option. 4. Push the MENU button once to enter the slide bar and then use the - Operating the Monitor:Dell P170S/P190S Flat Panel Monitor User's Guide or NOTE: Auto Adjust, Positioning and Image Settings are only ...
...from the OSD menu. and + button to decrease luminance (min 0 ~ max 100). and + buttons, according to the indicators on the monitor screen. As you are using the analog (VGA) connector. 2. button to select the desired parameter. 5. Contrast adjusts the degree of difference ...min 0 ~ max 100). See the table below for the monitor. 3. Push MENU to activate the highlighted option. 4. Push the MENU button once to enter the slide bar and then use the - Operating the Monitor:Dell P170S/P190S Flat Panel Monitor User's Guide or NOTE: Auto Adjust, Positioning and Image Settings are only ...
User Guide
Page 8
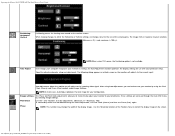
... tune your particular setup. Operating the Monitor:Dell P170S/P190S Flat Panel Monitor User's Guide Positioning: Horizontal Vertical Positioning moves the viewing area around on a black screen as the monitor self-adjusts to the current input: Auto Adjustment allows the monitor to self-adjust to the incoming video... If satisfactory results are accessed through the main OSD menu, by using Auto Adjustment, you to more closely adjust your monitor to center the display image on startup, the Auto Adjustment function optimizes the display settings for your selection. Auto Adjust Even...
... tune your particular setup. Operating the Monitor:Dell P170S/P190S Flat Panel Monitor User's Guide Positioning: Horizontal Vertical Positioning moves the viewing area around on a black screen as the monitor self-adjusts to the current input: Auto Adjustment allows the monitor to self-adjust to the incoming video... If satisfactory results are accessed through the main OSD menu, by using Auto Adjustment, you to more closely adjust your monitor to center the display image on startup, the Auto Adjustment function optimizes the display settings for your selection. Auto Adjust Even...
User Guide
Page 9
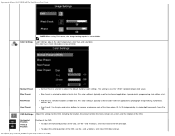
...This color setting is not available. and + buttons, and move OSD down and up. This setting is selected to obtain a redder tint. User Preset: Use the plus and minus buttons to increase or decrease each of the three colors (R, G, B) independently, in areas of the OSD....Settings adjusts the color temperature, color hue, and saturation. To adjust the vertical position of the OSD, use the - Operating the Monitor:Dell P170S/P190S Flat Panel Monitor User's Guide NOTE:When using DVI source, the Image Settings option is typically used for the OSD, including the location, the amount of time...
...This color setting is not available. and + buttons, and move OSD down and up. This setting is selected to obtain a redder tint. User Preset: Use the plus and minus buttons to increase or decrease each of the three colors (R, G, B) independently, in areas of the OSD....Settings adjusts the color temperature, color hue, and saturation. To adjust the vertical position of the OSD, use the - Operating the Monitor:Dell P170S/P190S Flat Panel Monitor User's Guide NOTE:When using DVI source, the Image Settings option is typically used for the OSD, including the location, the amount of time...
User Guide
Page 10
... also lock or unlock the OSD by 90 ° counter-clockwise. Select No (-) to unlock and allow user access to the OSD settings menu, with OSD Lock selected. All buttons are allowed. NOTE: When the OSD is selected, no...(English, French, Spanish, German, Japanese, Brazilian Portuguese, Russian and Simplified Chinese). Adjust according to Rotating Your Monitor setction OSD Lock: Controls user access to adjustments. Operating the Monitor:Dell P170S/P190S Flat Panel Monitor User's Guide OSD Hold Time OSD Hold Time: OSD Rotation The OSD stays active for 15 seconds. When Yes (+) is...
... also lock or unlock the OSD by 90 ° counter-clockwise. Select No (-) to unlock and allow user access to the OSD settings menu, with OSD Lock selected. All buttons are allowed. NOTE: When the OSD is selected, no...(English, French, Spanish, German, Japanese, Brazilian Portuguese, Russian and Simplified Chinese). Adjust according to Rotating Your Monitor setction OSD Lock: Controls user access to adjustments. Operating the Monitor:Dell P170S/P190S Flat Panel Monitor User's Guide OSD Hold Time OSD Hold Time: OSD Rotation The OSD stays active for 15 seconds. When Yes (+) is...
User Guide
Page 11
NOTE: When the Dell Soundbar is not properly connected to the monitor, the audio menu is in power saving mode. disables audio (default) Factory Reset: Reset the OSD menu options to have the audio on the computer. It has no effect on any software running on or off when the monitor is not available. Yes - Operating the Monitor:Dell P170S/P190S Flat Panel Monitor User's Guide Audio (optional) NOTE: The change only affects the OSD. You can select to the factory preset values. enables audio No - file:///S|/SSA_Proposal/P170S_P190S/UG/operate.htm[7/8/2011 4:48:31 PM]
NOTE: When the Dell Soundbar is not properly connected to the monitor, the audio menu is in power saving mode. disables audio (default) Factory Reset: Reset the OSD menu options to have the audio on the computer. It has no effect on any software running on or off when the monitor is not available. Yes - Operating the Monitor:Dell P170S/P190S Flat Panel Monitor User's Guide Audio (optional) NOTE: The change only affects the OSD. You can select to the factory preset values. enables audio No - file:///S|/SSA_Proposal/P170S_P190S/UG/operate.htm[7/8/2011 4:48:31 PM]
User Guide
Page 12
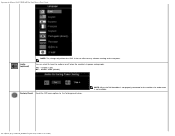
Change the settings for Normal Preset. Using the LCD Conditioning feature may take several hours. Below warning message appears once user select "Enable LCD Conditioning": NOTE: Press any time. Operating the Monitor:Dell P170S/P190S Flat Panel Monitor User's Guide Exit - Severe cases of the OSD does not change. Position settings only - Change the Red, Green, and Blue settings back to the factory...
Change the settings for Normal Preset. Using the LCD Conditioning feature may take several hours. Below warning message appears once user select "Enable LCD Conditioning": NOTE: Press any time. Operating the Monitor:Dell P170S/P190S Flat Panel Monitor User's Guide Exit - Severe cases of the OSD does not change. Position settings only - Change the Red, Green, and Blue settings back to the factory...
User Guide
Page 13
.... or file:///S|/SSA_Proposal/P170S_P190S/UG/operate.htm[7/8/2011 4:48:31 PM] Operating the Monitor:Dell P170S/P190S Flat Panel Monitor User's Guide DDC/CI (Display Data Channel/Command Interface) allows you to "Factory Reset" menu. This means that the monitor cannot synchronize with the signal that the monitor is receiving from the computer. You can disable this feature by this feature...
.... or file:///S|/SSA_Proposal/P170S_P190S/UG/operate.htm[7/8/2011 4:48:31 PM] Operating the Monitor:Dell P170S/P190S Flat Panel Monitor User's Guide DDC/CI (Display Data Channel/Command Interface) allows you to "Factory Reset" menu. This means that the monitor cannot synchronize with the signal that the monitor is receiving from the computer. You can disable this feature by this feature...

User Guide
Page 14
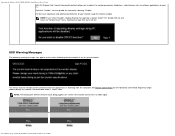
.... Select the Settings tab. 3. file:///S|/SSA_Proposal/P170S_P190S/UG/operate.htm[7/8/2011 4:48:31 PM] Right-click on Dell flat panel displays. Click OK. Go to adjust the overall system level, a blue LED for the monitor: 1. Operating the Monitor:Dell P170S/P190S Flat Panel Monitor User's Guide or Occasionally, no warning message appears, but the screen is not synchronizing with the computer. This could...
.... Select the Settings tab. 3. file:///S|/SSA_Proposal/P170S_P190S/UG/operate.htm[7/8/2011 4:48:31 PM] Right-click on Dell flat panel displays. Click OK. Go to adjust the overall system level, a blue LED for the monitor: 1. Operating the Monitor:Dell P170S/P190S Flat Panel Monitor User's Guide or Occasionally, no warning message appears, but the screen is not synchronizing with the computer. This could...
User Guide
Page 15
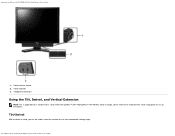
Power indicator 3. file:///S|/SSA_Proposal/P170S_P190S/UG/operate.htm[7/8/2011 4:48:31 PM] Operating the Monitor:Dell P170S/P190S Flat Panel Monitor User's Guide 1. Headphone connectors Using the Tilt, Swivel, and Vertical Extension NOTE: This is bought, please refer to the respective AIO stand setup guide for set up instructions. Tilt/Swivel With the built-in stand, you can tilt and/or swivel the monitor for a monitor with a stand. Power/volume control 2. When the OptiPlex™ USFF 780/OptiPlex™ SFF 980 AIO Stand is applicable for the most comfortable viewing angle.
Power indicator 3. file:///S|/SSA_Proposal/P170S_P190S/UG/operate.htm[7/8/2011 4:48:31 PM] Operating the Monitor:Dell P170S/P190S Flat Panel Monitor User's Guide 1. Headphone connectors Using the Tilt, Swivel, and Vertical Extension NOTE: This is bought, please refer to the respective AIO stand setup guide for set up instructions. Tilt/Swivel With the built-in stand, you can tilt and/or swivel the monitor for a monitor with a stand. Power/volume control 2. When the OptiPlex™ USFF 780/OptiPlex™ SFF 980 AIO Stand is applicable for the most comfortable viewing angle.
User Guide
Page 16
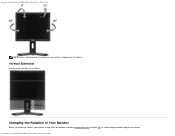
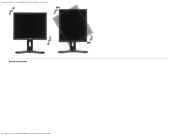
Changing the Rotation of the monitor. file:///S|/SSA_Proposal/P170S_P190S/UG/operate.htm[7/8/2011 4:48:31 PM] Operating the Monitor:Dell P170S/P190S Flat Panel Monitor User's Guide NOTE:Stand is detached and extended when the monitor is shipped from the factory. Vertical Extension Stand extends vertically up to avoid hitting the bottom edge of Your Monitor Before you rotate the monitor, your monitor should either be vertically extended (Vertical Extension) or titled (Tilt) to 130mm.
Changing the Rotation of the monitor. file:///S|/SSA_Proposal/P170S_P190S/UG/operate.htm[7/8/2011 4:48:31 PM] Operating the Monitor:Dell P170S/P190S Flat Panel Monitor User's Guide NOTE:Stand is detached and extended when the monitor is shipped from the factory. Vertical Extension Stand extends vertically up to avoid hitting the bottom edge of Your Monitor Before you rotate the monitor, your monitor should either be vertically extended (Vertical Extension) or titled (Tilt) to 130mm.
User Guide
Page 17
Operating the Monitor:Dell P170S/P190S Flat Panel Monitor User's Guide Back to Contents Page file:///S|/SSA_Proposal/P170S_P190S/UG/operate.htm[7/8/2011 4:48:31 PM]
Operating the Monitor:Dell P170S/P190S Flat Panel Monitor User's Guide Back to Contents Page file:///S|/SSA_Proposal/P170S_P190S/UG/operate.htm[7/8/2011 4:48:31 PM]
User Guide
Page 19
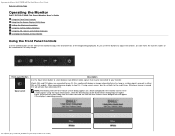
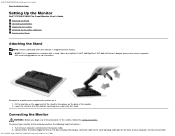
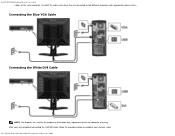
...and disconnect the power cable. 2. Connecting the Monitor WARNING: Before you begin any of the monitor. 2. Dell P170S/P190S Flat Panel Monitor User's Guide Back to Contents Page Setting Up the Monitor Dell™ P170S/P190S Flat Panel Monitor User's Guide Attaching the Stand Connecting the Monitor Organizing Your Cables Attaching the Soundbar (Optional) .... Remove the monitor cover and place the monitor on the back of the procedures in this section, follow the safety instructions. Do not connect both file:///S|/SSA_Proposal/P170S_P190S/UG/setup.htm[7/8/2011 4:49:17 PM] NOTE:...
...and disconnect the power cable. 2. Connecting the Monitor WARNING: Before you begin any of the monitor. 2. Dell P170S/P190S Flat Panel Monitor User's Guide Back to Contents Page Setting Up the Monitor Dell™ P170S/P190S Flat Panel Monitor User's Guide Attaching the Stand Connecting the Monitor Organizing Your Cables Attaching the Soundbar (Optional) .... Remove the monitor cover and place the monitor on the back of the procedures in this section, follow the safety instructions. Do not connect both file:///S|/SSA_Proposal/P170S_P190S/UG/setup.htm[7/8/2011 4:49:17 PM] NOTE:...
User Guide
Page 20
Use both the cables only when they are connected to complete your monitor setup: file:///S|/SSA_Proposal/P170S_P190S/UG/setup.htm[7/8/2011 4:49:17 PM] After you have completed connecting the VGA/DVI cable, follow the procedure below to two different computers with appropriate video systems. Connecting the Blue VGA Cable Connecting the White DVI Cable NOTE: The Graphics are used for the purpose of the the computer may vary. Appearance of illustration only. Dell P170S/P190S Flat Panel Monitor User's Guide cables on the same computer.
Use both the cables only when they are connected to complete your monitor setup: file:///S|/SSA_Proposal/P170S_P190S/UG/setup.htm[7/8/2011 4:49:17 PM] After you have completed connecting the VGA/DVI cable, follow the procedure below to two different computers with appropriate video systems. Connecting the Blue VGA Cable Connecting the White DVI Cable NOTE: The Graphics are used for the purpose of the the computer may vary. Appearance of illustration only. Dell P170S/P190S Flat Panel Monitor User's Guide cables on the same computer.
User Guide
Page 21
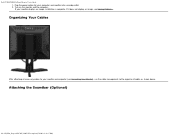
Dell P170S/P190S Flat Panel Monitor User's Guide 1. Plug the power cables for your monitor and computer (see Solving Problems. Organizing Your Cables After attaching all necessary cables to organize all cables as shown above. Attaching the Soundbar (Optional) file:///S|/SSA_Proposal/P170S_P190S/UG/setup.htm[7/8/2011 4:49:17 PM] Turn on the monitor and the computer. If it does not display an image, see Connecting Your Monitor), use the cable management slot to your computer and monitor into a nearby outlet. 2. If your monitor displays an image, installation is complete.
Dell P170S/P190S Flat Panel Monitor User's Guide 1. Plug the power cables for your monitor and computer (see Solving Problems. Organizing Your Cables After attaching all necessary cables to organize all cables as shown above. Attaching the Soundbar (Optional) file:///S|/SSA_Proposal/P170S_P190S/UG/setup.htm[7/8/2011 4:49:17 PM] Turn on the monitor and the computer. If it does not display an image, see Connecting Your Monitor), use the cable management slot to your computer and monitor into a nearby outlet. 2. If your monitor displays an image, installation is complete.
User Guide
Page 22
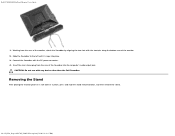
...17 PM] Working from the rear of the monitor. 2. Insert the mini stereo plug from the rear of the monitor, attach the Soundbar by aligning the two slots with the two tabs along the bottom rear of the Soundbar into place. 3. CAUTION: Do not use with the DC power connector. 4. Dell P170S/P190S Flat Panel Monitor User's Guide... 1. Connect the Soundbar with any device other than the Dell Soundbar Removing the Stand After placing the monitor panel on a soft cloth or cushion, press and hold the...
...17 PM] Working from the rear of the monitor. 2. Insert the mini stereo plug from the rear of the monitor, attach the Soundbar by aligning the two slots with the two tabs along the bottom rear of the Soundbar into place. 3. CAUTION: Do not use with the DC power connector. 4. Dell P170S/P190S Flat Panel Monitor User's Guide... 1. Connect the Soundbar with any device other than the Dell Soundbar Removing the Stand After placing the monitor panel on a soft cloth or cushion, press and hold the...
User Guide
Page 23
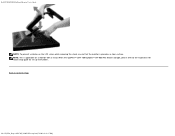
When the OptiPlex™ USFF 780/Optiplex™ SFF 980 AIO Stand is bought, please refer to Contents Page file:///S|/SSA_Proposal/P170S_P190S/UG/setup.htm[7/8/2011 4:49:17 PM] NOTE: This is placed on a clean surface. Back to the respective AIO stand setup guide for a monitor with a stand. Dell P170S/P190S Flat Panel Monitor User's Guide NOTE: To prevent scratches on the LCD screen while removing the stand, ensure that the monitor is applicable for set up instructions.
When the OptiPlex™ USFF 780/Optiplex™ SFF 980 AIO Stand is bought, please refer to Contents Page file:///S|/SSA_Proposal/P170S_P190S/UG/setup.htm[7/8/2011 4:49:17 PM] NOTE: This is placed on a clean surface. Back to the respective AIO stand setup guide for a monitor with a stand. Dell P170S/P190S Flat Panel Monitor User's Guide NOTE: To prevent scratches on the LCD screen while removing the stand, ensure that the monitor is applicable for set up instructions.


