
Monitor Users Guide
Page 3
... Safety instructions 5 About your monitor 6 Package contents 6 Product features 7 Identifying features and controls 8 Back view and label information 9 Monitor specifications 10 Resolution specifications 11 Preset display modes 11 Electrical specifications 12 Physical characteristics 13 Environmental characteristics 14 Pin assignments 15 Plug and play capability 16 LCD monitor quality and pixel policy 16 Maintenance guidelines 16 Cleaning your monitor 16 Setting up the monitor 18 Sleeve 18 Tilt adjustment 18 Connecting your monitor 19 Connecting...
... Safety instructions 5 About your monitor 6 Package contents 6 Product features 7 Identifying features and controls 8 Back view and label information 9 Monitor specifications 10 Resolution specifications 11 Preset display modes 11 Electrical specifications 12 Physical characteristics 13 Environmental characteristics 14 Pin assignments 15 Plug and play capability 16 LCD monitor quality and pixel policy 16 Maintenance guidelines 16 Cleaning your monitor 16 Setting up the monitor 18 Sleeve 18 Tilt adjustment 18 Connecting your monitor 19 Connecting...
Monitor Users Guide
Page 4
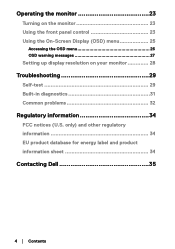
only) and other regulatory information 34 EU product database for energy label and product information sheet 34 Contacting Dell 35 4 │ Contents Operating the monitor 23 Turning on the monitor 23 Using the front panel control 23 Using the On-Screen Display (OSD) menu 25 Accessing the OSD menu 26 OSD warning messages 27 Setting up display resolution on your monitor 28 Troubleshooting 29 Self-test 29 Built-in diagnostics 31 Common problems 32 Regulatory information 34 FCC notices (U.S.
only) and other regulatory information 34 EU product database for energy label and product information sheet 34 Contacting Dell 35 4 │ Contents Operating the monitor 23 Turning on the monitor 23 Using the front panel control 23 Using the On-Screen Display (OSD) menu 25 Accessing the OSD menu 26 OSD warning messages 27 Setting up display resolution on your monitor 28 Troubleshooting 29 Self-test 29 Built-in diagnostics 31 Common problems 32 Regulatory information 34 FCC notices (U.S.

Monitor Users Guide
Page 5
... high volume through the headphones (on monitor that support it) may result in this document assumes that shipped with a sharp object. • Keep the monitor in room temperature. Keep this documentation may cause damage to remove any cover or touch the inside a car trunk. • Unplug the monitor when it carefully. The screen is going to ensure your personal safety. Safety instructions Use...
... high volume through the headphones (on monitor that support it) may result in this document assumes that shipped with a sharp object. • Keep the monitor in room temperature. Keep this documentation may cause damage to remove any cover or touch the inside a car trunk. • Unplug the monitor when it carefully. The screen is going to ensure your personal safety. Safety instructions Use...
Monitor Users Guide
Page 7
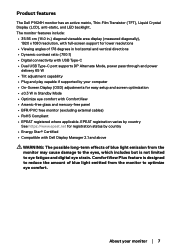
... diagonally), 1920 x 1080 resolution, with full-screen support for easy setup and screen optimization • ≤0.3 W in horizontal and vertical directions • Dynamic contrast ratio (700:1) • Digital connectivity with USB Type-C • Dual USB Type-C port supports DP Alternate Mode, power pass through and power delivery 65 W • Tilt adjustment capability • Plug and play capable if supported by country • Energy Star® Certified • Compatible with Dell Display Manager 2.1 and above WARNING...
... diagonally), 1920 x 1080 resolution, with full-screen support for easy setup and screen optimization • ≤0.3 W in horizontal and vertical directions • Dynamic contrast ratio (700:1) • Digital connectivity with USB Type-C • Dual USB Type-C port supports DP Alternate Mode, power pass through and power delivery 65 W • Tilt adjustment capability • Plug and play capable if supported by country • Energy Star® Certified • Compatible with Dell Display Manager 2.1 and above WARNING...
Monitor Users Guide
Page 8
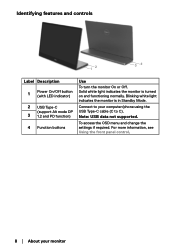
... supported. For more information, see Using the front panel control. 8 │ About your computer/phone using the USB Type-C cable (C to C). To access the OSD menu and change the settings if required. Connect to your monitor Blinking white light indicates the monitor is turned on and functioning normally. Identifying features and controls 12 34 Label Description 1 Power On/Off button (with LED indicator) 2 USB Type-C (support Alt mode DP 3 1.2 and PD function) 4 Function buttons Use To turn the monitor...
... supported. For more information, see Using the front panel control. 8 │ About your computer/phone using the USB Type-C cable (C to C). To access the OSD menu and change the settings if required. Connect to your monitor Blinking white light indicates the monitor is turned on and functioning normally. Identifying features and controls 12 34 Label Description 1 Power On/Off button (with LED indicator) 2 USB Type-C (support Alt mode DP 3 1.2 and PD function) 4 Function buttons Use To turn the monitor...
Monitor Users Guide
Page 10
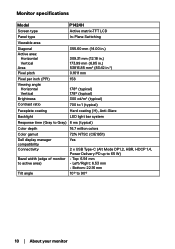
... in.2) Pixel pitch 0.1611 mm Pixel per inch (PPI) 158 Viewing angle: Horizontal Vertical 178° (typical) 178° (typical) Brightness 300 cd/m2 (typical) Contrast ratio 700 to 1 (typical) Faceplate coating Hard coating (H), Anti-Glare Backlight LED light bar system Response time (Gray to Gray) 6 ms (typical) Color depth 16.7 million colors Color gamut 72% NTSC (CIE1931) Dell display manager compatibility Connectivity Bezel width (edge of monitor to...
... in.2) Pixel pitch 0.1611 mm Pixel per inch (PPI) 158 Viewing angle: Horizontal Vertical 178° (typical) 178° (typical) Brightness 300 cd/m2 (typical) Contrast ratio 700 to 1 (typical) Faceplate coating Hard coating (H), Anti-Glare Backlight LED light bar system Response time (Gray to Gray) 6 ms (typical) Color depth 16.7 million colors Color gamut 72% NTSC (CIE1931) Dell display manager compatibility Connectivity Bezel width (edge of monitor to...
Monitor Users Guide
Page 12
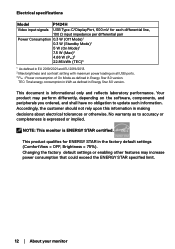
... 2019/2021 and EU 2019/2013. 2 Max brightness and contrast setting with maximum power loading on the software, components, and peripherals you ordered, and shall have no obligation to accuracy or completeness is ENERGY STAR certified. Electrical specifications Model P1424H Video input signals USB Type-C/DisplayPort, 600 mV for ENERGY STAR in the factory default settings (ComfortView = OFF, Brightness = 75%). This document is informational only and...
... 2019/2021 and EU 2019/2013. 2 Max brightness and contrast setting with maximum power loading on the software, components, and peripherals you ordered, and shall have no obligation to accuracy or completeness is ENERGY STAR certified. Electrical specifications Model P1424H Video input signals USB Type-C/DisplayPort, 600 mV for ENERGY STAR in the factory default settings (ComfortView = OFF, Brightness = 75%). This document is informational only and...

Monitor Users Guide
Page 16
... uncommon for cleaning may cause changes in the list below when unpacking, cleaning, or handling your Dell monitor. For best practices, follow the Safety instructions before placing your monitor LCD monitor quality and pixel policy During the LCD Monitor manufacturing process, it is thoroughly dry and free from the electrical outlet. WARNING: Before cleaning the monitor, unplug the monitor power cable from any Plug and Play-compatible system. Most monitor installations are hard...
... uncommon for cleaning may cause changes in the list below when unpacking, cleaning, or handling your Dell monitor. For best practices, follow the Safety instructions before placing your monitor LCD monitor quality and pixel policy During the LCD Monitor manufacturing process, it is thoroughly dry and free from the electrical outlet. WARNING: Before cleaning the monitor, unplug the monitor power cable from any Plug and Play-compatible system. Most monitor installations are hard...
Monitor Users Guide
Page 19
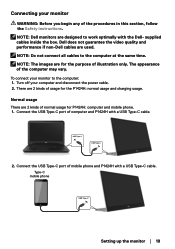
... used. supplied cables inside the box. Dell does not guarantee the video quality and performance if non-Dell cables are designed to work optimally with the Dell- Turn off your monitor to the computer at the same time. USB Type-C USB Type-C 2. NOTE: The images are for the purpose of the procedures in this section, follow the Safety instructions. The appearance of computer and P1424H with a USB Type-C cable. Connect...
... used. supplied cables inside the box. Dell does not guarantee the video quality and performance if non-Dell cables are designed to work optimally with the Dell- Turn off your monitor to the computer at the same time. USB Type-C USB Type-C 2. NOTE: The images are for the purpose of the procedures in this section, follow the Safety instructions. The appearance of computer and P1424H with a USB Type-C cable. Connect...
Monitor Users Guide
Page 20
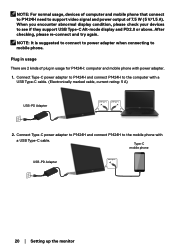
...; Setting up the monitor Connect Type-C power adapter to P1424H and connect P1424H to the mobile phone with a USB Type-C cable. (Electronically marked cable, current rating: 5 A) USB-PD Adapter USB Type-C USB Type-C 2. NOTE: It is suggested to connect to power adapter when connecting to see if they support USB Type-C Alt-mode display and PD2.0 or above. NOTE: For normal usage, devices of computer and mobile phone that connect to P1424H need to support video signal and power output of plug...
...; Setting up the monitor Connect Type-C power adapter to P1424H and connect P1424H to the mobile phone with a USB Type-C cable. (Electronically marked cable, current rating: 5 A) USB-PD Adapter USB Type-C USB Type-C 2. NOTE: It is suggested to connect to power adapter when connecting to see if they support USB Type-C Alt-mode display and PD2.0 or above. NOTE: For normal usage, devices of computer and mobile phone that connect to P1424H need to support video signal and power output of plug...

Monitor Users Guide
Page 23
Using the front panel control Use the control button on the edge of the monitor to turn the monitor On or Off. Blinking white light indicates that the monitor is in Standby Mode. Operating the monitor │ 23 Solid white light indicates that the monitor is turned on and functioning normally. Operating the monitor Turning on the monitor Press the button to adjust the image being displayed. 1 The following table describes the control button: Control button 1 Power button (with power-status light) Description To turn on the monitor.
Using the front panel control Use the control button on the edge of the monitor to turn the monitor On or Off. Blinking white light indicates that the monitor is in Standby Mode. Operating the monitor │ 23 Solid white light indicates that the monitor is turned on and functioning normally. Operating the monitor Turning on the monitor Press the button to adjust the image being displayed. 1 The following table describes the control button: Control button 1 Power button (with power-status light) Description To turn on the monitor.

Monitor Users Guide
Page 24
.... 24 │ Operating the monitor Brightness/ Down/[-] Use the Down button to decrease values or move down in a menu. • Press key to call out Brightness OSD menu. • Press [-] to increase values or move up in a menu. OSD controls Use the buttons on the edge of the monitor to adjust the image settings. 32+ 1 Control buttons 1 ComfortView 2 + Description To launch the On-Screen Display (OSD) menu, or to switch ComfortView ON/OFF. For...
.... 24 │ Operating the monitor Brightness/ Down/[-] Use the Down button to decrease values or move down in a menu. • Press key to call out Brightness OSD menu. • Press [-] to increase values or move up in a menu. OSD controls Use the buttons on the edge of the monitor to adjust the image settings. 32+ 1 Control buttons 1 ComfortView 2 + Description To launch the On-Screen Display (OSD) menu, or to switch ComfortView ON/OFF. For...
Monitor Users Guide
Page 28
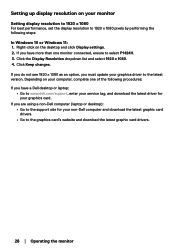
... an option, you are using a non-Dell computer (laptop or desktop): • Go to the support site for your graphics card. Depending on your computer, complete one monitor connected, ensure to select P1424H. 3. Click Keep changes. Right-click on the desktop and click Display settings. 2. Setting up display resolution on your monitor Setting display resolution to 1920 x 1080 For best performance, set the display resolution to 1920 x 1080 pixels by performing the following...
... an option, you are using a non-Dell computer (laptop or desktop): • Go to the support site for your graphics card. Depending on your computer, complete one monitor connected, ensure to select P1424H. 3. Click Keep changes. Right-click on the desktop and click Display settings. 2. Setting up display resolution on your monitor Setting display resolution to 1920 x 1080 For best performance, set the display resolution to 1920 x 1080 pixels by performing the following...

Monitor Users Guide
Page 29
...-C power adapter cable, computer USB Type-C cable from your computer. 2. P1424H Dell 14 Monitor ? Turn off your device. This way, the computer does not have to the monitor. If the monitor is working correctly, it scans for signal... Dell 14 Monitor Scanning for signal and detects that allows you begin any of the procedures in self-test mode, the power LED remains white. USB-PD Adapter USB Type-C USB Type-C 3. No Type-C 1 signal from the monitor. Troubleshooting...
...-C power adapter cable, computer USB Type-C cable from your computer. 2. P1424H Dell 14 Monitor ? Turn off your device. This way, the computer does not have to the monitor. If the monitor is working correctly, it scans for signal... Dell 14 Monitor Scanning for signal and detects that allows you begin any of the procedures in self-test mode, the power LED remains white. USB-PD Adapter USB Type-C USB Type-C 3. No Type-C 1 signal from the monitor. Troubleshooting...

Monitor Users Guide
Page 30
NOTE: These messages also appears during normal operation, when the computer USB Type-C cable is complete. Reconnect the computer USB Type-C cable, then turn on your video controller and computer. 30 │ Troubleshooting If your monitor remains dark after step 5, check your computer wait for computer boot up is disconnected or damaged. 5. Note: OSD menu supports English only.
NOTE: These messages also appears during normal operation, when the computer USB Type-C cable is complete. Reconnect the computer USB Type-C cable, then turn on your video controller and computer. 30 │ Troubleshooting If your monitor remains dark after step 5, check your computer wait for computer boot up is disconnected or damaged. 5. Note: OSD menu supports English only.
Monitor Users Guide
Page 32
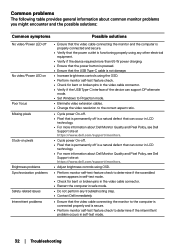
... that the power button is pressed. • Ensure that the USB Type-C cable is not damage. • Increase brightness controls using the OSD. • Perform monitor self-test feature check. • Check for bent or broken pins in the video cable connector. • Verify if the USB Type-C interface of the device can support DP alternate mode. • Set Windows to Projection mode. • Eliminate video extension cables. • Change the video resolution to the...
... that the power button is pressed. • Ensure that the USB Type-C cable is not damage. • Increase brightness controls using the OSD. • Perform monitor self-test feature check. • Check for bent or broken pins in the video cable connector. • Verify if the USB Type-C interface of the device can support DP alternate mode. • Set Windows to Projection mode. • Eliminate video extension cables. • Change the video resolution to the...
Monitor Simplified Service Manual
Page 2
Service Manual Service Manual Versions and Revision No. Version Release Date 1 1.0 2023/01/12 Revision Initial Release 2
Service Manual Service Manual Versions and Revision No. Version Release Date 1 1.0 2023/01/12 Revision Initial Release 2

Monitor Simplified Service Manual
Page 8
Service Manual 6. Trouble shooting instructions 8
Service Manual 6. Trouble shooting instructions 8

Monitor Teardown Instructions
Page 1
...;Take the electric screwdriver and remove the mainboard screws at positions "1~4" c:rque of the base b:Remove the cable hook, pull out the cable; 2. DELL P1422H Teardown Instruction Chapter 8-TEARDOWN INSTRUCTION 1.Tear the rubber a:Tear off the rubber attached to the lower cover of electric screwdriver: 1.1±0.1kgf.cm, Screwdriver head: star 5.Remove the pwer button and menu button a:Remove the pwer button and menu button S5 3.
...;Take the electric screwdriver and remove the mainboard screws at positions "1~4" c:rque of the base b:Remove the cable hook, pull out the cable; 2. DELL P1422H Teardown Instruction Chapter 8-TEARDOWN INSTRUCTION 1.Tear the rubber a:Tear off the rubber attached to the lower cover of electric screwdriver: 1.1±0.1kgf.cm, Screwdriver head: star 5.Remove the pwer button and menu button a:Remove the pwer button and menu button S5 3.

Monitor Teardown Instructions
Page 2
Separate panel a:Remove the cable hook, pull out the cable; Remove the upper cover of base screws S9 a:Take the electric screwdriver and remove the upper cover of base screws at positions "1~6" b:Torque of the base 39 S8 11.Take out the cable a:Tack out the cable from the back cover 10.Remove the Hinge screws a:Take the electric screwdriver and remove the Hinge S10 screws at positions "1~6" b:...
Separate panel a:Remove the cable hook, pull out the cable; Remove the upper cover of base screws S9 a:Take the electric screwdriver and remove the upper cover of base screws at positions "1~6" b:Torque of the base 39 S8 11.Take out the cable a:Tack out the cable from the back cover 10.Remove the Hinge screws a:Take the electric screwdriver and remove the Hinge S10 screws at positions "1~6" b:...


