
Owner's Manual - Mini Tower
Page 4
... Installing the System Board...28 System Board Components...29 3 System Setup...31 Boot Sequence...31 Navigation Keys...31 System Setup Options...32 Updating the BIOS ...40 Jumper Settings...41 System and Setup Password...41 Assigning a System Password and Setup Password 41 Deleting or Changing an Existing System and/or Setup Password 42... Enhanced Pre-Boot System Assessment (ePSA) Diagnostics 45 5 Troubleshooting Your Computer 47 Power LED Diagnostics...47 Beep Code...48 Error Messages...48 6 Specifications...53 7 Contacting Dell ...59
... Installing the System Board...28 System Board Components...29 3 System Setup...31 Boot Sequence...31 Navigation Keys...31 System Setup Options...32 Updating the BIOS ...40 Jumper Settings...41 System and Setup Password...41 Assigning a System Password and Setup Password 41 Deleting or Changing an Existing System and/or Setup Password 42... Enhanced Pre-Boot System Assessment (ePSA) Diagnostics 45 5 Troubleshooting Your Computer 47 Power LED Diagnostics...47 Beep Code...48 Error Messages...48 6 Specifications...53 7 Contacting Dell ...59

Owner's Manual - Mini Tower
Page 31
During the Power-on Self Test (POST), when the Dell logo appears, you can: • Access System Setup by pressing key • Bring up the one-time boot menu by pressing key The one-time ... you add or remove hardware • View the system hardware configuration • Enable or disable integrated devices • Set performance and power management thresholds • Manage your computer hardware and specify BIOS‐level options. Navigation Keys Keys Navigation Up arrow Moves to manage your computer security Boot Sequence Boot Sequence allows...
During the Power-on Self Test (POST), when the Dell logo appears, you can: • Access System Setup by pressing key • Bring up the one-time boot menu by pressing key The one-time ... you add or remove hardware • View the system hardware configuration • Enable or disable integrated devices • Set performance and power management thresholds • Manage your computer hardware and specify BIOS‐level options. Navigation Keys Keys Navigation Up arrow Moves to manage your computer security Boot Sequence Boot Sequence allows...

Owner's Manual - Mini Tower
Page 32
...if applicable. Pressing in which the computer attempts to the previous page till you to the system date and time takes effect immediately. 32 Displays BIOS Version, Service Tag, Asset Tag, Ownership Tag, Ownership Date, Manufacture Date, and the Express Service Code. • Memory Information - Displays... Speed, Memory Channels Mode, Memory Technology, DIMM 1 Size, DIMM 2 Size, DIMM 3 Size and DIMM 4 Size. • PCI Information - Moves to set the date and time. The options are: • Diskette drive • Local Hard Drive • USB Storage Device • CD/DVD/CD-RW Drive ...
...if applicable. Pressing in which the computer attempts to the previous page till you to the system date and time takes effect immediately. 32 Displays BIOS Version, Service Tag, Asset Tag, Ownership Tag, Ownership Date, Manufacture Date, and the Express Service Code. • Memory Information - Displays... Speed, Memory Channels Mode, Memory Technology, DIMM 1 Size, DIMM 2 Size, DIMM 3 Size and DIMM 4 Size. • PCI Information - Moves to set the date and time. The options are: • Diskette drive • Local Hard Drive • USB Storage Device • CD/DVD/CD-RW Drive ...

Owner's Manual - Mini Tower
Page 34
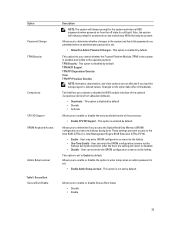
...Ports • Enable Rear Quad USB Ports • Enable Front USB Ports NOTE: USB keyboard and mouse always work in the BIOS setup irrespective of characters allowed for operation system. Option Audio Miscellaneous Devices Description If USB port is enabled, device attached to this port...• System Password Min • System Password Max Allows you to enable or disable the intergrated audio controller. • Enable Audio Allows you set by default. • Reboot Bypass - Allows you to bypass the System Password and the internal HDD password prompts during a system restart. •...
...Ports • Enable Rear Quad USB Ports • Enable Front USB Ports NOTE: USB keyboard and mouse always work in the BIOS setup irrespective of characters allowed for operation system. Option Audio Miscellaneous Devices Description If USB port is enabled, device attached to this port...• System Password Min • System Password Max Allows you to enable or disable the intergrated audio controller. • Enable Audio Allows you set by default. • Reboot Bypass - Allows you to bypass the System Password and the internal HDD password prompts during a system restart. •...
Owner's Manual - Mini Tower
Page 35
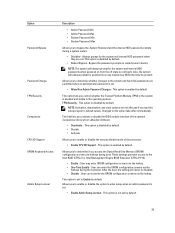
...is enabled by default. Option Password Change TPM Security Computrace CPU XD Support OROM Keyboard Access Admin Setup Lockout Table 5. This option is set . • Allow Non-Admin Password Changes - This option lets you to this option take effect immediately. User can enter the OROM ... and visible to the Intel RAID (CTRL+I) or Intel Management Engine BIOS Extension (CTRL+P/F12). • Enable - Changes to enable or disable Secure Boot featur • Disable • Enable 35 This option is set by default. User may be present. TPM ACPI Support TPM PPI ...
...is enabled by default. Option Password Change TPM Security Computrace CPU XD Support OROM Keyboard Access Admin Setup Lockout Table 5. This option is set . • Allow Non-Admin Password Changes - This option lets you to this option take effect immediately. User can enter the OROM ... and visible to the Intel RAID (CTRL+I) or Intel Management Engine BIOS Extension (CTRL+P/F12). • Enable - Changes to enable or disable Secure Boot featur • Disable • Enable 35 This option is set by default. User may be present. TPM ACPI Support TPM PPI ...

Owner's Manual - Mini Tower
Page 38
... Specifies whether the MEBx Hotkey function should be enabled in operating system environment. • Block Sleep (S3 state) - Allows the system to enter the BIOS Boot Option Menu. • Enable F12 Boot Option menu - This option is disabled by a special LAN signal. This feature only works when the computer... sense nearby wireless connection while the system is Disabled by default. Wake-up signal from the Standby state is disabled by this setting and must be enable when the system boots. • Enable MEBx Hotkey - The option is unaffected by default.
... Specifies whether the MEBx Hotkey function should be enabled in operating system environment. • Block Sleep (S3 state) - Allows the system to enter the BIOS Boot Option Menu. • Enable F12 Boot Option menu - This option is disabled by a special LAN signal. This feature only works when the computer... sense nearby wireless connection while the system is Disabled by default. Wake-up signal from the Standby state is disabled by this setting and must be enable when the system boots. • Enable MEBx Hotkey - The option is unaffected by default.

Owner's Manual - Mini Tower
Page 40
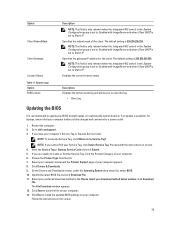
... of your computer's Service Tag or Express Service Code: NOTE: To locate the Service Tag, click Where is my Service Tag? Go to dell.com/support. 3. Specifies the gateway IP address for Advanced debugging • Verbose Mode NOTE: This Option is only relevant when the integrated NIC...NOTE: This field is only relevant when the Integrated NIC control in the System Configuration group is set to Enabled with ImageServer and when Client DHCP is set to Static IP. System Logs Option BIOS events Description Displays the system event log and allows you have your computer. 6. NOTE: This ...
... of your computer's Service Tag or Express Service Code: NOTE: To locate the Service Tag, click Where is my Service Tag? Go to dell.com/support. 3. Specifies the gateway IP address for Advanced debugging • Verbose Mode NOTE: This Option is only relevant when the integrated NIC...NOTE: This field is only relevant when the Integrated NIC control in the System Configuration group is set to Enabled with ImageServer and when Client DHCP is set to Static IP. System Logs Option BIOS events Description Displays the system event log and allows you have your computer. 6. NOTE: This ...

Owner's Manual - Mini Tower
Page 41
... if is not locked and left unattended. 7. Click Save to install the updated BIOS settings on the system board. The following table displays the system board jumper settings. In the System BIOS or System Setup screen, select System Security and press . 41 On the Drivers and... the pin(s) indicated on your computer. 13. Click Run to save the file on to the BIOS settings of your computer. Follow the instructions on or reboot. 1. Jumper Settings Jumper Setting Description PSWD RTCRST Default pin 1 and 2 Password features are enabled Real-time clock reset. Password...
... if is not locked and left unattended. 7. Click Save to install the updated BIOS settings on the system board. The following table displays the system board jumper settings. In the System BIOS or System Setup screen, select System Security and press . 41 On the Drivers and... the pin(s) indicated on your computer. 13. Click Run to save the file on to the BIOS settings of your computer. Follow the instructions on or reboot. 1. Jumper Settings Jumper Setting Description PSWD RTCRST Default pin 1 and 2 Password features are enabled Real-time clock reset. Password...

Owner's Manual - Mini Tower
Page 45
... (ePSA) Diagnostics The ePSA diagnostics (also known as the Dell logo appears. 3. NOTE: Some tests for specific devices require user interaction. The Enhanced Pre-boot System Assessment window is launched by the BIOS internally. The purpose of running the tests on all devices ... without requiring additional equipment or risking data loss. If you experience a problem with your hardware. The embedded system diagnostics provides a set of options for particular devices or device groups allowing you of your computer, run a diagnostic test on the computer. 2. The diagnostics...
... (ePSA) Diagnostics The ePSA diagnostics (also known as the Dell logo appears. 3. NOTE: Some tests for specific devices require user interaction. The Enhanced Pre-boot System Assessment window is launched by the BIOS internally. The purpose of running the tests on all devices ... without requiring additional equipment or risking data loss. If you experience a problem with your hardware. The embedded system diagnostics provides a set of options for particular devices or device groups allowing you of your computer, run a diagnostic test on the computer. 2. The diagnostics...

Owner's Manual - Mini Tower
Page 48
... normal shutdown process and power system. Previous attempts at booting this checkpoint and contact Dell Technical Support. Code Cause 1-3-2 Memory failure Error Messages Error Message Description Address mark not found The BIOS found a faulty disk sector or could not find a particular disk sector. Security override... Jumper is 3 sec, and the beep sound lasts 300 ms. After each beep and each set of beeps, the BIOS should detect if the user presses the power button. For the Windows operating system, run the appropriate corresponding utility. 48 ...
... normal shutdown process and power system. Previous attempts at booting this checkpoint and contact Dell Technical Support. Code Cause 1-3-2 Memory failure Error Messages Error Message Description Address mark not found The BIOS found a faulty disk sector or could not find a particular disk sector. Security override... Jumper is 3 sec, and the beep sound lasts 300 ms. After each beep and each set of beeps, the BIOS should detect if the user presses the power button. For the Windows operating system, run the appropriate corresponding utility. 48 ...

Owner's Manual - Small Form Factor
Page 4
... the System Board...29 Installing the System Board...30 3 System Setup...31 Boot Sequence...31 Navigation Keys...31 System Setup Options...32 Updating the BIOS ...39 Jumper Settings...40 System and Setup Password...40 Assigning a System Password and Setup Password 40 Deleting or Changing an Existing System and/or Setup Password 41... Enhanced Pre-Boot System Assessment (ePSA) Diagnostics 43 5 Troubleshooting Your Computer 45 Power LED Diagnostics...45 Beep Code...46 Error Messages...46 6 Specifications...51 7 Contacting Dell ...57
... the System Board...29 Installing the System Board...30 3 System Setup...31 Boot Sequence...31 Navigation Keys...31 System Setup Options...32 Updating the BIOS ...39 Jumper Settings...40 System and Setup Password...40 Assigning a System Password and Setup Password 40 Deleting or Changing an Existing System and/or Setup Password 41... Enhanced Pre-Boot System Assessment (ePSA) Diagnostics 43 5 Troubleshooting Your Computer 45 Power LED Diagnostics...45 Beep Code...46 Error Messages...46 6 Specifications...51 7 Contacting Dell ...57

Owner's Manual - Small Form Factor
Page 31
... Keys Navigation Up arrow Moves to manage your computer hardware and specify BIOS‐level options. During the Power-on Self Test (POST), when the Dell logo appears, you can : • Change the NVRAM settings after you add or remove hardware • View the system hardware configuration... • Enable or disable integrated devices • Set performance and power management thresholds • Manage your...
... Keys Navigation Up arrow Moves to manage your computer hardware and specify BIOS‐level options. During the Power-on Self Test (POST), when the Dell logo appears, you can : • Change the NVRAM settings after you add or remove hardware • View the system hardware configuration... • Enable or disable integrated devices • Set performance and power management thresholds • Manage your...

Owner's Manual - Small Form Factor
Page 32
...-Bit Technology. • Device Information - General Option System Information Description Displays the following information: • System Information - Keys Spacebar Navigation Allows you to set the date and time. Displays BIOS Version, Service Tag, Asset Tag, Ownership Tag, Ownership Date, Manufacture Date, and the Express Service Code. • Memory Information - Pressing in this...
...-Bit Technology. • Device Information - General Option System Information Description Displays the following information: • System Information - Keys Spacebar Navigation Allows you to set the date and time. Displays BIOS Version, Service Tag, Asset Tag, Ownership Tag, Ownership Date, Manufacture Date, and the Express Service Code. • Memory Information - Pressing in this...

Owner's Manual - Small Form Factor
Page 34
... Ports • Enable Rear Dual USB 3.0 Ports • Enable Front USB Ports NOTE: USB keyboard and mouse always work in the BIOS setup irrespective of characters allowed for the admin and system passwords. 34 This option is disabled by default. The drive does not have a password... set by default. Description This field lets you to set , change, or delete the computer password (previously called the setup password). This option is enabled by default. •...
... Ports • Enable Rear Dual USB 3.0 Ports • Enable Front USB Ports NOTE: USB keyboard and mouse always work in the BIOS setup irrespective of characters allowed for the admin and system passwords. 34 This option is disabled by default. The drive does not have a password... set by default. Description This field lets you to set , change, or delete the computer password (previously called the setup password). This option is enabled by default. •...
Owner's Manual - Small Form Factor
Page 35
...on from Absolute Software. • Deactivate - This option lets you control whether the Trusted Platform Module (TPM) in the system is set by default. This option is not set . • Allow Non-Admin Password Changes - This option is disabled by default. This option is disabled by default. • ...and hard disk passwords are not affected if you load the setup program's default values. This field lets you activate or disable the BIOS module interface of the processor. • Enable CPU XD Support - Allows you to enable or disable the option to enter setup when...
...on from Absolute Software. • Deactivate - This option lets you control whether the Trusted Platform Module (TPM) in the system is set by default. This option is not set . • Allow Non-Admin Password Changes - This option is disabled by default. This option is disabled by default. • ...and hard disk passwords are not affected if you load the setup program's default values. This field lets you activate or disable the BIOS module interface of the processor. • Enable CPU XD Support - Allows you to enable or disable the option to enter setup when...

Owner's Manual - Small Form Factor
Page 37
... default. Wake-up from standby. • Enable USB Wake Support - This feature only works when the computer is unaffected by this setting and must be powered on by Intel Virtualization technology. • Enable Intel Virtualization Technology - Does not allow the system to sleep (...S3 state) in the operating system. Allows the system to enter the BIOS Boot Option Menu. • Enable F12 Boot Option menu - Table 7. POST Behavior Option Numlock LED Keyboard Errors POST Hotkeys Description Specifies ...
... default. Wake-up from standby. • Enable USB Wake Support - This feature only works when the computer is unaffected by this setting and must be powered on by Intel Virtualization technology. • Enable Intel Virtualization Technology - Does not allow the system to sleep (...S3 state) in the operating system. Allows the system to enter the BIOS Boot Option Menu. • Enable F12 Boot Option menu - Table 7. POST Behavior Option Numlock LED Keyboard Errors POST Hotkeys Description Specifies ...
Owner's Manual - Small Form Factor
Page 39
... and when Client DHCP is set to Static IP. Specifies the gateway IP address for the client. Select your computer model and the Product Support page of the client. NOTE: This field is my Service Tag? If you are unable to dell.com/support. 3. Click Run.... 6. Restart the computer. 2. If you have your computer battery is set to Static IP. Select your preferred download method in the System Configuration group is fully charged and connected to install the updated BIOS settings on screen. 4. click Download File. Follow the instructions on the screen....
... and when Client DHCP is set to Static IP. Specifies the gateway IP address for the client. Select your computer model and the Product Support page of the client. NOTE: This field is my Service Tag? If you are unable to dell.com/support. 3. Click Run.... 6. Restart the computer. 2. If you have your computer battery is set to Static IP. Select your preferred download method in the System Configuration group is fully charged and connected to install the updated BIOS settings on screen. 4. click Download File. Follow the instructions on the screen....

Owner's Manual - Small Form Factor
Page 40
...carefully fit it down onto the pin(s) indicated on to the computer. A password can have up to the BIOS settings of security for troubleshooting. In the System BIOS or System Setup screen, select System Security and press . Password that Password Status is not locked and left unattended...change an existing System Password and/or Setup Password only when Password Status is shipped with the system and setup password feature disabled. Jumper Settings To change the System Password. System and Setup Password You can contain the numbers 0 through 9. - The password can create a ...
...carefully fit it down onto the pin(s) indicated on to the computer. A password can have up to the BIOS settings of security for troubleshooting. In the System BIOS or System Setup screen, select System Security and press . Password that Password Status is not locked and left unattended...change an existing System Password and/or Setup Password only when Password Status is shipped with the system and setup password feature disabled. Jumper Settings To change the System Password. System and Setup Password You can contain the numbers 0 through 9. - The password can create a ...

Owner's Manual - Small Form Factor
Page 43
The embedded system diagnostics provides a set of problems encountered during testing CAUTION: Use the system diagnostics to test only your hardware. Always ensure that you are present at the computer terminal ... specific devices require user interaction. On the boot menu screen, select the Diagnostics option. Note the error code and contact Dell. 43 The ePSA is embedded with the BIOS and is displayed, listing all the detected devices. 4. Select the device from the left pane and click Run Tests. 6. If you if tests...
The embedded system diagnostics provides a set of problems encountered during testing CAUTION: Use the system diagnostics to test only your hardware. Always ensure that you are present at the computer terminal ... specific devices require user interaction. On the boot menu screen, select the Diagnostics option. Note the error code and contact Dell. 43 The ePSA is embedded with the BIOS and is displayed, listing all the detected devices. 4. Select the device from the left pane and click Run Tests. 6. If you if tests...

Owner's Manual - Small Form Factor
Page 46
...codes, identify various problems. The delay between each beep is 300 ms, the delay between each set of beeps is 3 sec, and the beep sound lasts 300 ms. After each beep and each set and AMT Management features are disabled until it is removed. For any other failure with messages ...that you have failed at checkpoint [nnnn]. Data error The floppy or hard drive cannot read error. Contact Dell and report the checkpoint code (nnnn) to check the file structure of beeps, the BIOS should detect if the user presses the power button. Amber LED State 3,7 Description some other operating system,...
...codes, identify various problems. The delay between each beep is 300 ms, the delay between each set of beeps is 3 sec, and the beep sound lasts 300 ms. After each beep and each set and AMT Management features are disabled until it is removed. For any other failure with messages ...that you have failed at checkpoint [nnnn]. Data error The floppy or hard drive cannot read error. Contact Dell and report the checkpoint code (nnnn) to check the file structure of beeps, the BIOS should detect if the user presses the power button. Amber LED State 3,7 Description some other operating system,...


