
Quick Reference Guide
Page 3
... Determining Placement and Orientation of the Computer 10 Installing a Device in the Module Bay 11 Connecting External Devices 12 Installing a Hard Drive 15 Attaching the Optional Cable Cover 16 Inside Your Computer 16 Removing the Computer Cover 16 Inside View 17 Replacing the Computer ...Cover 18 Solving Problems 18 Dell Diagnostics 19 Power Supply Light 22 System Lights 22 Diagnostic Lights 23 Beep Codes 26 Running the Dell™ IDE Hard Drive Diagnostics 27 Resolving Software and Hardware Incompatibilities 27 Using Microsoft® ...
... Determining Placement and Orientation of the Computer 10 Installing a Device in the Module Bay 11 Connecting External Devices 12 Installing a Hard Drive 15 Attaching the Optional Cable Cover 16 Inside Your Computer 16 Removing the Computer Cover 16 Inside View 17 Replacing the Computer ...Cover 18 Solving Problems 18 Dell Diagnostics 19 Power Supply Light 22 System Lights 22 Diagnostic Lights 23 Beep Codes 26 Running the Dell™ IDE Hard Drive Diagnostics 27 Resolving Software and Hardware Incompatibilities 27 Using Microsoft® ...
Quick Reference Guide
Page 6
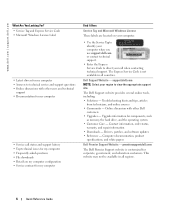
... with other users and technical support • Documentation for my computer • Service call when contacting technical support. support.dell.com NOTE: Select your region to direct your call status and support history • Top technical issues for my computer ... courses • Community - The Express Service Code is customized for components, such as memory, the hard drive, and the operating system • Customer Care - Dell Support Website - premiersupport.dell.com The Dell Premier Support website is not available in all countries. Online discussion with other...
... with other users and technical support • Documentation for my computer • Service call when contacting technical support. support.dell.com NOTE: Select your region to direct your call status and support history • Top technical issues for my computer ... courses • Community - The Express Service Code is customized for components, such as memory, the hard drive, and the operating system • Customer Care - Dell Support Website - premiersupport.dell.com The Dell Premier Support website is not available in all countries. Online discussion with other...

Quick Reference Guide
Page 8
To order the bracket, contact Dell. NOTE: To ensure proper ventilation, do not block) 8 Quick Reference Guide mounting holes (2) mount bracket. For information on a wall surface, use the optional wall- www.dell.com | support.dell.com About Your Computer NOTE: If you want to orient your computer under a desk top or on contacting Dell, see your online User's Guide. Front View microphone connector USB connectors (2) power light power button headphone connector hard-drive access light Side View vents (do not block) module bay vents (do not block the cooling vents.
To order the bracket, contact Dell. NOTE: To ensure proper ventilation, do not block) 8 Quick Reference Guide mounting holes (2) mount bracket. For information on a wall surface, use the optional wall- www.dell.com | support.dell.com About Your Computer NOTE: If you want to orient your computer under a desk top or on contacting Dell, see your online User's Guide. Front View microphone connector USB connectors (2) power light power button headphone connector hard-drive access light Side View vents (do not block) module bay vents (do not block the cooling vents.

Quick Reference Guide
Page 10
Use a monitor stand. Determining Placement and Orientation of the Computer NOTICE: Do not place your computer (see "Installing a Hard Drive" on page 15). www.dell.com | support.dell.com Setting Up Your Computer NOTICE: When setting up your computer, secure all cables toward the back of your work area to prevent the cables ...
Use a monitor stand. Determining Placement and Orientation of the Computer NOTICE: Do not place your computer (see "Installing a Hard Drive" on page 15). www.dell.com | support.dell.com Setting Up Your Computer NOTICE: When setting up your computer, secure all cables toward the back of your work area to prevent the cables ...
Quick Reference Guide
Page 11
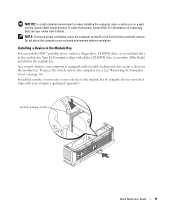
... added security, you may also secure a device in the module bay. Installing a Device in the Module Bay You can install a Dell™ portable device such as a floppy drive, CD/DVD drive, or second hard drive in the module bay by using the device screw that ships with your computer is equipped with either a CD/DVD...
... added security, you may also secure a device in the module bay. Installing a Device in the Module Bay You can install a Dell™ portable device such as a floppy drive, CD/DVD drive, or second hard drive in the module bay by using the device screw that ships with your computer is equipped with either a CD/DVD...

Quick Reference Guide
Page 15
... a grounding wire, and you are installing a new drive, attach the drive rails-located inside the cover-to the new drive. 2 Attach the data and power cables to the hard drive connectors, being careful not to step 5. Installing a Hard Drive CAUTION: Before you begin any of the pins. 3 Slide the hard drive into the bracket. Connecting Two Monitors Use the...
... a grounding wire, and you are installing a new drive, attach the drive rails-located inside the cover-to the new drive. 2 Attach the data and power cables to the hard drive connectors, being careful not to step 5. Installing a Hard Drive CAUTION: Before you begin any of the pins. 3 Slide the hard drive into the bracket. Connecting Two Monitors Use the...
Quick Reference Guide
Page 17
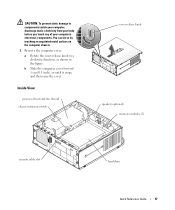
..., and then raise the cover. Inside View processor heat-sink fan shroud chassis intrusion switch cover release knob speaker (optional) memory modules (2) security cable slot hard drive Quick Reference Guide 17 CAUTION: To prevent static damage to components inside your computer, discharge static electricity from your body before you touch any of...
..., and then raise the cover. Inside View processor heat-sink fan shroud chassis intrusion switch cover release knob speaker (optional) memory modules (2) security cable slot hard drive Quick Reference Guide 17 CAUTION: To prevent static damage to components inside your computer, discharge static electricity from your body before you touch any of...
Quick Reference Guide
Page 19
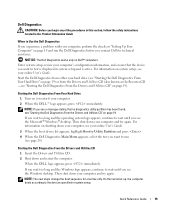
...NOTE: The next steps change the boot sequence for technical assistance. Dell Diagnostics CAUTION: Before you want to test is displayed in system setup and is active. Starting the Dell Diagnostics From Your Hard Drive 1 Turn on shutting down your computer and try again. For information... has been found, see the Microsoft® Windows® desktop. Quick Reference Guide 19 Start the Dell Diagnostics from either your hard drive (see "Starting the Dell Diagnostics From Your Hard Drive" on page 19. Then shut down your computer, see your online User's Guide. Starting the...
...NOTE: The next steps change the boot sequence for technical assistance. Dell Diagnostics CAUTION: Before you want to test is displayed in system setup and is active. Starting the Dell Diagnostics From Your Hard Drive 1 Turn on shutting down your computer and try again. For information... has been found, see the Microsoft® Windows® desktop. Quick Reference Guide 19 Start the Dell Diagnostics from either your hard drive (see "Starting the Dell Diagnostics From Your Hard Drive" on page 19. Then shut down your computer, see your online User's Guide. Starting the...

Quick Reference Guide
Page 22
... electrical outlet and is not receiving power from the computer for technical assistance. 22 Quick Reference Guide System Lights Your power button light and hard-drive light may Check "Diagnostic Lights" on page 23 to see "System Lights" on the power supply should turn green. Power Light Solid... power light and no load AC present/power to load Indicates that the power supply is properly connected to the computer. www.dell.com | support.dell.com Power Supply Light Light State Off Yellow Green PSU State Description Troubleshooting No AC, or a fault condition occurred AC present/...
... electrical outlet and is not receiving power from the computer for technical assistance. 22 Quick Reference Guide System Lights Your power button light and hard-drive light may Check "Diagnostic Lights" on page 23 to see "System Lights" on the power supply should turn green. Power Light Solid... power light and no load AC present/power to load Indicates that the power supply is properly connected to the computer. www.dell.com | support.dell.com Power Supply Light Light State Off Yellow Green PSU State Description Troubleshooting No AC, or a fault condition occurred AC present/...

Quick Reference Guide
Page 23
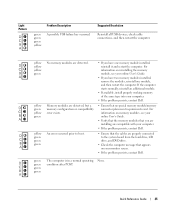
... boot completes successfully, all four lights display solid green. If the computer malfunctions during POST A problem was detected while the BIOS See "Running the Dell™ IDE Hard Drive was executing. To help identify where in the Product Information Guide. If the POST portion of the procedures in this section, follow the safety...
... boot completes successfully, all four lights display solid green. If the computer malfunctions during POST A problem was detected while the BIOS See "Running the Dell™ IDE Hard Drive was executing. To help identify where in the Product Information Guide. If the POST portion of the procedures in this section, follow the safety...

Quick Reference Guide
Page 24
...and restart the computer. the Run the BIOS Recovery utility, wait for recovery computer is in the recovery mode. www.dell.com | support.dell.com Light Pattern off off off off Problem Description Suggested Resolution The computer is in a normal off Plug the computer ... on reinstalling the memory module, see your computer. • If the problem persists, contact Dell. green yellow yellow yellow A possible BIOS failure has occurred; A possible floppy or hard drive failure has Reseat all power and data cables and restart occurred. has occurred. the computer. 24...
...and restart the computer. the Run the BIOS Recovery utility, wait for recovery computer is in the recovery mode. www.dell.com | support.dell.com Light Pattern off off off off Problem Description Suggested Resolution The computer is in a normal off Plug the computer ... on reinstalling the memory module, see your computer. • If the problem persists, contact Dell. green yellow yellow yellow A possible BIOS failure has occurred; A possible floppy or hard drive failure has Reseat all power and data cables and restart occurred. has occurred. the computer. 24...
Quick Reference Guide
Page 25
An error occurred prior to the system board from the hard drive, CD drive, and DVD drive. • Check the computer message that appears on your computer. • If the problem persists, contact Dell. • Ensure that you have one module, and then restart the computer. green green green ...module. • If available, install properly working memory of the same type into your monitor screen. • If the problem persists, contact Dell. For information on memory modules, see your online User's Guide. • If you are installing are compatible with your computer. • ...
An error occurred prior to the system board from the hard drive, CD drive, and DVD drive. • Check the computer message that appears on your computer. • If the problem persists, contact Dell. • Ensure that you have one module, and then restart the computer. green green green ...module. • If available, install properly working memory of the same type into your monitor screen. • If the problem persists, contact Dell. For information on memory modules, see your online User's Guide. • If you are installing are compatible with your computer. • ...

Quick Reference Guide
Page 27
... Troubleshooter in the upper-right corner of the screen, press . 3 Follow the instructions on the screen. If a failure is reported, see "Hard Drive Problems" in your computer is already on, restart it). 2 When F2 = Setup appears in the Search Results list. 4 In the Hardware... detected but incorrectly configured, you can use Device Manager to resolve incompatibilities. Running the Dell™ IDE Hard Drive Diagnostics The Dell IDE Hard Drive Diagnostics is a utility that tests the hard drive to troubleshoot or confirm a hard drive failure. 1 Turn on your computer (if your User's Guide.
... Troubleshooter in the upper-right corner of the screen, press . 3 Follow the instructions on the screen. If a failure is reported, see "Hard Drive Problems" in your computer is already on, restart it). 2 When F2 = Setup appears in the Search Results list. 4 In the Hardware... detected but incorrectly configured, you can use Device Manager to resolve incompatibilities. Running the Dell™ IDE Hard Drive Diagnostics The Dell IDE Hard Drive Diagnostics is a utility that tests the hard drive to troubleshoot or confirm a hard drive failure. 1 Turn on your computer (if your User's Guide.

Quick Reference Guide
Page 29
... then use System Restore (see "Using Microsoft® Windows® XP System Restore" on page 28) to return your primary hard drive. Undoing the Last System Restore NOTICE: Before you undo the last system restore, save and close all data files on Device Driver ...open programs. Do not alter, open, or delete any files or programs until the system restoration is unchecked. For conventional hard drive configurations, the primary hard drive is automatically disabled. The Restoration Complete screen appears after System Restore finishes collecting data and then the computer restarts. 6 ...
... then use System Restore (see "Using Microsoft® Windows® XP System Restore" on page 28) to return your primary hard drive. Undoing the Last System Restore NOTICE: Before you undo the last system restore, save and close all data files on Device Driver ...open programs. Do not alter, open, or delete any files or programs until the system restoration is unchecked. For conventional hard drive configurations, the primary hard drive is automatically disabled. The Restoration Complete screen appears after System Restore finishes collecting data and then the computer restarts. 6 ...

Quick Reference Guide
Page 30
...immediately after the DELL™ logo appears. Windows XP Setup 1 When the Windows XP Setup screen appears, press to select To set up Windows now. 2 Read the information on the Microsoft Windows Licensing Agreement screen, and press to accept the license agreement. 3 If your hard drive. Reinstalling Windows...during assembly of the computer. To reinstall Windows XP, perform all the steps in the following items: • Dell™ Operating System CD • Dell Drivers and Utilities CD NOTE: The Drivers and Utilities CD contains drivers that came with Windows XP, disable any ...
...immediately after the DELL™ logo appears. Windows XP Setup 1 When the Windows XP Setup screen appears, press to select To set up Windows now. 2 Read the information on the Microsoft Windows Licensing Agreement screen, and press to accept the license agreement. 3 If your hard drive. Reinstalling Windows...during assembly of the computer. To reinstall Windows XP, perform all the steps in the following items: • Dell™ Operating System CD • Dell Drivers and Utilities CD NOTE: The Drivers and Utilities CD contains drivers that came with Windows XP, disable any ...

Quick Reference Guide
Page 31
... copy of Windows XP, press to select that option. 5 Press to select the highlighted partition (recommended), and follow the instructions on the size of the hard drive and the speed of your settings, accept the default selections. message appears, click Skip. 15 When the Ready to register with the Drivers and Utilities...
... copy of Windows XP, press to select that option. 5 Press to select the highlighted partition (recommended), and follow the instructions on the size of the hard drive and the speed of your settings, accept the default selections. message appears, click Skip. 15 When the Ready to register with the Drivers and Utilities...


