Quick Reference Guide
Page 11
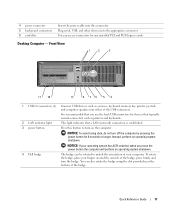
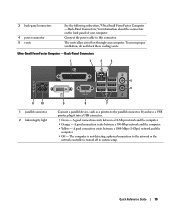
... 76 5 4 1 USB 2.0 connectors (2) Connect USB devices such as printers and keyboards. 2 LAN indicator light This light indicates that a LAN (network) connection is recommended that typically remain connected, such as a mouse, keyboard, memory key,...press the power button the computer will perform an operating system shutdown. 4 Dell badge The badge can be rotated to turn off the computer by pressing ...Desktop Computer - 4 power connector 5 back-panel connectors 6 card slots Insert the power cable into this button to match the orientation of the badge. You can access connectors for ...
... 76 5 4 1 USB 2.0 connectors (2) Connect USB devices such as printers and keyboards. 2 LAN indicator light This light indicates that a LAN (network) connection is recommended that typically remain connected, such as a mouse, keyboard, memory key,...press the power button the computer will perform an operating system shutdown. 4 Dell badge The badge can be rotated to turn off the computer by pressing ...Desktop Computer - 4 power connector 5 back-panel connectors 6 card slots Insert the power cable into this button to match the orientation of the badge. You can access connectors for ...
Quick Reference Guide
Page 14
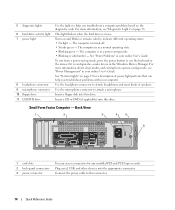
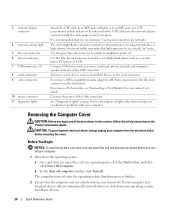
.... The computer is in a normal operating state. • Blinking green - See "System Lights" on the diagnostic code. Insert a floppy disk into the appropriate connector. Connect the power cable to this drive. 5 diagnostic lights 6 hard-drive activity light 7 power light 8 headphone connector 9 microphone connector 10 floppy drive 11 CD/DVD drive Use the...
.... The computer is in a normal operating state. • Blinking green - See "System Lights" on the diagnostic code. Insert a floppy disk into the appropriate connector. Connect the power cable to this drive. 5 diagnostic lights 6 hard-drive activity light 7 power light 8 headphone connector 9 microphone connector 10 floppy drive 11 CD/DVD drive Use the...
Quick Reference Guide
Page 16
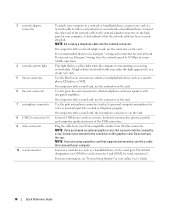
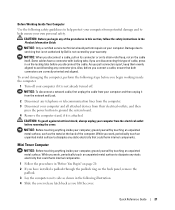
... Use the green line-out connector to the serial port. On computers with a network adapter card, use the y-cable that the network cable has been securely attached. Connect your network or broadband device. The default designations are using a graphics card that supports dual monitors, use the connector... not remove the cap. On computers with a sound card, use the connector on the graphics card. Connect a serial device, such as a cassette player, CD player, or VCR. Plug the cable from your computer. NOTE: If you use Category 3 wiring, force the network speed to 10 Mbps to...
... Use the green line-out connector to the serial port. On computers with a network adapter card, use the y-cable that the network cable has been securely attached. Connect your network or broadband device. The default designations are using a graphics card that supports dual monitors, use the connector... not remove the cap. On computers with a sound card, use the connector on the graphics card. Connect a serial device, such as a cassette player, CD player, or VCR. Plug the cable from your computer. NOTE: If you use Category 3 wiring, force the network speed to 10 Mbps to...
Quick Reference Guide
Page 19
...block these cooling vents. Ultra-Small Form Factor Computer - A good connection exists between a 1000-Mbps (1-Gbps) network and the computer. • Off - The computer is turned off in system setup. Connect the power cable to flow through your computer. The vents allow air to this ...connector. A good connection exists between a 100-Mbps network and the computer. • Yellow - 3 back-panel connectors ...
...block these cooling vents. Ultra-Small Form Factor Computer - A good connection exists between a 1000-Mbps (1-Gbps) network and the computer. • Off - The computer is turned off in system setup. Connect the power cable to flow through your computer. The vents allow air to this ...connector. A good connection exists between a 100-Mbps network and the computer. • Yellow - 3 back-panel connectors ...
Quick Reference Guide
Page 20
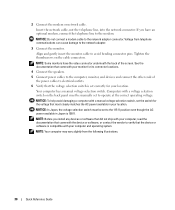
... system shutdown process finishes. 2 Ensure that can help you turn off when you begin any of the UTP cable into the network adapter connector until the cable snaps securely into place. Connect the power cable to attach an amplified speaker set. If your computer and attached devices did not automatically turn them off now...
... system shutdown process finishes. 2 Ensure that can help you turn off when you begin any of the UTP cable into the network adapter connector until the cable snaps securely into place. Connect the power cable to attach an amplified speaker set. If your computer and attached devices did not automatically turn them off now...
Quick Reference Guide
Page 21
... help protect your computer from the electrical outlet before removing the cover. Damage due to servicing that is not authorized by your warranty. if you connect a cable, ensure that could harm internal components. 1 Follow the procedures in "Before You Begin" on page 20. 2 If you lift the cover. NOTICE: Only a certified service... from their electrical outlets, and then press the power button to ground the system board. 4 Remove the computer stand, if it is not covered by Dell is not already turned off your computer, ground yourself by touching an unpainted metal surface.
... help protect your computer from the electrical outlet before removing the cover. Damage due to servicing that is not authorized by your warranty. if you connect a cable, ensure that could harm internal components. 1 Follow the procedures in "Before You Begin" on page 20. 2 If you lift the cover. NOTICE: Only a certified service... from their electrical outlets, and then press the power button to ground the system board. 4 Remove the computer stand, if it is not covered by Dell is not already turned off your computer, ground yourself by touching an unpainted metal surface.
Quick Reference Guide
Page 29
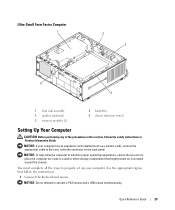
... around the chassis. You must complete all the steps to properly set up your computer has an expansion card installed (such as a modem card), connect the appropriate cable to the card, not to the connector on the back panel. NOTICE: Do not attempt to a wall or other storage compartment that follow the... (optional) 3 memory modules (2) 4 hard drive 5 chassis intrusion switch Setting Up Your Computer CAUTION: Before performing any of the procedures in this section, follow the instructions. 1 Connect the keyboard and mouse. Quick Reference Guide 29 NOTICE: If your computer.
... around the chassis. You must complete all the steps to properly set up your computer has an expansion card installed (such as a modem card), connect the appropriate cable to the card, not to the connector on the back panel. NOTICE: Do not attempt to a wall or other storage compartment that follow the... (optional) 3 memory modules (2) 4 hard drive 5 chassis intrusion switch Setting Up Your Computer CAUTION: Before performing any of the procedures in this section, follow the instructions. 1 Connect the keyboard and mouse. Quick Reference Guide 29 NOTICE: If your computer.
Quick Reference Guide
Page 30
...switch, set to electrical outlets. 6 Verify that came with your monitor for its connector locations. 4 Connect the speakers. 5 Connect power cables to the computer, monitor, and devices and connect the other ends of the screen. NOTE: Before you have the video connector underneath the back of... avoid bending connector pins. NOTICE: Do not connect a modem cable to the modem. NOTE: Some monitors have an optional modem, connect the telephone line to the network adapter connector. 2 Connect the modem or network cable. Insert the network cable, not the telephone line, into the network ...
...switch, set to electrical outlets. 6 Verify that came with your monitor for its connector locations. 4 Connect the speakers. 5 Connect power cables to the computer, monitor, and devices and connect the other ends of the screen. NOTE: Before you have the video connector underneath the back of... avoid bending connector pins. NOTICE: Do not connect a modem cable to the modem. NOTE: Some monitors have an optional modem, connect the telephone line to the network adapter connector. 2 Connect the modem or network cable. Insert the network cable, not the telephone line, into the network ...
Quick Reference Guide
Page 37
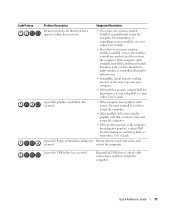
...reinstall an additional module. Reinstall all power and data cables and occurred. For information on contacting Dell, see your online User's Guide. A possible floppy or hard drive failure has Reseat all USB devices, check cable connections, and then restart the computer. A possible USB... failure has occurred. For information on reinstalling memory modules, see your computer. • If the problem persists, contact Dell. Quick Reference Guide 37 Continue until you...
...reinstall an additional module. Reinstall all power and data cables and occurred. For information on contacting Dell, see your online User's Guide. A possible floppy or hard drive failure has Reseat all USB devices, check cable connections, and then restart the computer. A possible USB... failure has occurred. For information on reinstalling memory modules, see your computer. • If the problem persists, contact Dell. Quick Reference Guide 37 Continue until you...
Quick Reference Guide
Page 38
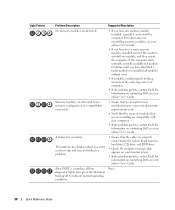
...Verify that the memory modules that appears on contacting Dell, see your computer. • If the problem persists, contact Dell. For information on contacting Dell, see your online User's Guide. • If you are installing are properly connected to the system board from the hard drive,...; If the problem persists, contact Dell. This pattern also displays when you enter system setup and may not indicate a problem. • Ensure that the cables are compatible with your monitor screen. • If the problem persists, contact Dell. For information on reinstalling memory modules...
...Verify that the memory modules that appears on contacting Dell, see your computer. • If the problem persists, contact Dell. For information on contacting Dell, see your online User's Guide. • If you are installing are properly connected to the system board from the hard drive,...; If the problem persists, contact Dell. This pattern also displays when you enter system setup and may not indicate a problem. • Ensure that the cables are compatible with your monitor screen. • If the problem persists, contact Dell. For information on reinstalling memory modules...


