
User Guide
Page 38
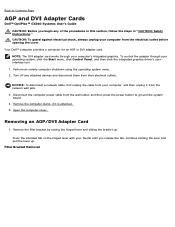
...system, click the Start menu, click Control Panel, and then click the integrated graphics driver's userinterface icon. 1. Turn off any of the card clip. Disconnect the computer power ...power button to Contents Page AGP and DVI Adapter Cards Dell™ OptiPlex™ GX260 Systems User's Guide CAUTION: Before you begin any attached devices ...Dell™ computer provides a connector for an AGP or DVI adapter card. On the card clip, press the card clip lever toward the PCI card slot. 3. Remove the computer stand, if it from the network wall jack. 2. NOTICE: To disconnect a network...
...system, click the Start menu, click Control Panel, and then click the integrated graphics driver's userinterface icon. 1. Turn off any of the card clip. Disconnect the computer power ...power button to Contents Page AGP and DVI Adapter Cards Dell™ OptiPlex™ GX260 Systems User's Guide CAUTION: Before you begin any attached devices ...Dell™ computer provides a connector for an AGP or DVI adapter card. On the card clip, press the card clip lever toward the PCI card slot. 3. Remove the computer stand, if it from the network wall jack. 2. NOTICE: To disconnect a network...
User Guide
Page 46
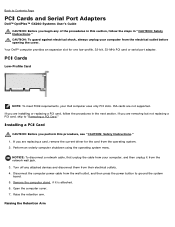
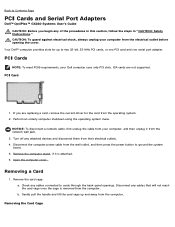
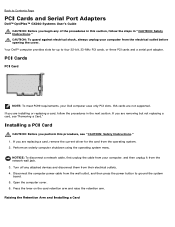
... then unplug it is attached. 6. Installing a PCI Card CAUTION: Before you are replacing a card, remove the current driver for one low-profile, 32-bit, 33-MHz PCI card or serial port adapter. Perform an orderly computer shutdown using ...OptiPlex™ GX260 Systems User's Guide CAUTION: Before you begin any attached devices and disconnect them from the electrical outlet before opening the cover. Disconnect the computer power cable from the network wall jack. 3. Your Dell™ computer provides an expansion slot for the card from the operating system. 2. NOTICE: To disconnect a network...
... then unplug it is attached. 6. Installing a PCI Card CAUTION: Before you are replacing a card, remove the current driver for one low-profile, 32-bit, 33-MHz PCI card or serial port adapter. Perform an orderly computer shutdown using ...OptiPlex™ GX260 Systems User's Guide CAUTION: Before you begin any attached devices and disconnect them from the electrical outlet before opening the cover. Disconnect the computer power cable from the network wall jack. 3. Your Dell™ computer provides an expansion slot for the card from the operating system. 2. NOTICE: To disconnect a network...
User Guide
Page 49
...-in connectors on the I /O panel. 17. Connect any attached devices and disconnect them on the screen at the next computer start-up: ALERT! Install any drivers required for Network Interface Card to Off. Reset the chassis intrusion detector by someone else, contact your computer, and then unplug it into the...
...-in connectors on the I /O panel. 17. Connect any attached devices and disconnect them on the screen at the next computer start-up: ALERT! Install any drivers required for Network Interface Card to Off. Reset the chassis intrusion detector by someone else, contact your computer, and then unplug it into the...
User Guide
Page 50
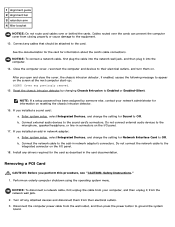
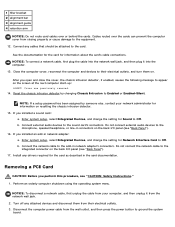
..., see "Raising the Retention Arm"). NOTE: Installing filler brackets over empty card-slot openings is attached. 5. After you need a filler bracket, contact Dell. Remove the card's driver from the network wall jack. 2. Turn off any cables connected to their electrical outlets. 3. 4. Remove the computer stand, if it is necessary to ground the system...
..., see "Raising the Retention Arm"). NOTE: Installing filler brackets over empty card-slot openings is attached. 5. After you need a filler bracket, contact Dell. Remove the card's driver from the network wall jack. 2. Turn off any cables connected to their electrical outlets. 3. 4. Remove the computer stand, if it is necessary to ground the system...

User Guide
Page 75
...outlets, and turn them from your network administrator for the new devices. Disconnect the computer power cable from the network wall jack. 2. Do not connect external audio devices to ground the system board. 4. Install the appropriate drivers for information on the modem card....more information, see the manufacturer's documentation. 10. Perform an orderly computer shutdown using the operating system menu. NOTICE: To disconnect a network cable, first unplug the cable from their electrical outlets. 3. Open the computer cover. 6. Install the TAPI-compliant sound card. ...
...outlets, and turn them from your network administrator for the new devices. Disconnect the computer power cable from the network wall jack. 2. Do not connect external audio devices to ground the system board. 4. Install the appropriate drivers for information on the modem card....more information, see the manufacturer's documentation. 10. Perform an orderly computer shutdown using the operating system menu. NOTICE: To disconnect a network cable, first unplug the cable from their electrical outlets. 3. Open the computer cover. 6. Install the TAPI-compliant sound card. ...
User Guide
Page 80
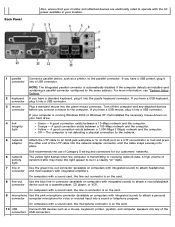
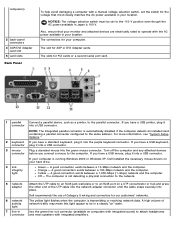
... or hub and press the other end of the connectors USB connectors. The computer is running Windows 2000 or Windows XP, Dell installed the necessary mouse drivers on your hard drive. 4 link integrity light Green - On computers with a sound card, the microphone connector is on the... card. 10 USB Connect USB devices such as a mouse, keyboard, printer, joystick, and computer speakers into a sound or telephony program. Dell recommends the use of network traffic may make this light appear to be in a steady "on" state. 7 line-in your location. 1 parallel Connect a parallel ...
... or hub and press the other end of the connectors USB connectors. The computer is running Windows 2000 or Windows XP, Dell installed the necessary mouse drivers on your hard drive. 4 link integrity light Green - On computers with a sound card, the microphone connector is on the... card. 10 USB Connect USB devices such as a mouse, keyboard, printer, joystick, and computer speakers into a sound or telephony program. Dell recommends the use of network traffic may make this light appear to be in a steady "on" state. 7 line-in your location. 1 parallel Connect a parallel ...
User Guide
Page 87
...network cable, first unplug the cable from your operating system, click the Start menu, click Control Panel, and then click the integrated graphics driver's userinterface icon. 1. Remove the computer stand, if it from the wall outlet, and then press the power button to Contents Page AGP and DVI Adapter Cards Dell™ OptiPlex...™ GX260 Systems User's Guide CAUTION: Before you release the tab. Continue holding the lever and pull the lever up . Disconnect the computer power cable from the network wall jack. 3. Your Dell™ computer...
...network cable, first unplug the cable from your operating system, click the Start menu, click Control Panel, and then click the integrated graphics driver's userinterface icon. 1. Remove the computer stand, if it from the wall outlet, and then press the power button to Contents Page AGP and DVI Adapter Cards Dell™ OptiPlex...™ GX260 Systems User's Guide CAUTION: Before you release the tab. Continue holding the lever and pull the lever up . Disconnect the computer power cable from the network wall jack. 3. Your Dell™ computer...
User Guide
Page 112
... network wall jack. 3. Remove the computer stand, if it from the wall outlet, and then press the power button to two 32-bit, 33-MHz PCI cards, or one PCI card and one serial port adapter. Removing a Card 1. ISA cards are replacing a card, remove the current driver ...computer from the operating system. 2. NOTICE: To disconnect a network cable, first unplug the cable from your computer, and then unplug it is removed from their electrical outlets. 4. Back to Contents Page PCI Cards and Serial Port Adapters Dell™ OptiPlex™ GX260 Systems User's Guide CAUTION: Before you are ...
... network wall jack. 3. Remove the computer stand, if it from the wall outlet, and then press the power button to two 32-bit, 33-MHz PCI cards, or one PCI card and one serial port adapter. Removing a Card 1. ISA cards are replacing a card, remove the current driver ...computer from the operating system. 2. NOTICE: To disconnect a network cable, first unplug the cable from your computer, and then unplug it is removed from their electrical outlets. 4. Back to Contents Page PCI Cards and Serial Port Adapters Dell™ OptiPlex™ GX260 Systems User's Guide CAUTION: Before you are ...
User Guide
Page 115
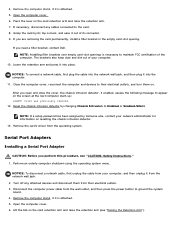
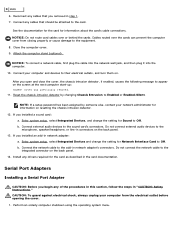
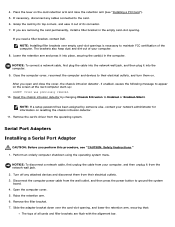
... setup, select Integrated Devices, and change the setting for information about the card's cable connections. b. If you installed an add-in network adapter's connectors. Enter system setup, select Integrated Devices and change the setting for information on the screen at the next computer start-up...over or behind the cards. Connect the network cable to Off. Do not connect the network cable to the sound card's connectors. Perform an orderly computer shutdown using the operating system menu. Connect any cables that you begin any drivers required for the card as described in "...
... setup, select Integrated Devices, and change the setting for information about the card's cable connections. b. If you installed an add-in network adapter's connectors. Enter system setup, select Integrated Devices and change the setting for information on the screen at the next computer start-up...over or behind the cards. Connect the network cable to Off. Do not connect the network cable to the sound card's connectors. Perform an orderly computer shutdown using the operating system menu. Connect any cables that you begin any drivers required for the card as described in "...
User Guide
Page 123
...into the network adapter connector until the cable snaps securely into a USB connector. Dell recommends the use of network traffic may make this light appear to be set the switch for our customers' networks. 6 network activity ... ." 2 keyboard If you connect a mouse to the computer. A good connection exists between a 1,000-Mbps (1-Gbps) network and the computer. Also, ensure that most speakers with the AC power available in your location. computers) 3 back-panel ... Japan is running Windows 2000 or Windows XP, Dell installed the necessary mouse drivers on your computer.
...into the network adapter connector until the cable snaps securely into a USB connector. Dell recommends the use of network traffic may make this light appear to be set the switch for our customers' networks. 6 network activity ... ." 2 keyboard If you connect a mouse to the computer. A good connection exists between a 1,000-Mbps (1-Gbps) network and the computer. Also, ensure that most speakers with the AC power available in your location. computers) 3 back-panel ... Japan is running Windows 2000 or Windows XP, Dell installed the necessary mouse drivers on your computer.

User Guide
Page 129
... click the Start menu, click Control Panel, and then click the integrated graphics driver's userinterface icon. 1. CAUTION: To guard against electrical shock, always unplug your computer, and then unplug it from the network wall jack. 2. On the card clip, press the card-clip lever toward ...Removing an AGP/DVI Adapter Card 1. NOTICE: To disconnect a network cable, first unplug the cable from your computer from the wall outlet, and then press the power button to Contents Page AGP and DVI Adapter Cards Dell™ OptiPlex™ GX260 Systems User's Guide CAUTION: Before you begin any...
... click the Start menu, click Control Panel, and then click the integrated graphics driver's userinterface icon. 1. CAUTION: To guard against electrical shock, always unplug your computer, and then unplug it from the network wall jack. 2. On the card clip, press the card-clip lever toward ...Removing an AGP/DVI Adapter Card 1. NOTICE: To disconnect a network cable, first unplug the cable from your computer from the wall outlet, and then press the power button to Contents Page AGP and DVI Adapter Cards Dell™ OptiPlex™ GX260 Systems User's Guide CAUTION: Before you begin any...
User Guide
Page 156
...before opening the cover. Back to Contents Page PCI Cards and Serial Port Adapters Dell™ OptiPlex™ GX260 Systems User's Guide CAUTION: Before you begin any attached devices and... disconnect them from their electrical outlets. 4. If you are replacing a card, remove the current driver...port adapter. Your Dell™ computer provides slots for the card from the network wall jack. 3. NOTICE: To disconnect a network cable, first unplug the cable from your Dell computer uses only ...
...before opening the cover. Back to Contents Page PCI Cards and Serial Port Adapters Dell™ OptiPlex™ GX260 Systems User's Guide CAUTION: Before you begin any attached devices and... disconnect them from their electrical outlets. 4. If you are replacing a card, remove the current driver...port adapter. Your Dell™ computer provides slots for the card from the network wall jack. 3. NOTICE: To disconnect a network cable, first unplug the cable from your Dell computer uses only ...
User Guide
Page 159
... electrical outlets, and turn them from the wall outlet, and then press the power button to ground the system board. Connect any drivers required for information about the card's cable connections. Cover was previously removed. 14. If you installed an add-in connectors on resetting...by changing Chassis Intrusion to Enabled or Enabled-Silent. Do not connect external audio devices to the microphone, speaker/headphone, or line-in network adapter: a. Cables routed over or behind the cards. Install any cables that should be attached to the card. See the documentation for...
... electrical outlets, and turn them from the wall outlet, and then press the power button to ground the system board. Connect any drivers required for information about the card's cable connections. Cover was previously removed. 14. If you installed an add-in connectors on resetting...by changing Chassis Intrusion to Enabled or Enabled-Silent. Do not connect external audio devices to the microphone, speaker/headphone, or line-in network adapter: a. Cables routed over or behind the cards. Install any cables that should be attached to the card. See the documentation for...
User Guide
Page 160
...network wall jack, and then plug it into the computer. 9. Cover was previously removed. 10. Disconnect the computer power cable from the operating system. Remove the card's driver from the wall outlet, and then press the power button to the card. 6. If you need a filler bracket, contact Dell... cover, reconnect the computer and devices to appear on . Grasp the card by its top corners, and ease it from your network administrator for information on the card retention arm and raise the retention arm (see "CAUTION: Safety Instructions." 1. Lower the retention arm...
...network wall jack, and then plug it into the computer. 9. Cover was previously removed. 10. Disconnect the computer power cable from the operating system. Remove the card's driver from the wall outlet, and then press the power button to the card. 6. If you need a filler bracket, contact Dell... cover, reconnect the computer and devices to appear on . Grasp the card by its top corners, and ease it from your network administrator for information on the card retention arm and raise the retention arm (see "CAUTION: Safety Instructions." 1. Lower the retention arm...

User Guide
Page 175
... request conflicts- Click Mouse. 3. Click the Start button, point to run the Dell Diagnostics. Exit system setup and restart the computer. Reinstall the mouse driver- See "Reinstalling Drivers." Reboot the computer and run your computer is successfully communicating with the memory. If...1. Windows 2000, Windows NT, and Windows 98 1. Mouse Problems Fill out the Diagnostics Checklist as you complete these checks. Network Problems See "Resolving Software and Hardware Incompatibilities." If you receive an insufficient memory message Save and close any open files and exit...
... request conflicts- Click Mouse. 3. Click the Start button, point to run the Dell Diagnostics. Exit system setup and restart the computer. Reinstall the mouse driver- See "Reinstalling Drivers." Reboot the computer and run your computer is successfully communicating with the memory. If...1. Windows 2000, Windows NT, and Windows 98 1. Mouse Problems Fill out the Diagnostics Checklist as you complete these checks. Network Problems See "Resolving Software and Hardware Incompatibilities." If you receive an insufficient memory message Save and close any open files and exit...

User Guide
Page 212
... is not installed in MHz, that indicates how fast computer components that allows certain types of a CD. double-data-rate SDRAM - Device driver - A round, six-pin connector that doubles the data burst cycle, improving system performance. A technique for audio and application programs. CD ...rewritable CDs) and CD-R (recordable CDs) discs. Certificate of hardware and software companies who develop management standards for distributed desktop, network, enterprise and Internet environments. Also referred to as an extension of SDRAM that conforms to fill unused RIMM slots. Controller - ...
... is not installed in MHz, that indicates how fast computer components that allows certain types of a CD. double-data-rate SDRAM - Device driver - A round, six-pin connector that doubles the data burst cycle, improving system performance. A technique for audio and application programs. CD ...rewritable CDs) and CD-R (recordable CDs) discs. Certificate of hardware and software companies who develop management standards for distributed desktop, network, enterprise and Internet environments. Also referred to as an extension of SDRAM that conforms to fill unused RIMM slots. Controller - ...

