User Guide
Page 12
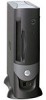
Back to Contents Page System Board Components Dell™ OptiPlex™ GX260 Systems User's Guide System Board 1 floppy drive connector (DSKT) 2 internal speaker (SPEAKER) 3 battery socket (BATTERY) 4 CD/DVD drive connector (IDE2) 5 hard drive connector (IDE1) 6 front-panel connector (FRONTPANEL) 7 PCI riser (small mini-tower computer only) 8 standby power light (AUX_PWR) 12 CD drive audio cable connector (CD_IN) 13...
Back to Contents Page System Board Components Dell™ OptiPlex™ GX260 Systems User's Guide System Board 1 floppy drive connector (DSKT) 2 internal speaker (SPEAKER) 3 battery socket (BATTERY) 4 CD/DVD drive connector (IDE2) 5 hard drive connector (IDE1) 6 front-panel connector (FRONTPANEL) 7 PCI riser (small mini-tower computer only) 8 standby power light (AUX_PWR) 12 CD drive audio cable connector (CD_IN) 13...
User Guide
Page 16
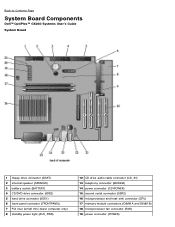
...OptiPlex GX260 supports the following ASF alerts and remote capabilities: Alert Description Chassis Intrusion/Chassis Intrusion Cleared System chassis has been opened/System chassis intrusion alert has been cleared Corrupt BIOS The system BIOS is a DMTF management standard that are deactivated make resources available. Back to generate an alert on common platforms, hard-drive...limits Voltage - It is designed to Contents Page Advanced Features Dell™ OptiPlex™ GX260 Systems User's Guide LegacySelect Technology Control Manageability Security Password Protection ...
...OptiPlex GX260 supports the following ASF alerts and remote capabilities: Alert Description Chassis Intrusion/Chassis Intrusion Cleared System chassis has been opened/System chassis intrusion alert has been cleared Corrupt BIOS The system BIOS is a DMTF management standard that are deactivated make resources available. Back to generate an alert on common platforms, hard-drive...limits Voltage - It is designed to Contents Page Advanced Features Dell™ OptiPlex™ GX260 Systems User's Guide LegacySelect Technology Control Manageability Security Password Protection ...
User Guide
Page 30
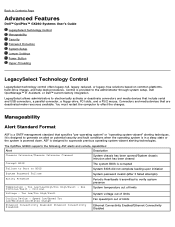
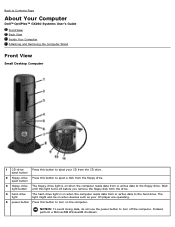
...Back to Contents Page About Your Computer Dell™ OptiPlex™ GX260 Systems User's Guide Front View Back View Inside Your Computer Attaching and Removing the Computer Stand Front View Small Form-Factor Computer 1 USB connectors 2 headphone connector 3 hard-drive access light 4 power button Connect USB... 5 power light The power light illuminates and blinks or remains solid to the hard drive. See "Diagnostic Lights" for a description of the USB connectors. The computer is on the computer. The hard-drive access light is in a power-saving state (S1 or S3) To exit ...
...Back to Contents Page About Your Computer Dell™ OptiPlex™ GX260 Systems User's Guide Front View Back View Inside Your Computer Attaching and Removing the Computer Stand Front View Small Form-Factor Computer 1 USB connectors 2 headphone connector 3 hard-drive access light 4 power button Connect USB... 5 power light The power light illuminates and blinks or remains solid to the hard drive. See "Diagnostic Lights" for a description of the USB connectors. The computer is on the computer. The hard-drive access light is in a power-saving state (S1 or S3) To exit ...
User Guide
Page 53
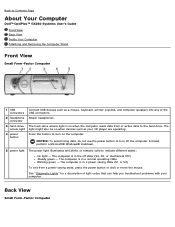
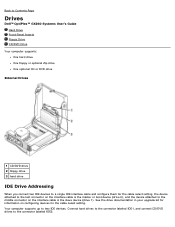
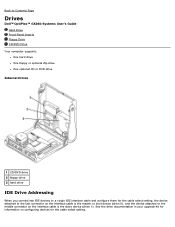
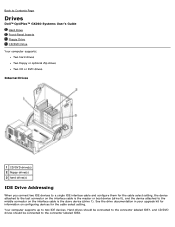
... kit for the cable select setting. Back to Contents Page Drives Dell™ OptiPlex™ GX260 Systems User's Guide Hard Drive Front-Panel Inserts Floppy Drive CD/DVD Drive Your computer supports: One hard drive One floppy or optional Zip drive One optional CD or DVD drive Internal Drives 1 CD/DVD drive 2 floppy drive 3 hard drive IDE Drive Addressing When you connect two IDE devices to a single IDE...
... kit for the cable select setting. Back to Contents Page Drives Dell™ OptiPlex™ GX260 Systems User's Guide Hard Drive Front-Panel Inserts Floppy Drive CD/DVD Drive Your computer supports: One hard drive One floppy or optional Zip drive One optional CD or DVD drive Internal Drives 1 CD/DVD drive 2 floppy drive 3 hard drive IDE Drive Addressing When you connect two IDE devices to a single IDE...
User Guide
Page 78
... when devices such as your CD from or writes data to the hard drive. Instead, perform a Microsoft® Windows® shutdown. Wait light button until this light turns off the computer. Back to Contents Page About Your Computer Dell™ OptiPlex™ GX260 Systems User's Guide Front View Back View Inside Your Computer Attaching and...
... when devices such as your CD from or writes data to the hard drive. Instead, perform a Microsoft® Windows® shutdown. Wait light button until this light turns off the computer. Back to Contents Page About Your Computer Dell™ OptiPlex™ GX260 Systems User's Guide Front View Back View Inside Your Computer Attaching and...
User Guide
Page 90
... kit for the cable select setting. Back to Contents Page Drives Dell™ OptiPlex™ GX260 Systems User's Guide Hard Drive Front-Panel Inserts Floppy Drive CD/DVD Drive Your computer supports: One hard drive One floppy or optional Zip drive One optional CD or DVD drive Internal Drives 1 CD/DVD drive 2 floppy drive 3 hard drive IDE Drive Addressing When you connect two IDE devices to a single IDE...
... kit for the cable select setting. Back to Contents Page Drives Dell™ OptiPlex™ GX260 Systems User's Guide Hard Drive Front-Panel Inserts Floppy Drive CD/DVD Drive Your computer supports: One hard drive One floppy or optional Zip drive One optional CD or DVD drive Internal Drives 1 CD/DVD drive 2 floppy drive 3 hard drive IDE Drive Addressing When you connect two IDE devices to a single IDE...
User Guide
Page 121
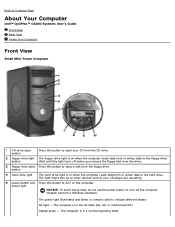
... use the power button to eject a disk from the floppy drive. Instead, perform a Windows shutdown. Back to Contents Page About Your Computer Dell™ OptiPlex™ GX260 Systems User's Guide Front View Back View Inside Your Computer Front... View Small Mini-Tower Computer 1 CD-drive eject button Press this button to eject your CD player are operating. 5 power button and Press this button to indicate different states: No light - button 4 hard-drive light The hard-drive...
... use the power button to eject a disk from the floppy drive. Instead, perform a Windows shutdown. Back to Contents Page About Your Computer Dell™ OptiPlex™ GX260 Systems User's Guide Front View Back View Inside Your Computer Front... View Small Mini-Tower Computer 1 CD-drive eject button Press this button to eject your CD player are operating. 5 power button and Press this button to indicate different states: No light - button 4 hard-drive light The hard-drive...
User Guide
Page 132
... attached to Contents Page Drives Dell™ OptiPlex™ GX260 Systems User's Guide Hard Drive Front-Panel Inserts Floppy Drive CD/DVD Drive Your computer supports: Two hard drives Two floppy or optional Zip drives Two CD or DVD drives. Back to the middle connector on configuring devices for the cable select setting. Internal Drives 1 CD/DVD drive(s) 2 floppy drive(s) 3 hard drive(s) IDE Drive Addressing When you connect...
... attached to Contents Page Drives Dell™ OptiPlex™ GX260 Systems User's Guide Hard Drive Front-Panel Inserts Floppy Drive CD/DVD Drive Your computer supports: Two hard drives Two floppy or optional Zip drives Two CD or DVD drives. Back to the middle connector on configuring devices for the cable select setting. Internal Drives 1 CD/DVD drive(s) 2 floppy drive(s) 3 hard drive(s) IDE Drive Addressing When you connect...
User Guide
Page 182
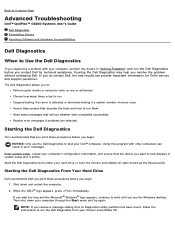
... CD. Starting the Dell Diagnostics From Your Hard Drive Dell recommends that you print these procedures before you receive a message stating that tell you begin . Then shut down and restart the computer. 2. If you contact Dell for Dell's service and support personnel. Back to Contents Page Advanced Troubleshooting Dell™ OptiPlex™ GX260 Systems User's Guide Dell Diagnostics Reinstalling Drivers...
... CD. Starting the Dell Diagnostics From Your Hard Drive Dell recommends that you print these procedures before you receive a message stating that tell you begin . Then shut down and restart the computer. 2. If you contact Dell for Dell's service and support personnel. Back to Contents Page Advanced Troubleshooting Dell™ OptiPlex™ GX260 Systems User's Guide Dell Diagnostics Reinstalling Drivers...
User Guide
Page 201
...), replaces Windows Help from earlier operating systems. The Help and Support Center provides an integrated resource center for always-on the hard drive. Click User and System Guides for portable computers. You can conduct a search or select categories of information, leading to task... 2000 operating system, Windows XP is available in using your Dell™ computer, including installed hardware devices and software. Back to Contents Page Microsoft® Windows® XP Features Dell™ OptiPlex™ GX260 Systems User's Guide Overview New User Interface Files and Settings ...
...), replaces Windows Help from earlier operating systems. The Help and Support Center provides an integrated resource center for always-on the hard drive. Click User and System Guides for portable computers. You can conduct a search or select categories of information, leading to task... 2000 operating system, Windows XP is available in using your Dell™ computer, including installed hardware devices and software. Back to Contents Page Microsoft® Windows® XP Features Dell™ OptiPlex™ GX260 Systems User's Guide Overview New User Interface Files and Settings ...
User Guide
Page 211
...cable into an electrical outlet. As a precaution, back up the data files from your computer. Boot sequence - In case your hard drive is the boiling point of the devices from which the computer attempts to start your computer. Bootable disk - BTU - A .... The standard unit for reporting hardware and software alerts to put a computer in your computer. Bus - Celsius - AGP - Also referred to Contents Page Glossary Dell™ OptiPlex™ GX260 Systems User's Guide A B C D EFG H I K LM NO P R S T UV WX Z A AC - Bit - bits per second - A temperature ...
...cable into an electrical outlet. As a precaution, back up the data files from your computer. Boot sequence - In case your hard drive is the boiling point of the devices from which the computer attempts to start your computer. Bootable disk - BTU - A .... The standard unit for reporting hardware and software alerts to put a computer in your computer. Bus - Celsius - AGP - Also referred to Contents Page Glossary Dell™ OptiPlex™ GX260 Systems User's Guide A B C D EFG H I K LM NO P R S T UV WX Z A AC - Bit - bits per second - A temperature ...
Service Manual
Page 7
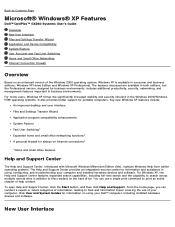
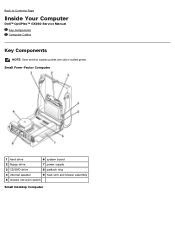
Back to Contents Page Inside Your Computer Dell™ OptiPlex™ GX260 Service Manual Key Components Computer Cables Key Components NOTE: User service access points are color-coded green. Small Form-Factor Computer 1 hard drive 6 system board 2 floppy drive 7 power supply 3 CD/DVD drive 8 padlock ring 4 internal speaker 9 heat sink and blower assembly 5 chassis intrusion switch Small Desktop Computer
Back to Contents Page Inside Your Computer Dell™ OptiPlex™ GX260 Service Manual Key Components Computer Cables Key Components NOTE: User service access points are color-coded green. Small Form-Factor Computer 1 hard drive 6 system board 2 floppy drive 7 power supply 3 CD/DVD drive 8 padlock ring 4 internal speaker 9 heat sink and blower assembly 5 chassis intrusion switch Small Desktop Computer
Service Manual
Page 35
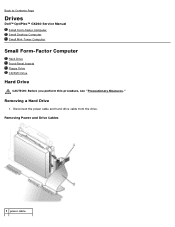
Removing a Hard Drive 1. Disconnect the power cable and hard-drive cable from the drive. Back to Contents Page Drives Dell™ OptiPlex™ GX260 Service Manual Small Form-Factor Computer Small Desktop Computer Small Mini-Tower Computer Small Form-Factor Computer Hard Drive Front-Panel Inserts Floppy Drive CD/DVD Drive Hard Drive CAUTION: Before you perform this procedure, see "Precautionary Measures." Removing Power and Drive Cables 1 power cable
Removing a Hard Drive 1. Disconnect the power cable and hard-drive cable from the drive. Back to Contents Page Drives Dell™ OptiPlex™ GX260 Service Manual Small Form-Factor Computer Small Desktop Computer Small Mini-Tower Computer Small Form-Factor Computer Hard Drive Front-Panel Inserts Floppy Drive CD/DVD Drive Hard Drive CAUTION: Before you perform this procedure, see "Precautionary Measures." Removing Power and Drive Cables 1 power cable

Service Manual
Page 66
... cable 4 front audio cable 5 mounting screw 6 I /O panel, such as the chassis intrusion switch and internal speaker cables. Back to Contents Page I/O Panel Dell™ OptiPlex™ GX260 Service Manual Removing the I/O Panel Replacing the I/O Panel Removing the I /O panel to the I /O cable 2. To access the screw that are connected to the computer, remove the hard drive.
... cable 4 front audio cable 5 mounting screw 6 I /O panel, such as the chassis intrusion switch and internal speaker cables. Back to Contents Page I/O Panel Dell™ OptiPlex™ GX260 Service Manual Removing the I/O Panel Replacing the I/O Panel Removing the I /O panel to the I /O cable 2. To access the screw that are connected to the computer, remove the hard drive.

Service Manual
Page 84
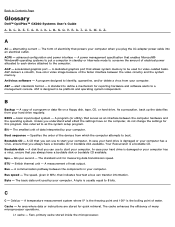
Back to Contents Page System Board Dell™ OptiPlex™ GX260 Service Manual System Board Components Removing the System Board Replacing the System Board System Board Components 1 floppy drive connector (DSKT) 2 internal speaker (SPEAKER) 3 battery socket (BATTERY) 4 CD/DVD drive connector (IDE2) 5 hard drive connector (IDE1) 12 CD drive audio cable connector (CD_IN) 13 telephony connector (MODEM) 14 power connector (12VPOWER) 15 second serial connector (SER2) 16 microprocessor and heat-sink connector (CPU)
Back to Contents Page System Board Dell™ OptiPlex™ GX260 Service Manual System Board Components Removing the System Board Replacing the System Board System Board Components 1 floppy drive connector (DSKT) 2 internal speaker (SPEAKER) 3 battery socket (BATTERY) 4 CD/DVD drive connector (IDE2) 5 hard drive connector (IDE1) 12 CD drive audio cable connector (CD_IN) 13 telephony connector (MODEM) 14 power connector (12VPOWER) 15 second serial connector (SER2) 16 microprocessor and heat-sink connector (CPU)


