System Information Guide
Page 5
... desktop. Read these documents before reading other system documents because they may have a Dell Documents icon) located on your hard drive, go to the Dell support website at http://support.dell.com. System Information Guide 5 Dell Online Documentation You can access Dell...contain information that supersedes information in other documents. Double-clicking the icon starts your Dell Document Viewer, from which contain updated information about your Dell OptiPlex computer. Dell™ OptiPlex™ Systems System Information Guide This document contains help, getting started, system ...
... desktop. Read these documents before reading other system documents because they may have a Dell Documents icon) located on your hard drive, go to the Dell support website at http://support.dell.com. System Information Guide 5 Dell Online Documentation You can access Dell...contain information that supersedes information in other documents. Double-clicking the icon starts your Dell Document Viewer, from which contain updated information about your Dell OptiPlex computer. Dell™ OptiPlex™ Systems System Information Guide This document contains help, getting started, system ...
System Information Guide
Page 16
w w w.d el l.co m | su p po rt. com Read the software license agreement and follow the operating system setup instructions on the screen. 7 Access the HTML documentation from the User's Guides icon on the desktop for more information. 8 16 S y s te m In f or m a t i on Gu i d e d ell.
w w w.d el l.co m | su p po rt. com Read the software license agreement and follow the operating system setup instructions on the screen. 7 Access the HTML documentation from the User's Guides icon on the desktop for more information. 8 16 S y s te m In f or m a t i on Gu i d e d ell.
User Guide
Page 3
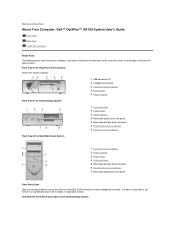
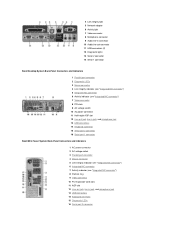
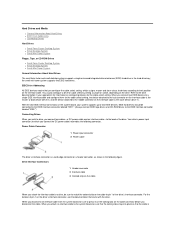
... Form-Factor Computer 1 USB connectors (2) 2 Headphone connector 3 Hard drive access indicator 4 Power button 5 Power indicator Front View of the Small Desktop System Front View of the Small Mini-Tower System 1 Front-panel door 2 Power button 3 Power indicator 4 Removable optical drive front panel 5... indicator 7 Removable optical drive front panel Front-Panel Door Open the front-panel door to Contents Page About Your Computer: Dell™ OptiPlex™ GX150 System User's Guide Front View Back View Inside Your Computer Front View The following figures show the controls, indicators, and...
... Form-Factor Computer 1 USB connectors (2) 2 Headphone connector 3 Hard drive access indicator 4 Power button 5 Power indicator Front View of the Small Desktop System Front View of the Small Mini-Tower System 1 Front-panel door 2 Power button 3 Power indicator 4 Removable optical drive front panel 5... indicator 7 Removable optical drive front panel Front-Panel Door Open the front-panel door to Contents Page About Your Computer: Dell™ OptiPlex™ GX150 System User's Guide Front View Back View Inside Your Computer Front View The following figures show the controls, indicators, and...
User Guide
Page 6
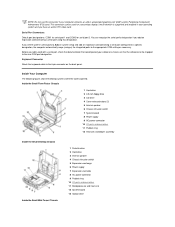
... connector 8 Microphone connector 9 Audio line-in connector 10 Audio line-out connector 11 USB connectors (2) 12 Diagnostic lights 13 Serial 2 connector 14 Serial 1 connector Small Desktop System Back-Panel Connectors and Indicators 1 Parallel port connector 2 Diagnostic LEDs 3 Mouse connector 4 Link integrity indicator (see "Integrated NIC connector") 5 Integrated NIC connector 6 Activity indicator...
... connector 8 Microphone connector 9 Audio line-in connector 10 Audio line-out connector 11 USB connectors (2) 12 Diagnostic lights 13 Serial 2 connector 14 Serial 1 connector Small Desktop System Back-Panel Connectors and Indicators 1 Parallel port connector 2 Diagnostic LEDs 3 Mouse connector 4 Link integrity indicator (see "Integrated NIC connector") 5 Integrated NIC connector 6 Activity indicator...
User Guide
Page 8
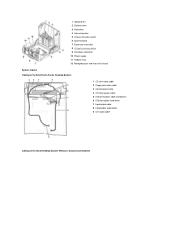
Inside Your Computer The following figures show the desktop systems with a serial port, check the documentation that accompanied your software to make sure that the software can be used for serial port 2. If you ... intrusion switch 7 System board 8 Power supply 9 AC power connector 10 I/O ports and connectors 11 Padlock ring 12 Heat sink and blower assembly Inside the Small Desktop Chassis Inside the Small Mini-Tower Chassis 1 Diskette drive 2 Hard drive 3 Internal speaker 4 Chassis intrusion switch 5 Expansion-card cage 6 Power supply 7 Expansion-card slots 8 AC...
Inside Your Computer The following figures show the desktop systems with a serial port, check the documentation that accompanied your software to make sure that the software can be used for serial port 2. If you ... intrusion switch 7 System board 8 Power supply 9 AC power connector 10 I/O ports and connectors 11 Padlock ring 12 Heat sink and blower assembly Inside the Small Desktop Chassis Inside the Small Mini-Tower Chassis 1 Diskette drive 2 Hard drive 3 Internal speaker 4 Chassis intrusion switch 5 Expansion-card cage 6 Power supply 7 Expansion-card slots 8 AC...
User Guide
Page 9
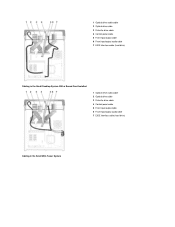
... and connectors 9 AC power connector 10 Power supply 11 Padlock ring 12 Microprocessor and heat sink shroud System Cables Cabling in the Small Form-Factor Desktop System 1 CD drive data cable 2 Floppy drive data cable 3 Control-panel cable 4 CD drive power cable 5 IDE drive power cable (hard drive) 6 IDE data cable...
... and connectors 9 AC power connector 10 Power supply 11 Padlock ring 12 Microprocessor and heat sink shroud System Cables Cabling in the Small Form-Factor Desktop System 1 CD drive data cable 2 Floppy drive data cable 3 Control-panel cable 4 CD drive power cable 5 IDE drive power cable (hard drive) 6 IDE data cable...
User Guide
Page 10
1 Optical drive audio cable 2 Optical drive cable 3 Diskette drive cable 4 Control panel cable 5 Front input/output cable 6 Front input/output audio cable 7 EIDE interface cable (hard drive) Cabling in the Small Desktop System With a Sound Card Installed 1 Optical drive audio cable 2 Optical drive cable 3 Diskette drive cable 4 Control panel cable 5 Front input/output cable 6 Front input/output audio cable 7 EIDE interface cable (hard drive) Cabling in the Small Mini-Tower System
1 Optical drive audio cable 2 Optical drive cable 3 Diskette drive cable 4 Control panel cable 5 Front input/output cable 6 Front input/output audio cable 7 EIDE interface cable (hard drive) Cabling in the Small Desktop System With a Sound Card Installed 1 Optical drive audio cable 2 Optical drive cable 3 Diskette drive cable 4 Control panel cable 5 Front input/output cable 6 Front input/output audio cable 7 EIDE interface cable (hard drive) Cabling in the Small Mini-Tower System

User Guide
Page 11
... 8 Front-panel cable connector 9 EIDE1 connector 10 PCI 2 riser connector (not populated on the small form-factor chassis, used as the riser in the small desktop chassis, and can be populated with PCI expansion card in the small mini-tower chassis) 11 PCI 1 connector (not able to be populated on the... small desktop chassis) 12 AGP/GPA (AIMM) connector 13 Video connector (upper) and audio connectors (lower) 14 CD audio and telephony connectors 15 NIC connector (upper)...
... 8 Front-panel cable connector 9 EIDE1 connector 10 PCI 2 riser connector (not populated on the small form-factor chassis, used as the riser in the small desktop chassis, and can be populated with PCI expansion card in the small mini-tower chassis) 11 PCI 1 connector (not able to be populated on the... small desktop chassis) 12 AGP/GPA (AIMM) connector 13 Video connector (upper) and audio connectors (lower) 14 CD audio and telephony connectors 15 NIC connector (upper)...
User Guide
Page 24
...for the local and remote systems in a Dell DMI network ¡ Support for the Microsoft&#...more groups for the remote systems in a Dell DMI network ¡ Network administrators can enable ... system about the Dell OpenManage IT Assistant, see the online Dell OpenManage IT Assistant ... an integrated NIC that accompanied the software. the Dell software-management application interface for use : a network... asset tag for a remote system in a Dell DMI network ¡ Automated and manual mapping of...Advanced Features: Dell™ OptiPlex™ GX150 System User's Guide Manageability ...
...for the local and remote systems in a Dell DMI network ¡ Support for the Microsoft&#...more groups for the remote systems in a Dell DMI network ¡ Network administrators can enable ... system about the Dell OpenManage IT Assistant, see the online Dell OpenManage IT Assistant ... an integrated NIC that accompanied the software. the Dell software-management application interface for use : a network... asset tag for a remote system in a Dell DMI network ¡ Automated and manual mapping of...Advanced Features: Dell™ OptiPlex™ GX150 System User's Guide Manageability ...
User Guide
Page 38
... General Support 1-800-805-8035 U.S.A. (Austin, Texas) Automated Order-Status System AutoTech (For portable and desktop computers) toll free: 1-800-433-9014 toll free: 1-800-247-9362 Dell Home and Small Business Group (For portable and desktop computers): Customer Technical Support (Return Material Authorization Numbers) toll free: 1-800-624-9896 Customer Technical Support...
... General Support 1-800-805-8035 U.S.A. (Austin, Texas) Automated Order-Status System AutoTech (For portable and desktop computers) toll free: 1-800-433-9014 toll free: 1-800-247-9362 Dell Home and Small Business Group (For portable and desktop computers): Customer Technical Support (Return Material Authorization Numbers) toll free: 1-800-624-9896 Customer Technical Support...
User Guide
Page 39
U.S. Virgin Islands Customer Service and Technical Support (Return Material Authorization Numbers) Dell Sales Spare Parts Sales Desktop and Portable Fee-Based Technical Support Sales (Catalogs) Fax TechFax Dell Services for the Deaf, Hard-of-Hearing, or SpeechImpaired Switchboard 512 DellNet™ General ...Small Business Technical Support 01 795676-04 Preferred Accounts/Corporate Technical Support 0660-8779 Website: support.euro.dell.com E-mail: tech_support_central_europe@dell.com Technical Support 02 481 92 88 Customer Care 02 481 91 19 Home/Small Business Sales toll...
U.S. Virgin Islands Customer Service and Technical Support (Return Material Authorization Numbers) Dell Sales Spare Parts Sales Desktop and Portable Fee-Based Technical Support Sales (Catalogs) Fax TechFax Dell Services for the Deaf, Hard-of-Hearing, or SpeechImpaired Switchboard 512 DellNet™ General ...Small Business Technical Support 01 795676-04 Preferred Accounts/Corporate Technical Support 0660-8779 Website: support.euro.dell.com E-mail: tech_support_central_europe@dell.com Technical Support 02 481 92 88 Customer Care 02 481 91 19 Home/Small Business Sales toll...
User Guide
Page 47
... l EIDE Drive Addressing l Connecting Drives Hard Drives l Small Form-Factor Desktop System l Small Desktop System l Small Mini-Tower System Floppy, Tape, or CD-ROM Drives l Small Form-Factor Desktop System l Small Desktop System l Small Mini-Tower System General Information About Hard Drives The small... form-factor and small desktop systems support a single enhanced integrated drive electronics (EIDE) hard drive in the...
... l EIDE Drive Addressing l Connecting Drives Hard Drives l Small Form-Factor Desktop System l Small Desktop System l Small Mini-Tower System Floppy, Tape, or CD-ROM Drives l Small Form-Factor Desktop System l Small Desktop System l Small Mini-Tower System General Information About Hard Drives The small... form-factor and small desktop systems support a single enhanced integrated drive electronics (EIDE) hard drive in the...
User Guide
Page 48
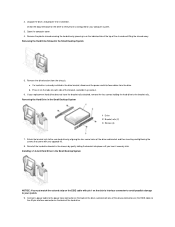
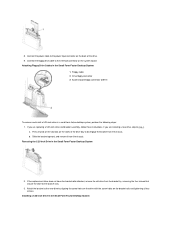
... Check the documentation for the drive to verify that came with your computer system. 3. Reinstall the hard drive bracket in a small form-factor desktop system, perform the following steps. NOTICE: Ground yourself by aligning the four screw holes of the connector). The pin-1 end of a connector on... you install a drive, see the other connector. Remove the drive bracket from the drive. Inserting a 1.6-Inch Hard Drive in the Small Form-Factor Desktop System 6. Unpack the drive, and prepare it on a surface, such as a foam pad, that the pin-1 wire in hole on the system ...
... Check the documentation for the drive to verify that came with your computer system. 3. Reinstall the hard drive bracket in a small form-factor desktop system, perform the following steps. NOTICE: Ground yourself by aligning the four screw holes of the connector). The pin-1 end of a connector on... you install a drive, see the other connector. Remove the drive bracket from the drive. Inserting a 1.6-Inch Hard Drive in the Small Form-Factor Desktop System 6. Unpack the drive, and prepare it on a surface, such as a foam pad, that the pin-1 wire in hole on the system ...
User Guide
Page 49
...step. Check all connectors to be sure to the 40-pin interface connector on the system board. 10. Attaching Hard Drive Cables in a small desktop system, perform the following steps. If it on a hard surface, which may damage the drive. Enter system setup, and update the appropriate ...is not already connected, connect the other precautions in "Safety First - For You and Your Computer." 1. NOTICE: Ground yourself by running the Dell Diagnostics. NOTICE: You must match the colored strip on the EIDE cable with pin 1 on the drive's interface connector to avoid possible damage to...
...step. Check all connectors to be sure to the 40-pin interface connector on the system board. 10. Attaching Hard Drive Cables in a small desktop system, perform the following steps. If it on a hard surface, which may damage the drive. Enter system setup, and update the appropriate ...is not already connected, connect the other precautions in "Safety First - For You and Your Computer." 1. NOTICE: Ground yourself by running the Dell Diagnostics. NOTICE: You must match the colored strip on the EIDE cable with pin 1 on the drive's interface connector to avoid possible damage to...
User Guide
Page 50
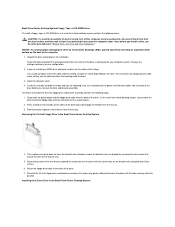
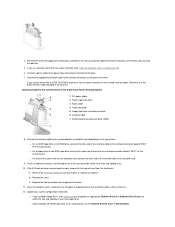
... drive bracket, disconnect the power and interface cables from the chassis. Check the documentation for installation. Installing a 1.6-Inch Hard Drive in the Small Desktop System 1 Drive 2 Bracket rails (2) 3 Screws (4) 7. Unpack the drive, and prepare it for the drive to verify that it is already...securely click. a. If your computer system. 3. Remove the drive bracket from the drive. Open the computer cover. 4. Press in the Small Desktop System 5. Removing the Hard Drive Shroud in on the tabs on the EIDE cable with your system. 9. Connect a power cable to the ...
... drive bracket, disconnect the power and interface cables from the chassis. Check the documentation for installation. Installing a 1.6-Inch Hard Drive in the Small Desktop System 1 Drive 2 Bracket rails (2) 3 Screws (4) 7. Unpack the drive, and prepare it for the drive to verify that it is already...securely click. a. If your computer system. 3. Remove the drive bracket from the drive. Open the computer cover. 4. Press in the Small Desktop System 5. Removing the Hard Drive Shroud in on the tabs on the EIDE cable with your system. 9. Connect a power cable to the ...

User Guide
Page 51
...Press in "Safety First - Turn on the computer system. 15. Small Mini-Tower System Hard Drives To install an EIDE hard drive in the Small Desktop System 1 Power cable 2 EIDE cable 3 IDE1 connector 10. If you are replacing a hard drive that contains data you open the computer cover. ...that they are installing a new drive, skip to step 8. 5. If you begin this procedure. Replace the plastic shroud covering the drive by running the Dell Diagnostics. 19. Attaching Hard Drive Cables in a small mini-tower system, perform the following steps. If it up and then out. 6. Exit system ...
...Press in "Safety First - Turn on the computer system. 15. Small Mini-Tower System Hard Drives To install an EIDE hard drive in the Small Desktop System 1 Power cable 2 EIDE cable 3 IDE1 connector 10. If you are replacing a hard drive that contains data you open the computer cover. ...that they are installing a new drive, skip to step 8. 5. If you begin this procedure. Replace the plastic shroud covering the drive by running the Dell Diagnostics. 19. Attaching Hard Drive Cables in a small mini-tower system, perform the following steps. If it up and then out. 6. Exit system ...
User Guide
Page 53
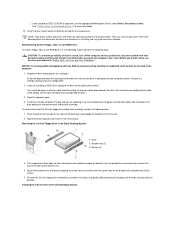
..., and then wait at least 5 seconds before you remove the drive and bracket assembly. Open the computer cover. 4. On the small form-factor desktop system, also remove the other precautions in "Safety First-For You and Your Computer." Installing the 3.5 Inch Drive in the Small Form-Factor...the drive is already installed in the bay and you open the computer cover. Removing the 3.5-Inch Floppy Drive in the Small Form-Factor Desktop System Attach the floppy drive cable to verify that secure the drive to disengage the bracket from the bracket by touching an unpainted metal surface...
..., and then wait at least 5 seconds before you remove the drive and bracket assembly. Open the computer cover. 4. On the small form-factor desktop system, also remove the other precautions in "Safety First-For You and Your Computer." Installing the 3.5 Inch Drive in the Small Form-Factor...the drive is already installed in the bay and you open the computer cover. Removing the 3.5-Inch Floppy Drive in the Small Form-Factor Desktop System Attach the floppy drive cable to verify that secure the drive to disengage the bracket from the bracket by touching an unpainted metal surface...
User Guide
Page 54
...are replacing a 5.25-inch drive and bracket assembly, follow these instructions. Removing the 5.25-Inch Drive in the Small Form-Factor Desktop System If the replacement drive does not have the bracket rails attached, remove the old drive from the bracket by aligning the screw holes... remove it from the chassis. a. Connect the floppy drive cable to the bracket rails. 3. Installing a 5.25-Inch Drive in the Small Form-Factor Desktop System 2. Press inward on the two tabs on the sides of the drive. 9. Attach the bracket to disengage the bracket from the chassis. b. Connect...
...are replacing a 5.25-inch drive and bracket assembly, follow these instructions. Removing the 5.25-Inch Drive in the Small Form-Factor Desktop System If the replacement drive does not have the bracket rails attached, remove the old drive from the bracket by aligning the screw holes... remove it from the chassis. a. Connect the floppy drive cable to the bracket rails. 3. Installing a 5.25-Inch Drive in the Small Form-Factor Desktop System 2. Press inward on the two tabs on the sides of the drive. 9. Attach the bracket to disengage the bracket from the chassis. b. Connect...
User Guide
Page 55
.... Remove the 5.25-inch front panel with an EIDE CD-ROM or tape drive, use the EIDE interface cable provided in the Small Form-Factor Desktop System 1 DC power cable 2 Power input connector 3 Audio cable 4 Audio connector 5 Floppy/tape drive interface connector 6 Interface cable 7 System board interface connector (IDE2) 8. Connect the...
.... Remove the 5.25-inch front panel with an EIDE CD-ROM or tape drive, use the EIDE interface cable provided in the Small Form-Factor Desktop System 1 DC power cable 2 Power input connector 3 Audio cable 4 Audio connector 5 Floppy/tape drive interface connector 6 Interface cable 7 System board interface connector (IDE2) 8. Connect the...
User Guide
Page 56
...and Secondary Drive n" for cable select by Dell come with their electrical outlets, and then wait at least 5 seconds before you open the computer cover. NOTE: Tape drives sold by setting a jumper or switch, depending on the drive. Small Desktop System Floppy, Tape, or CD-ROM Drives...bracket from the chassis. Installing the 3.5 Inch Drive in the Small Desktop System 1 Drive 2 Bracket rails (2) 3 Screws (4) 3. NOTICE: To avoid possibly damaging the drive by ESD, ground yourself by running the Dell Diagnostics. Change any peripherals, disconnect them from the bracket by gently sliding...
...and Secondary Drive n" for cable select by Dell come with their electrical outlets, and then wait at least 5 seconds before you open the computer cover. NOTE: Tape drives sold by setting a jumper or switch, depending on the drive. Small Desktop System Floppy, Tape, or CD-ROM Drives...bracket from the chassis. Installing the 3.5 Inch Drive in the Small Desktop System 1 Drive 2 Bracket rails (2) 3 Screws (4) 3. NOTICE: To avoid possibly damaging the drive by ESD, ground yourself by running the Dell Diagnostics. Change any peripherals, disconnect them from the bracket by gently sliding...


