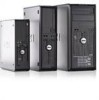
Setup and Features Information Tech Sheet (Desktop, Mini-Tower, Small Form Factor)
Page 8
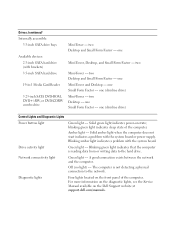
...Desktop - The computer is reading data from or writing data to the network. For more information on the diagnostic lights, see the Service Manual available on the front panel of the computer. two Mini-Tower - one (slimline drive) Control Lights and Diagnostic Lights Power button ...Desktop, and Small Form Factor - Amber light - Drive activity light Green light - Diagnostic lights Four lights located on the Dell Support website at support.dell.com/manuals. one Small Form Factor - Solid amber light when the computer does not start indicates a problem with the system board. ...
...Desktop - The computer is reading data from or writing data to the network. For more information on the diagnostic lights, see the Service Manual available on the front panel of the computer. two Mini-Tower - one (slimline drive) Control Lights and Diagnostic Lights Power button ...Desktop, and Small Form Factor - Amber light - Drive activity light Green light - Diagnostic lights Four lights located on the Dell Support website at support.dell.com/manuals. one Small Form Factor - Solid amber light when the computer does not start indicates a problem with the system board. ...
Setup and Features Information Tech Sheet (Ultra Small Form Factor)
Page 6
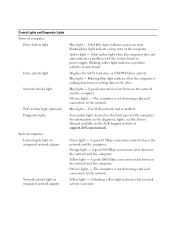
... network. Solid blue light indicates power-on the Dell Support website at support.dell.com/manuals. Blinking amber light indicates a problem with the system board or power supply. The computer is not detecting a physical connection to the network. For information on the diagnostic lights, see the Service Manual available on state; Blue light - Green light...
... network. Solid blue light indicates power-on the Dell Support website at support.dell.com/manuals. Blinking amber light indicates a problem with the system board or power supply. The computer is not detecting a physical connection to the network. For information on the diagnostic lights, see the Service Manual available on state; Blue light - Green light...
Service Manual
Page 1
... or loss of Intel Corporation in the U.S. All rights reserved. Intel, Core, and Celeron are registered trademarks of data if instructions are not followed. Dell™ OptiPlex™ 780 Service Manual Desktop Computer Working on Your Computer Removing and Replacing Parts Specifications Diagnostics System Setup Notes, Cautions, and Warnings NOTE: A NOTE indicates important information that...
... or loss of Intel Corporation in the U.S. All rights reserved. Intel, Core, and Celeron are registered trademarks of data if instructions are not followed. Dell™ OptiPlex™ 780 Service Manual Desktop Computer Working on Your Computer Removing and Replacing Parts Specifications Diagnostics System Setup Notes, Cautions, and Warnings NOTE: A NOTE indicates important information that...
Service Manual
Page 3
... grounding strap or by periodically touching an unpainted metal surface, such as directed by its edges, not by a certified service technician. Ensure that the following conditions exist: You have connectors with your computer. For additional safety best practices information, ...While you disconnect a cable, pull on its connector or on a card. Recommended Tools Working on Your Computer Dell™ OptiPlex™ 780 Service Manual-Desktop Before Working Inside Your Computer Recommended Tools Turning Off Your Computer After Working Inside Your Computer Before Working ...
... grounding strap or by periodically touching an unpainted metal surface, such as directed by its edges, not by a certified service technician. Ensure that the following conditions exist: You have connectors with your computer. For additional safety best practices information, ...While you disconnect a cable, pull on its connector or on a card. Recommended Tools Working on Your Computer Dell™ OptiPlex™ 780 Service Manual-Desktop Before Working Inside Your Computer Recommended Tools Turning Off Your Computer After Working Inside Your Computer Before Working ...
Service Manual
Page 5
Back to Contents Page Removing and Replacing Parts Dell™ OptiPlex™ 780 Service Manual-Desktop Cover Primary Hard Drive Floppy Drive (Optional) Expansion Card Memory Power Supply Fan System Board Optical Drive Secondary Hard Drive (Optional) Riser Cage Standard Back Plate Heat Sink and Processor Coin-Cell Battery IO Panel Back to Contents Page
Back to Contents Page Removing and Replacing Parts Dell™ OptiPlex™ 780 Service Manual-Desktop Cover Primary Hard Drive Floppy Drive (Optional) Expansion Card Memory Power Supply Fan System Board Optical Drive Secondary Hard Drive (Optional) Riser Cage Standard Back Plate Heat Sink and Processor Coin-Cell Battery IO Panel Back to Contents Page
Service Manual
Page 12
... the next startup, the computer boots according to Utility Partition and press . 4. Back to Contents Page Diagnostics Dell™ OptiPlex™ 780 Service Manual Dell Diagnostics Power Button Light Codes Beep Codes Diagnostic Lights Dell Diagnostics When to Use the Dell Diagnostics It is recommended that you print these procedures before you want to test displays in the...
... the next startup, the computer boots according to Utility Partition and press . 4. Back to Contents Page Diagnostics Dell™ OptiPlex™ 780 Service Manual Dell Diagnostics Power Button Light Codes Beep Codes Diagnostic Lights Dell Diagnostics When to Use the Dell Diagnostics It is recommended that you print these procedures before you want to test displays in the...
Service Manual
Page 17
Back to Contents Page System Setup Dell™ OptiPlex™ 780 Service Manual-Mini-Tower, Desktop, and Small Form Factor Boot Menu Navigation Keystrokes Entering System Setup System Setup Simulation System Setup Menu Options Boot Menu Press when the Dell™ logo appears to initiate a one -time boot menu with a list of the valid boot devices for...
Back to Contents Page System Setup Dell™ OptiPlex™ 780 Service Manual-Mini-Tower, Desktop, and Small Form Factor Boot Menu Navigation Keystrokes Entering System Setup System Setup Simulation System Setup Menu Options Boot Menu Press when the Dell™ logo appears to initiate a one -time boot menu with a list of the valid boot devices for...
Service Manual
Page 22
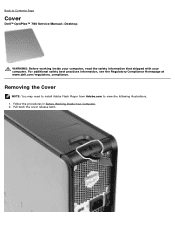
Follow the procedures in Before Working Inside Your Computer. 2. Pull back the cover release latch. Back to view the following illustrations. 1. Removing the Cover NOTE: You may need to install Adobe Flash Player from Adobe.com to Contents Page Cover Dell™ OptiPlex™ 780 Service Manual-Desktop WARNING: Before working inside your computer, read the safety information that shipped with your computer. For additional safety best practices information, see the Regulatory Compliance Homepage at www.dell.com/regulatory_compliance.
Follow the procedures in Before Working Inside Your Computer. 2. Pull back the cover release latch. Back to view the following illustrations. 1. Removing the Cover NOTE: You may need to install Adobe Flash Player from Adobe.com to Contents Page Cover Dell™ OptiPlex™ 780 Service Manual-Desktop WARNING: Before working inside your computer, read the safety information that shipped with your computer. For additional safety best practices information, see the Regulatory Compliance Homepage at www.dell.com/regulatory_compliance.
Service Manual
Page 24
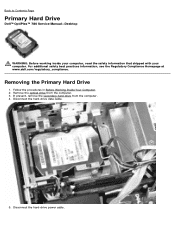
Back to Contents Page Primary Hard Drive Dell™ OptiPlex™ 780 Service Manual-Desktop WARNING: Before working inside your computer, read the safety information that shipped with your computer. Removing the Primary Hard Drive 1. Remove the optical drive ... Your Computer. 2. If present, remove the secondary hard drive from the computer. 3. For additional safety best practices information, see the Regulatory Compliance Homepage at www.dell.com/regulatory_compliance. Disconnect the hard-drive data cable. 5.
Back to Contents Page Primary Hard Drive Dell™ OptiPlex™ 780 Service Manual-Desktop WARNING: Before working inside your computer, read the safety information that shipped with your computer. Removing the Primary Hard Drive 1. Remove the optical drive ... Your Computer. 2. If present, remove the secondary hard drive from the computer. 3. For additional safety best practices information, see the Regulatory Compliance Homepage at www.dell.com/regulatory_compliance. Disconnect the hard-drive data cable. 5.
Service Manual
Page 28
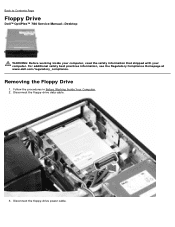
Disconnect the floppy-drive data cable. 3. For additional safety best practices information, see the Regulatory Compliance Homepage at www.dell.com/regulatory_compliance. Back to Contents Page Floppy Drive Dell™ OptiPlex™ 780 Service Manual-Desktop WARNING: Before working inside your computer, read the safety information that shipped with your computer. Removing the Floppy Drive 1. Disconnect the floppy-drive power cable. Follow the procedures in Before Working Inside Your Computer. 2.
Disconnect the floppy-drive data cable. 3. For additional safety best practices information, see the Regulatory Compliance Homepage at www.dell.com/regulatory_compliance. Back to Contents Page Floppy Drive Dell™ OptiPlex™ 780 Service Manual-Desktop WARNING: Before working inside your computer, read the safety information that shipped with your computer. Removing the Floppy Drive 1. Disconnect the floppy-drive power cable. Follow the procedures in Before Working Inside Your Computer. 2.
Service Manual
Page 32
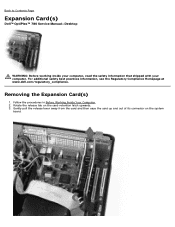
Follow the procedures in Before Working Inside Your Computer. 2. Rotate the release tab on the system board. Back to Contents Page Expansion Card(s) Dell™ OptiPlex™ 780 Service Manual-Desktop WARNING: Before working inside your computer, read the safety information that shipped with your computer. For additional safety best practices information, see the Regulatory ...
Follow the procedures in Before Working Inside Your Computer. 2. Rotate the release tab on the system board. Back to Contents Page Expansion Card(s) Dell™ OptiPlex™ 780 Service Manual-Desktop WARNING: Before working inside your computer, read the safety information that shipped with your computer. For additional safety best practices information, see the Regulatory ...
Service Manual
Page 34
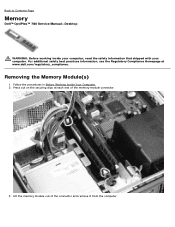
Press out on the securing clips at www.dell.com/regulatory_compliance. For additional safety best practices information, see the Regulatory Compliance Homepage at each end of the connector and remove it from the computer. Removing the Memory Module(s) 1. Lift the memory module out of the memory module connector. 3. Follow the procedures in Before Working Inside Your Computer. 2. Back to Contents Page Memory Dell™ OptiPlex™ 780 Service Manual-Desktop WARNING: Before working inside your computer, read the safety information that shipped with your computer.
Press out on the securing clips at www.dell.com/regulatory_compliance. For additional safety best practices information, see the Regulatory Compliance Homepage at each end of the connector and remove it from the computer. Removing the Memory Module(s) 1. Lift the memory module out of the memory module connector. 3. Follow the procedures in Before Working Inside Your Computer. 2. Back to Contents Page Memory Dell™ OptiPlex™ 780 Service Manual-Desktop WARNING: Before working inside your computer, read the safety information that shipped with your computer.
Service Manual
Page 36
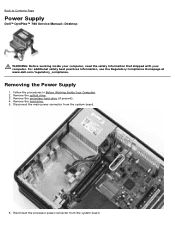
... Computer. 2. Remove the optical drive. 3. Remove the hard drive. 5. Disconnect the processor power connector from the system board. 6. Back to Contents Page Power Supply Dell™ OptiPlex™ 780 Service Manual-Desktop WARNING: Before working inside your computer, read the safety information that shipped with your computer. Disconnect the main power connector from the system...
... Computer. 2. Remove the optical drive. 3. Remove the hard drive. 5. Disconnect the processor power connector from the system board. 6. Back to Contents Page Power Supply Dell™ OptiPlex™ 780 Service Manual-Desktop WARNING: Before working inside your computer, read the safety information that shipped with your computer. Disconnect the main power connector from the system...
Service Manual
Page 42
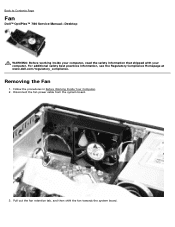
Follow the procedures in Before Working Inside Your Computer. 2. Disconnect the fan power cable from the system board. 3. Back to Contents Page Fan Dell™ OptiPlex™ 780 Service Manual-Desktop WARNING: Before working inside your computer, read the safety information that shipped with your computer. Pull out the fan retention tab, and then shift the fan towards the system board. For additional safety best practices information, see the Regulatory Compliance Homepage at www.dell.com/regulatory_compliance. Removing the Fan 1.
Follow the procedures in Before Working Inside Your Computer. 2. Disconnect the fan power cable from the system board. 3. Back to Contents Page Fan Dell™ OptiPlex™ 780 Service Manual-Desktop WARNING: Before working inside your computer, read the safety information that shipped with your computer. Pull out the fan retention tab, and then shift the fan towards the system board. For additional safety best practices information, see the Regulatory Compliance Homepage at www.dell.com/regulatory_compliance. Removing the Fan 1.
Service Manual
Page 45
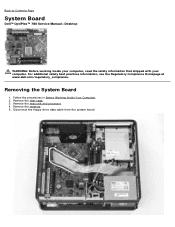
For additional safety best practices information, see the Regulatory Compliance Homepage at www.dell.com/regulatory_compliance. Removing the System Board 1. Follow the procedures in Before Working Inside Your Computer. 2. Remove the riser cage. 3. Back to Contents Page System Board Dell™ OptiPlex™ 780 Service Manual-Desktop WARNING: Before working inside your computer, read the safety information that shipped with your computer. Remove the heat sink and processor. 4. Remove the memory. 5. Disconnect the floppy-drive data cable from the system board.
For additional safety best practices information, see the Regulatory Compliance Homepage at www.dell.com/regulatory_compliance. Removing the System Board 1. Follow the procedures in Before Working Inside Your Computer. 2. Remove the riser cage. 3. Back to Contents Page System Board Dell™ OptiPlex™ 780 Service Manual-Desktop WARNING: Before working inside your computer, read the safety information that shipped with your computer. Remove the heat sink and processor. 4. Remove the memory. 5. Disconnect the floppy-drive data cable from the system board.
Service Manual
Page 55
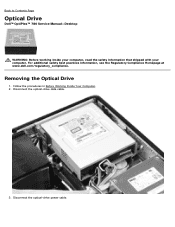
For additional safety best practices information, see the Regulatory Compliance Homepage at www.dell.com/regulatory_compliance. Disconnect the optical-drive data cable. 3. Back to Contents Page Optical Drive Dell™ OptiPlex™ 780 Service Manual-Desktop WARNING: Before working inside your computer, read the safety information that shipped with your computer. Follow the procedures in Before Working Inside Your Computer. 2. Removing the Optical Drive 1. Disconnect the optical-drive power cable.
For additional safety best practices information, see the Regulatory Compliance Homepage at www.dell.com/regulatory_compliance. Disconnect the optical-drive data cable. 3. Back to Contents Page Optical Drive Dell™ OptiPlex™ 780 Service Manual-Desktop WARNING: Before working inside your computer, read the safety information that shipped with your computer. Follow the procedures in Before Working Inside Your Computer. 2. Removing the Optical Drive 1. Disconnect the optical-drive power cable.
Service Manual
Page 59
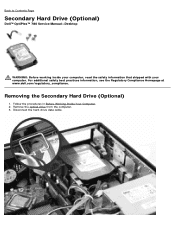
Removing the Secondary Hard Drive (Optional) 1. Disconnect the hard-drive data cable. Follow the procedures in Before Working Inside Your Computer. 2. Remove the optical drive from the computer. 3. Back to Contents Page Secondary Hard Drive (Optional) Dell™ OptiPlex™ 780 Service Manual-Desktop WARNING: Before working inside your computer, read the safety information that shipped with your computer. For additional safety best practices information, see the Regulatory Compliance Homepage at www.dell.com/regulatory_compliance.
Removing the Secondary Hard Drive (Optional) 1. Disconnect the hard-drive data cable. Follow the procedures in Before Working Inside Your Computer. 2. Remove the optical drive from the computer. 3. Back to Contents Page Secondary Hard Drive (Optional) Dell™ OptiPlex™ 780 Service Manual-Desktop WARNING: Before working inside your computer, read the safety information that shipped with your computer. For additional safety best practices information, see the Regulatory Compliance Homepage at www.dell.com/regulatory_compliance.

Service Manual
Page 63
Back to an upright position. For additional safety best practices information, see the Regulatory Compliance Homepage at www.dell.com/regulatory_compliance. Disconnect the PS/2 serial-port cable from the system board. 3. Removing the Riser Cage 1. Pivot the riser-cage handle to Contents Page Riser Cage Dell™ OptiPlex™ 780 Service Manual-Desktop WARNING: Before working inside your computer, read the safety information that shipped with your computer. Follow the procedures in Before Working Inside Your Computer. 2.
Back to an upright position. For additional safety best practices information, see the Regulatory Compliance Homepage at www.dell.com/regulatory_compliance. Disconnect the PS/2 serial-port cable from the system board. 3. Removing the Riser Cage 1. Pivot the riser-cage handle to Contents Page Riser Cage Dell™ OptiPlex™ 780 Service Manual-Desktop WARNING: Before working inside your computer, read the safety information that shipped with your computer. Follow the procedures in Before Working Inside Your Computer. 2.
Service Manual
Page 68
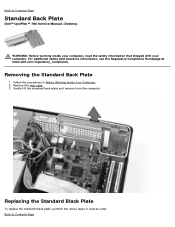
For additional safety best practices information, see the Regulatory Compliance Homepage at www.dell.com/regulatory_compliance. Back to Contents Page Replacing the Standard Black Plate To replace the standard black plate, perform the above ...Removing the Standard Back Plate 1. Follow the procedures in reverse order. Remove the riser cage. 3. Back to Contents Page Standard Back Plate Dell™ OptiPlex™ 780 Service Manual-Desktop WARNING: Before working inside your computer, read the safety information that shipped with your computer. Gently lift the standard back plate and...
For additional safety best practices information, see the Regulatory Compliance Homepage at www.dell.com/regulatory_compliance. Back to Contents Page Replacing the Standard Black Plate To replace the standard black plate, perform the above ...Removing the Standard Back Plate 1. Follow the procedures in reverse order. Remove the riser cage. 3. Back to Contents Page Standard Back Plate Dell™ OptiPlex™ 780 Service Manual-Desktop WARNING: Before working inside your computer, read the safety information that shipped with your computer. Gently lift the standard back plate and...
Service Manual
Page 70
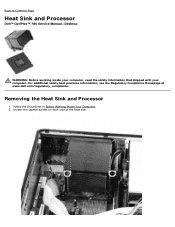
Follow the procedures in Before Working Inside Your Computer. 2. Removing the Heat Sink and Processor 1. Loosen the captive screws on each side of the heat sink. Back to Contents Page Heat Sink and Processor Dell™ OptiPlex™ 780 Service Manual-Desktop WARNING: Before working inside your computer, read the safety information that shipped with your computer. For additional safety best practices information, see the Regulatory Compliance Homepage at www.dell.com/regulatory_compliance.
Follow the procedures in Before Working Inside Your Computer. 2. Removing the Heat Sink and Processor 1. Loosen the captive screws on each side of the heat sink. Back to Contents Page Heat Sink and Processor Dell™ OptiPlex™ 780 Service Manual-Desktop WARNING: Before working inside your computer, read the safety information that shipped with your computer. For additional safety best practices information, see the Regulatory Compliance Homepage at www.dell.com/regulatory_compliance.


