
Quick Reference Guide
Page 15
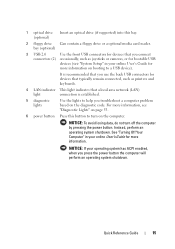
... for bootable USB devices (see "Diagnostic Lights" on page 55. 6 power button Press this bay. (optional) 2 floppy drive Can contain a floppy drive or a optional media card reader. Instead, perform an operating system shutdown. For more information on the diagnostic code. NOTICE: If your online User's Guide for devices that a local area network...
... for bootable USB devices (see "Diagnostic Lights" on page 55. 6 power button Press this bay. (optional) 2 floppy drive Can contain a floppy drive or a optional media card reader. Instead, perform an operating system shutdown. For more information on the diagnostic code. NOTICE: If your online User's Guide for devices that a local area network...
Quick Reference Guide
Page 23
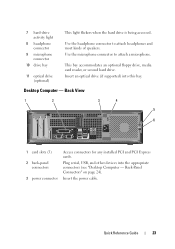
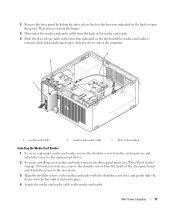
... connector to attach a microphone. Plug serial, USB, and other devices into this bay. Insert the power cable. This bay accommodates an optional floppy drive, media card reader, or second hard drive. 7 hard-drive activity light 8 headphone connector 9 microphone connector 10 drive bay 11 optical drive (optional) This light flickers when the hard...
... connector to attach a microphone. Plug serial, USB, and other devices into this bay. Insert the power cable. This bay accommodates an optional floppy drive, media card reader, or second hard drive. 7 hard-drive activity light 8 headphone connector 9 microphone connector 10 drive bay 11 optical drive (optional) This light flickers when the hard...
Quick Reference Guide
Page 28
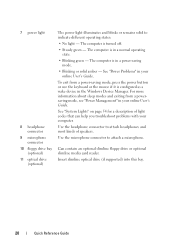
... User's Guide. The computer is configured as a wake device in the Windows Device Manager. Can contain an optional slimline floppy drive or optional slimline media card reader. 7 power light 8 headphone connector 9 microphone connector 10 floppy drive bay (optional) 11 optical drive (optional) The power light illuminates and blinks or remains solid to...
... User's Guide. The computer is configured as a wake device in the Windows Device Manager. Can contain an optional slimline floppy drive or optional slimline media card reader. 7 power light 8 headphone connector 9 microphone connector 10 floppy drive bay (optional) 11 optical drive (optional) The power light illuminates and blinks or remains solid to...
User's Guide
Page 3
... the I/O Panel 37 Replacing the I/O Panel 38 Removing the Computer Cover 39 PCI, PCI Express Cards, and PS/2 Serial Port Adapters 41 PCI Cards 41 PCI Express Cards 46 PS/2 Serial Port Adapters 56 Drives 61 General Installation Guidelines 61 Hard Drive 63 Drive-Panel Inserts 70 Floppy Drive 73 Media Card Reader 76 Contents 3
... the I/O Panel 37 Replacing the I/O Panel 38 Removing the Computer Cover 39 PCI, PCI Express Cards, and PS/2 Serial Port Adapters 41 PCI Cards 41 PCI Express Cards 46 PS/2 Serial Port Adapters 56 Drives 61 General Installation Guidelines 61 Hard Drive 63 Drive-Panel Inserts 70 Floppy Drive 73 Media Card Reader 76 Contents 3

User's Guide
Page 4
... I/O Panel 112 Drives 113 General Installation Guidelines 113 Optical Drive 115 Floppy Drive 118 Media Card Reader 121 Hard Drive 125 PCI, PCI Express Cards, and PS/2 Serial Port Adapters 135 PCI Cards 135 PCI Express and DVI Cards 146 PS/2 Serial Port Adapters 163 Power Supply 169 Replacing the Power Supply 169 DC Power...
... I/O Panel 112 Drives 113 General Installation Guidelines 113 Optical Drive 115 Floppy Drive 118 Media Card Reader 121 Hard Drive 125 PCI, PCI Express Cards, and PS/2 Serial Port Adapters 135 PCI Cards 135 PCI Express and DVI Cards 146 PS/2 Serial Port Adapters 163 Power Supply 169 Replacing the Power Supply 169 DC Power...

User's Guide
Page 5
... 203 Drives 205 General Installation Guidelines 205 Hard Drive 208 Optical Drive 215 Floppy Drive and Media Card Reader 217 PCI, PCI Express Cards, and PS/2 Serial Port Adapters 223 PCI Cards 223 PCI Express and DVI Cards 227 PS/2 Serial Port Adapters 233 Power Supply 237 Replacing the Power Supply 237 DC Power Connectors...
... 203 Drives 205 General Installation Guidelines 205 Hard Drive 208 Optical Drive 215 Floppy Drive and Media Card Reader 217 PCI, PCI Express Cards, and PS/2 Serial Port Adapters 223 PCI Cards 223 PCI Express and DVI Cards 227 PS/2 Serial Port Adapters 233 Power Supply 237 Replacing the Power Supply 237 DC Power Connectors...

User's Guide
Page 9
...computer stops responding 316 A program stops responding 317 A program crashes repeatedly 317 A solid blue screen appears 317 Other software problems 317 Media Card Reader Problems 318 Memory Problems 318 Mouse Problems 319 Network Problems 320 Power Problems 321 Printer Problems 322 Restoring Default Settings 323 Serial or Parallel ... 325 If the screen is blank 325 If the screen is difficult to read 326 15 Troubleshooting Tools and Utilities 327 Dell Diagnostics 327 When to Use the Dell Diagnostics 327 System Lights 329 Diagnostic Lights 330 Beep Codes 332 Contents 9
...computer stops responding 316 A program stops responding 317 A program crashes repeatedly 317 A solid blue screen appears 317 Other software problems 317 Media Card Reader Problems 318 Memory Problems 318 Mouse Problems 319 Network Problems 320 Power Problems 321 Printer Problems 322 Restoring Default Settings 323 Serial or Parallel ... 325 If the screen is blank 325 If the screen is difficult to read 326 15 Troubleshooting Tools and Utilities 327 Dell Diagnostics 327 When to Use the Dell Diagnostics 327 System Lights 329 Diagnostic Lights 330 Beep Codes 332 Contents 9

User's Guide
Page 22
... flickers when the hard drive is turned off the computer by pressing the power button. Can contain an optional floppy drive or an optional media card reader. See "Turning Off Your Computer" on page 321. See "System Lights" on the diagnostic code. Use the lights to help you troubleshoot problems with your...
... flickers when the hard drive is turned off the computer by pressing the power button. Can contain an optional floppy drive or an optional media card reader. See "Turning Off Your Computer" on page 321. See "System Lights" on the diagnostic code. Use the lights to help you troubleshoot problems with your...
User's Guide
Page 61
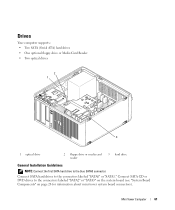
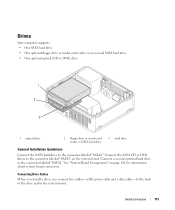
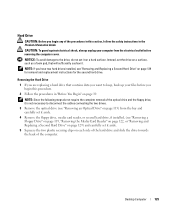
... SATA0 connector. Drives Your computer supports: • Two SATA (Serial ATA) hard drives • One optional floppy drive or Media Card Reader • Two optical drives 2 1 3 1 optical drive 2 floppy drive or media card reader 3 hard drive General Installation Guidelines NOTE: Connect the first SATA hard drive to the connectors labeled "SATA2" or "SATA3" on...
... SATA0 connector. Drives Your computer supports: • Two SATA (Serial ATA) hard drives • One optional floppy drive or Media Card Reader • Two optical drives 2 1 3 1 optical drive 2 floppy drive or media card reader 3 hard drive General Installation Guidelines NOTE: Connect the first SATA hard drive to the connectors labeled "SATA2" or "SATA3" on...
User's Guide
Page 70
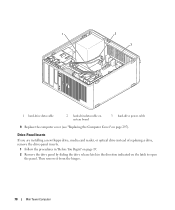
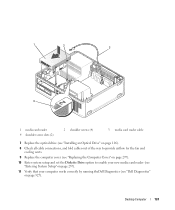
Drive-Panel Inserts If you are installing a new floppy drive, media card reader, or optical drive instead of replacing a drive, remove the drive-panel inserts. 1 Follow the procedures in "Before You Begin" on page 19. 2 Remove the drive panel by sliding the drive release latch in the direction indicated on page 297). Then remove it from the hinges. 70 Mini Tower Computer 1 2 3 1 hard-drive data cable 2 hard-drivedata cable on system board 3 hard-drive power cable 9 Replace the computer cover (see "Replacing the Computer Cover" on the latch to open the panel.
Drive-Panel Inserts If you are installing a new floppy drive, media card reader, or optical drive instead of replacing a drive, remove the drive-panel inserts. 1 Follow the procedures in "Before You Begin" on page 19. 2 Remove the drive panel by sliding the drive release latch in the direction indicated on page 297). Then remove it from the hinges. 70 Mini Tower Computer 1 2 3 1 hard-drive data cable 2 hard-drivedata cable on system board 3 hard-drive power cable 9 Replace the computer cover (see "Replacing the Computer Cover" on the latch to open the panel.
User's Guide
Page 72
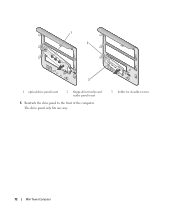
The drive panel only fits one way. 3 holder for shoulder screws 72 Mini Tower Computer 1 2 3 1 optical-drive panel insert 2 floppy-drive/media card reader panel insert 5 Reattach the drive panel to the front of the computer.
The drive panel only fits one way. 3 holder for shoulder screws 72 Mini Tower Computer 1 2 3 1 optical-drive panel insert 2 floppy-drive/media card reader panel insert 5 Reattach the drive panel to the front of the computer.
User's Guide
Page 76
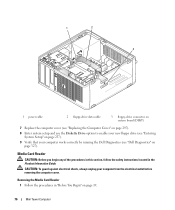
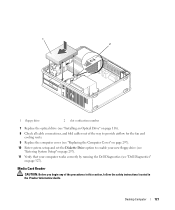
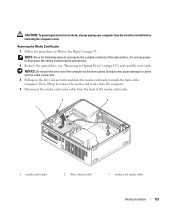
Media Card Reader CAUTION: Before you begin any of the procedures in this section, follow the safety instructions located in "Before You Begin" on page 327). 1 2 3 1 power cable 2 ... computer from the electrical outlet before removing the computer cover. CAUTION: To guard against electrical shock, always unplug your computer works correctly by running the Dell Diagnostics (see "Dell Diagnostics" on page 19. 76 Mini Tower Computer Removing the Media Card Reader 1 Follow the procedures in the Product Information Guide.
Media Card Reader CAUTION: Before you begin any of the procedures in this section, follow the safety instructions located in "Before You Begin" on page 327). 1 2 3 1 power cable 2 ... computer from the electrical outlet before removing the computer cover. CAUTION: To guard against electrical shock, always unplug your computer works correctly by running the Dell Diagnostics (see "Dell Diagnostics" on page 19. 76 Mini Tower Computer Removing the Media Card Reader 1 Follow the procedures in the Product Information Guide.
User's Guide
Page 77
...3 2 1 1 media card reader 2 media card reader cable 3 drive release latch Installing the Media Card Reader 1 If you are replacing a media card reader, remove the shoulder screws from the existing device and attach the screws to the replacement device. 2 If you are installing a new media card reader, remove the drive-panel ...until it from the hinges. 3 Disconnect the media card reader cable from the inside of the media card reader. 4 Slide the drive release latch in the direction indicated on the latch to the media card reader. Mini Tower Computer 77 Then remove it clicks into...
...3 2 1 1 media card reader 2 media card reader cable 3 drive release latch Installing the Media Card Reader 1 If you are replacing a media card reader, remove the shoulder screws from the existing device and attach the screws to the replacement device. 2 If you are installing a new media card reader, remove the drive-panel ...until it from the hinges. 3 Disconnect the media card reader cable from the inside of the media card reader. 4 Slide the drive release latch in the direction indicated on the latch to the media card reader. Mini Tower Computer 77 Then remove it clicks into...
User's Guide
Page 78
... Components" on page 28 for the connector location). 4 3 2 1 1 media card reader 4 media card reader cable 2 shoulder screws (4) 3 shoulder screw slots (2) 6 Install the drive panel to enable your new media card reader (see "Entering System Setup" on page 257). 9 Verify that your computer works correctly by running the Dell Diagnostics (see "Replacing the Computer Cover" on page 327...
... Components" on page 28 for the connector location). 4 3 2 1 1 media card reader 4 media card reader cable 2 shoulder screws (4) 3 shoulder screw slots (2) 6 Install the drive panel to enable your new media card reader (see "Entering System Setup" on page 257). 9 Verify that your computer works correctly by running the Dell Diagnostics (see "Replacing the Computer Cover" on page 327...
User's Guide
Page 113
... one second SATA hard drive • One optional optical (CD or DVD) drive 1 2 3 1 optical drive 2 floppy drive or media card reader or SATA hard drive 3 hard drive General Installation Guidelines Connect the SATA hard drive to the system board. See "System Board Components" on the system ...
... one second SATA hard drive • One optional optical (CD or DVD) drive 1 2 3 1 optical drive 2 floppy drive or media card reader or SATA hard drive 3 hard drive General Installation Guidelines Connect the SATA hard drive to the system board. See "System Board Components" on the system ...
User's Guide
Page 121
Media Card Reader CAUTION: Before you begin any of the way to provide airflow for the fan and cooling vents. 9 Replace the computer cover (see "Replacing the Computer ... option to enable your new floppy drive (see "Entering System Setup" on page 257). 11 Verify that your computer works correctly by running the Dell Diagnostics (see "Dell Diagnostics" on page 116). 8 Check all cable connections, and fold cables out of the procedures in this section, follow the safety instructions located in...
Media Card Reader CAUTION: Before you begin any of the way to provide airflow for the fan and cooling vents. 9 Replace the computer cover (see "Replacing the Computer ... option to enable your new floppy drive (see "Entering System Setup" on page 257). 11 Verify that your computer works correctly by running the Dell Diagnostics (see "Dell Diagnostics" on page 116). 8 Check all cable connections, and fold cables out of the procedures in this section, follow the safety instructions located in...
User's Guide
Page 122
... of the optical drive, it is not necessary to remove the media card reader from the computer. 4 Disconnect the media card reader cable from the electrical outlet before removing the computer cover. Removing the Media Card Reader 1 Follow the procedures in "Before You Begin" on the drive release... lift up on page 19. NOTE: Since the following steps do not require the complete removal of the media card reader. 2 3 1 1 media card reader 2 drive release latch 3 media card reader cable Desktop Computer 122 NOTICE: Do not pull the drive out of the computer. Doing so may cause damage ...
... of the optical drive, it is not necessary to remove the media card reader from the computer. 4 Disconnect the media card reader cable from the electrical outlet before removing the computer cover. Removing the Media Card Reader 1 Follow the procedures in "Before You Begin" on the drive release... lift up on page 19. NOTE: Since the following steps do not require the complete removal of the media card reader. 2 3 1 1 media card reader 2 drive release latch 3 media card reader cable Desktop Computer 122 NOTICE: Do not pull the drive out of the computer. Doing so may cause damage ...

User's Guide
Page 123
...edge screw driver on page 102 for the connector location). 6 Align the shoulder screws with the screw guides numbered as 2, and slide the media card reader forward into the bay until it clicks into place. b Remove the four shoulder screws from the drive-panel insert. 2 If you are replacing... an existing media card reader: Remove the four shoulder screws from the existing media card reader. 3 Insert the four shoulder screws into the sides of the drive-panel insert to the USB1 connector on the system...
...edge screw driver on page 102 for the connector location). 6 Align the shoulder screws with the screw guides numbered as 2, and slide the media card reader forward into the bay until it clicks into place. b Remove the four shoulder screws from the drive-panel insert. 2 If you are replacing... an existing media card reader: Remove the four shoulder screws from the existing media card reader. 3 Insert the four shoulder screws into the sides of the drive-panel insert to the USB1 connector on the system...
User's Guide
Page 124
... screw slots (2) 2 shoulder screws (4) 3 media card reader cable 7 Replace the optical drive (see "Installing an Optical Drive" on page 116). 8 Check all cable connections, and fold cables out of the way to ... computer cover (see "Replacing the Computer Cover" on page 297). 10 Enter system setup and set the Diskette Drive option to enable your new media card reader (see "Entering System Setup" on page 257). 11 Verify that your computer works correctly by running theDell Diagnostics (see...
... screw slots (2) 2 shoulder screws (4) 3 media card reader cable 7 Replace the optical drive (see "Installing an Optical Drive" on page 116). 8 Check all cable connections, and fold cables out of the way to ... computer cover (see "Replacing the Computer Cover" on page 297). 10 Enter system setup and set the Diskette Drive option to enable your new media card reader (see "Entering System Setup" on page 257). 11 Verify that your computer works correctly by running theDell Diagnostics (see...
User's Guide
Page 125
..., back up your computer from the bay and carefully set it aside. 4 Remove the floppy drive, media card reader, or second hard drive, if installed, (see "Removing a Floppy Drive" on page 119, "Removing the Media Card Reader" on page 122, or "Removing and Replacing a Second Hard Drive" on page 129) and carefully set it...
..., back up your computer from the bay and carefully set it aside. 4 Remove the floppy drive, media card reader, or second hard drive, if installed, (see "Removing a Floppy Drive" on page 119, "Removing the Media Card Reader" on page 122, or "Removing and Replacing a Second Hard Drive" on page 129) and carefully set it...


